はじめに
こんにちは、のんびりエンジニアのたっつーです。
今回の記事を紹介しているのでよろしければ見てください。
今回は、 みんな大好き『TextMeshPro 』 のエントリーになります。
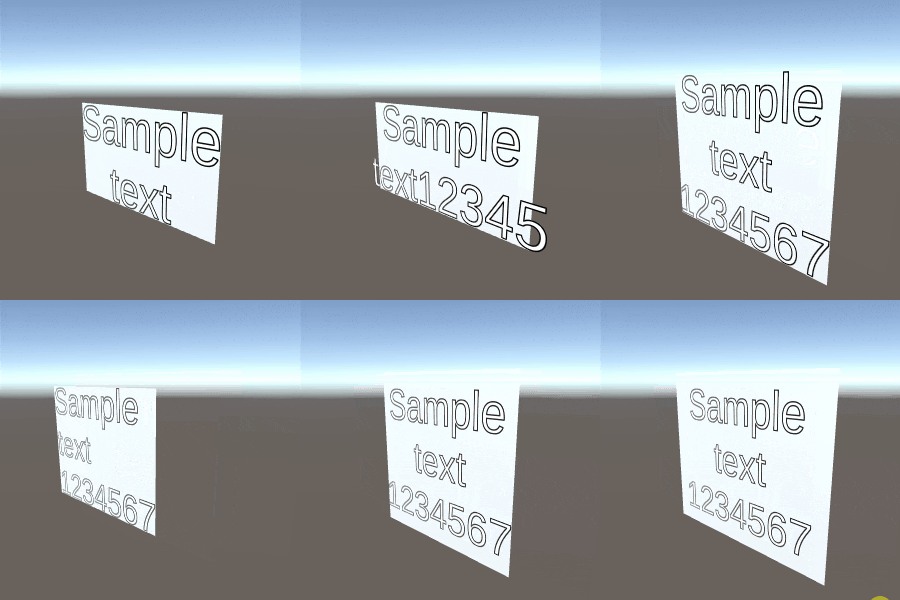
こんな感じに文字列に背景色が追従するのができます!

TextMeshProに背景色を付ける
TextMeshPro で文字列の背景色を付けて表示したいなと思って困った時ありませんか?そんな時は、TextMeshPro の裏に Plane/Cube を置いて対処している人が多いかと思います。
しかし、Plane/Cube ではサイズの変更を手動で行わないといけなかったり、右寄せ・左寄せ・自動改行・フォントサイズなどの制限を受けその都度調整したりと大変めんどくさい作業になります。
そこで、今回は TextMeshPro の描画領域に追従して背景オブジェクトを自動でリサイズしたり余白(Padding)を設定したり、マテリアルを設定できるよなスクリプトを作成してみました。
ソースコード
まずは、以下のソースコードを使っているプロジェクトに***「TextMeshProBackground.cs」で追加***してください。
using System.Collections;
using System.Collections.Generic;
using UnityEngine;
using TMPro;

[RequireComponent(typeof(TextMeshPro))]
public class TextMeshProBackground : MonoBehaviour
{
    public float PaddingTop;

    public float PaddingBottom;

    public float PaddingLeft;

    public float PaddingRight;

    public Material material;

    private GameObject Background;

    private TextMeshPro textMeshPro;

    void Start()
    {
        this.textMeshPro = GetComponent<TextMeshPro>();

        this.Background = GameObject.CreatePrimitive(PrimitiveType.Plane);
        this.Background.name = "background";
        this.Background.transform.Rotate(-90, 0, 0);
        this.Background.transform.SetParent(this.transform);
        if(material != null)
            this.Background.GetComponent<MeshRenderer>().material = material;
    }

    void Update()
    {
        var bounds = this.textMeshPro.bounds;
        // Debug.Log($"{bounds}");

        // 描画位置の計算
        {
            var pos = bounds.center;
            var hoseiX = -(PaddingLeft / 2) + (PaddingRight / 2);
            var hoseiY = -(PaddingBottom / 2) + (PaddingTop / 2);
            var hoseiZ = 0.01f;
            this.Background.transform.localPosition = new Vector3(pos.x + hoseiX, pos.y + hoseiY, pos.z + hoseiZ);
        }

        // 描画サイズの計算
        {
            var scale = bounds.extents;
            var hoseiW = (PaddingLeft + PaddingRight) / 10;
            var hoseiH = (PaddingTop + PaddingBottom) / 10;
            this.Background.transform.localScale = new Vector3((scale.x / 10 * 2) + hoseiW, 1, (scale.y / 10 * 2) + hoseiH);
        }
    }
}
使い方
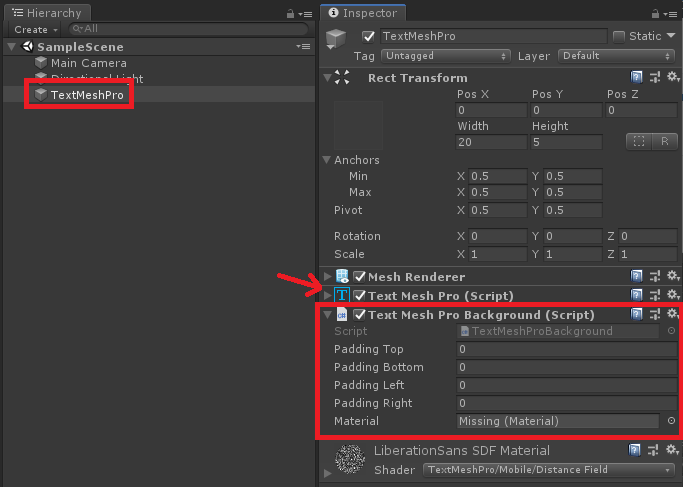
次に、上記で追加したソースコードを TextMeshPro と同じオブジェクトにアタッチして追加してください。
プロパティの意味
- PaddingTop :上の余白
- PaddingBottom :下の余白
- PaddingLeft :左の余白
- PaddingRight :右の余白
- Material :背景色として Planeオブジェクトを生成するがそれに設定するマテリアル

実行結果
それでは、さっそく適当に実行してみましょう。
Unity上で、TextMeshPro のテキスト・フォントサイズ・表示位置を変更したり、TextMeshProBackground の 余白の幅を変更してみたりしました。
終わりに
よければ ブログ「Unity+AssetStoreおすすめ情報」の方にも色々記載しているのでぜひご参照いただければと思います。