概要
こんにちは、のんびりエンジニアのたっつーです。
ブログを運営しているのでよろしければ見てください。
Hololens と言う Microsoft が発売している MR(AR/VR) デバイスを用いて、空間上にディスプレイを無限に増やしてみよう!との試みになります。(無限とは言っていない)
Hololens 上にディスプレを増やす事により「他人に覗かれない!」との気持ちから増やしてみました、かなり簡単に実装できるのでぜひチャレンジしてみていただければと思います。
Hololens でディスプレイが無限(有限)に増えた! #Hololens #Unity pic.twitter.com/qX473yy7Y8
— たっつー(ささきたかし) (@kingyo222) 2018年8月5日
開発環境
- Unity 2017.4.8f1
- iTween
- HoloToolkit-Unity-2017.4.1.0
- Visual Studio 2017 Comminuty
システム構成
出来るだけ簡単に実装をしたかったので、既存ソフトとの組み合わせ、Unityの基本機能などで実装しております。
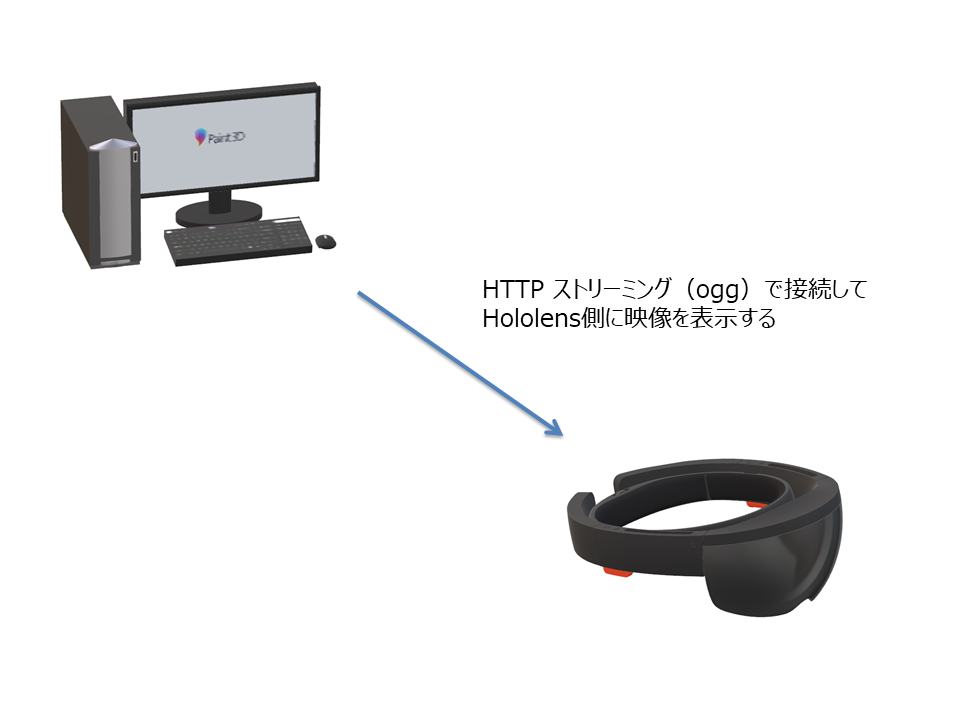
PC
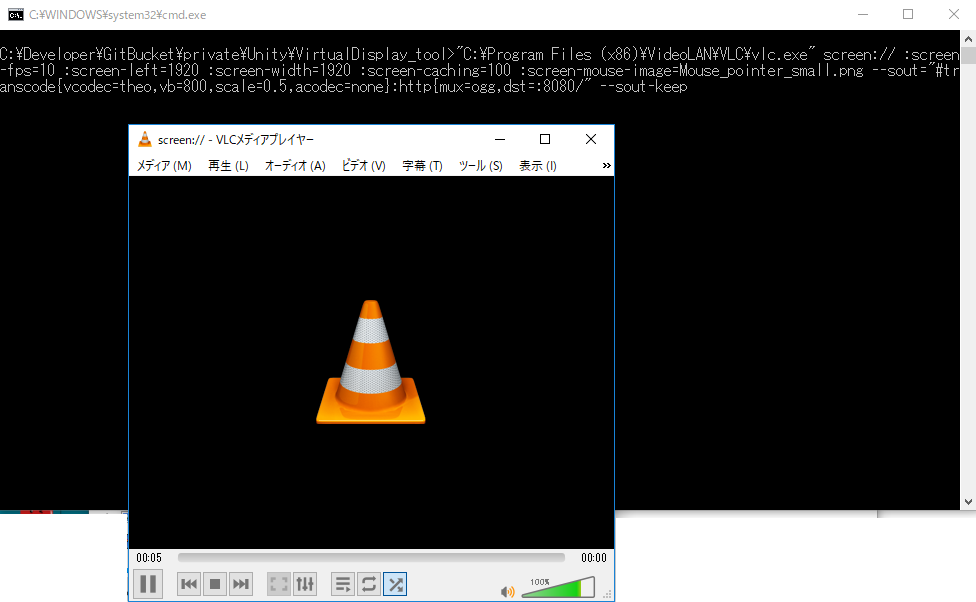
PCから Httpストリーミング(ogg)をするために VLC を利用する、VLCプレイヤーではコマンドライン引数から Httpストリーミング が行える。
- VLC media player(https://www.videolan.org/vlc/index.ja.html)
VLC 起動引数
実際に使った起動引数を以下に示します。
"C:\Program Files (x86)\VideoLAN\VLC\vlc.exe" screen:// :screen-fps=10 :screen-left=1920 :screen-width=1920 :screen-caching=100 :screen-mouse-image=Mouse_pointer_small.png --sout="#transcode{vcodec=theo,vb=800,scale=0.5,acodec=none}:http{mux=ogg,dst=:8080/" --sout-keep
以下に起動引数のポイントの説明を行います。
-
「screen://」
ディスプレイを対象とします。 -
「:screen-fps=10」
理想的なFPSを指定します。 -
「:screen-left=1920 :screen-width=1920」
ディスプレイのキャプチャ範囲を指定します。他にも、:screen-top、:screen-height を指定できます。 -
「:screen-mouse-image=Mouse_pointer_small.png」
通常の設定だとマウスカーソルがキャプチャされないので画像を追加で描画します。(ファイル名で検索して Wiki から取得してください) -
「--sout="#transcode{vcodec=theo,vb=800,scale=0.5,acodec=none}:http{mux=ogg,dst=:8080/"」
出力フォーマットの設定(Video=theo、Audio=無し)、出力先を設定(Httpで8080/)
起動するとこんな感じでVLCが起動します。
Hololens(Unity)
Unity では動画を表示するために MovieTexture を使用します。Unity では標準で Httpストリーミング(ogg)を MovieTexture で扱えるためそれを用いります。
Httpストリーミング(ogg)を受信
参考:Unityでビデオストリーミングをテクスチャとして表示する(アセットなしでOK)
上記のサイトと違う箇所は、Audioが必要なかったため AudioSource部分を無効にしております。
using UnityEngine;
using System.Collections;
using System;

public class OggVideoStreamingTexture : MonoBehaviour {

    public string OggVideoURL;
    public GameObject GameobjectForVideoTexture;

    void Start () {
        StreamPlayVideoAsTexture();
    }

    public void StreamPlayVideoAsTexture()
    {
        if (this.OggVideoURL!="") {
            StartCoroutine(StartStream(this.OggVideoURL));
        }
    }

    protected IEnumerator StartStream(String url)
    {
         MovieTexture movieTexture;

        //エラー2つ出るが無視してOK
        //https://issuetracker.unity3d.com/issues/movietexture-fmod-error-when-trying-to-play-video-using-www-class
        Debug.Log("Ignore following two errors");
        WWW videoStreamer = new WWW(url);
        movieTexture = videoStreamer.GetMovieTexture();
        while (!movieTexture.isReadyToPlay)
        {
            yield return 0;
        }
        GameobjectForVideoTexture.GetComponent<Renderer>().material.mainTexture = movieTexture;
        // AudioSource audioSource = GameobjectForVideoTexture.AddComponent<AudioSource>();
        // audioSource.clip = movieTexture.audioClip;
        movieTexture.Play();
        // audioSource.Play();
    }

}
+(プラス)ボタンの実装
空間上に、+(プラス)オブジェクトを回転させており、これを Airtap する事により新しい画面(スクリーン)を生成します。
画面生成時に+(プラス)が飛び跳ねてアニメーションするのですがこの部分に関しては iTween にて実装しております。
using HoloToolkit.Unity.InputModule;
using System.Collections;
using System.Collections.Generic;
using UnityEngine;

public class PlusController : MonoBehaviour, IInputClickHandler
{
    ScreensManager screenManager;

    void Awake()
    {
        screenManager = FindObjectOfType<ScreensManager>();
    }

    void Start ()
    {
    }

	void Update ()
    {
        this.UpdateAnimationWaiting();
    }

    public void OnInputClicked(InputClickedEventData eventData)
    {
        this.StartAnimationFun();
    }

    private void UpdateAnimationWaiting()
    {
        //設定した速さで、Y軸に回転します。
        float speed = 10f;
        transform.Rotate(0, speed * Time.deltaTime, 0);
    }

    private void StartAnimationFun(int stage = 0)
    {
        switch (stage)
        {
            case 0: // 拡大
                iTween.MoveTo(gameObject, iTween.Hash("y", 0.03, "time", 0.5f, "isLocal", true));
                iTween.ScaleTo(gameObject, iTween.Hash("x", 1.1, "y", 1.1, "z", 1.1, "time", 0.5f, "isLocal", true, "onComplete", "StartAnimationFun", "onCompleteParams", ++stage));
                break;

            case 1: // ディスプレイポップ
                screenManager.CreateScreen(this.gameObject.transform.position);
                this.StartAnimationFun(++stage);
                break;

            case 2: // 縮小
                iTween.MoveTo(gameObject, iTween.Hash("y", 0.0, "time", 0.3f, "isLocal", true));
                iTween.ScaleTo(gameObject, iTween.Hash("x", 1.0, "y", 1.0, "z", 1.0, "time", 0.3f, "isLocal", true, "onComplete", "StartAnimationFun", "onCompleteParams", ++stage));
                break;
        }
    }
}
画面の生成は ScreenManager にて実装しております。
接続先のURLに関しては Unity のインスペクター上に設定します。
using System.Collections;
using System.Collections.Generic;
using UnityEngine;

public class ScreensManager : MonoBehaviour {

    private int urlIndex = 0;

    public List<string> Urls;

    public GameObject ScreenPrefab;

    public GameObject CreateScreen(Vector3 startPosition)
    {
        var gm = Instantiate(ScreenPrefab, startPosition, Quaternion.identity);
        gm.transform.localScale.Set(0, 0, 0);
        gm.GetComponent<OggVideoStreamingTexture>().OggVideoURL = Urls[GetNowUrlIndex()];
        return gm;
    }

    private int GetNowUrlIndex()
    {
        int now = urlIndex++;
        if (Urls.Count <= urlIndex)
            urlIndex = 0;
        return now;
    }
}
所感(まとめ)
WebRTC などを用いて実装する方法もありましたが、プラグイン(UWP)での実装や Unity でのデバッグ、環境準備が難しいため使わない方向で実装してみました。
PC側が既存ソフト、Unity側が標準機能なのでかなり簡単な実装で行え改めて Unity のパワフルさを感じるとともに無料でここまでの開発が行える事に感動![]()
Hololensの案件やりたい。。。
ソースコード
終わりに
よければ ブログ「初心者向けUnity情報サイト」の方にも色々記載しているのでぜひご参照いただければと思います。