Blazorアプリ(BlazorWebAssembly)で入力された郵便番号を元に、郵便番号検索APIを利用して住所を自動入力してみます。

サンプルソース
JSON形式でAPIから取得
BlazorとWebAPIの連携はとても簡単です。戻り値となるパラメータはだいたいJSON形式なので、デフォルトテンプレートのFetchData.razorの仕組みがそのまま使えます。
FetchData.razor
@code {
    private WeatherForecast[]? forecasts;

    protected override async Task OnInitializedAsync()
    {
        forecasts = await Http.GetFromJsonAsync<WeatherForecast[]>("sample-data/weather.json");
    }

    public class WeatherForecast
    {
        public DateTime Date { get; set; }

        public int TemperatureC { get; set; }

        public string? Summary { get; set; }

        public int TemperatureF => 32 + (int)(TemperatureC / 0.5556);
    }
}
郵便番号から住所を取得
今回は郵便番号検索API - zipcolud を使って、郵便番号から住所を取得してみたいと思います。
モデルクラスの作成
郵便番号検索APIが返却するレスポンスサンプルから、モデルクラスを作成します。
レスポンスサンプル
{
	"message": null,
	"results": [
		{
			"address1": "北海道",
			"address2": "美唄市",
			"address3": "上美唄町協和",
			"kana1": "ホッカイドウ",
			"kana2": "ビバイシ",
			"kana3": "カミビバイチョウキョウワ",
			"prefcode": "1",
			"zipcode": "0790177"
		},
		{
			"address1": "北海道",
			"address2": "美唄市",
			"address3": "上美唄町南",
			"kana1": "ホッカイドウ",
			"kana2": "ビバイシ",
			"kana3": "カミビバイチョウミナミ",
			"prefcode": "1",
			"zipcode": "0790177"
		}
	],
	"status": 200
}
quicktypeにレスポンスサンプルを張り付けて、C#のモデルクラスを作成します。
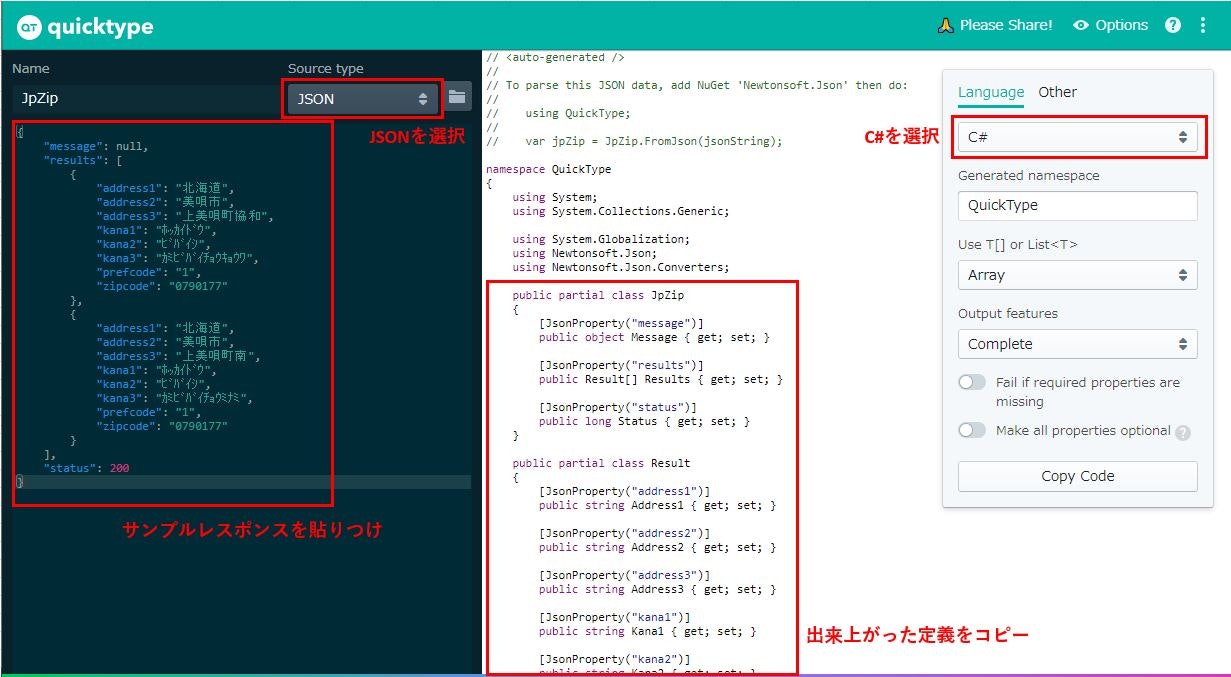
ここではJpZipという名前を付けて作成します。出来上がったクラスで必要なのはJpZipとResultだけです。Newtonsoft.Jsonの属性と、いくつかのワーニングを解消してあげて、SharedフォルダにModel.csというファイルで作成しておきます。
Shared/Model.cs
namespace BlazorAppWithAPI_JPZipCode.Shared
{
    public partial class JpZip
    {
        public string Message { get; set; } = "";

        public Result[]? Results { get; set; }

        public long Status { get; set; }
    }

    public partial class Result
    {
        public string Address1 { get; set; } = "";

        public string Address2 { get; set; } = "";

        public string Address3 { get; set; } = "";

        public string Kana1 { get; set; } = "";

        public string Kana2 { get; set; } = "";

        public string Kana3 { get; set; } = "";

        public long Prefcode { get; set; }

        public string Zipcode { get; set; } = "";
    }
}
郵便番号検索APIから取得して住所を表示
郵便番号を入力して郵便番号検索APIから住所を取得してみましょう。簡単なフォームを作って、表示させてみます。
Index.razor
@page "/"

@inject HttpClient Http

<PageTitle>住所入力</PageTitle>

<div class="container-fluid">
    <div class="row">
        <div class="col-6">
            <div class="form-group row">
                <label class="col-12">郵便番号</label>
                <div class="col-3">
                    <input type="text" class="form-control col-12" @bind-value="@current.Zipcode" maxlength=8 />
                </div>
                <div class="col-3">
                    <div class="float-right">
                        <button class="btn btn-primary" style="width:100px;margin-right:15px" @onclick="ZipSearch">検索</button>
                    </div>
                </div>
            </div>
            <div class="form-group row">
                <label class="col-12">都道府県名</label>
                <div class="col-6">
                    <input type="text" class="form-control col-12" @bind-value="@current.Address1" />
                </div>
                <div class="col-6">
                    <input type="text" class="form-control" @bind-value="@current.Kana1" />
                </div>
            </div>
            <div class="form-group row">
                <label class="col-12">市区町村名</label>
                <div class="col-6">
                    <input type="text" class="form-control col-12" @bind-value="@current.Address2" />
                </div>
                <div class="col-6">
                    <input type="text" class="form-control" @bind-value="@current.Kana2" />
                </div>
            </div>
            <div class="form-group row">
                <label class="col-12">町域名</label>
                <div class="col-6">
                    <input type="text" class="form-control col-12" @bind-value="@current.Address3" />
                </div>
                <div class="col-6">
                    <input type="text" class="form-control" @bind-value="@current.Kana3"/>
                </div>
            </div>
            <div class="form-group row">
                <div class="col-12">@httpResult.Message</div>
            </div>
        </div>
    </div>
</div>

@code {
    private JpZip? httpResult = new JpZip();

    private Result current = new Result();

    private async void ZipSearch()
    {
        httpResult = await Http.GetFromJsonAsync<JpZip>("https://zipcloud.ibsnet.co.jp/api/search?zipcode="+current.Zipcode);

        if (httpResult?.Status == 200)
        {
            if (httpResult.Results != null)
            {
                current = httpResult.Results[0];
            }
            else
            {
                httpResult.Message = "該当なし";
            }
        }

        this.StateHasChanged();
    }
}
取得してきたデータはモデルクラスで作成したインスタンスにそのままセットします。画面側ではBlazorの強力なバイディングのおかげで、データ取得後のコードがほとんどなく、すっきりー![]()
![]()
![]()
![]()
![]()
![]()
参考サイト