はじめに
Select2でAjaxを使うためのノウハウを、最小サンプルをベースに解説したい。
環境
本サンプルの環境は以下の通りである。
- Select2 4.0.6-rc.1
- python
- flask
サンプルの概要
2つの県を選択することができる画面である。
各Select2のフォームでは、データの初期設定、クリア、データの取得、親ウィンドウからの値の設定ができるようになっている。
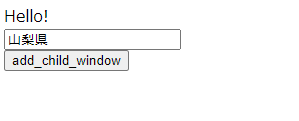
それぞれ北海道と東京都が初期設定されている。「get_data」ボタンで設定された値を取得し、「add_data」でボタン「埼玉県」を追加する。また、「open_window」ボタンをクリックすると下のようなウィンドウが表示され、手動で要素を追加し、親画面のフォームに反映させることができる。
やってみよう
では、サーバ側、クライアント側それぞれで見ていこう。
サーバ側
まず県のデータをテキストファイルで用意しよう。
以下のようにコード、項目名をカンマ区切りで並べたものを47都道府県分用意する。
今回コードと項目名は面倒なので同じにした。
 北海道,北海道
 青森県,青森県
 岩手県,岩手県
 宮城県,宮城県
 秋田県,秋田県
 山形県,山形県
 福島県,福島県
 茨城県,茨城県
 栃木県,栃木県
 群馬県,群馬県
 埼玉県,埼玉県
 千葉県,千葉県
 東京都,東京都
 神奈川県,神奈川県
 新潟県,新潟県
 富山県,富山県
 石川県,石川県
 福井県,福井県
 山梨県,山梨県
 長野県,長野県
 岐阜県,岐阜県
 静岡県,静岡県
 愛知県,愛知県
 三重県,三重県
 滋賀県,滋賀県
 京都府,京都府
 大阪府,大阪府
 兵庫県,兵庫県
 奈良県,奈良県
 和歌山県,和歌山県
 鳥取県,鳥取県
 島根県,島根県
 岡山県,岡山県
 広島県,広島県
 山口県,山口県
 徳島県,徳島県
 香川県,香川県
 愛媛県,愛媛県
 高知県,高知県
 福岡県,福岡県
 佐賀県,佐賀県
 長崎県,長崎県
 熊本県,熊本県
 大分県,大分県
 宮崎県,宮崎県
 鹿児島県,鹿児島県
 沖縄県,沖縄県
次に、keyword というパラメータを受け取ると項目名部分一致検索した結果を、サーバ側に返すAPIを作成しよう。
言語は何でもいいのだが、今回は簡単のためPythonのflaskでの実装例を以下の通り紹介する。
import os
import glob
from flask import Flask, request
import json

# Flaskオブジェクトの生成
app = Flask(__name__)
datas = []

# CRLFのエラーが発生しないようヘッダを設定
@app.after_request
def after_request(response):
  response.headers.add('Access-Control-Allow-Origin', '*')
  response.headers.add('Access-Control-Allow-Headers', 'X-Requested-With, Origin, X-Csrftoken, Content-Type, Accept')
  response.headers.add('Access-Control-Allow-Methods', 'GET,PUT,POST,DELETE,OPTIONS')
  return response

@app.route("/",  methods=["GET"])
def get_prefectures():
    req = request.args
    keyword = req.get("keyword")
    results = {}
    results["prefectures"] = []
    # 全データ走査
    for data in datas:
      # キーワードが空または、指定キーワードに部分一致する場合、結果に追加
      if keyword is None or str(keyword) in data[1]:
        result = {}
        result["id"] = data[0]
        result["text"] = data[1]
        results["prefectures"].append(result)

    json_text = json.dumps(results)
    return json_text

if __name__ == "__main__" :
  # データを事前に読み込んでおく
  with open("./data/data.txt", "r", encoding="utf8") as f:
    for line in f.readlines():
      line = line.strip()
      data = line.split(",")
      datas.append(data)

  app.run(debug=True, port=8889)
これを python main.pyで起動してブラウザから、
http://127.0.0.1:8889/?keyword=%E9%9D%99
を叩いてみると、以下のレスポンスが返るはずだ。
{"prefectures": [{"id": "\u9759\u5ca1\u770c", "text": "\u9759\u5ca1\u770c"}]}
上例のURLのkeyword パラメータには「静」(URLエンコード)といれており、結果として prefectures にid、textが「静岡県」(Unicodeエスケープシーケンス)であるオブジェクトが格納されたjsonを返している
サーバ側の準備ができたので、次にクライアント側を見ていこう。
クライアント側
前提として以下で作成する html は、main.py のあるフォルダの直下の static フォルダの下に置くようにしよう。これは flask で静的ファイルを読み込むためのルールと考えてほしい。そして、ブラウザでアクセスする場合は、http://127.0.0.f1:8889/static/ajax_sample.html のようにstaticパスをはさむようにしよう。
では html の説明に入る。まずは親画面の html である。
html>
<head>
<link href="https://code.jquery.com/jquery-3.2.1.min.js" rel="stylesheet" />
<link href="https://cdnjs.cloudflare.com/ajax/libs/select2/4.0.6-rc.0/css/select2.min.css" rel="stylesheet" />
<script src="https://code.jquery.com/jquery-3.2.1.min.js"></script>
<script src="https://cdnjs.cloudflare.com/ajax/libs/select2/4.0.6-rc.0/js/select2.min.js"></script>
<script>
	function clear_form(id){
		$("." + id).val(null).trigger("change");
	}
	function get_data(id){
		const selections = $('.' + id).select2('data')
		.map((element) => element.id);
		alert(selections)
	}
	function add_data(id){
		$("." + id).select2("trigger", "select", {data: { id: "埼玉県" , text: "埼玉県"} });
	}
	function open_window(num){
		var handler = window.open( './child' + num + '.html', "windows1", "width=500,height=400");
	}
	function setup_select2(id){
		$("." + id).select2({
			ajax: {
				url: "http://localhost:8889/",
				dataType: 'json',
				delay: 250,
				data: function(params){
					return {
						// keywrodパラメータでサーバにリクエストが飛ぶ
						keyword: params.term,
					}
				}
				,
				processResults: function (data, params){
					// data.prefecturesに結果配列が格納されている想定
					results = $.map(data.prefectures, function (prefecture) {
						return {
							id: prefecture.id,
							text: prefecture.text
						}
					})
					return {
						results: results
					}
				}
			},
			minimumInputLength: 0,
			language: 'ja',
			allowClear: false,
		})
	}

</script>
</head>
<body>
<form>
	<select class="js-example-basic-multiple1" name="states[]" multiple="multiple" style="width: 100%"></select>
	<input type="button" onclick='javascript:clear_form("js-example-basic-multiple1");' value="clear">
	<input type="button" onclick='javascript:get_data("js-example-basic-multiple1");' value="get_data">
	<input type="button" onclick='javascript:add_data("js-example-basic-multiple1");' value="add_data">
	<input type="button" onclick='javascript:open_window(1);' value="open_window">

	<select class="js-example-basic-multiple2" name="states[]" multiple="multiple" style="width: 100%"></select>
	<input type="button" onclick='javascript:clear_form("js-example-basic-multiple2");' value="clear">
	<input type="button" onclick='javascript:get_data("js-example-basic-multiple2");' value="get_data">
	<input type="button" onclick='javascript:add_data("js-example-basic-multiple2");' value="add_data">
	<input type="button" onclick='javascript:open_window(2);' value="open_window">
	</form>
<script>

	$(document).ready(function() {
		setup_select2('js-example-basic-multiple1');
		setup_select2('js-example-basic-multiple2');
		// 初期設定サンプル
    	$(".js-example-basic-multiple1").select2("trigger", "select", {data: { id: "北海道" , text: "北海道"} });
    	$(".js-example-basic-multiple2").select2("trigger", "select", {data: { id: "東京都" , text: "東京都"} });
	});
</script>
</body>
解説
-
setup_select2関数に対しidを与えて呼び出すことでselect2フォームを初期化している。 -
clear_form、get_data,add_data、open_windowの各関数でクリア、データ取得、データ追加、子ウィンドウ表示を実装している。 -
$(".js-example-basic-multiple1").select2("trigger", "select", {data: { id: "北海道" , text: "北海道"} });などでSelect2フォームへの値の初期設定をしている。 - 各Select2フォームに対応する子ウィンドウは夫々別のhtmlを呼び出している。
子ウィンドウのコードは以下の通りである。
<html>
<head>
</head>
<script>
	function add_child_window(){
		var parent_id = "js-example-basic-multiple1";
		prefecture = document.getElementById("prefecture").value;
		opener.$("." + parent_id).select2("trigger", "select", {data: { id: prefecture , text: prefecture} });
		data = {data: { id: prefecture , text: prefecture} }
		// alert(JSON.stringify(data))
	}
</script>
<body>
	Hello!<br>
	<input type="text" id="prefecture"><br>
	<input type="button" onclick='javascript:add_child_window();' value="add_child_window">
	<input type="hidden" id="parent_id">
</body>
parent_id にて親ウィンドウの対応するSelect2フォームの id を指定する。
opener.$("." + parent_id).select2("trigger", "select", {data: { id: prefecture , text: prefecture} });の所で、id を元に親ウィンドウの対応するSelect2フォームに要素を追加設定している。
おわりに
今回情報が少ない Select2 で Ajax によりリモートデータを取得する方法について、実用的なサンプルを示し解説した。本記事のサンプルは簡単に動かせるので、まずは自身でセットアップをした後、読み込むデータを変えたり、Select2 のオプションを変更する等して試行錯誤してみてほしい。そうすれば理解が深まり、自分のWEBアプリに自由自在に組み込めるようになるはずだ。

