■ はじめに
Unityでネットワーク機能を使うときに必要な機能であるRelayの使い方をまとめます。
(なお、筆者も記事を書きながら学んでます。間違いなどがあればご指摘お願いします。)
(記事の内容は随時追加予定です)
また、結構ネットワーク関係の専門用語が出てくるので、知識を軽く身に着けておくといいかもです!(ぼくもお勉強中です)
環境
- Unity:
2023.2.0f1 - UnitHub:
3.6.1 - Relay:
1.0.5
また、当記事ではNetcodeでの使用を前提としたRelayの使い方を紹介しています。
- Netcode for Gameobjects:
1.7.0 - Unity Transport:
1.4.0
■ UnityRelayとは

- Unity公式が提供するのリレーサーバー、Allocation Service(割り当てサービス)
- リレーサーバー:ホストとクライアントの中継役的な役割のサーバー?
- Allocation Service:サーバーの割り当てとかをしてくれる機能
● PhotonFusionとの違い
料金
| PhotonFusion | UnityRelay | |
|---|---|---|
| 同時接続数 | 20 CCU | 50 CCU |
| 一月あたりの転送量 | 60GB | 150GB |
■使用例
めちゃくちゃ簡素な実装例ですが、こんな感じでコードをもとに参加できます。
また、今回はローカル環境でやってますが、オンラインで遠くのどっかの人とも通信できます。

■ セットアップ
● パッケージのインストール
- PackageManagerからRelayをインストール

● プロジェクト設定
-
ProjectSettings/Servicesを表示して、このようになってたらOK
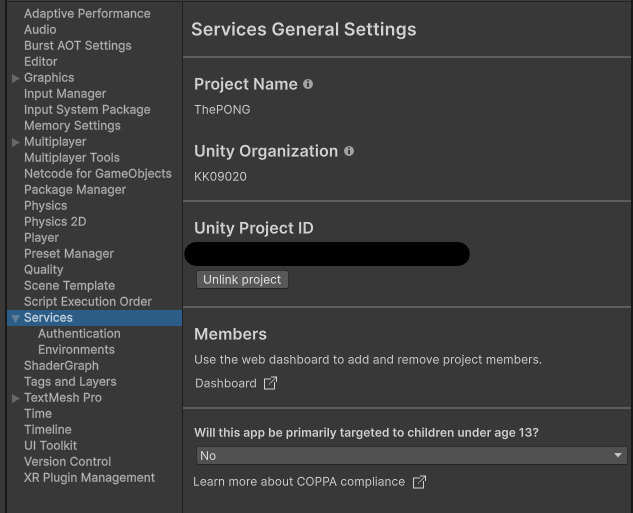
-
UnityProjectIDがリンクされていない場合、
Link Projectボタンをクリックする
● Unity Cloud
- Unityアカウントにサインインして、↑のサイトにアクセス
- 左のサイドバー内の [プロジェクト] をクリック

- プロジェクト一覧が表示されるので、対象のプロジェクトを選択
- 先ほどのプロジェクト設定でリンクしたプロジェクトがこのように表示されてたらOK

- 下の方に [サービス] という項目があるので、下の方までスクロールして、Relayを見つけて、 [起動] ボタンをクリック

- 右上らへんの [Get Started] をクリック

- セットアップガイドが表示されていますが、全て完了済みなので無視して [Finish] ボタンをクリックして完了!

■ 使い方
● Relayの初期化
.cs
async void Awake()
{
    // UnityServicesの初期化
    await UnityServices.InitializeAsync();
}
- 一番初めにRelayなどのUnityServicesの初期化を行います
● ユーザーのサインイン
.cs
void SignIn()
{
    // サインイン時にログ表示
    AuthenticationService.Instance.SignedIn += () => {
        print("Sined in:" + AuthenticationService.Instance.PlayerId);
    };

    // 匿名サインイン
    await AuthenticationService.Instance.SignInAnonymouslyAsync();
  }
-
AuthenticationService.Instanceで認証サービスの操作を行えます - 匿名サインインについての詳細はこちら(公式ドキュメント)
● 部屋(Allocation)の作成
.cs
public async void CreateRelay()
{
    try {
        // 部屋の作成
        Allocation allocation = await RelayService.Instance.CreateAllocationAsync(1);

        // 部屋の参加コードを取得
        string joinCode = await RelayService.Instance.GetJoinCodeAsync(allocation.AllocationId);
        print(joinCode);

        // 作成した部屋をもとに、UTPの設定
        var relayServerData = new RelayServerData(allocation, "dtls");
        var transport = NetworkManager.Singleton.GetComponent<UnityTransport>();
        transport.SetRelayServerData(relayServerData);

        // ホストとして開始
        NetworkManager.Singleton.StartHost();
    }
    catch (RelayServiceException e) {
        Debug.LogException(e);
    }
}
-
RelayService.InstanceでRelayの機能が利用できます -
CreateAllocationAsync()で部屋(Allocation)を作成できます- 引数には、参加人数とリージョン(接続地域)を指定できます
- 参加人数は、ホストを除いたクライアントの数です
- リージョンを省略した場合、自動で決められます
- 引数には、参加人数とリージョン(接続地域)を指定できます
-
作成した部屋の情報をもとに、UnityTransportにサーバーデータを指定します
-
RelayServerDataのコンストラクタで部屋と接続タイプを指定できます- 接続タイプはUTPやDTLS、WSなどがある
(知識ないので詳細は不明です。時間があれば追記しておきます)
- 接続タイプはUTPやDTLS、WSなどがある
-
データをセットしたあとに、
NetworkManager.Singleton.StartHost()で開始すると、作成した部屋のIPアドレスとかポート番号をもとにゲームが開始される
● 部屋への参加
.cs
	public async void JoinRelay(string joinCode)
	{
		try {
			// コードをもとに部屋に参加
			print($"Joining... (code: {joinCode})");
			var allocation = await RelayService.Instance.JoinAllocationAsync(joinCode);

			// 参加する部屋をもとに、UTPの設定
			var relayServerData = new RelayServerData(allocation, "dtls");
			var transport = NetworkManager.Singleton.GetComponent<UnityTransport>();
			transport.SetRelayServerData(relayServerData);

			// クライアントとして参加
			NetworkManager.Singleton.StartClient();
		}
		catch (RelayServiceException e) {
			Debug.LogException(e);
		}
	}
● プレイヤーの切断
編集中…
- 作成時に取得した参加コードを使用して、その部屋に参加できます
- サーバー設定は作成時と同じです(※
allocationの型はAllocationではなく、JoinAllocation) - 作成時と同様に、
NetworkManagerのシングルトンインスタンスを利用してクライアントとして参加
■ さいごに
基本的にこんな感じで扱えます。
結構学習コスト高くてハードル高めですが、いろいろできるので頑張りましょう~~
● 参考
- 公式ドキュメント
- 公式サンプルコード
- 分かりやすい海外の方の解説動画