Summary
- iOS8の通知機能
- 必要なファイルはAppDelegate.swiftとViewController.swift
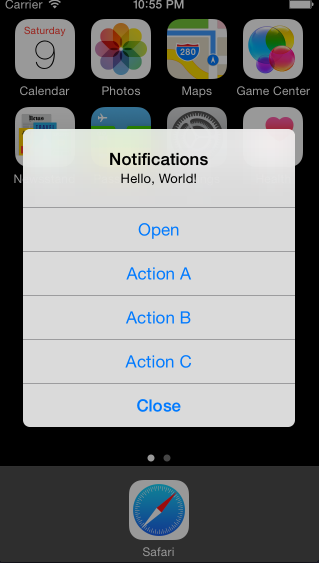
- スリープ時では無いときは、通知に3種類のアクションを仕込む
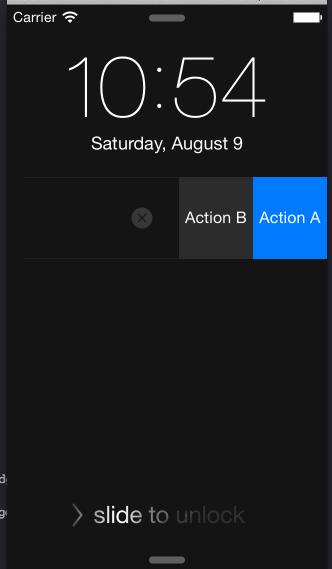
- スリープ時は、通知に2種類のアクションを仕込む
Github
Other Contents about Swift
- SwiftとParse.comを使ってTwitterみたいなポスト機能を作ってみた(Xcode6 beta4, Parse.com)
- SwiftでTo Doリストを作ってみた(Xcode6 beta4, Tabbed Application, UITableView, UITextField)
作り方
(1) 3つのアクションを用意
AppDelegate.swift
 func application(application: UIApplication, didFinishLaunchingWithOptions launchOptions: NSDictionary?) -> Bool {

        // Actions
        var firstAction:UIMutableUserNotificationAction = UIMutableUserNotificationAction()
        firstAction.identifier = "FIRST_ACTION"
        firstAction.title = "Action A"

        firstAction.activationMode = UIUserNotificationActivationMode.Foreground
        firstAction.destructive = false
        firstAction.authenticationRequired = false

        var secondAction:UIMutableUserNotificationAction = UIMutableUserNotificationAction()
        secondAction.identifier = "SECOND_ACTION"
        secondAction.title = "Action B"

        secondAction.activationMode = UIUserNotificationActivationMode.Foreground
        secondAction.destructive = false
        secondAction.authenticationRequired = false

        var thirdAction:UIMutableUserNotificationAction = UIMutableUserNotificationAction()
        thirdAction.identifier = "THIRD_ACTION"
        thirdAction.title = "Action C"

        thirdAction.activationMode = UIUserNotificationActivationMode.Background
        thirdAction.destructive = false
        thirdAction.authenticationRequired = false

        // (2)の内容あとでをここに追加

        return true
    }
(2) その続きに、ロックスクリーン時及びポップアップじゃない時に表示するアクションと、ポップアップ時に表示するアクションを決める
AppDelegate.swift
        // category

        var firstCategory:UIMutableUserNotificationCategory = UIMutableUserNotificationCategory()
        firstCategory.identifier = "FIRST_CATEGORY"


        let defaultActions:NSArray = [firstAction, secondAction, thirdAction]
        let minimalActions:NSArray = [firstAction, secondAction]

        firstCategory.setActions(defaultActions, forContext: UIUserNotificationActionContext.Default)
        firstCategory.setActions(minimalActions, forContext: UIUserNotificationActionContext.Minimal)

        // NSSet of all our categories

        let categories:NSSet = NSSet(objects: firstCategory)


        let types:UIUserNotificationType = UIUserNotificationType.Alert | UIUserNotificationType.Badge

        let mySettings:UIUserNotificationSettings = UIUserNotificationSettings(forTypes: types, categories: categories)

        UIApplication.sharedApplication().registerUserNotificationSettings(mySettings)
(3) Notificationをクリックした時のアクションを決める
ViewController.swift
//
// ViewController.swift
// Notifications
//
// Created by kiiita on 2014/08/09.
// Copyright (c) 2014年 kiiita. All rights reserved.
//
import UIKit
class ViewController: UIViewController {
override func viewDidLoad() {
super.viewDidLoad()
NSNotificationCenter.defaultCenter().addObserver(self, selector:"popUpText:", name: "actionOnePressed", object: nil)
NSNotificationCenter.defaultCenter().addObserver(self, selector:"showAMessage:", name: "actionTwoPressed", object: nil)
NSNotificationCenter.defaultCenter().addObserver(self, selector:"showAText:", name: "actionThreePressed", object: nil)
// Noticeを出す日時の設定
var dateComp:NSDateComponents = NSDateComponents()
dateComp.year = 2014;
dateComp.month = 06;
dateComp.day = 09;
dateComp.hour = 15;
dateComp.minute = 26;
dateComp.timeZone = NSTimeZone.systemTimeZone()
var calender:NSCalendar = NSCalendar(calendarIdentifier: NSGregorianCalendar)
var date:NSDate = calender.dateFromComponents(dateComp)
var notification:UILocalNotification = UILocalNotification()
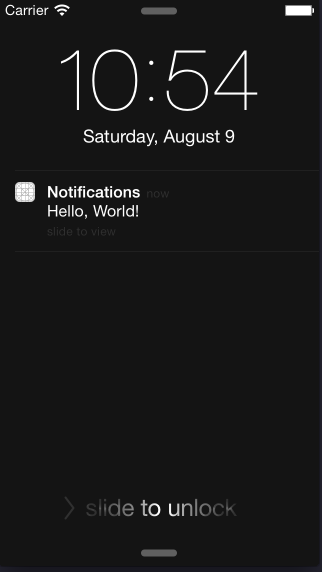
notification.category = "FIRST_CATEGORY"
notification.alertBody = "Hello, World!"
// notification.fireDate = date // テスト時にめんどくさいので今はコメントアウト
// 5秒後にNoticeを出したいとき
notification.fireDate = NSDate(timeIntervalSinceNow: 5)
UIApplication.sharedApplication().scheduleLocalNotification(notification)
}
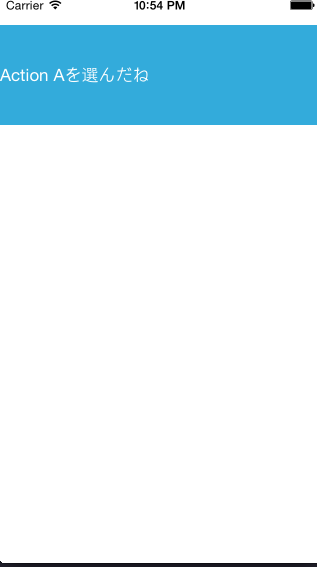
func popUpText(notification:NSNotification){
// frame:GGRectMake(left, top, width, height)
var newLabel:UILabel = UILabel(frame:CGRectMake(0, 30, 320, 100))
// 表示するアイテム
newLabel.text = "Action Aを選んだね"
newLabel.textColor = UIColor.whiteColor()
newLabel.backgroundColor = UIColor(red: 0.20, green: 0.67, blue: 0.86, alpha: 1.0);
self.view.addSubview(newLabel)
}
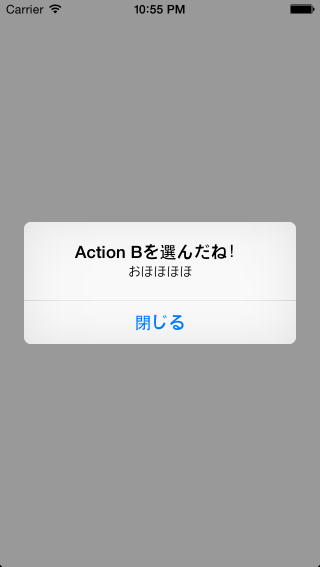
func showAMessage(notification:NSNotification){
var message:UIAlertController = UIAlertController(title: "Action Bを選んだね!", message: "おほほほほ", preferredStyle: UIAlertControllerStyle.Alert)
message.addAction(UIAlertAction(title: "閉じる", style: UIAlertActionStyle.Default, handler: nil))
self.presentViewController(message, animated: true, completion: nil)
}
func showAText(notification:NSNotification){
var newLabel:UILabel = UILabel(frame:CGRectMake(0, 100, 320, 100))
newLabel.text = "Action Cを選んだね!!"
newLabel.textColor = UIColor(red: 0.20, green: 0.67, blue: 0.86, alpha: 1.0);
self.view.addSubview(newLabel)
}
override func didReceiveMemoryWarning() {
super.didReceiveMemoryWarning()
// Dispose of any resources that can be recreated.
}
}