Objectives
Outdoor IoT
Recording daily task is dragging and often easy to be forgotten. Using IoT this problem has been alleviated to track indoor data, such as the temperature of the room. But how about outdoor activities? SORACOM Air provides 3G connection to sensor devices without the pricey commitment of a lengthy contract. They charge as little as a couple of cents per day, and mainly charged [per data] (https://soracom.jp/services/air/cellular/price/) . This is the perfect solution to track daily outdoor activities.
Motivation: Make it easier than the analog world
Dedicated pet owners often take a note of daily pet status, such as eating, walking then food digestion.

Keeping a diary could be plausible by any vets, however the conversation in the owner family to take this record would override actual family conversation; by asking each other whether the pet ate, walked or ran, etc. If the record could be taken automatically, or required less effort than picking up a pen and writing down, then pet owner families could enjoy actual family conversation with each other rather than pet status exchange.
Preparation
Physical equipment:
- ADXL234 Digital Accelerometer for approx. $20 USD
- [Raspberry Pi Zero W] (https://www.switch-science.com/catalog/3200/)... Wireless is needed for initial setup
- [Soracom Air SIM] (https://www.amazon.co.jp/SORACOM-Air-SIM%E3%82%AB%E3%83%BC%E3%83%89%EF%BC%88%E3%83%87%E3%83%BC%E3%82%BF%E9%80%9A%E4%BF%A1%E3%81%AE%E3%81%BF%EF%BC%89-%E3%83%8A%E3%83%8E/dp/B015FFCZ02) and USB adapter for the SIM ABIT AK-20is used here
- Generic mobile battery
- 4 female-male jumper cables
- SD flash memory card; 16 GB is enough.
- A/C adapter, HDMI cable (Micro HDMI to HDMI) and mini USB converter
Prerequisites
- An active AWS account is required to use DynamoDB
- An IAM user allowed to access DynamoDB should to be created.
- Soracom Account has to be set up.
Getting Started
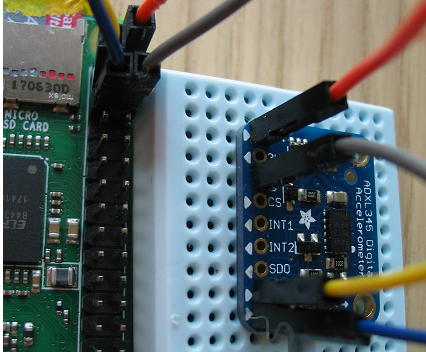
1. Wiring the ADXL234 Digital Accelerometer and Raspberry Pi Zero W
Set Up Raspberry Pi Zero
The below is basic set up where the scenario of local wireless network and HDMI monitor are available. Please skip to the next "Wiring ADXL345" section, if you are already comfortable with setting up Raspberry Pi
- [Download the latest Raspbian] (https://www.raspberrypi.org/downloads/raspbian/) ; Raspbian Lite is good enough for this hands-on.
- Format the SD card using a tool, such as [SD Card Formatter] (https://www.sdcard.org/downloads/formatter/)
- Write image using a tool, such as [Win32DiskImager] (https://sourceforge.net/projects/win32diskimager/)
- In order to enable ssh server and local wireless access, create a file named "ssh" and another file wpa_supplicant.conf (explained here ) in the /boot directory. The wpa_supplicant.conf in the example should be modified to use your wireless environment.
- When the Pi boots up, make sure to enable I2C digital interface by
sudo raspi-configand setting Interfacing Options -> I2C -> Yes. You can also change Hostname and password for your security. - Find IP address of eth0 on Pi assigned by local DHCP server by typing
ifconfig. From here, you can log in SSH to your Pi using the local address obtained in 5.
C:\Users\saki>ssh pi@192.168.1.2
pi@192.168.1.2's password:
pi@soracom-raspi-zero:~ $
After making sure SSH log-in is working, you can shutdown Pi for now, then unplug HDMI monitor.
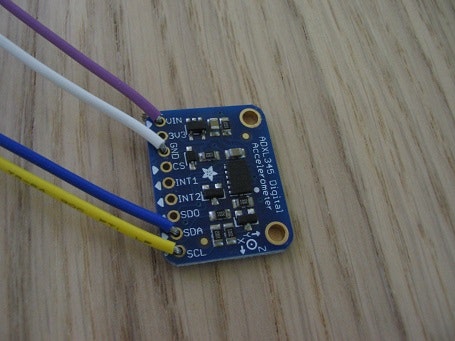
Wiring ADXL345
- For your safety, shut down Raspberry Pi Zero, unplug the power cable, before starting any wiring.
- For wiring, you will use 4 wires.
| ADXL345 | Raspberry Pi |
|---|---|
| GND | GND |
| VIN | 5V |
| SDA | SDA1(GPIO2) |
| SCL | SCL1(GPIO3) |
|
Although the example is with Arduino, [another photo of wiring is available here] (https://learn.adafruit.com/adxl345-digital-accelerometer/assembly-and-wiring)
3. Boot up Raspberry Pi, and make sure the accelerometer is recognized by typing i2cdetect -y 1
$ sudo i2cdetect -y 1
     0  1  2  3  4  5  6  7  8  9  a  b  c  d  e  f
00:          -- -- -- -- -- -- -- -- -- -- -- -- --
10: -- -- -- -- -- -- -- -- -- -- -- -- -- -- -- --
20: -- -- -- -- -- -- -- -- -- -- -- -- -- -- -- --
30: -- -- -- -- -- -- -- -- -- -- -- -- -- -- -- --
40: -- -- -- -- -- -- -- -- -- -- -- -- -- -- -- --
50: -- -- -- 53 -- -- -- -- -- -- -- -- -- -- -- --
60: -- -- -- -- -- -- -- -- -- -- -- -- -- -- -- --
70: -- -- -- -- -- -- -- --
The i2c bus address is 0x53 in the example above
To make sure the sensor is working, I used the sample program obtained from [here] (https://github.com/vitiral/adxl345-python3).
Note: Git and Python3 installation may be required if the installation of Raspberry pi is Stretch Lite.
$ sudo python3 example.py
ADXL345 on address 0x53:
   x = 0.980G
   y = -0.308G
   z = -0.176G
You can shut down Raspberry pi for now, while working on the next sections; 2. Set up SORACOM Air and 3. DynamoDB
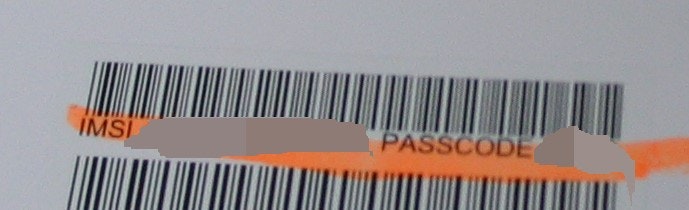
2. Set up SORACOM Air SIM
-
[Register the SIM] (https://dev.soracom.io/en/start/console/#account) In case of SORACOM Air, you can find IMSI and PASSCODE on the plastic card.
-
Open the lid in the backside of USB modem adapter. Set the SIM card to USB modem. Make sure the SIM surface is down. Close the lid.

-
Wire the modem adapter and Raspberry Pi.
-
Turn on the Raspberry Pi again. Set up the Raspberry Pi to use the 3G connection if a wireless connection is not available. SORACOM has
their [official instructions "Setup Raspberry Pi + USB modem"] (https://dev.soracom.io/en/start/device_setting/)
Upon successful execution of the connect_air.sh, you will end up with having local IP addresses for both ppp0 and eth0.
In this example, 10.253.17.75 for ppp0 is obtained for SORACOM Air, and 192.168.10.109 is kept for eth0 from the local wireless network.
$ ifconfig -a
ppp0: flags=4305<UP,POINTOPOINT,RUNNING,NOARP,MULTICAST>  mtu 1500
        inet 10.253.1.2  netmask 255.255.255.255  destination 10.64.64.64
    ...
wlan0: flags=4163<UP,BROADCAST,RUNNING,MULTICAST>  mtu 1500
        inet 192.168.10.2  netmask 255.255.255.0  broadcast 192.168.10.255
3. DynamoDB
- Log into AWS Management Console (https://ap-northeast-1.console.aws.amazon.com/dynamodb/home?region=ap-northeast-1)
- Create a Table. In this hands-on, a) Table "soracom-air-pi-zero" b) Primary key "ind" as Number in ap-northeast-1 region is created as an example.
Coding
Since the previously used example.py only ran once, in order to continuously track activities, the code has to be modified to have a loop.
adxl345 = ADXL345()
while True:
        axes = adxl345.getAxes(True)
Also, the code needs timestamps to track activities, as well as TTL to keep the table from increasing.
        now = datetime.now(pytz.timezone("Asia/Tokyo")) # current date and time
        strf = now.strftime("%m/%d/%Y %H:%M:%S")
        ttl = now + timedelta(days=1)
AWS account information and DynamoDB table information has to be configured. It is recommended not to include the Access key or the Secret Access key directly in the code. Refer to [Best Practices for Managing AWS Access Keys] (https://docs.aws.amazon.com/general/latest/gr/aws-access-keys-best-practices.html) and choose the method that suits your environment.
dynamodb = boto3.resource('dynamodb', region_name = 'ap-northeast-1',
aws_access_key_id = aws_access_key_id, aws_secret_access_key = aws_access_key_id)
table    = dynamodb.Table('soracom-air-pi-zero') #Table name created in 1-3. DynamoDB
Inside of the loop, add timestamps and logic to determine whether the outside activity is "walking" or "jogging" based on the acceleration.
Since [acceleration is a = (v0 - v) /t) ] (https://en.wikipedia.org/wiki/Acceleration), we can derive to v = v0 + at. In this example, previousv variable was used to store the previous velocity.
        variancev = previousv +  axes['x'] * 3

        if (variancev >=3.0):
            type_of_activity = "jogging"
        else:
            type_of_activity = "walking"
Send the data to DynamoDB. In this example, the code will wait for 3 seconds before the following retrieval of acceleration.
        table.put_item(
            Item={
                "ind": ind,
                "x":  str(axes['x']),
                "y":  str(axes['y']),
                "z":  str(axes['z']),
                "variance": str(variancev),
                "timestamp": strf,
                "type_of_activity":type_of_activity
                "ttl": str(ttl)
           }
        )
        previousv = variancev
        ind += 1
        time.sleep(3)
Make sure the code runs as expected. The acceleration in each 3 seconds is recorded in DynamoDB. Open DynanmoDB Management console, open the table and click the Items tab.

Optionally, execution could be stored in rc.local, so that everytime the Pi Zero boot up, even headlessly, the program will run.
For the sake of keeping the environment clean, [virtualenv] (https://virtualenv.pypa.io/en/latest/) is used in this example below, but virtualenv is completely optional.
. /home/pi/soracom/venv/bin/activate
sudo nohup python3 /home/pi/soracom/venv/soracom-zero-adx.py &
Implementation for pets
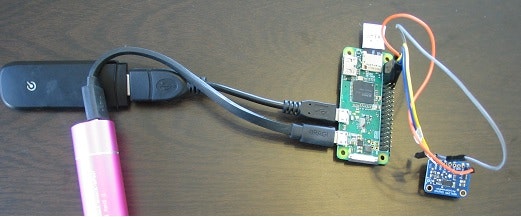
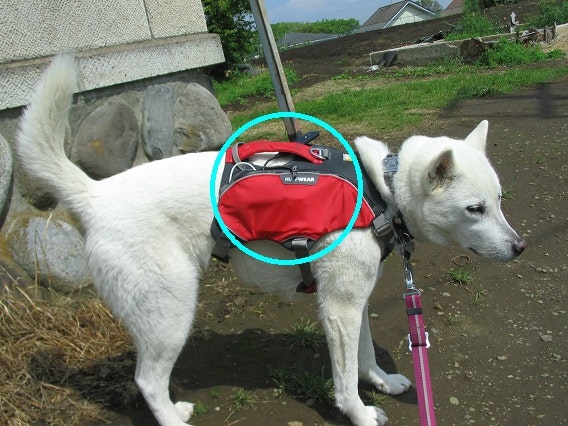
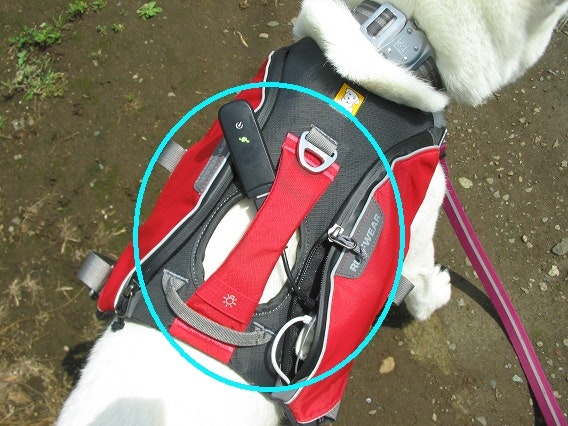
Turn on the Raspberry Pi Zero using mobile battery with SORACOM Air attached to Raspberry Pi Zero, stash in the pets harness, and walk outside of the building. It will take a while to get connected. In the case of AK-20 modem adapter, the indicator will turn red when SIM is negotiating in boot up time, but within less than a minute, the indicator will change to blinking state to show it is connected. With this implementation, the pet owners will now be able to record pet's activities outside without a need for analog notes.
Furthermore...
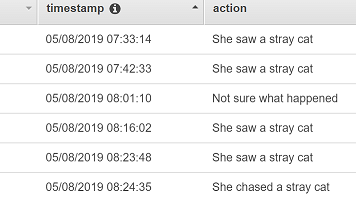
Additionally, pet owners could use [SORACOM LTE-M Button powered by AWS] (https://dev.soracom.io/jp/aws_button/what-is-aws-button/) to record events of pets outside by invoking the Lambda function below.

def lambda_handler(event, context):
    clicktype = event["deviceEvent"]["buttonClicked"]["clickType"]
    print (clicktype)
    if (clicktype == "SINGLE"):
        message = "She saw a stray cat"
    elif (clicktype == "DOUBLE"):
        message = "She chased a stray cat"
    elif (clicktype == "LONG"):
        message = "She digested food"
    else:
        message = "Not sure what happened"
Stored events are recorded in DynamoDB as in the example below.
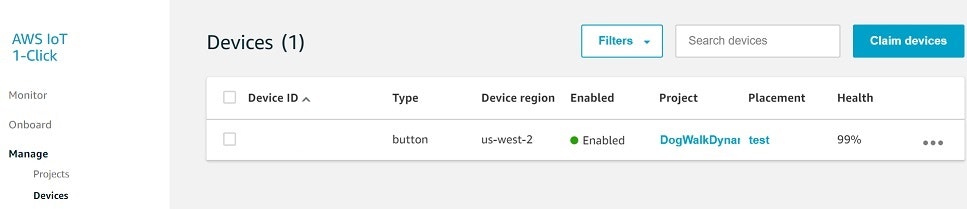
To invoke Lambda function in this scenario, the button must be registered to both SORACOM console and AWS IoT 1-Click, Claim the Device, Enable the device then Add to the Project.
Referenced article
- [加速度センサを使って犬用Wifi歩数計を作ってみた] (https://qiita.com/shinsuki/items/76e2bf2d8a703e88fb10)