このメモに書いてあること
- CentOS Stream8 インストールの流れ
- インストール画面が見切れる問題への対処方法
- VirtualBox Guest Additions のインストール方法
- IPv6 の無効化方法:kernel boot option の場合
- IPv6 の無効化方法:sysctl の場合
- virbr0 の無効化方法
CentOS8のインストールとほぼ変わらないけど、
ほとんど変わらないという事がわかるのも何かの役に立つかもしれない。
かなww
インストール条件
| 設定項目 | このメモでの設定値 | 備考 |
|---|---|---|
| ソフトウェアの選択 | サーバ(GUI使用) | 初期値 |
| hostname | cent8st.example.co.jp | |
| rootパスワード | 適当な物を考えておきましょう | |
| 一般ユーザID | user01 | |
| 一般ユーザパスワード | ||
| インストール先PC | VirtualBox 仮想マシン | VBoxGuestAdditions を導入 |
| 日本語入力環境 | 日本語入力環境を設定 | |
| IPv6 | 無効化 | |
| virtbr0 | 無効化 | 仮想ブリッジ、不要なら無効化 |
インストール
-
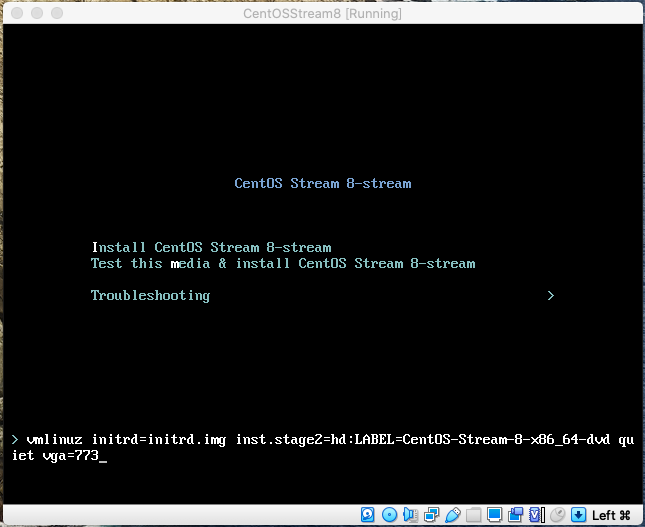
インストール開始
Install CentOS Stream 8-stream を選択した状態で Tab を押してメニューを表示
末尾に vga=773 を追記、Enterを押してインストーラを起動してください。
※この時点でシステムは英語キーボードモードです。日本語キーボードを使っている場合"="は "^"を押して入力してください。
※ちなみに、VMWareWorkstationで画面が見きれる問題も同じ対処方法で大丈夫です。
参考:GRUB VGA Modes
-
インストール概要
インストールの開始をクリックする前に以下の設定をしてます。
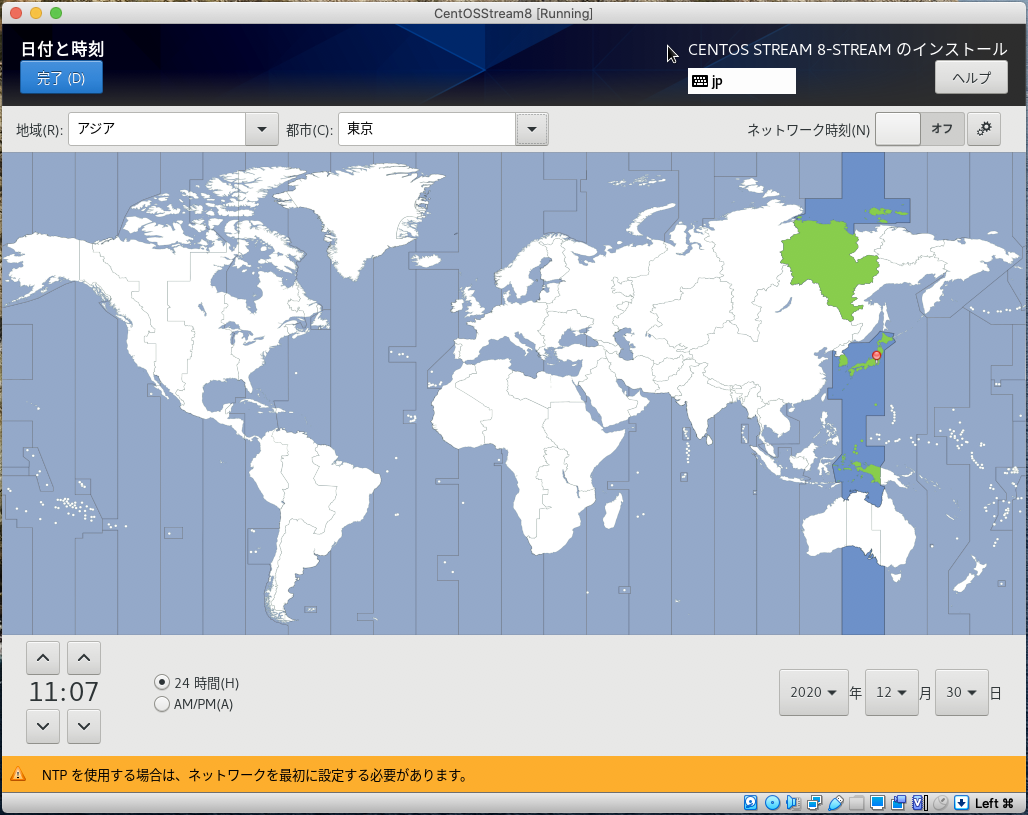
- 時刻と日付:タイムゾーンの指定
- インストール先:ディスク および 必要であればパーティション設定
- KDUMP:無効化、自宅サーバならKDUMPが取れても解析しないよね?
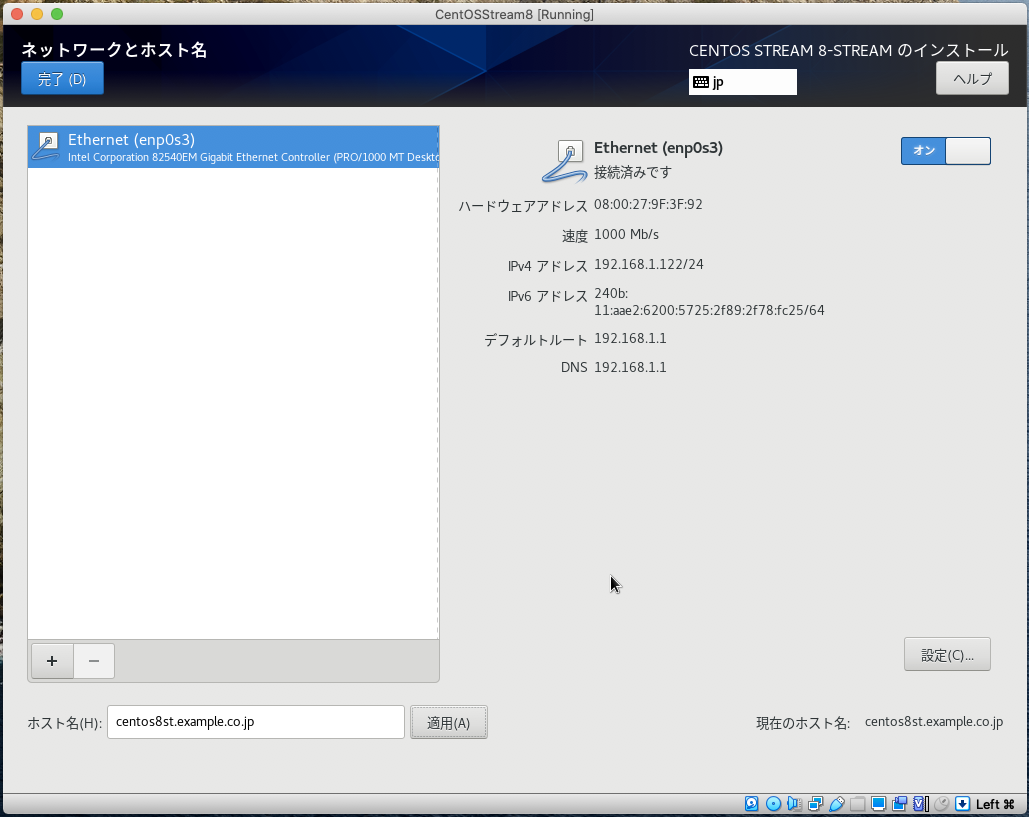
- ネットワークとホスト名(DHCPでもホスト名位設定しましょう)
- rootパスワード:rootアカウントのパスワードを設定します。
- ユーザーの作成:一般ユーザを作成します。
※以前CentOS8をインストールした時は、rootパスワード、ユーザの作成が別画面でした。
CentOS8自体が変わったのかもしれませんが、気づいた変化はここくらい。

-
ユーザの作成
作成するユーザの情報を指定
私は "このユーザを管理者にする" をチェックしてここで作成したユーザで作業してます。

-
インストール概要の確認
設定が終わったらインストールの開始をクリックしてインストールを開始します。
VirtualBox Guest Additons インストール
- 必要なパッケージ追加
VirtualBox Guest Additions インストールの為に開発環境のインストールを行う
最初、VBoxGuestAdditions のインストールに失敗したのでsetup.logを見ると以下のモジュールを要求していたので、
開発環境と一緒にインストールしてます。
libelf-dev lebelf-devel or elfutils-libelf-devel
[user01@centos8st ~]$ sudo dnf group install -y "Development Tools"
[user01@centos8st ~]$ sudo dnf install -y elfutils-libelf-devel
- アップデートの実施
大抵の場合、追加インストールされた kernel-header と稼働中のkernelにずれが出来ます。
アップデートを実施してパッケージのバージョンを揃えましょう。
[user01@centos8st ~]$ sudo dnf clean all
[user01@centos8st ~]$ sudo dnf check-update
[user01@centos8st ~]$ sudo dnf -y upgrade
[user01@centos8st ~]$ shutdown -r now
-
VirtualBox Guest Additions のインストール1
Guest Additions CDイメージの挿入"Insert Guest Addtions CD image"を選択

-
VirtualBox Guest Additions のインストール2
VBox_GAs_XXX の画面が出たら 実行する をクリックしてください。

-
VirtualBox Guest Additions のインストール3
認証が要求された場合、認証情報を入力してください。

-
VirtualBox Guest Additions のインストール4
インストールが完了したらOSを再起動して完了です。
[user01@centos8st ~] sudo shutdown -r now
インストール直後のIP付与状況
仮想環境を利用しないサーバとして利用する場合、IPv6とvirbr0が邪魔ですね。
次の項目でIPv6とvirbrの無効化を行って行きます。
[user01@centos8st ~]$ ip a
1: lo: <LOOPBACK,UP,LOWER_UP> mtu 65536 qdisc noqueue state UNKNOWN group default qlen 1000
    link/loopback 00:00:00:00:00:00 brd 00:00:00:00:00:00
    inet 127.0.0.1/8 scope host lo
       valid_lft forever preferred_lft forever
    inet6 ::1/128 scope host
       valid_lft forever preferred_lft forever
2: enp0s3: <BROADCAST,MULTICAST,UP,LOWER_UP> mtu 1500 qdisc fq_codel state UP group default qlen 1000
    link/ether 08:00:27:9f:3f:92 brd ff:ff:ff:ff:ff:ff
    inet 192.168.1.122/24 brd 192.168.1.255 scope global dynamic noprefixroute enp0s3
       valid_lft 13605sec preferred_lft 13605sec
    inet6 240b:11:aae2:6200:5678:5987:aded:cf0f/64 scope global dynamic noprefixroute
       valid_lft 13973sec preferred_lft 12173sec
    inet6 fe80::4a7c:a888:c035:7231/64 scope link noprefixroute
       valid_lft forever preferred_lft forever
3: virbr0: <NO-CARRIER,BROADCAST,MULTICAST,UP> mtu 1500 qdisc noqueue state DOWN group default qlen 1000
    link/ether 52:54:00:1b:5f:80 brd ff:ff:ff:ff:ff:ff
    inet 192.168.122.1/24 brd 192.168.122.255 scope global virbr0
       valid_lft forever preferred_lft forever
4: virbr0-nic: <BROADCAST,MULTICAST> mtu 1500 qdisc fq_codel master virbr0 state DOWN group default qlen 1000
    link/ether 52:54:00:1b:5f:80 brd ff:ff:ff:ff:ff:ff
[user01@centos8st ~]$
IPv6無効化
方法1:Kernel Boot Option での無効化(おすすめ)
- 設定ファイル編集
GRUB_CMDLINE_LINUX 行の末尾に "ipv6.disable=1" を追記してください。
[user01@centos8st ~]$ sudo vi /etc/default/grub
GRUB_TIMEOUT=5
GRUB_DISTRIBUTOR="$(sed 's, release .*$,,g' /etc/system-release)"
GRUB_DEFAULT=saved
GRUB_DISABLE_SUBMENU=true
GRUB_TERMINAL_OUTPUT="console"
GRUB_CMDLINE_LINUX="resume=/dev/mapper/cs-swap rd.lvm.lv=cs/root rd.lvm.lv=cs/swap rhgb quiet ipv6.disable=1"
GRUB_DISABLE_RECOVERY="true"
GRUB_ENABLE_BLSCFG=true
[user01@centos8st ~]$
- Grub設定を反映
ls で確認したgrub2.cfgのリンク先を指定して grub2-mkconfig を実行してください。
リンク先が2カ所あった場合 grub2-mkconfig も二回実行してください。
で、実行後システムの再起動を行います。
[user01@centos8st ~]$ ls -lh /etc/grub*.cfg
lrwxrwxrwx. 1 root root 22  9月  9 04:00 /etc/grub2.cfg -> ../boot/grub2/grub.cfg
[user01@centos8st ~]$ sudo grub2-mkconfig -o /boot/grub2/grub.cfg
Generating grub configuration file ...
done
[user01@centos8st ~]$ shutdown -r now
方法2:sysctl での無効化
- sysctl.conf での IPv6無効化設定
[user01@centos8st ~]$ sudo vi /etc/sysctl.d/ipv6.conf
net.ipv6.conf.all.disable_ipv6 = 1
net.ipv6.conf.default.disable_ipv6 = 1
[user01@centos8st ~]$ sudo sysctl --load /etc/sysctl.d/ipv6.conf
- NetworkManager でのIPv6無効化設定
NetworkManagerを利用している場合 OSを再起動したり コマンドでnicの再起動を行うと、
IPv6が有効化されてしまいます。NetworkManagerがIPv6を有効化しないように設定しましょう。
(enp0s3 の部分は自サーバのNIC名に置き換えてください)
[user01@centos8st ~]$ nmcli connection show enp0s3 |grep ipv6.method
ipv6.method:                            auto
[user01@centos8st ~]$ sudo nmcli connection modify enp0s3 ipv6.method ignore
[user01@centos8st ~]$ nmcli connection show enp0s3 |grep ipv6.method
ipv6.method:                            ignore
[user01@centos8st ~]$
共通設定
sysctl/kernel boot option のどちらでIPv6を停止した場合でも共通で行う設定です。
- /etc/hosts から IPv6 エントリを削除
IPv6 のエントリを削除するかコメントアウトしましょう。
[user01@centos8st ~]$ sudo vi /etc/hosts
127.0.0.1   localhost localhost.localdomain localhost4 localhost4.localdomain4
## ::1         localhost localhost.localdomain localhost6 localhost6.localdomain6
[user01@centos8st ~]$
- /etc/netconfig から IPv6 エントリを削除
エラーメッセージの抑止です。
udp6/tcp6 の行削除するかコメントアウトしましょう。
[user01@centos8st ~]$ sudo vi /etc/netconfig
#
# The network configuration file. This file is currently only used in
# conjunction with the TI-RPC code in the libtirpc library.
#
# Entries consist of:
#
#       <network_id> <semantics> <flags> <protofamily> <protoname> \
#               <device> <nametoaddr_libs>
#
# The <device> and <nametoaddr_libs> fields are always empty in this
# implementation.
#
udp        tpi_clts      v     inet     udp     -       -
tcp        tpi_cots_ord  v     inet     tcp     -       -
## udp6       tpi_clts      v     inet6    udp     -       -
## tcp6       tpi_cots_ord  v     inet6    tcp     -       -
rawip      tpi_raw       -     inet      -      -       -
local      tpi_cots_ord  -     loopback  -      -       -
unix       tpi_cots_ord  -     loopback  -      -       -
[user01@centos8st ~]$
virbrの無効化
KVMなどの仮想環境を構築しない場合は、不要なので止めてしまいます。
[user01@centos8st ~]$ systemctl disable libvirtd
[user01@centos8st ~]$ sudo shutdown -r now
参考
- CentOS 8.0.1905 documentation
- 画面の見切れを解消する方法は、他に仮想マシンのグラフィックコントローラを VBoxSVGA に設定する方法もあります。

