Dockerの学習を始めて4日目。
まだ全体の流れがイメージできていない、メモのような内容です。
間違っているところがあるかもしれませんし、
読みづらい記事になっているかと思います。。。
理解が深まり次第、その都度、更新・訂正します!
(間違いのご指摘や、アドバイスいただければとても嬉しいです!)
《目的》
- Dockerの基本を理解 ←今日はここの最後少しと、
- docker-composeの理解 ←ここ
- コンテナオーケストレーションツール(AWS ECS)の理解
1-11 本番ステージ
使用するコマンド
■dockerfile
# Release stage
FROM alpine:3.13.5
LABEL application=todobackend
# Install operating system dependencies
RUN apk add --no-cache python3 py3-pip mariadb-client bash curl bats jq
# Create app user
RUN addgroup -g 1000 app && \
adduser -u 1000 -G app -D app
# Copy and install application source and pre-built dependencies
COPY --from=test --chown=app:app /build /build
COPY --from=test --chown=app:app /app /app
RUN pip3 install -r /build/requirements.t
xt -f /build --no-index --no-cache-dir
RUN rm -rf /build
# Set working directory and application user
WORKDIR /app
USER app
■ビルド
docker build -t todobackend-release .

■アプリケーション実行
docker run -it --rm -p 8000:8000 todobackend-release uwsgi --http=0.0.0.0:8000 --module=todobackend.wsgi --master
■ビルドの補足
docker build -t test --target test .
#--target XXXX オプションで、指定したステージだけをbuildしてくれる
■runの補足
docker run -it --rm -p 8000:8000 todobackend-release uwsgi --http=0.0.0.0:8000 --module=todobackend.wsgi --master
#uwsgiを使ってアプリケーションを動かす。-p 8000:8000で、コンテナの8000番ポートとEC2の8000番ポート番号を紐付ける。uwsgi以降の部分、以前はbashでログインしていたが今回の本番ステージではuwsgiを立ち上げている。
■アプリケーション実行コマンドの解説
COPY --from=test --chown=app:app /build /build
COPY --from=test --chown=app:app /app /app
# --from=XXXで、XXXステージからファイルをコピーしてきて
# --chown=app:app /build /buildで、権限をユーザー/グループに変更して、/コピー元のファイル名 /コピー先のファイル名に保存(今回の場合はTE)

RUN pip3 install -r /build/requirements.txt -f /build --no-index --no-cache-dir
RUN rm -rf /build
# -f XXXX で、インナーネットに接続しに行かずに、指定のフォルダ(/build)をターゲットにする
1-12 .dockerignoreコマンド
テストステージから本番環境へフォルダをコピーする際、あるファイルは除外したい場合、dockerfileと同じ階層に.dockerignoreフォルダを作成する。その中にコピーしたくないファイルの名前を記述する。
#例)`db.sqlite3`というファイルを除外したい場合は下記のように書く。
# **/で全てのディレクトリを対象に探して、
# .sqlite3という文字列ファ入っているフォルダを全て除外という意味。
**/*.sqlite3
2 docker-composeの理解
■docker-compose公式リファレンス
https://docs.docker.jp/compose/compose-file.html
2-1. docker-composeのイメージ図
下記の図がdocker-composeを使って、build、run、コンテナ起動の流れ。

2-2. dockerfile testステージのbuildとrun
version: '2.4'

services:
  test:
    build:
      context: .
      dockerfile: Dockerfile
      target: test
  release:
    build:
      context: .
      dockerfile: DockerfileC
yamlファイルの解説
context: .
#docker-compose.ymlのファイルがあるディレクトリをCDに設定
dockerfile: Dockerfile
#docker-composeが読み込むファイルを指定
target: test
#マルチステージビルドで設定したtestステージのみだけ読み込んで
上記のyamlファイルに対して行うコマンド
docker-compose build test
#このコマンドでtestステージを丸ごとビルド

docker-compose run test
docker-compose build testで作成されたdockerimageを確認。

docker-compose run testコマンド実行後。docker-composeを使用していないときと同じ実行状態が得られたのでOK。

2-3. リリースステージのbuildとrun
  release:
    build:
      context: .
      dockerfile: Dockerfile
    ports:
      - 8000:8000
    command:
      - uwsgi
      - --http=0.0.0.0:8000
      - --module=todobackend.wsgi
      - --master
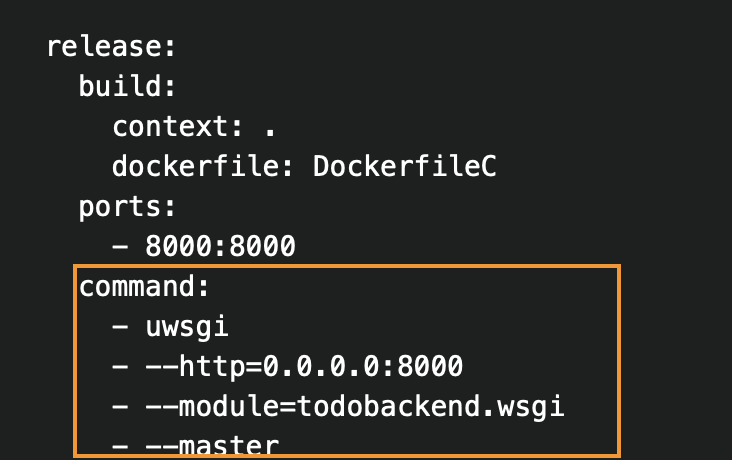
上記のオレンジ部分が、Dockerだと下記のようにコマンドで指定しなければいけなかったが、docker-composeだと設定ファイル(yamlファイル)で管理する。
docker run -it --rm -p 8000:8000 todobackend-release uwsgi --http=0.0.0.0:8000 --module=todobackend.wsgi --masterc
上記のyamlファイルに対して行うコマンド
#upで一気に、buildとrunができる
docker-compose up release
コマンド実行結果
リリースステージのコンテナが実行できた。
以下で、インターネット上でアプリケーションを見れる。
http://EC2のIPアドレス:8000
補足 VScodeでパスを表示する方法
コマンドパレットを使用:
Ctrl + Shift + P(Windows/Linux)または Cmd + Shift + P(Mac)を押してコマンドパレットを開き、そこで File: Copy Path と入力