目的
前回はVertexAIへのAPIアクセスとして、WorkbenchとGoogle Colabからの実装を試した。
今回は、GoogleCloudのCloudRunにアプリをコンテナ化し、VertexAIへのAPIアクセスを試す。
CloudRunのデプロイはCloudShellから実施する。
動作イメージ
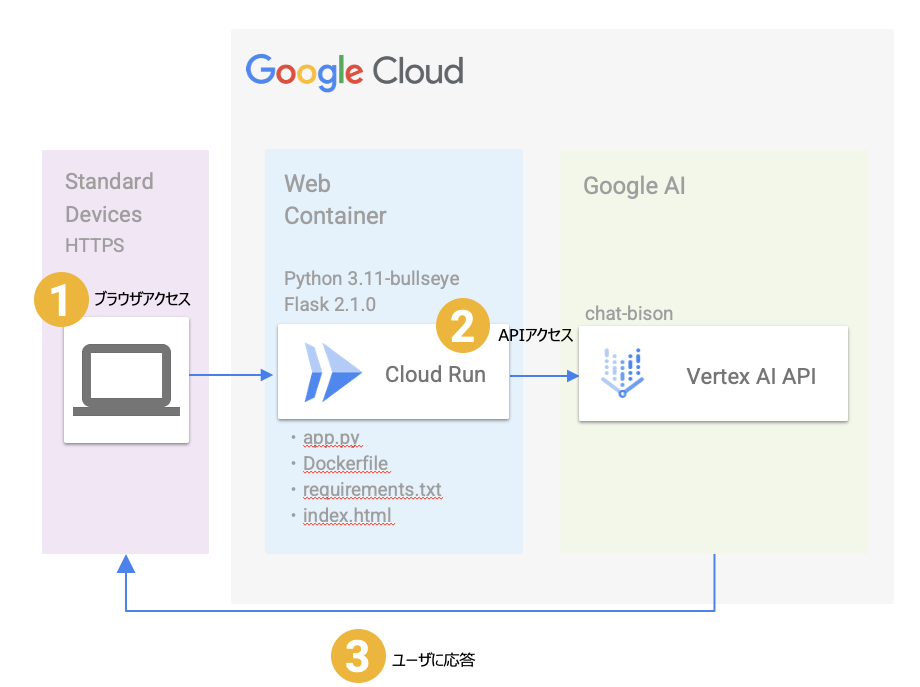
まずは動作させたイメージ
PythonコンテナをCloudRunで動作させ、ユーザの入力値をVertexAIに渡す
1.ユーザはCloudRunで立ち上げたサービスのURLへアクセスする
アクセス先:https://vertexai-zht7id3eia-uc.a.run.app
2.VertexAIへ渡すキーワードをユーザが入力し、submitを押す

3.VertexAIからの応答をブラウザに表示して終了

ファイル構成
CloudShellにディレクトリを作成し、その中に必要なファイルを格納する
全体はこんな感じ
user@cloudshell:~/vertex (project_name)$ ls
app.py  Dockerfile  requirements.txt  templates
まずはvertexaiというフォルダを作る
$ mkdir vertexai
user@cloudshell:~/vertex (project_name)$ pwd
/home/user/vertexai
Pythonコードを作成
Flaskを使用してWebアプリケーションを作成し、VertexAIの言語モデルと対話するコード
ファイル名:app.py
# 必要なモジュールをインポート
import json  # JSONデータの処理に使用
import os  # OSレベルの操作に使用

# FlaskとVertexAIのモジュールをインポート
from flask import Flask, request, render_template, jsonify
from vertexai.preview.language_models import ChatModel, InputOutputTextPair

# VertexAIの言語モデルを事前にロード
chat_model = ChatModel.from_pretrained("chat-bison@001")

# チャットモデルのパラメータを設定(必要に応じて調整可能)
parameters = {
    "temperature": 0.2,  # 生成テキストの多様性を制御(0-1)
    "max_output_tokens": 256,  # 最大出力トークン数
    "top_p": 0.95,  # 生成に使用するトークンの確率閾値
    "top_k": 40,  # 生成に使用するトップKトークン
}

# Flaskアプリケーションを初期化
app = Flask(__name__)

# ルートURLにアクセスしたときの処理
@app.route('/')
def index():
    return render_template('index.html')  # HTMLテンプレートをレンダリング

# "/chat" URLにPOSTリクエストでアクセスしたときの処理
@app.route("/chat", methods=['POST'])
def chat_with_vertexai():
    """Chat with Vertex AI."""
    user_message = request.form.get("message", "")  # ユーザーからのメッセージを取得

    # メッセージが空の場合はエラーを返す
    if not user_message:
        return jsonify({"error": "No message provided"}), 400

    # VertexAIの言語モデルでチャットを開始
    chat = chat_model.start_chat(
        context="",  # コンテキスト(オプション)
        examples=[],  # 以前の対話の例(オプション)
    )

    # 言語モデルにメッセージを送信し、レスポンスを取得
    response = chat.send_message(user_message, **parameters)

    # 取得したレスポンスをJSON形式で返す
    return jsonify(response.text)

# アプリケーションのエントリーポイント
if __name__ == "__main__":
    app.run(debug=True, host='0.0.0.0', port=int(os.environ.get('PORT', 8080)))
Dockerファイルの作成
このDockerfileは、Python WebアプリケーションをDockerコンテナで実行するための基本的な設定を含んでいます。Flaskとgoogle-cloud-aiplatformパッケージをインストールし、8080ポートを公開しています。最後に、コンテナが起動したときにapp.pyを実行するように設定しています。
ファイル名:Dockerfile
# 公式のPythonランタイムを親イメージとして使用
# Python 3.11バージョンとDebian bullseyeベースのイメージを指定
FROM python:3.11-bullseye

# コンテナ内で作業するディレクトリを設定
# /appディレクトリを作成(もしくは既存のものを使用)
WORKDIR /app

# 現在のディレクトリの内容をコンテナの/appにコピー
# これにより、アプリケーションのソースコードがコンテナ内に配置される
COPY . /app

# requirements.txtに指定された必要なパッケージをインストール
# Flaskとgoogle-cloud-aiplatformをインストール
# --trusted-hostオプションでpypi.python.orgを信頼するホストとして指定
RUN pip install --trusted-host pypi.python.org Flask google-cloud-aiplatform

# コンテナの8080ポートを外部に公開
# これにより、外部からこのポートを通じてアプリケーションにアクセスできる
EXPOSE 8080

# コンテナが起動したときにapp.pyを実行
# これがアプリケーションのエントリーポイントとなる
CMD ["python", "app.py"]
requirements.txtファイルの作成
パッケージ: Flask
バージョン: 2.1.0
用途: PythonでWebアプリケーションを作成するための軽量なWebフレームワーク
なぜ必要か: Webサーバーとして動作させるため、使用する
ファイル名:requirements.txt
Flask==2.1.0
HTMLファイルの作成
ユーザがアクセスするWebトップページとし、ユーザからの入力をPythonコードに渡す
ファイル名:index.html
(保存場所はtemplatesフォルダの中に入れる)
<!DOCTYPE html>
<html lang="ja">
<head>
<meta charset="UTF-8">
<title>question and answer</title>
</head>
<body>

<h1>question and answer</h1>

<form action="/chat" method="post">
  <input type="text" name="message" placeholder="Please fill out the form">
  <input type="submit" value="submit">
</form>

</body>
</html>
CloudRunのデプロイ
ソースファイルの場所に移動する
user@cloudshell:~/vertexai (project_name)$ ls
app.py  Dockerfile  requirements.txt  templates
デプロイの実施
(project_name)$ gcloud run deploy --source .
サービス名を変える場合は、値を入力する
そのままでよければ、Enter
Service name (vertexai):
CloudRunを稼働させるリージョンを選択する。
今回は[30] us-central1を選択した。
Please specify a region:
 [1] asia-east1
 [2] asia-east2
 [3] asia-northeast1
 [4] asia-northeast2
 [5] asia-northeast3
 [6] asia-south1
 [7] asia-south2
 [8] asia-southeast1
 [9] asia-southeast2
 [10] australia-southeast1
 [11] australia-southeast2
 [12] europe-central2
 [13] europe-north1
 [14] europe-southwest1
 [15] europe-west1
 [16] europe-west10
 [17] europe-west12
 [18] europe-west2
 [19] europe-west3
 [20] europe-west4
 [21] europe-west6
 [22] europe-west8
 [23] europe-west9
 [24] me-central1
 [25] me-west1
 [26] northamerica-northeast1
 [27] northamerica-northeast2
 [28] southamerica-east1
 [29] southamerica-west1
 [30] us-central1
 [31] us-east1
 [32] us-east4
 [33] us-east5
 [34] us-south1
 [35] us-west1
 [36] us-west2
 [37] us-west3
 [38] us-west4
 [39] cancel
Please enter numeric choice or text value (must exactly match list item):  30
未認証でアプリケーションへのアクセスを許可するか?
今回はテストなので、yとする。
To make this the default region, run `gcloud config set run/region us-central1`.

This command is equivalent to running `gcloud builds submit --tag [IMAGE] .` and `gcloud run deploy vertexai --image [IMAGE]`

Allow unauthenticated invocations to [vertexai] (y/N)?  y
問題なければデプロイ完了
Building using Dockerfile and deploying container to Cloud Run service [vertexai] in project [project_name] region [us-central1]
OK Building and deploying new service... Done.
  OK Uploading sources...
  OK Building Container... Logs are available at [https://console.cloud.google.com/cloud-build/build
  s/f1e718a7-b872-40bf-b8e9-d53d2f089eb1?project=285464393872].
  OK Creating Revision...
  OK Routing traffic...
  OK Setting IAM Policy...
Done.
Service [vertexai] revision [vertexai-00001-noc] has been deployed and is serving 100 percent of traffic.
Service URL: https://vertexai-zht7id3eia-uc.a.run.app
サービスURLが表示されているので、
そこにアクセスすることでCloudRun上で動作するアプリケーションにアクセス可能
Service URL: https://vertexai-zht7id3eia-uc.a.run.app