概要
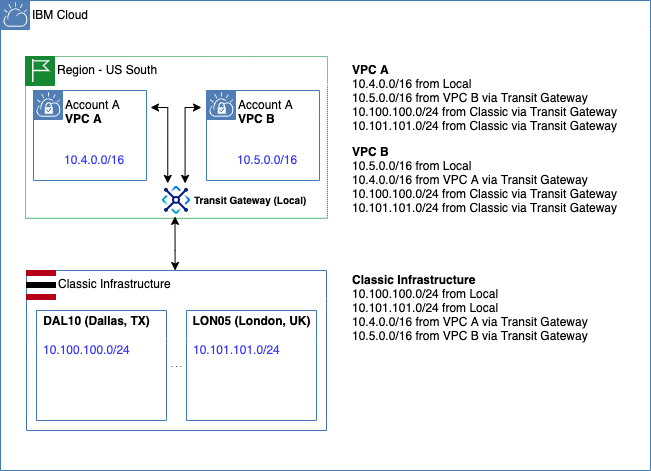
こちらの構成を検証します。
Use case 3: Interconnect one or more VPCs in the same MZR and an IBM classic network
リソースグループ
リソースグループを設定します。
リソースグループ設定
export rg="khayama"
# ibmcloud resource group-create $rg

export rgid=`ibmcloud resource groups  --output json | jq -r '.[] | select (.name=="'$rg'") | .id'`
VPC
ibmcloud コマンドを使って進めます。
CLI プラグインインストール
ibmcloud plugin install vpc-infrastructure
ibmcloud plugin show vpc-infrastructure
Gen2 に設定
ibmcloud is target --gen 2
リージョン確認
% ibmcloud is regions
ユーザー khayama@jp.ibm.com としてアカウント IBM の下で世代 2 コンピュートの地域をリストしています...
名前       エンドポイント                        状況
eu-de      https://eu-de.iaas.cloud.ibm.com      available
eu-gb      https://eu-gb.iaas.cloud.ibm.com      available
us-east    https://us-east.iaas.cloud.ibm.com    available
us-south   https://us-south.iaas.cloud.ibm.com   available
リージョン設定
Frankfurt に作成します。
export region=eu-de
ibmcloud target -r $region
ゾーン設定
export zone1=`ibmcloud is zones --json | jq -r '.[0] | .name'`
export zone2=`ibmcloud is zones --json | jq -r '.[1] | .name'`
export zone3=`ibmcloud is zones --json | jq -r '.[2] | .name'`
# echo $zone1 $zone2 $zone3
VPC 作成
VPC を2つ作ります。
export vpc1=`ibmcloud is vpc-create khayama-vpc-1 \
--address-prefix-management manual \
--resource-group-name $rg --json | jq -r .id`

export vpc2=`ibmcloud is vpc-create khayama-vpc-2 \
--address-prefix-management manual \
--resource-group-name $rg --json | jq -r .id`

# echo $vpc1 $vpc2
プレフィックス作成
export prefix1=`ibmcloud is vpc-address-prefix-create khayama-prefix-$zone1 $vpc1 $zone1 192.168.10.0/23 --json | jq -r .id`
export prefix2=`ibmcloud is vpc-address-prefix-create khayama-prefix-$zone2 $vpc2 $zone2 192.168.20.0/23 --json | jq -r .id`
# echo $prefix1 $prefix2
サブネット作成
export subnet1=`ibmcloud is subnet-create khayama-subnet-$zone1 $vpc1 $zone1 --ipv4-cidr-block "192.168.10.0/24" --resource-group-name $rg --json | jq -r .id`
export subnet2=`ibmcloud is subnet-create khayama-subnet-$zone2 $vpc2 $zone2 --ipv4-cidr-block "192.168.20.0/24" --resource-group-name $rg --json | jq -r .id`
# echo $subnet1 $subnet2
パブリックゲートウェイ作成
export gateway1=`ibmcloud is public-gateway-create khayama-gateway-$zone1 $vpc1 $zone1 --resource-group-name $rg --json | jq -r .id`
export gateway2=`ibmcloud is public-gateway-create khayama-gateway-$zone2 $vpc2 $zone2 --resource-group-name $rg --json | jq -r .id`
# echo $gateway1 $gateway2
パブリックゲートウェイをサブネットに紐付け
ibmcloud is subnet-update $subnet1 --public-gateway-id $gateway1
ibmcloud is subnet-update $subnet2 --public-gateway-id $gateway2
ACL名変更
デフォルトのACL名を変更します。
export acl1=`ibmcloud is network-acls --json | jq -r '.[] | select (.vpc.id=="'$vpc1'") | .id'`
export acl2=`ibmcloud is network-acls --json | jq -r '.[] | select (.vpc.id=="'$vpc2'") | .id'`
ibmcloud is network-acl-update $acl1 --name khayama-network-acl1
ibmcloud is network-acl-update $acl2 --name khayama-network-acl2
セキュリティグループ設定
デフォルトのセキュリティグループを更新します。
export sg1=`ibmcloud is vpc-default-security-group $vpc1 --json | jq -r .id`
export sg2=`ibmcloud is vpc-default-security-group $vpc2 --json | jq -r .id`

ibmcloud is security-group-update $sg1 --name khayama-security-group1
ibmcloud is security-group-update $sg2 --name khayama-security-group2

# 社内ネットワークからping,ssh許可
ibmcloud is security-group-rule-add $sg1 inbound tcp --port-min 22 --port-max 22 --remote 203.141.91.0/24
ibmcloud is security-group-rule-add $sg1 inbound icmp --icmp-type 8 --icmp-code 0 --remote 203.141.91.0/24
ibmcloud is security-group-rule-add $sg2 inbound tcp --port-min 22 --port-max 22 --remote 203.141.91.0/24
ibmcloud is security-group-rule-add $sg2 inbound icmp --icmp-type 8 --icmp-code 0 --remote 203.141.91.0/24
# vpc,classicからの通信を許可
ibmcloud is security-group-rule-add $sg1 inbound all --remote 192.168.0.0/16
ibmcloud is security-group-rule-add $sg1 inbound all --remote 10.0.0.0/8
ibmcloud is security-group-rule-add $sg2 inbound all --remote 192.168.0.0/16
ibmcloud is security-group-rule-add $sg2 inbound all --remote 10.0.0.0/8
SSH 鍵アップロード
export key=`ibmcloud is key-create khayama-key @$HOME/.ssh/id_rsa.pub --resource-group-name $rg --json | jq -r .id`
イメージ設定
CentOS を選択します。
export image=`ibmcloud is images --json | jq -r '.[] | select (.status=="available") | select (.operating_system.family=="CentOS") | .id'`
VSI作成
2 つの VSI を 2 つの VPC にそれぞれ配置します。
ibmcloud is instance-create khayama-vsi1 \
$vpc1 $zone1 cx2-2x4 \
--image-id $image \
--primary-network-interface '{"name":"eth0","primary_ipv4_address":"192.168.10.10","security_groups":[{"id":"'$sg1'"}],"subnet":{"id":"'$subnet1'"}}' \
--key-ids $key \
--resource-group-name $rg

ibmcloud is instance-create khayama-vsi2 \
$vpc2 $zone2 cx2-2x4 \
--image-id $image \
--primary-network-interface '{"name":"eth0","primary_ipv4_address":"192.168.20.20","security_groups":[{"id":"'$sg2'"}],"subnet":{"id":"'$subnet2'"}}' \
--key-ids $key \
--resource-group-name $rg

# ibmcloud is instance-create -i でも可
フローティングIP設定
外部から SSH でログインできるように Floating IP を予約してバインドします。
export vsi1=`ibmcloud is instances --json | jq -r '.[] | select (.name=="khayama-vsi1") | .id'`
export vsi2=`ibmcloud is instances --json | jq -r '.[] | select (.name=="khayama-vsi2") | .id'`

export nic1=`ibmcloud is instance-network-interfaces $vsi1 --json | jq -r '.[] | .id'`
export nic2=`ibmcloud is instance-network-interfaces $vsi2 --json | jq -r '.[] | .id'`

export fip1=`ibmcloud is floating-ip-reserve khayama-fip1 --nic-id $nic1 --resource-group-name $rg  --json | jq -r .address`
export fip2=`ibmcloud is floating-ip-reserve khayama-fip2 --nic-id $nic2 --resource-group-name $rg  --json | jq -r .address`
SSH ログイン
ssh root@$fip1
ssh root@$fip2
# ssh -o ProxyCommand='nc -X connect -x x.x.x.x:yyyy %h %p' root@$fip1
# ssh -o ProxyCommand='nc -X connect -x x.x.x.x:yyyy %h %p' root@$fip2
Transit Gateway
ibmcloud コマンドを使って、VPC - VPC、VPC - Classic Infrastructure の接続を作成します。
CLI プラグインインストール
ibmcloud plugin install tg
ibmcloud plugin show tg
Transit Gateway 作成
ibmcloud tg gateway-create --name khayama-tgw \
 --location eu-de \
 --routing local \
 --resource-group-id $rgid
Connection 作成
export tgid="" #ibmcloud tg gateways

export crn1=`ibmcloud is vpcs --json | jq -r '.[] | select (.id=="'$vpc1'") | .crn'`
export crn2=`ibmcloud is vpcs --json | jq -r '.[] | select (.id=="'$vpc2'") | .crn'`

# vpc1 を追加
ibmcloud tg connection-create $tgid \
--name khayama-vpc1 \
--network-id $crn1 \
--network-type vpc

# vpc2 を追加
ibmcloud tg connection-create $tgid \
--name khayama-vpc2 \
--network-id $crn2 \
--network-type vpc

# classic infra を追加
ibmcloud tg connection-create $tgid \
--name khayama-classic \
--network-type classic

# ibmcloud tg connections $tgid
疎通確認
最後に疏通確認をします。
vpc --> vpc
疏通が確認できます。
[root@khayama-vsi1 ~]# ping 192.168.20.20 -c 4
PING 192.168.20.20 (192.168.20.20) 56(84) bytes of data.
64 bytes from 192.168.20.20: icmp_seq=1 ttl=55 time=1.34 ms
64 bytes from 192.168.20.20: icmp_seq=2 ttl=55 time=1.31 ms
64 bytes from 192.168.20.20: icmp_seq=3 ttl=55 time=1.39 ms
64 bytes from 192.168.20.20: icmp_seq=4 ttl=55 time=1.42 ms

--- 192.168.20.20 ping statistics ---
4 packets transmitted, 4 received, 0% packet loss, time 3004ms
rtt min/avg/max/mdev = 1.317/1.369/1.425/0.048 ms
[root@khayama-vsi2 ~]# ping 192.168.10.10 -c 4
PING 192.168.10.10 (192.168.10.10) 56(84) bytes of data.
64 bytes from 192.168.10.10: icmp_seq=1 ttl=55 time=1.39 ms
64 bytes from 192.168.10.10: icmp_seq=2 ttl=55 time=1.41 ms
64 bytes from 192.168.10.10: icmp_seq=3 ttl=55 time=1.19 ms
64 bytes from 192.168.10.10: icmp_seq=4 ttl=55 time=1.41 ms

--- 192.168.10.10 ping statistics ---
4 packets transmitted, 4 received, 0% packet loss, time 3004ms
rtt min/avg/max/mdev = 1.194/1.353/1.419/0.103 ms
vpc --> classic
Classic VSI (Windows Server) に Static Route を設定します。
(Private-only なサーバーでデフォルトゲートウェイが Back-end Customer Router に向いている場合は必要ありませんが、Public Interface がある場合など、デフォルトゲートウェイが Back-end Customer Router を向いていない場合は必要です。)
C:\Users\Administrator>route print
...
===========================================================================
Persistent Routes:
  Network Address          Netmask  Gateway Address  Metric
         10.0.0.0        255.0.0.0     10.133.38.65       1
       161.26.0.0      255.255.0.0     10.133.38.65       1
          0.0.0.0          0.0.0.0    10.132.87.201       1
===========================================================================
...

C:\Users\Administrator>route add 192.168.0.0 mask 255.255.0.0 10.133.38.65 -p
 OK!
その後、疏通が確認できます。
[root@khayama-vsi1 ~]# ping 10.133.38.85 -c 4
PING 10.133.38.85 (10.133.38.85) 56(84) bytes of data.
64 bytes from 10.133.38.85: icmp_seq=1 ttl=115 time=217 ms
64 bytes from 10.133.38.85: icmp_seq=2 ttl=115 time=217 ms
64 bytes from 10.133.38.85: icmp_seq=3 ttl=115 time=217 ms
64 bytes from 10.133.38.85: icmp_seq=4 ttl=115 time=217 ms

--- 10.133.38.85 ping statistics ---
4 packets transmitted, 4 received, 0% packet loss, time 3004ms
rtt min/avg/max/mdev = 217.499/217.560/217.680/0.337 ms
[root@khayama-vsi2 ~]# ping 10.133.38.85 -c 4
PING 10.133.38.85 (10.133.38.85) 56(84) bytes of data.
64 bytes from 10.133.38.85: icmp_seq=1 ttl=115 time=231 ms
64 bytes from 10.133.38.85: icmp_seq=2 ttl=115 time=231 ms
64 bytes from 10.133.38.85: icmp_seq=3 ttl=115 time=231 ms
64 bytes from 10.133.38.85: icmp_seq=4 ttl=115 time=231 ms

--- 10.133.38.85 ping statistics ---
4 packets transmitted, 4 received, 0% packet loss, time 3004ms
rtt min/avg/max/mdev = 231.572/231.601/231.654/0.032 ms
classic --> vpc
疏通が確認できます。
C:\Users\Administrator>ping 192.168.10.10

Pinging 192.168.10.10 with 32 bytes of data:
Reply from 192.168.10.10: bytes=32 time=216ms TTL=51
Reply from 192.168.10.10: bytes=32 time=216ms TTL=51
Reply from 192.168.10.10: bytes=32 time=216ms TTL=51
Reply from 192.168.10.10: bytes=32 time=216ms TTL=51

Ping statistics for 192.168.10.10:
    Packets: Sent = 4, Received = 4, Lost = 0 (0% loss),
Approximate round trip times in milli-seconds:
    Minimum = 216ms, Maximum = 216ms, Average = 216ms

C:\Users\Administrator>ping 192.168.20.20

Pinging 192.168.20.20 with 32 bytes of data:
Reply from 192.168.20.20: bytes=32 time=230ms TTL=51
Reply from 192.168.20.20: bytes=32 time=230ms TTL=51
Reply from 192.168.20.20: bytes=32 time=230ms TTL=51
Reply from 192.168.20.20: bytes=32 time=230ms TTL=51

Ping statistics for 192.168.20.20:
    Packets: Sent = 4, Received = 4, Lost = 0 (0% loss),
Approximate round trip times in milli-seconds:
    Minimum = 230ms, Maximum = 230ms, Average = 230ms