Cloudflare Managed CA によるクライアント証明書認証(mTLS)
Cloudflare Managed CA を対象として考えます。
(持ち込み CA の場合は、Mutual TLS · Cloudflare Zero Trust docs を参照)
設定方法は以下のドキュメントです。
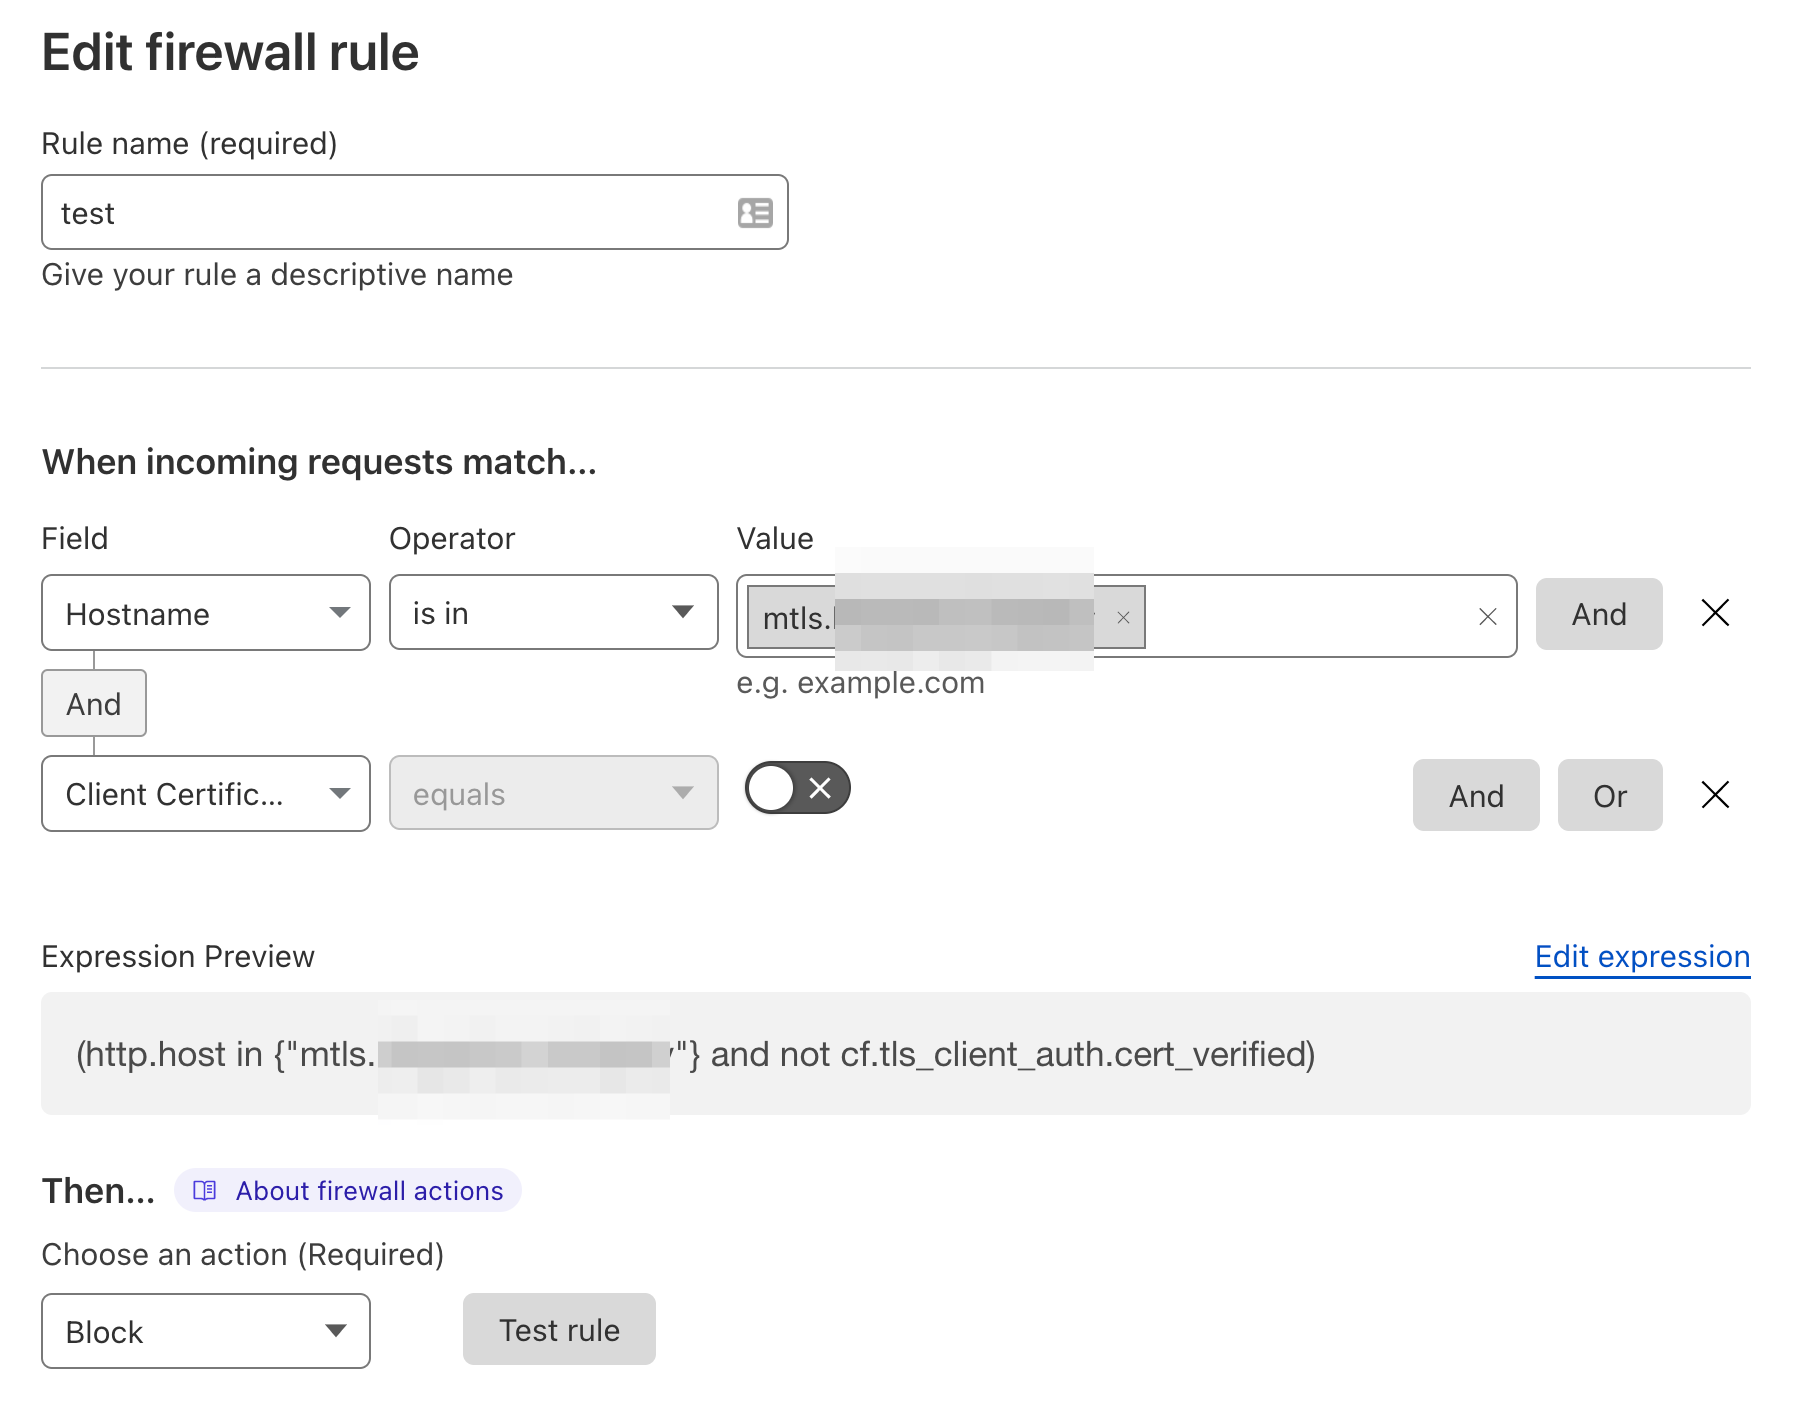
ただし、このルールだけだと、いずれかのクライアント証明書を持つ全てのアクセスが紐づけられたホストに許可されます。
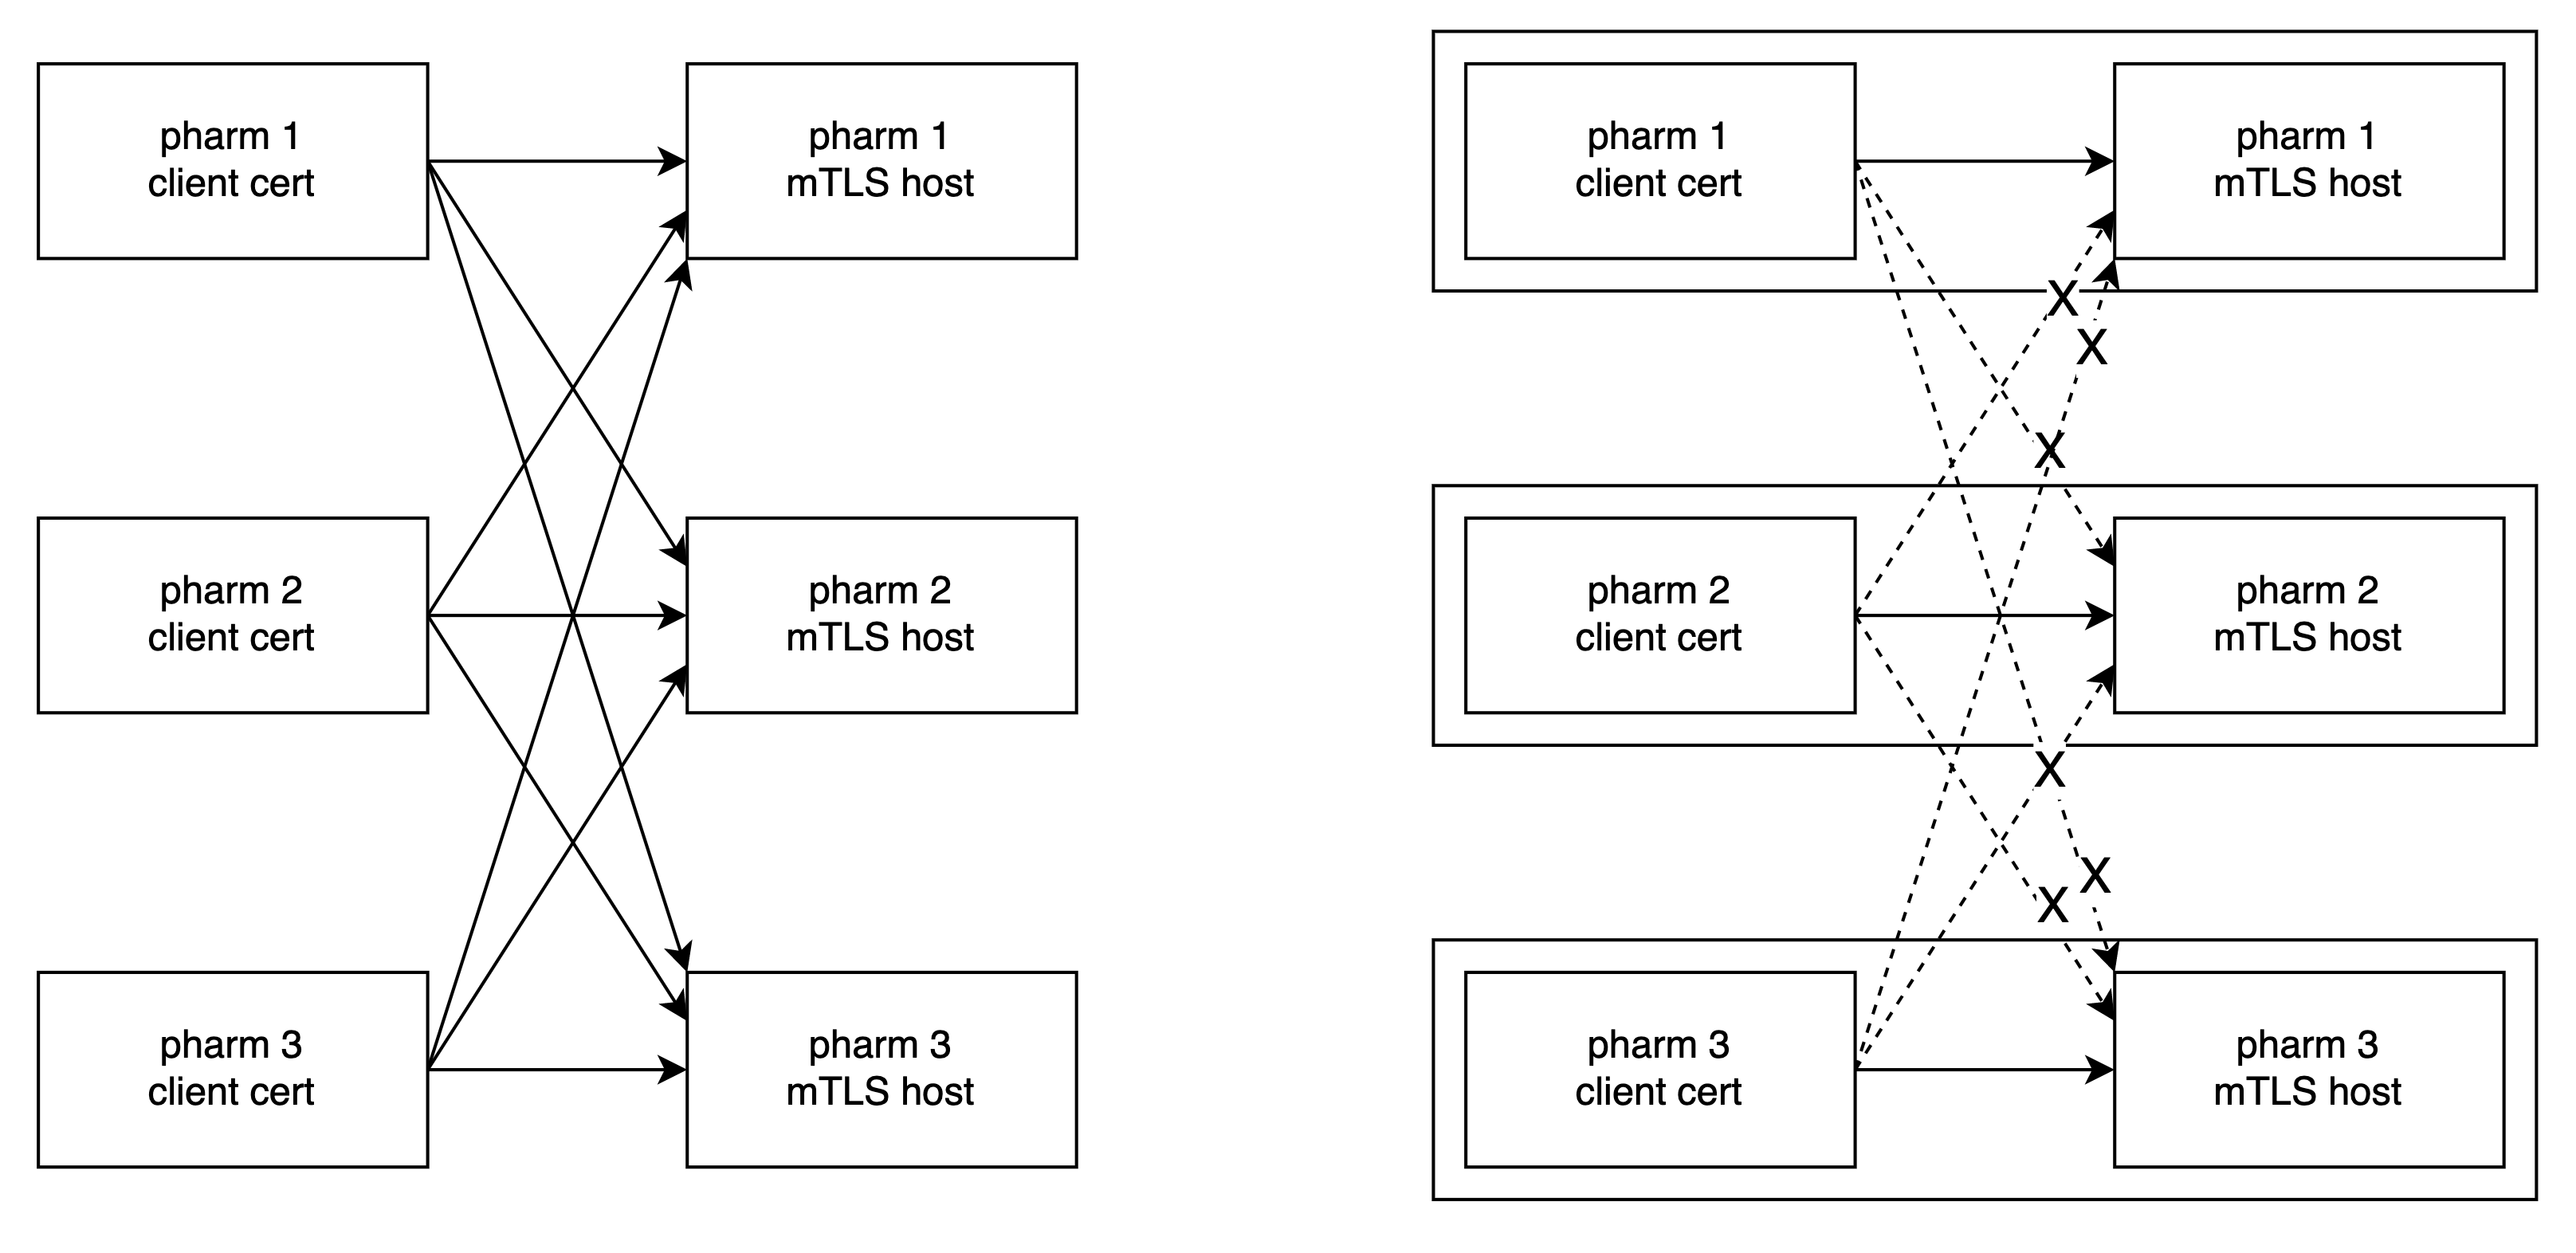
複数の対象ホスト・複数のクライアント証明書が存在する場合において、区分けができていない状態になります(左図)。
それを右図のように、クライアント証明書と対象ホストを区分けしたいというのが今回の目的です。
クライアント証明書を区別するのにどのパラメータを使えばいい?
フィンガープリントを使います。
Serial number A number that uniquely identifies the certificate and is issued by the certification authority.
Thumbprint: The hash itself, used as an abbreviated form of the public key certificate.
-
シリアル番号は、同一 CA 内で便宜的に振られる番号であり、CRL (Certificate Revocation List) という、証明書の失効情報(シリアル番号と失効日)が記載されている認証局 (CA) 毎に作成・更新されるリストで活用されているが、異なる CA であれば、同じシリアル番号が存在する可能性があり、世界中でユニークな値ではない。
- Cloudflare Workers では
request.cf.tlsClientAuth.certIssuerSerialとして取得できる。 - pem ファイルを p12 形式に変更した際にシリアル番号が変わってしまう
- Cloudflare Workers では
-
フィンガープリントは、証明書から計算される一方向ハッシュ関数の結果であり、世界中でユニークな値として扱うことができる。
- Cloudflare Workers では
request.cf.tlsClientAuth.certFingerprintSHA256として、コロンなしの英数字(例:67b26359c24b6d08a237588442b8f1fe27d510af046a524f7c18e32eee9e466e)で取得できる。(request.cf.tlsClientAuth.certFingerprintSHA1は非推奨として考えます。) - pem ファイルを p12 形式に変更してもフィンガープリントは変わらない
- Cloudflare Workers では
Request · Cloudflare Workers docs
certFingerprintSHA1, certFingerprintSHA256, certIssuerDN, certIssuerDNLegacy, certIssuerDNRFC2253, certIssuerSKI, certIssuerSerial, certNotAfter, certNotBefore, certPresented, certRevoked, certSKI, certSerial, certSubjectDN, certSubjectDNLegacy, certSubjectDNRFC2253, certVerified
クライアント証明書の準備
こちらの手順に従って、pharm1.pem、pharm2.pem、pharm3.pem を作成・保存します。
フィンガープリントは以下のように確認できた値を使います。
% openssl x509 -in pharm1.pem  -outform der | sha256sum
67b26359c24b6d08a237588442b8f1fe27d510af046a524f7c18e32eee9e466e  -
% openssl x509 -in pharm2.pem  -outform der | sha256sum
dfd7d9668b00dd0b928ed299b75cadf0c0acf83ab032a5859e86cd517a600a39  -
% openssl x509 -in pharm3.pem  -outform der | sha256sum
904deaa2d02a603231867d1da867a1daba9d6253e6e7dc67c50b6c28c05c0d11  -
Workers Script
こちらのサンプルスクリプトをベースに改変しました。
-
pharm1.example.comにpharm1.pemでアクセス -
pharm2.example.comにpharm2.pemでアクセス -
pharm3.example.comにpharm3.pemでアクセス
の組み合わせ以外では、403 のレスポンスを返します。
async function handleRequest(request) {
  try {
    const host = request.headers.get('host');
    const fingerprint = request.cf.tlsClientAuth.certFingerprintSHA256;

    // Allow only the correct client certificate, which is associated to the specific host
    if (host == 'pharm1.example.com' && fingerprint == '67b26359c24b6d08a237588442b8f1fe27d510af046a524f7c18e32eee9e466e') {
    }else if (host == 'pharm2.example.com' && fingerprint == 'dfd7d9668b00dd0b928ed299b75cadf0c0acf83ab032a5859e86cd517a600a39') {
    }else if (host == 'pharm3.example.com' && fingerprint == '904deaa2d02a603231867d1da867a1daba9d6253e6e7dc67c50b6c28c05c0d11') {
    }else{
      return new Response('Please use the correct client certificate, which is associated to the specific host.', {
        status: 403,
      });
    }

    return fetch(request);
  } catch (err) {
    console.error('request.cf does not exist in the previewer, only in production');
    return new Response('Error in workers script' + err.message, {
      status: 500,
    });
  }
}

addEventListener('fetch', event => {
  event.respondWith(handleRequest(event.request));
});
Workers 適用前の状態確認
クライアント証明書なしでは Block される (Firewall Rule が適用)
% curl -so /dev/null https://pharm1.example.com -w "%{http_code}\n"
403
% curl -so /dev/null https://pharm2.example.com -w "%{http_code}\n"
403
% curl -so /dev/null https://pharm3.example.com -w "%{http_code}\n"
403
pharm1 クライアント証明書で pharm1、pharm2、pharm3 にアクセスでき、区別がされていない状態
% curl -so /dev/null --cert pharm1.pem --key pharm1.key https://pharm1.example.com -w "%{http_code}\n"
200
% curl -so /dev/null --cert pharm1.pem --key pharm1.key https://pharm2.example.com -w "%{http_code}\n"
200
% curl -so /dev/null --cert pharm1.pem --key pharm1.key https://pharm3.example.com -w "%{http_code}\n"
200
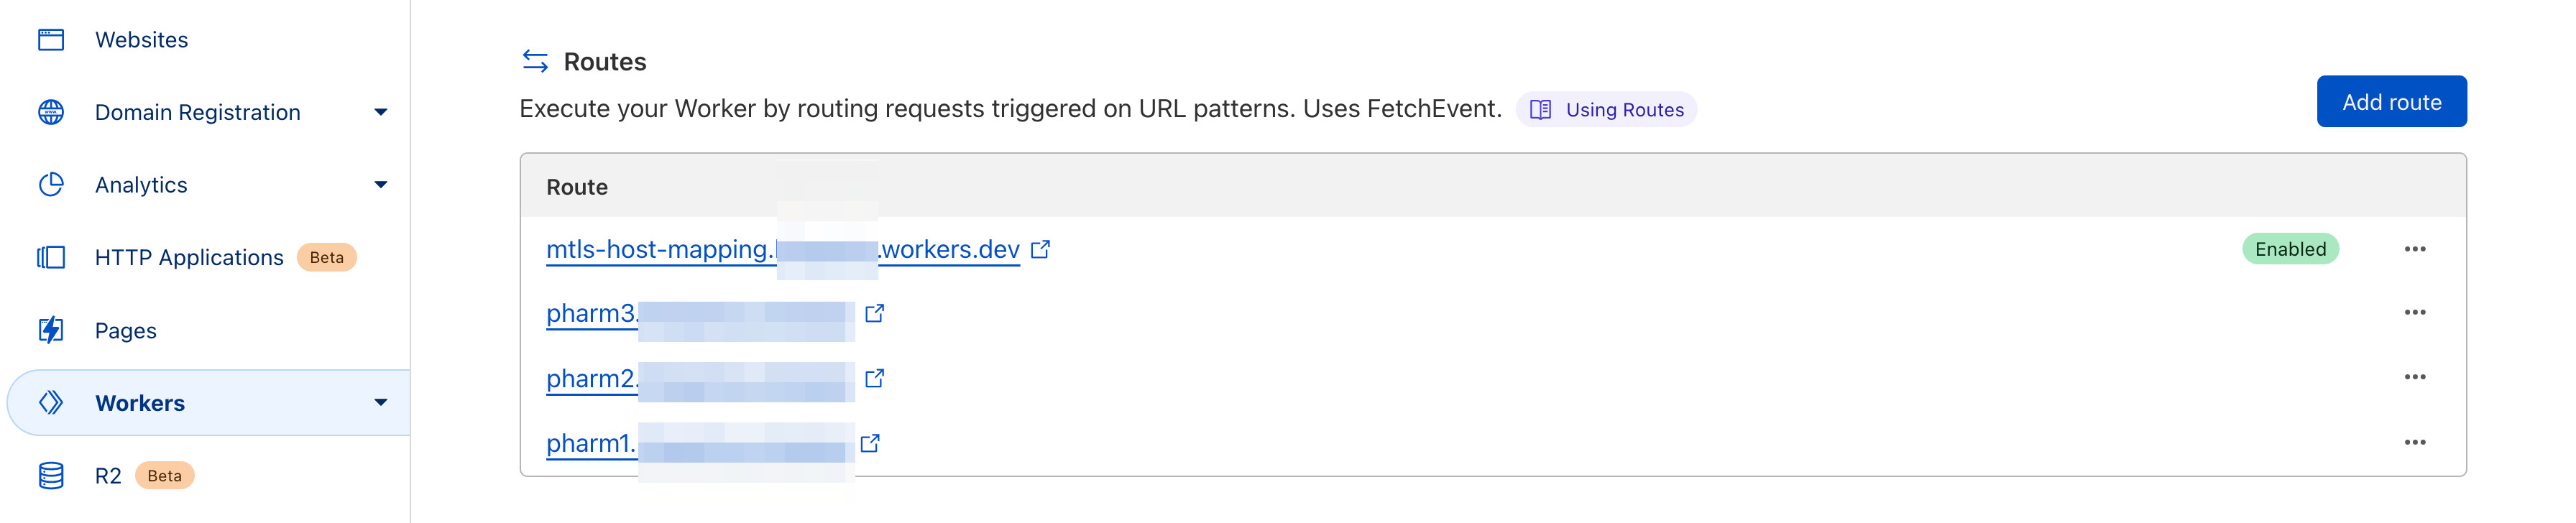
Workers 適用
対象とするホストで上記 Workers ロジックが稼働するように Route を設定します。
Workers 適用後の状態確認
クライアント証明書なしでは Block される (Firewall Rule が適用)
% curl -so /dev/null https://pharm1.example.com -w "%{http_code}\n"
403
% curl -so /dev/null https://pharm2.example.com -w "%{http_code}\n"
403
% curl -so /dev/null https://pharm3.example.com -w "%{http_code}\n"
403
pharm1 クライアント証明書で pharm1のみにアクセスでき、区分けがされている状態(pharm2、pharm3も同様)(Workers ロジックが適用)
% curl -so /dev/null --cert pharm1.pem --key pharm1.key https://pharm1.example.com -w "%{http_code}\n"
200
% curl -so /dev/null --cert pharm1.pem --key pharm1.key https://pharm2.example.com -w "%{http_code}\n"
403
% curl -so /dev/null --cert pharm1.pem --key pharm1.key https://pharm3.example.com -w "%{http_code}\n"
403
---
% curl -so /dev/null --cert pharm2.pem --key pharm2.key https://pharm1.example.com -w "%{http_code}\n"
403
% curl -so /dev/null --cert pharm2.pem --key pharm2.key https://pharm2.example.com -w "%{http_code}\n"
200
% curl -so /dev/null --cert pharm2.pem --key pharm2.key https://pharm3.example.com -w "%{http_code}\n"
403
---
% curl -so /dev/null --cert pharm3.pem --key pharm3.key https://pharm1.example.com -w "%{http_code}\n"
403
% curl -so /dev/null --cert pharm3.pem --key pharm3.key https://pharm2.example.com -w "%{http_code}\n"
403
% curl -so /dev/null --cert pharm3.pem --key pharm3.key https://pharm3.example.com -w "%{http_code}\n"
200
まとめ
Cloudflare Workers を組み合わせることで、クライアント証明書利用時の付加情報を活用したアクセス制御を行うことができました。
今回は使いませんでしたが、Workers KV を使ったリスト管理もあり得ます。
こうした機能をオリジンに求めることなく、エッジサービスとしてすぐに利用できるのが Cloudflare の良いところだと感じました。
以上
参考:pem --> p12 変更時にシリアル番号が変わる例
% cfssl certinfo -cert pharm1.pem | jq -r .serial_number
104554697899914447591574248515612823537462555953
openssl pkcs12 -export -nodes \
-in pharm1.pem \
-inkey pharm1.key \
-out pharm1.p12  \
-passout pass:password \
-name "pharm1 client cert"
% keytool -list -v -keystore pharm1.p12 -storetype PKCS12 -storepass password | grep Serial
Serial number: 12506511d54ca5d18c808ea67c8b91b06ba03531
参考:pem --> p12 変更時にフィンガープリントが変わらない例
 % openssl x509 -sha256 -fingerprint -noout -in pharm1.pem
SHA256 Fingerprint=67:B2:63:59:C2:4B:6D:08:A2:37:58:84:42:B8:F1:FE:27:D5:10:AF:04:6A:52:4F:7C:18:E3:2E:EE:9E:46:6E
openssl pkcs12 -export -nodes \
-in pharm1.pem \
-inkey pharm1.key \
-out pharm1.p12  \
-passout pass:password \
-name "pharm1 client cert"
% keytool -list -v -keystore pharm1.p12 -storetype PKCS12 -storepass password | grep SHA256:
	 SHA256: 67:B2:63:59:C2:4B:6D:08:A2:37:58:84:42:B8:F1:FE:27:D5:10:AF:04:6A:52:4F:7C:18:E3:2E:EE:9E:46:6E
参考:keytool のインストール
brew install java11
% which keytool
/usr/bin/keytool
keytool -list -v -keystore pharm1.p12 -storetype PKCS12 -storepass password
参考:Cloudflare Managed CA から複数発行したクライアント証明書の差分
% diff <(cfssl certinfo -cert pharm1.pem) <(cfssl certinfo -cert pharm2.pem)
26,28c26,28
<   "serial_number": "104554697899914447591574248515612823537462555953",
<   "not_before": "2022-09-05T02:53:00Z",
<   "not_after": "2023-09-05T02:53:00Z",
---
>   "serial_number": "669033804668770017759053154727916399317657217507",
>   "not_before": "2022-09-05T02:54:00Z",
>   "not_after": "2024-09-04T02:54:00Z",
31,32c31,32
<   "subject_key_id": "56:DE:BF:FC:61:A8:D8:0C:CF:D2:B1:01:29:F9:57:07:5F:6D:50:6A",
<   "pem": "-----BEGIN CERTIFICATE-----\nxxx\n-----END CERTIFICATE-----\n"
---
>   "subject_key_id": "E9:84:07:DC:BA:B8:52:32:0B:B9:A7:40:34:55:2A:56:11:60:5F:0A",
>   "pem": "-----BEGIN CERTIFICATE-----\nxxx\n-----END CERTIFICATE-----\n"