Cloudflare Zero Trust Root CA 証明書の期限切れ
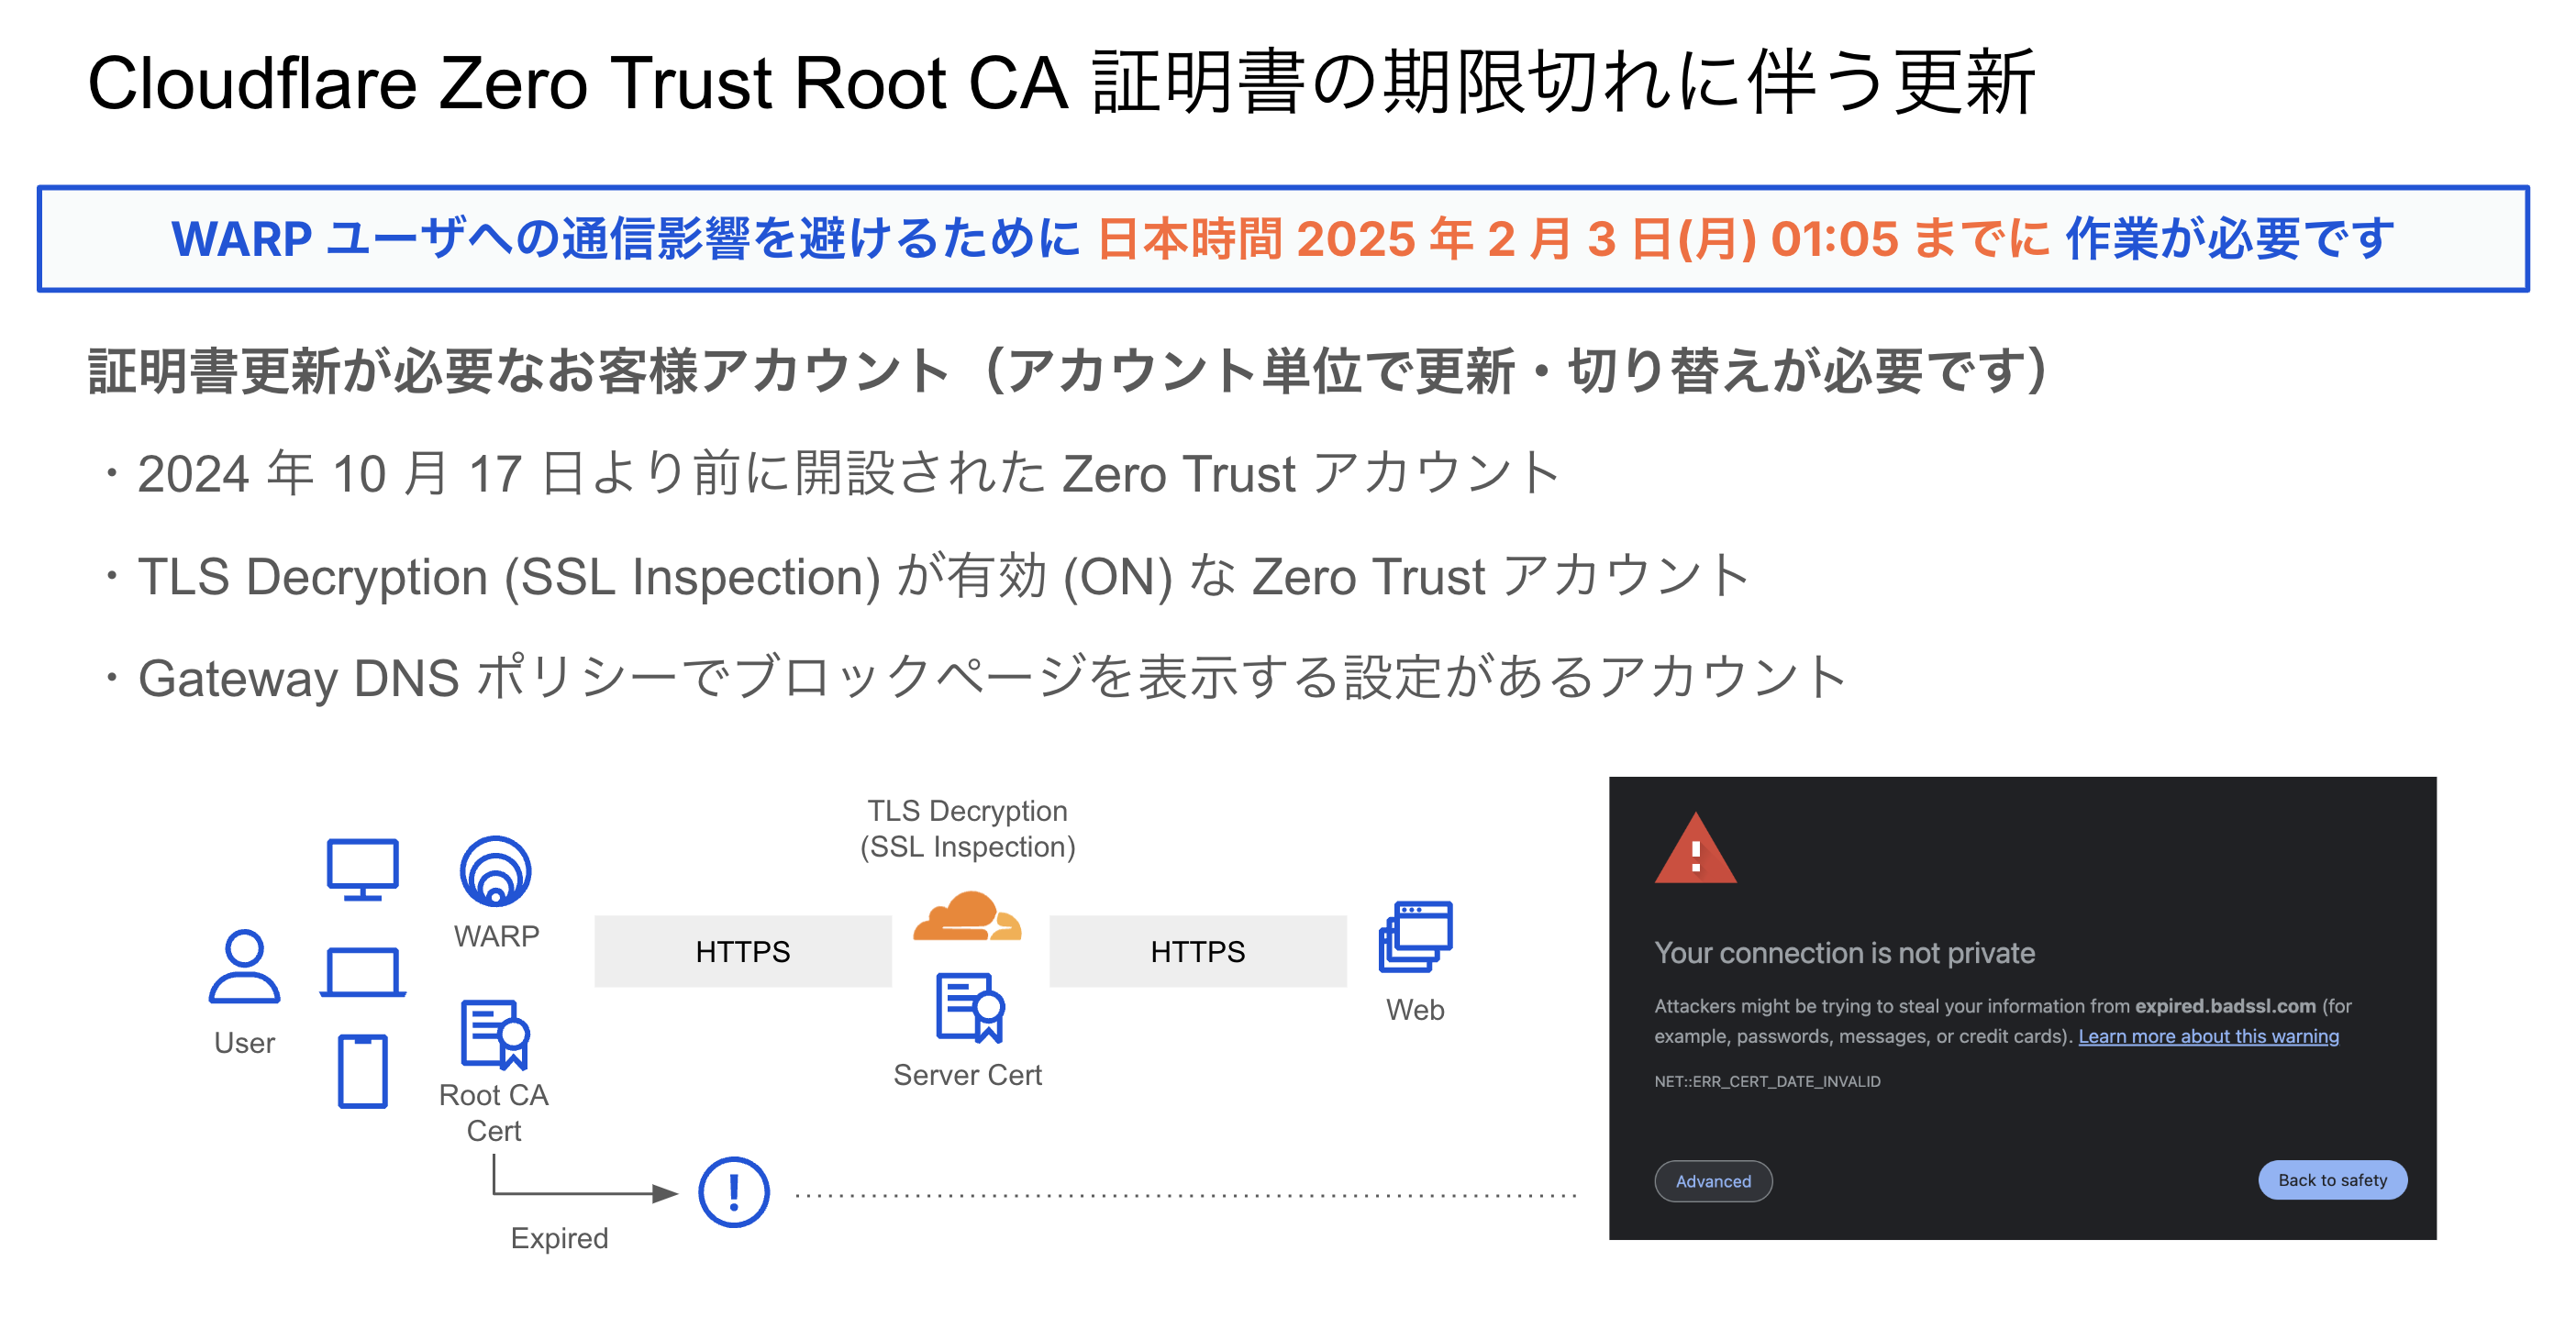
WARP ユーザへの通信影響を避けるために 日本時間 2025 年 2 月 3 日(月) 01:05 までに 作業が必要です
User-side certificates · Cloudflare Zero Trust docs
デフォルトのグローバル Cloudflare ルート証明書の有効期限は 2025年2月3日です。2024年10月17日より前にデフォルトの Cloudflare 証明書をインストールした場合は、検査エラーを避けるために、新しい証明書を生成し、Zero Trust 組織用に有効化する必要があります。
更新手順
以下のような手順で Cloudflare Zero Trust Root CA 証明書の更新作業が必要です。
0. 既存証明書の確認
GUI
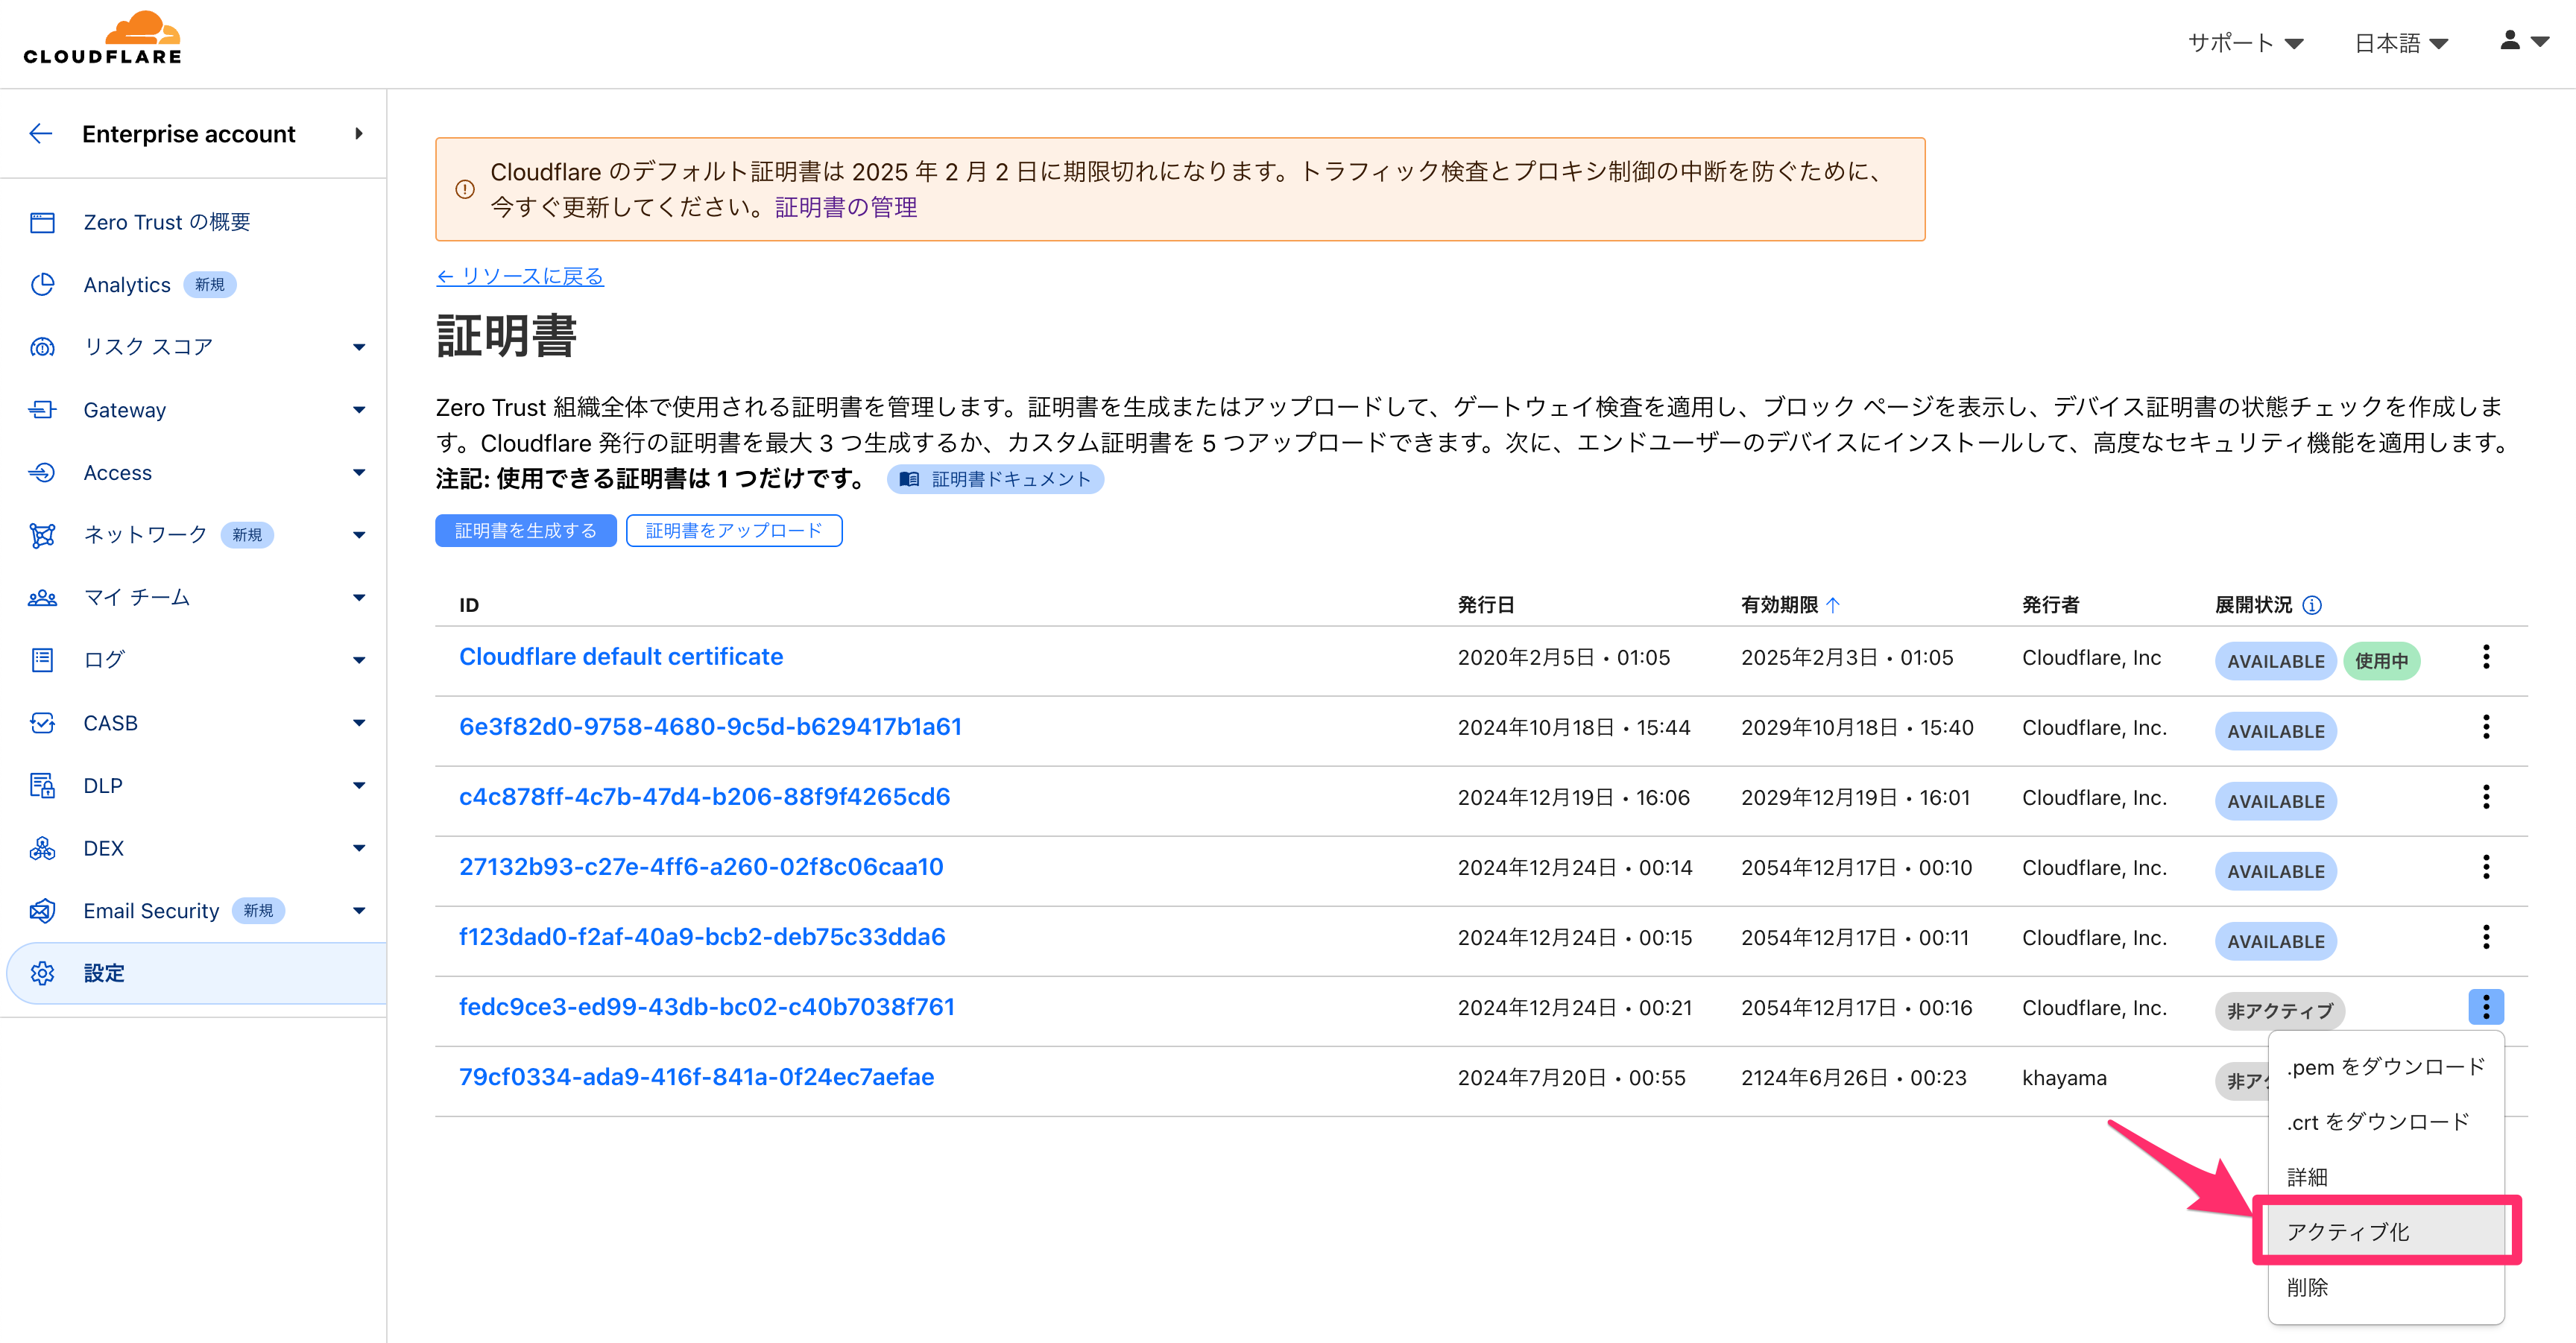
「設定 > リソース > 証明書 > 管理」から、現在「使用中」の証明書の有効期限が確認できます。
API
settings.certificate.id が存在しなければ、デフォルトの Cloudflare Root CA が使用されます。
certificate?: {
Certificate settings for Gateway TLS interception. If not specified, the Cloudflare Root CA will be used.id: string
UUID of certificate to be used for interception. Certificate must be active on the edge. A nil UUID will indicate the Cloudflare Root CA should be used.}
export EMAIL='YOUR_EMAIL'
export APIKEY='YOUR_APIKEY'
export ACCOUNT_ID='YOUR_ACCOUNT_ID'

curl -s https://api.cloudflare.com/client/v4/accounts/$ACCOUNT_ID/gateway/configuration -X GET \
     -H "X-Auth-Email: $EMAIL" \
     -H "X-Auth-Key: $APIKEY" \
     -H "Content-Type: application/json" | jq '.result.settings.certificate'
1. 証明書の生成
GUI
生成する証明書の有効期間は、1 日以上 30 年以内で指定する必要があります。
指定がない場合、証明書の有効期間はデフォルトで 5 年です。
24 時間以内に最大 3 つの証明書を作成できます。必要に応じて証明書を削除してください。
API
{"validity_period_days": 10950} でカスタム日数指定することで、30 年先まで有効なルート証明書がアカウントごとに発行できます。
curl -s https://api.cloudflare.com/client/v4/accounts/$ACCOUNT_ID/gateway/certificates -X POST \
     -H "X-Auth-Email: $EMAIL" \
     -H "X-Auth-Key: $APIKEY" \
     -H "Content-Type: application/json" \
     -d '{"validity_period_days": 10950}' | jq
{
  "result": {
    "in_use": false,
    "id": "xxx",
    "certificate": "-----BEGIN CERTIFICATE-----\nxxx\n-----END CERTIFICATE-----\n",
    "issuer_org": "Cloudflare, Inc.",
    "issuer_raw": "CN=Gateway CA - Cloudflare Managed G1 YOUR_ACCOUNT_ID,OU=www.cloudflare.com,O=Cloudflare\\, Inc.,L=San Francisco,ST=California,C=US",
    "fingerprint": "xxx",
    "binding_status": "inactive",
    "qs_pack_id": "00000000-0000-0000-0000-000000000000",
    "type": "gateway_managed",
    "updated_at": "0001-01-01T00:00:00Z",
    "uploaded_on": "0001-01-01T00:00:00Z",
    "created_at": "2024-10-18T06:44:40.154205Z",
    "expires_on": "2054-10-18T06:40:00Z"
  },
  "success": true,
  "errors": [],
  "messages": []
}
2. 証明書のアクティブ化
GUI
ステータスが AVAILABLE の証明書は、「Install certificate using WARP」の機能で、WARP を使用してユーザーのデバイスにインストールできます。
API
inactive な証明書をアクティベートし、 pending_deployment から active になることを確認します。
export CERT_ID='YOUR_CERT_ID'

curl -s https://api.cloudflare.com/client/v4/accounts/$ACCOUNT_ID/gateway/certificates/$CERT_ID/activate \ -X POST \
     -H "X-Auth-Email: $EMAIL" \
     -H "X-Auth-Key: $APIKEY" \
     -H "Content-Type: application/json" \
     -d '{}' | jq
{
  "result": {
    "in_use": false,
    "id": "xxx",
    "certificate": "-----BEGIN CERTIFICATE-----\nxxx\n-----END CERTIFICATE-----\n",
    "issuer_org": "Cloudflare, Inc.",
    "issuer_raw": "CN=Gateway CA - Cloudflare Managed G1 YOUR_ACCOUNT_ID,OU=www.cloudflare.com,O=Cloudflare\\, Inc.,L=San Francisco,ST=California,C=US",
    "fingerprint": "xxx",
    "binding_status": "pending_deployment",
    "qs_pack_id": "00000000-0000-0000-0000-000000000000",
    "type": "gateway_managed",
    "updated_at": "0001-01-01T00:00:00Z",
    "uploaded_on": "0001-01-01T00:00:00Z",
    "created_at": "2024-10-18T06:44:40.154205Z",
    "expires_on": "2054-10-18T06:40:00Z"
  },
  "success": true,
  "errors": [],
  "messages": []
}
curl -s https://api.cloudflare.com/client/v4/accounts/$ACCOUNT_ID/gateway/certificates/$CERT_ID -X GET \
     -H "X-Auth-Email: $EMAIL" \
     -H "X-Auth-Key: $APIKEY" \
     -H "Content-Type: application/json" | jq
{
  "result": {
    "in_use": false,
    "id": "xxx",
    "certificate": "-----BEGIN CERTIFICATE-----\nxxx\n-----END CERTIFICATE-----\n",
    "issuer_org": "Cloudflare, Inc.",
    "issuer_raw": "CN=Gateway CA - Cloudflare Managed G1 YOUR_ACCOUNT_ID,OU=www.cloudflare.com,O=Cloudflare\\, Inc.,L=San Francisco,ST=California,C=US",
    "fingerprint": "xxx",
    "binding_status": "active",
    "qs_pack_id": "00000000-0000-0000-0000-000000000000",
    "type": "gateway_managed",
    "updated_at": "0001-01-01T00:00:00Z",
    "uploaded_on": "0001-01-01T00:00:00Z",
    "created_at": "2024-10-18T06:44:40.154205Z",
    "expires_on": "2054-10-18T06:40:00Z"
  },
  "success": true,
  "errors": [],
  "messages": []
}
3. 証明書のインストール
Windows デバイスでは、Install certificate using WARP によって、自動的に証明書をインストールし、信頼します。
Install certificate using WARP は、AVAILABLE に設定された証明書をダウンロードするようになります。新しく利用可能になった証明書がユーザーのデバイスにダウンロードされるまで、最大24時間かかる場合があります。
デバイスへのダウンロードを即時強制したい場合は、warp-cli tunnel rotate-keys によって、すぐに新しい証明書を WARP デバイスに強制配備できます。
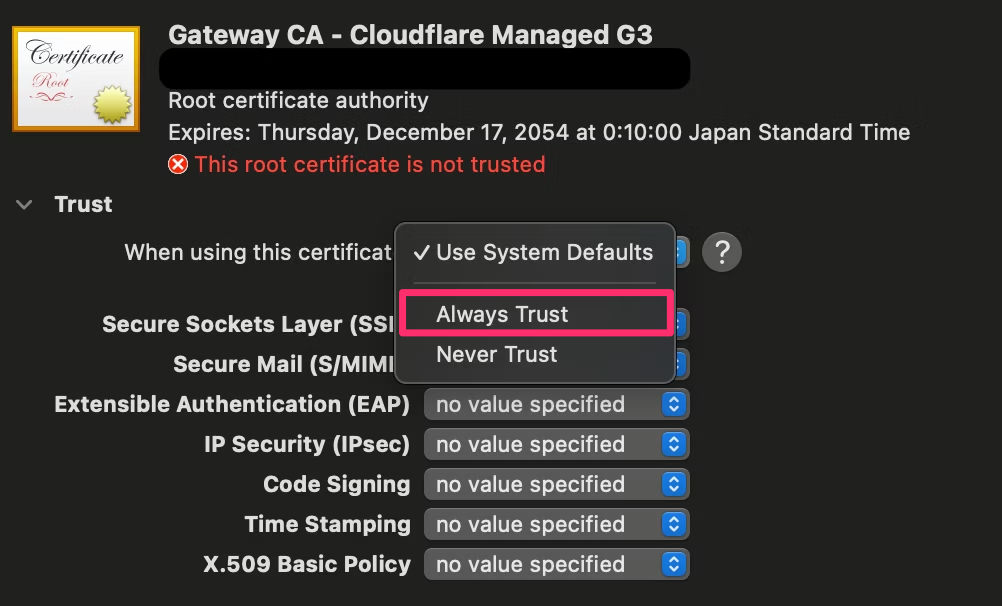
macOS Big Sur 以降では、Install certificate using WARP によって、証明書を自動的に信頼することができません。
追加の対応として、個別に手動で信頼する、もしくは組織のすべてのデバイスで証明書が自動的に信頼されるように、モバイルデバイス管理(MDM)ツールを設定することが考えられます。
| Manually | With MDM | Using WARP | |
|---|---|---|---|
| Windows |
Version 2024.12.554.0 or later (Automatically installed and trusted) |
||
| macOS |
Version 2024.12.554.0 or later (Need to trust manually) |
||
| Linux | |||
| iOS | |||
| Android | |||
| ChromeOS |
Windows using WARP Version 2024.12.554.0
- 「設定 > WARP クライアント > グローバル設定 > システム証明書ストアに CA をインストールする」を有効にします。
- Cloudflare WARP Windows Release から Version 2024.12.554.0 をインストールします。
Cloudflare WARP Windows Latest release
— kyhayama (@kyhayama) December 20, 2024
Version 2024.12.554.0
Dec 20, 2024 at 07:24
--
Adds support for installing all available custom gateway certificates from an account to the system store.https://t.co/NidgfsKUxQ pic.twitter.com/1C5fzSJne6
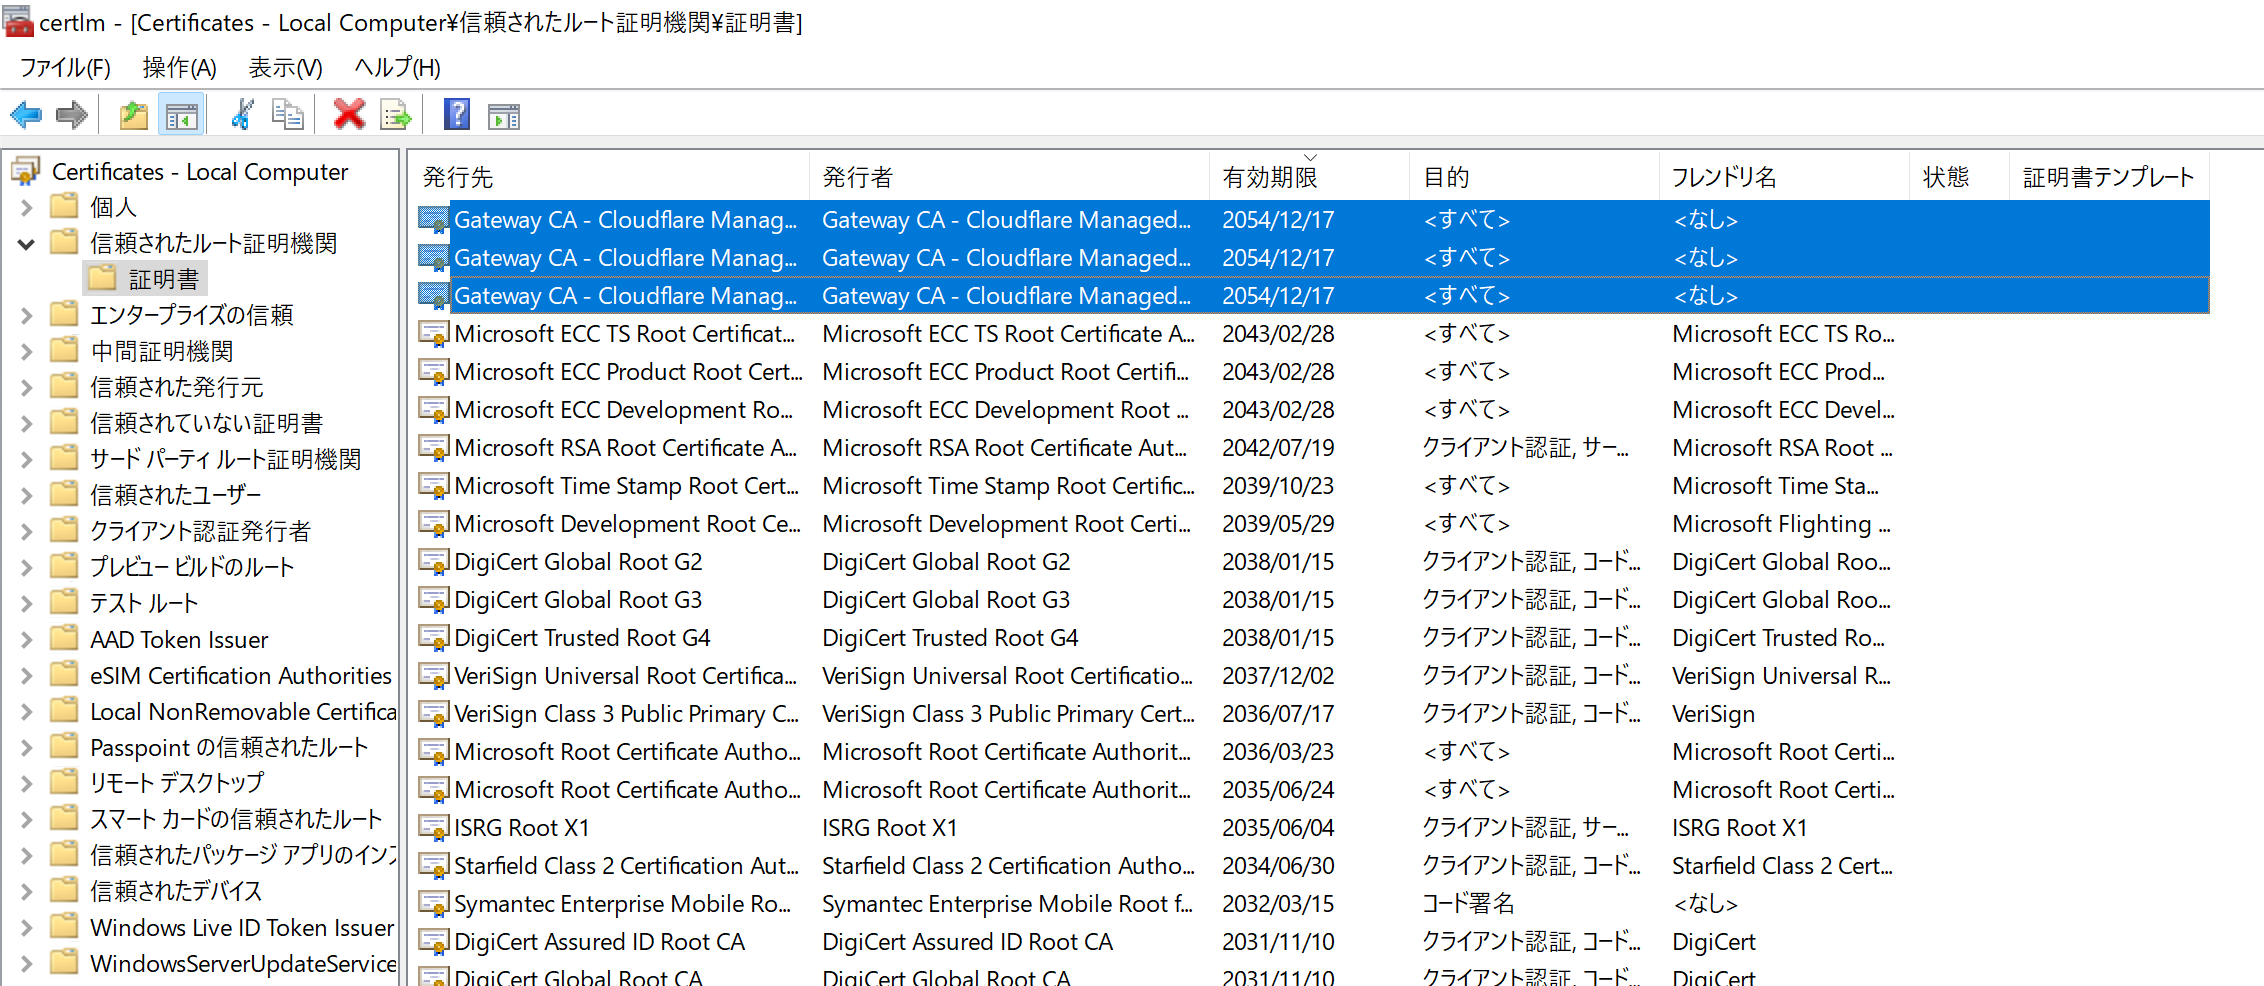
インストールされた証明書の一覧を確認するには、管理者として Command Prompt を実行した上で、以下のコマンドを実行します。
certlm.msc
「信頼されたルート証明機関 > 証明書」に信頼済み証明書としてインストールされることが確認できます。
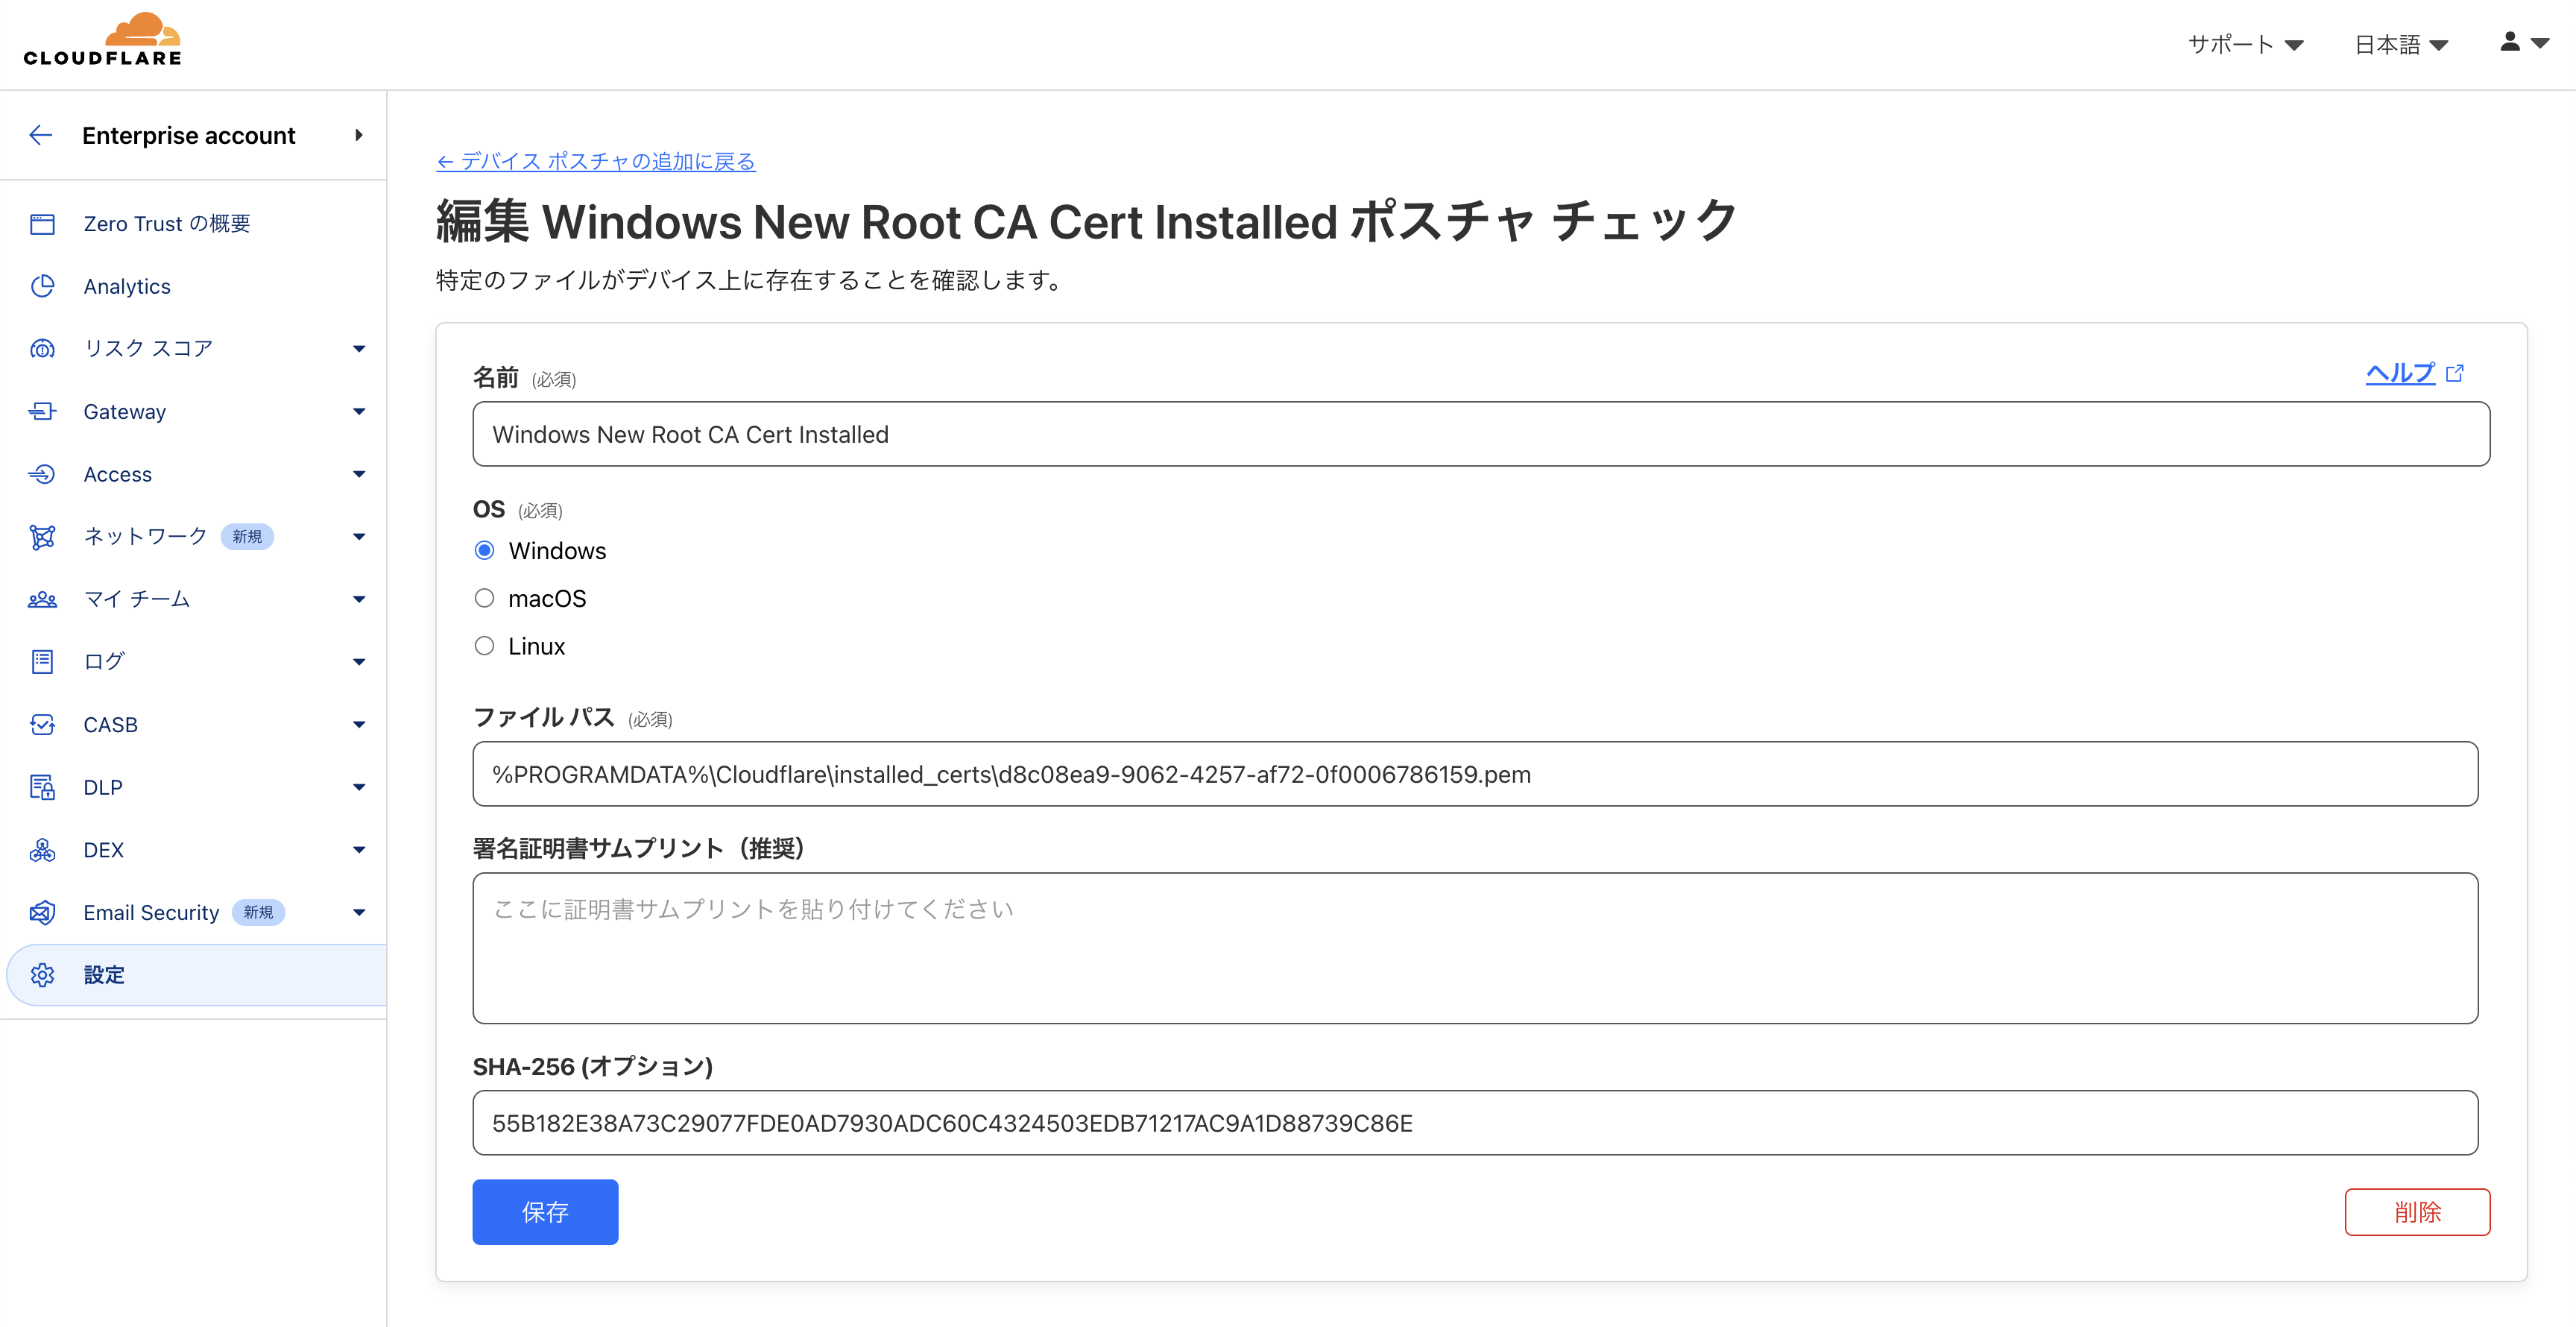
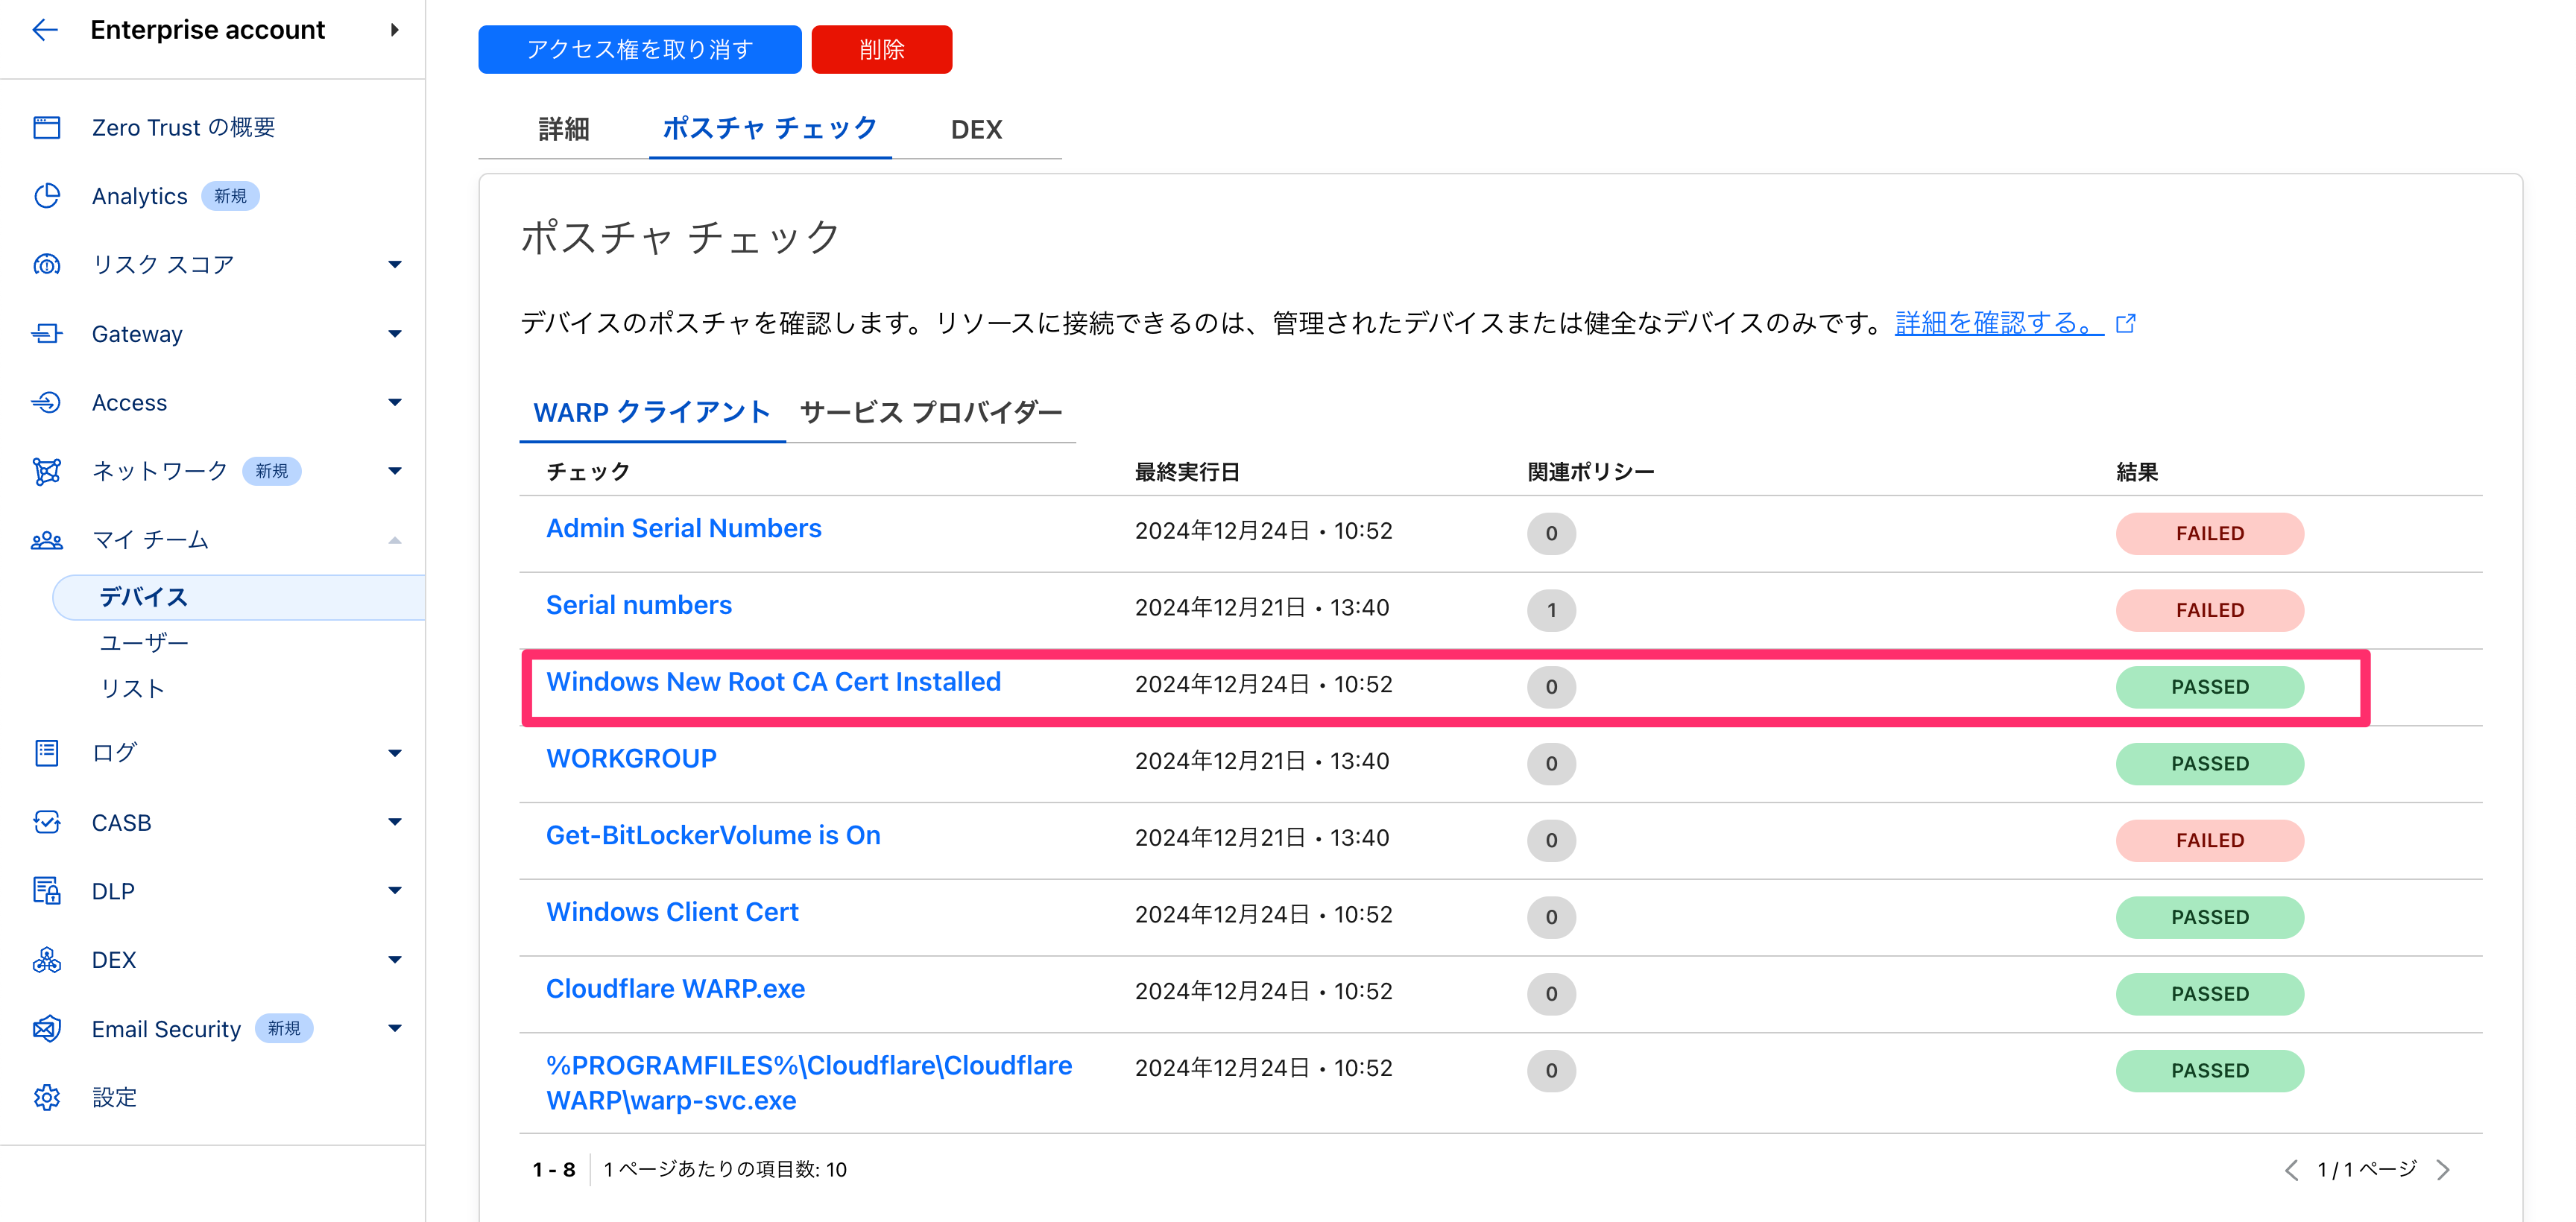
また、WARP クライアントによるデバイスポスチャで、以下のファイルチェックを設定することで、管理者側からデバイス全体に配布されたかどうかを確認できます。
%PROGRAMDATA%\Cloudflare\installed_certs\<CERT_ID>.pem
macOS using WARP Version 2024.12.554.0
以下の設定と WARP バージョンを使用します。
- 「設定 > WARP クライアント > グローバル設定 > システム証明書ストアに CA をインストールする」を有効にします。
- Cloudflare WARP macOS Release から Version 2024.12.554.0 をインストールします。
Cloudflare WARP macOS Latest release
— kyhayama (@kyhayama) December 20, 2024
Version 2024.12.554.0 (20241219.55)
Dec 20, 2024 at 07:33
---
Adds support for installing all available custom gateway certificates from an account to the system store.https://t.co/gYrVzTLjGf pic.twitter.com/xMo95JlEvU
証明書のインストールログは warp-diag の daemon.log から以下のような内容が確認できます。
macOS Sequoia を使用したため、証明書を自動的に信頼することに失敗している様子も確認できます。
% cat Downloads/warp-debugging-info-20241223-160849/daemon.log | grep _ca
2024-12-23T03:10:30.990Z DEBUG actor_root_ca: Initializing root-ca actor
2024-12-23T03:10:30.990Z DEBUG actor_root_ca: Sleeping for 15s to allow main loop boot-up
2024-12-23T03:10:31.003Z DEBUG main_loop: warp::storage::registration: Error loading registration config, fetching a new one Error("missing field `install_root_ca`", line: 1, column: 24491)
2024-12-23T03:10:45.991Z DEBUG actor_root_ca::handler: Starting root-ca actor loop
2024-12-23T03:10:47.111Z  INFO actor_root_ca::handler: Applying account certificate(s) cert_ids=["6e3f82d0-9758-4680-9c5d-b629417b1a61", "c4c878ff-4c7b-47d4-b206-88f9f4265cd6"]
2024-12-23T03:10:47.310Z  INFO root_ca: Installing new root CA certificate total=2
2024-12-23T03:10:47.357Z  WARN root_ca: Failed to automatically trust certificates installed err=InstallFailed(Custom { kind: Other, error: "SecTrustSettingsSetTrustSettings: The authorization was denied since no user interaction was possible.\n" })
2024-12-23T03:10:47.357Z  INFO root_ca::utils: Successfully wrote certs to separate files destination="/Library/Application Support/Cloudflare/installed_certs"
2024-12-23T03:10:47.357Z DEBUG root_ca::store: Done installing certificate(s) total=2
2024-12-23T03:10:59.738Z  INFO actor_root_ca::handler: Applying account certificate(s) cert_ids=[]
2024-12-23T03:10:59.739Z  INFO root_ca: Removing cert from trust store fingerprint="E1804F9F3BE727C0FB9886098F1ED54E915E1229"
2024-12-23T03:10:59.770Z  INFO root_ca: Removing cert from trust store fingerprint="5E6A25FE165022165C58004C93E17A6C648043A1"
2024-12-23T03:10:59.793Z DEBUG root_ca::store: Done installing certificate(s) total=0
2024-12-23T03:11:05.163Z  INFO actor_root_ca::handler: Applying account certificate(s) cert_ids=[]
2024-12-23T03:11:05.164Z DEBUG root_ca::store: Done installing certificate(s) total=0
インストールされた証明書の一覧を取得するには、以下のコマンドを実行します。
% security find-certificate -a /Library/Keychains/System.keychain | awk -F'"' '/alis/{print $4}' | grep Gateway
Gateway CA - Cloudflare Managed G4 YOUR_ACCOUNT_ID
Gateway CA - Cloudflare Managed G1 YOUR_ACCOUNT_ID
Gateway CA - Cloudflare Managed G3 YOUR_ACCOUNT_ID
Gateway CA - Cloudflare Managed G2 YOUR_ACCOUNT_ID
これらの証明書を信頼するには、以下のコマンドを実行します。
security find-certificate -a /Library/Keychains/System.keychain | awk -F'"' '/alis/{print $4}' | grep Gateway | while read line
do
  security -v find-certificate -c $line -p /Library/Keychains/System.keychain > $line.pem
  sudo security add-trusted-cert -d -r trustRoot -k "/Library/Keychains/System.keychain" $line.pem
done
もしくは Keychain Access のアプリを使って、証明書の確認と信頼ができます。
open /System/Library/CoreServices/Applications/Keychain\ Access.app
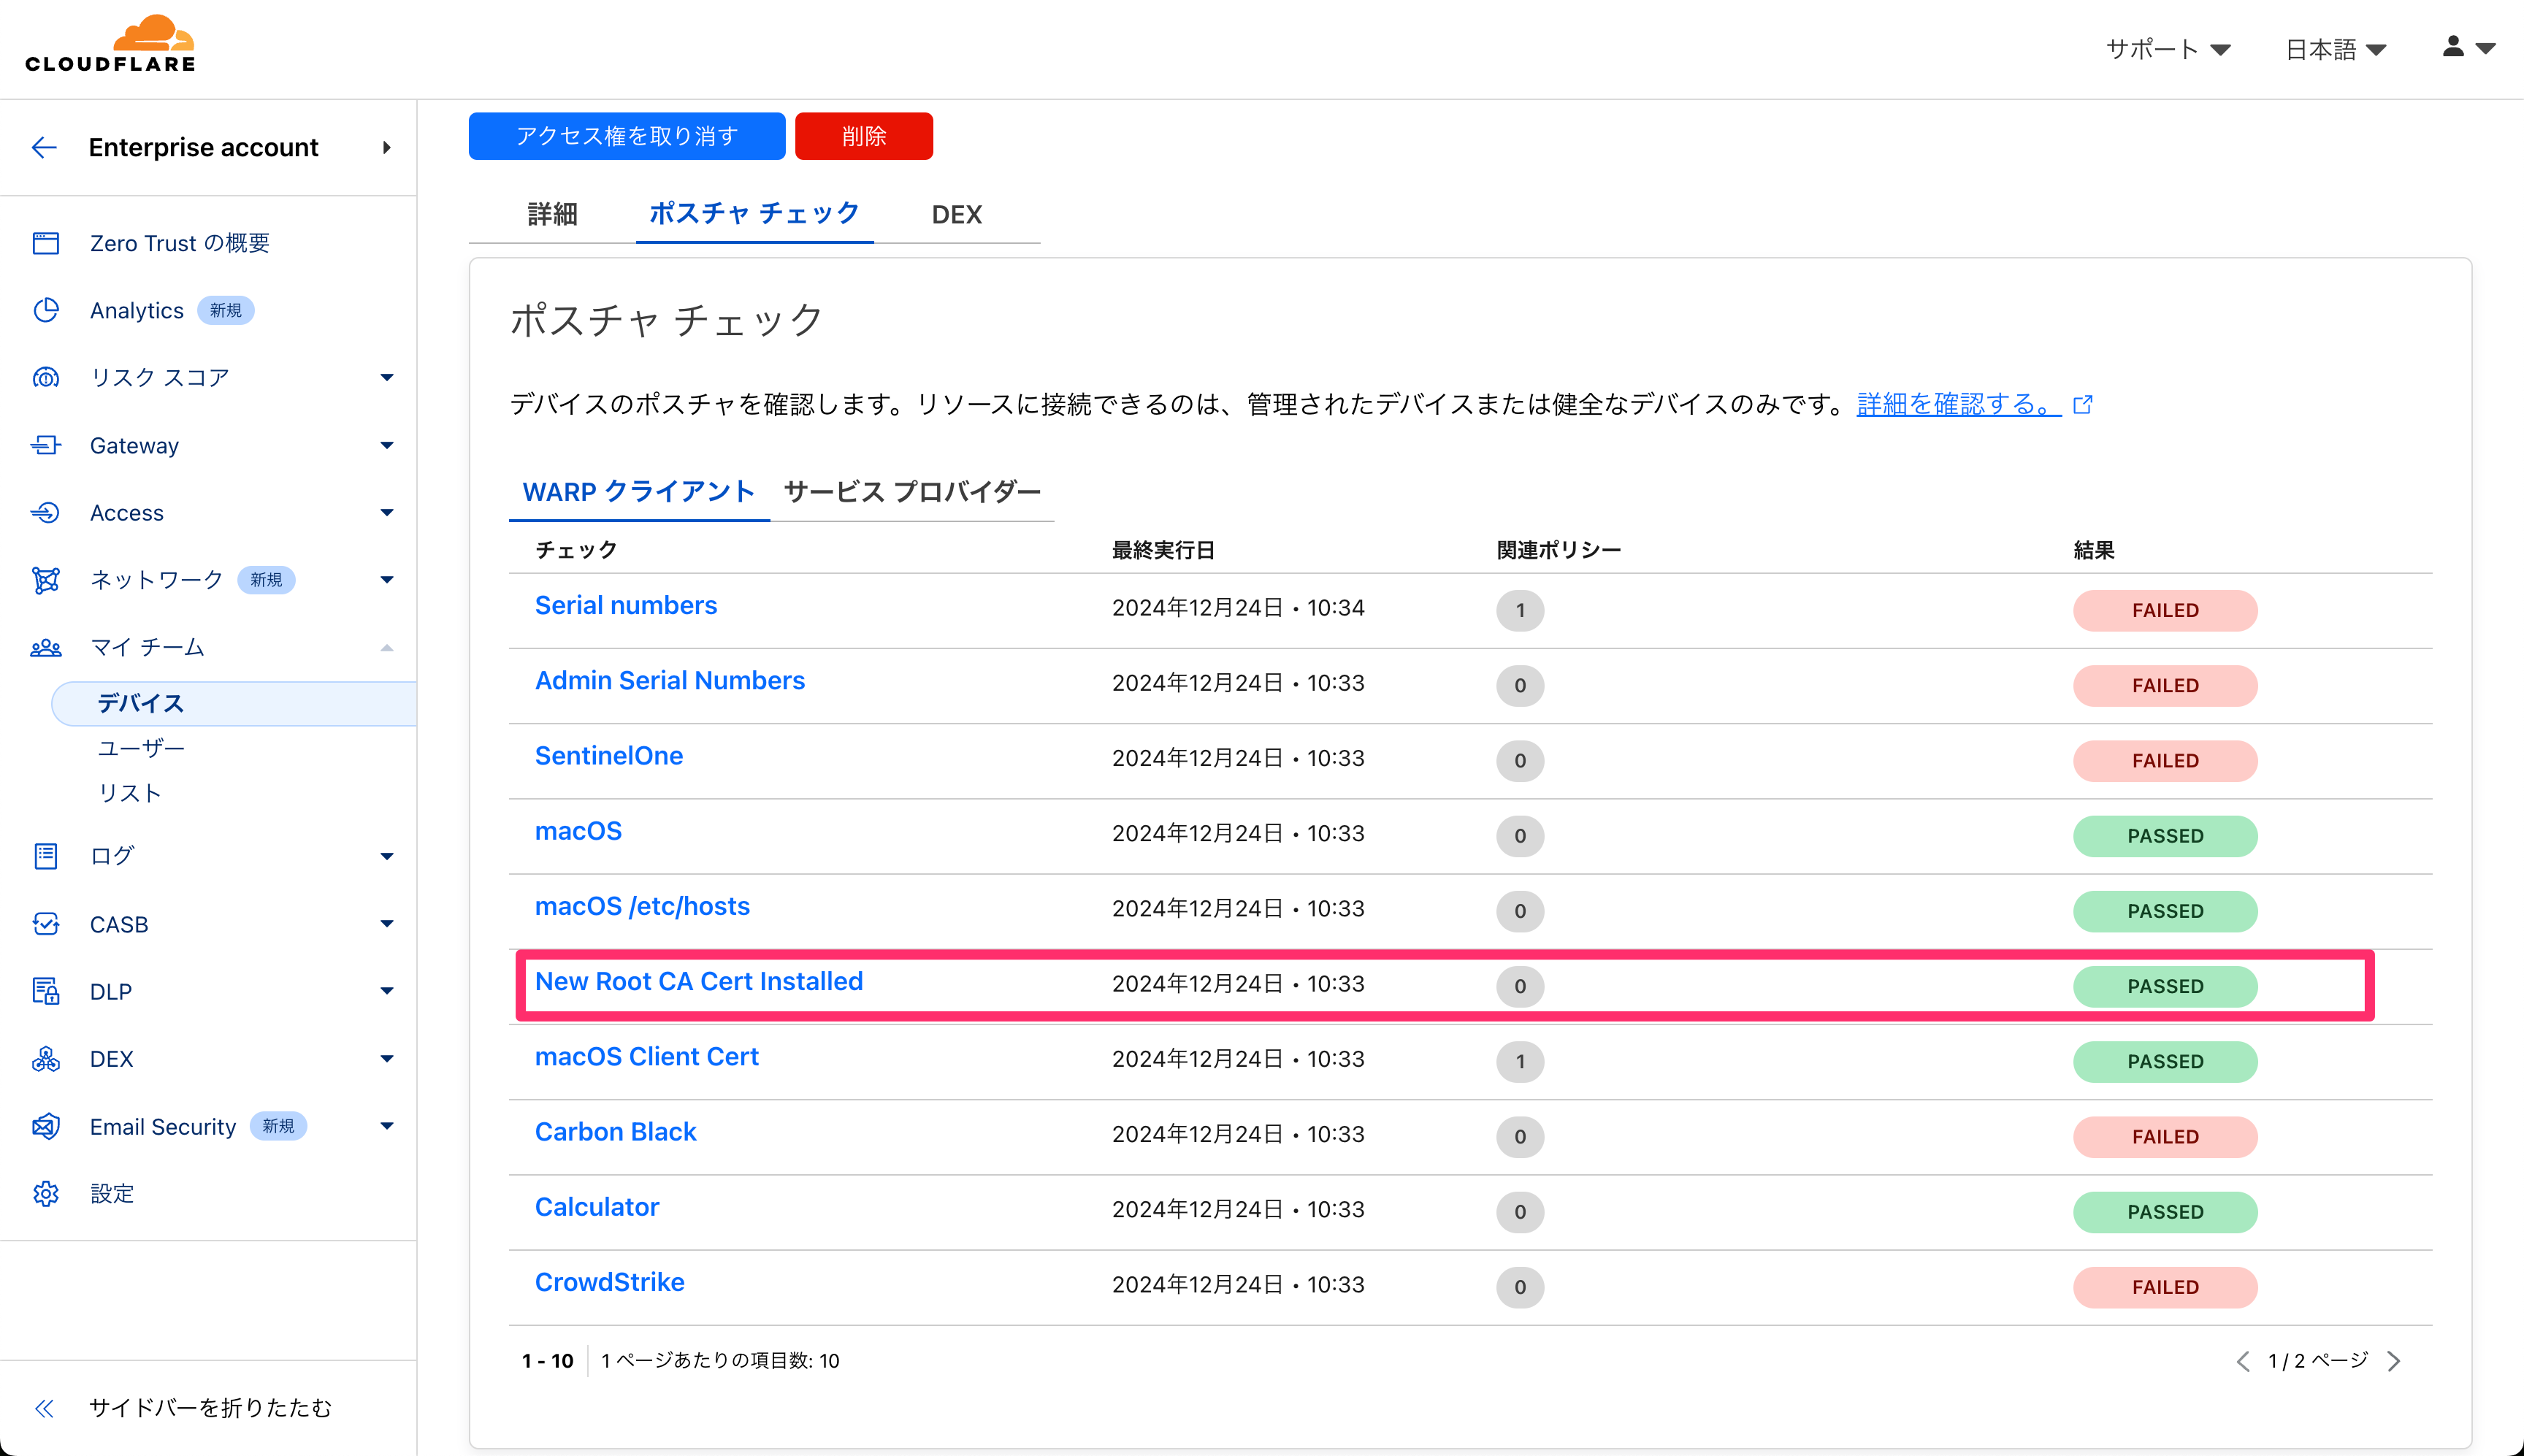
また、WARP クライアントによるデバイスポスチャで、以下のファイルチェックを設定することで、管理者側からデバイス全体に配布されたかどうかを確認できます。
/Library/Application Support/Cloudflare/installed_certs/<CERT_ID>.pem
4. 証明書の有効化(切り替え)
使用中 のステータスに設定することができる証明書はアカウントごとに 1 つのみです。
アカウントに属するデバイス全体へ証明書が事前に配布されたことを確認してから切り替えるようにしてください。
GUI
各証明書の詳細から「証明書を確認して有効にする」ボタンを押すと、即時切り替わります。
API
以下のコマンドを実行します。
curl -s https://api.cloudflare.com/client/v4/accounts/$ACCOUNT_ID/gateway/configuration \
     -H "X-Auth-Email: $EMAIL" \
     -H "X-Auth-Key: $APIKEY" \
     -H "Content-Type: application/json" \
     -d '{"settings": {"certificate": {"id": "'$CERT_ID'"}} }' | jq
5. 接続確認
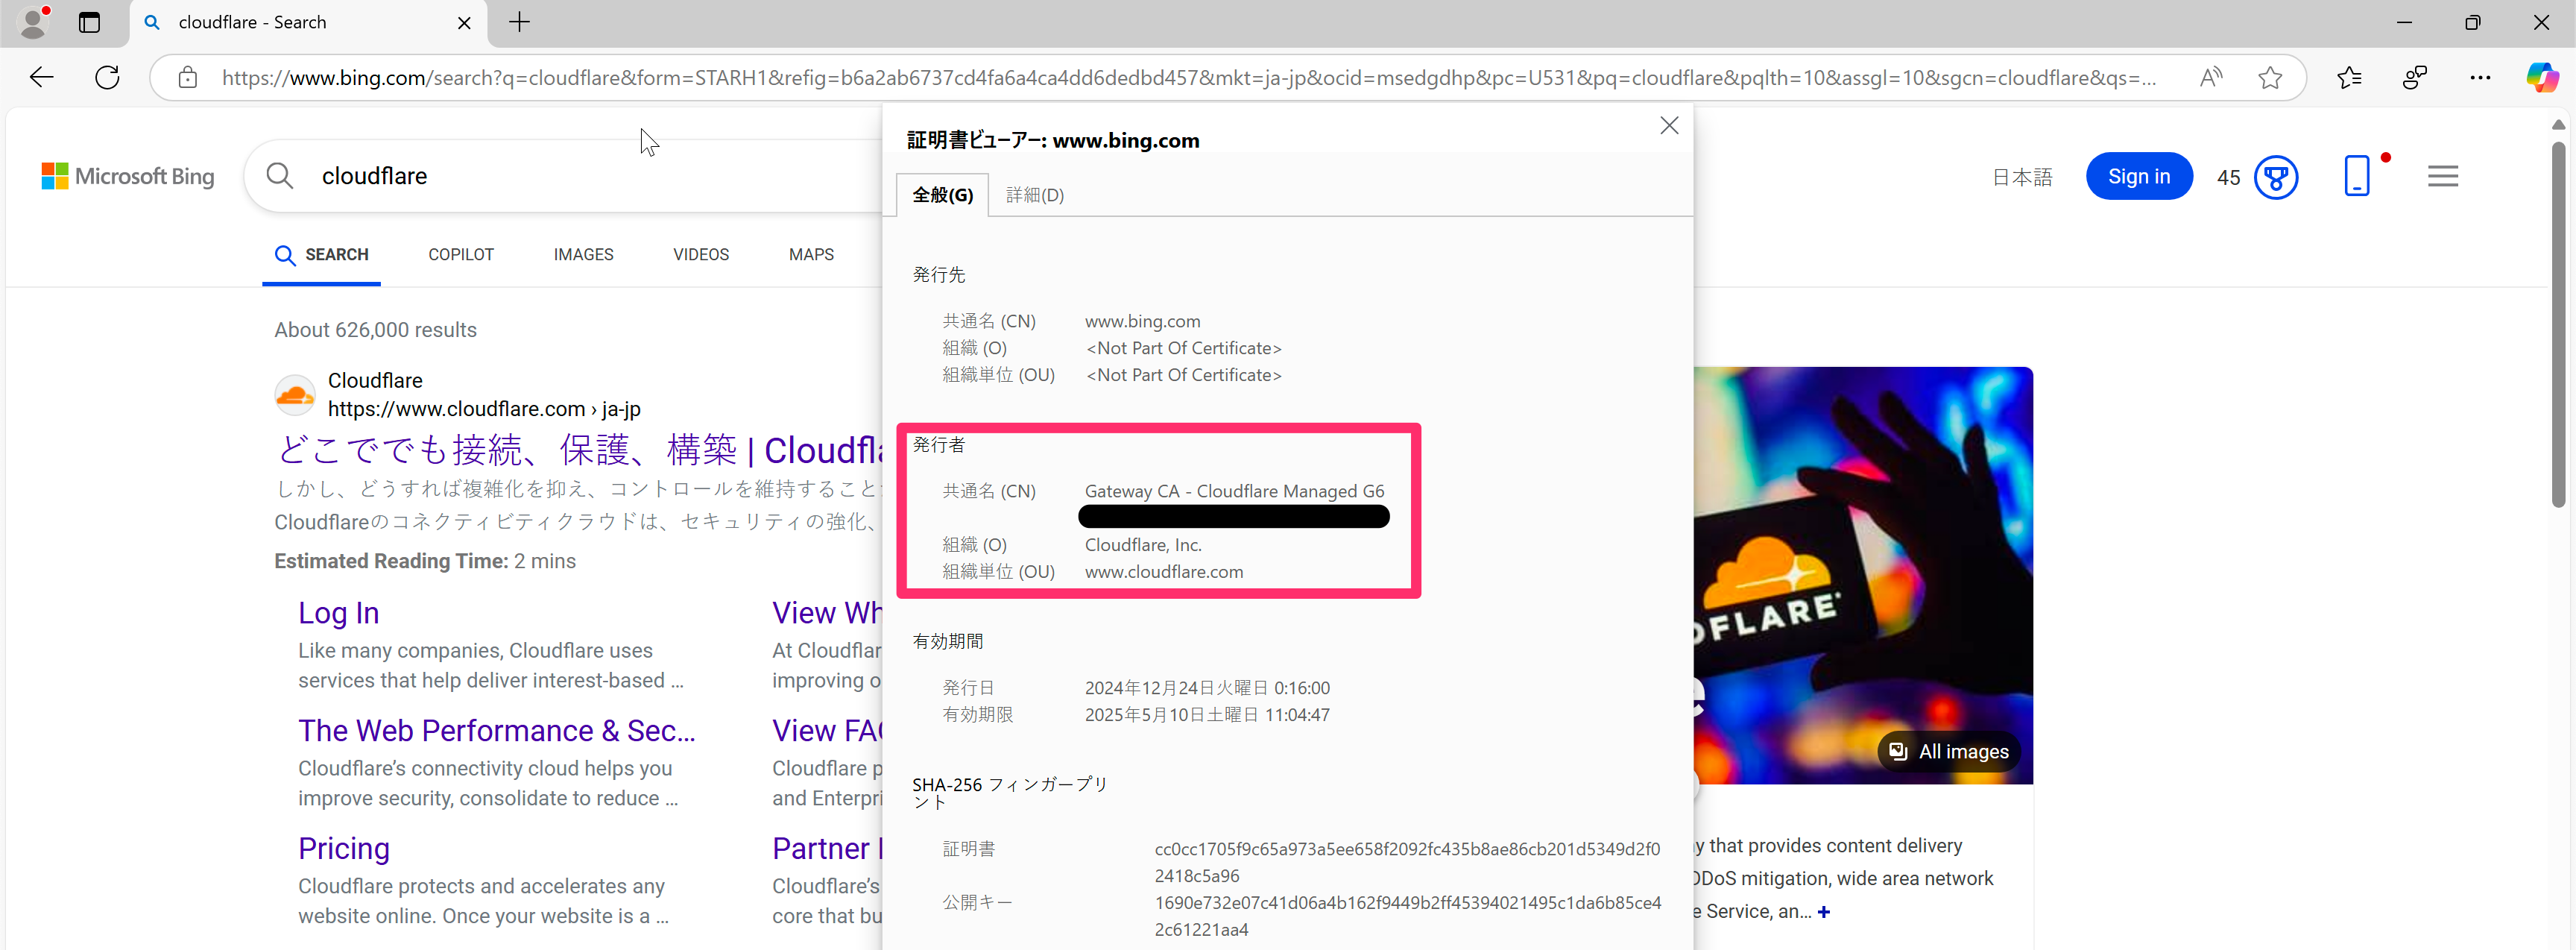
証明書の有効化(切り替え)後に WARP ON の状態でブラウジングすると、TLS Decryption に使用される証明書が切り替わっていることが確認できます。
まとめ
アカウント全体に及ぶ設定の変更は、影響が大きいため、慎重におこなう必要があります。
とはいえ、既存の証明書の有効期限が迫っているため、期限前に切り替えを実施する必要があります。
各種連携ツールを駆使しながら、テスト用のアカウントを用意して手順を確認する等の対応を進める必要があります。
必要に応じてメンテナンスウインドウを設ける等して、業務への影響を最小限にできるよう、検討してもらえたらと思います。
参考 : デバイス一覧の取得
API からデバイス一覧を csv として取得したい場合には、以下のコマンドを実行します。
デバイスごとのバージョン情報を確認できます。
デバイス数が per_page の最大値 100 を超える場合、すべてのデバイスリストを取得するには page パラメータを増やして、複数回の API コールが必要です。
export EMAIL='YOUR_EMAIL'
export APIKEY='YOUR_APIKEY'
export ACCOUNT_ID='YOUR_ACCOUNT_ID'

curl -sX GET "https://api.cloudflare.com/client/v4/accounts/$ACCOUNT_ID/devices?page=1&per_page=100" \
     -H "X-Auth-Email: $EMAIL" \
     -H "X-Auth-Key: $APIKEY" \
     -H "Content-Type: application/json" \
     | jq -r '.result | ["id","user.id","user.email","user.name","key","device_type","name","version","updated","created","last_seen","model","mac_address","os_version","ip","gateway_device_id","serial_number"],(.[]|[.id,.user.id,.user.email,.user.name,.key,.device_type,.name,.version,.updated,.created,.last_seen,.model,.mac_address,.os_version,.ip,.gateway_device_id,.serial_number])|@csv' \
     > `date +%Y%m%d`_devices.csv
参考:デバイスポスチャチェックも含めたデバイス一覧の取得
デバイスポスチャチェックの情報を個別に取得し、上記の内容にマージして csv として出力します。
export EMAIL='YOUR_EMAIL'
export APIKEY='YOUR_APIKEY'
export ACCOUNT_ID='YOUR_ACCOUNT_ID'

# Download Device List as JSON
curl -sX GET "https://api.cloudflare.com/client/v4/accounts/$ACCOUNT_ID/devices?page=1&per_page=100" \
     -H "X-Auth-Email: $EMAIL" \
     -H "X-Auth-Key: $APIKEY" \
     -H "Content-Type: application/json" \
     | jq -r '.result' > `date +%Y%m%d`_devices.json

---------------
--- Windows ---
---------------

# Specify the posuture rule id of Windows New Root CA Cert Installed Check
export WIN_POSTURE_ID=$(curl -sX GET "https://api.cloudflare.com/client/v4/accounts/$ACCOUNT_ID/devices/posture?per_page=100" \
     -H "X-Auth-Email: $EMAIL" \
     -H "X-Auth-Key: $APIKEY" \
     -H "Content-Type: application/json" \
     | jq -r '.result[] | select(.name == "Windows New Root CA Cert Installed") | .id')
echo $WIN_POSTURE_ID

# Merge the posture check information into device list
echo '' > `date +%Y%m%d`_win_devices.json
cat `date +%Y%m%d`_devices.json | jq -r '.[].id' | while read line
do
  curl -sX GET "https://api.cloudflare.com/client/v4/accounts/$ACCOUNT_ID/devices/$line" \
"https://api.cloudflare.com/client/v4/accounts/$ACCOUNT_ID/devices/$line/posture/check" \
       -H "X-Auth-Email: $EMAIL" \
       -H "X-Auth-Key: $APIKEY" \
       -H "Content-Type: application/json" \
       | jq -s 'select(.[0].result.device_type == "windows") | .[0].result * {posture: .[1].result."'$WIN_POSTURE_ID'"}' >> `date +%Y%m%d`_win_devices.json
done

# Format JSON as CSV file
cat `date +%Y%m%d`_win_devices.json \
| jq -r -s '["id","user.id","user.email","user.name","key","device_type","name","version","updated","created","last_seen","model","mac_address","os_version","ip","gateway_device_id","serial_number","posture.rule_name","posture.timestamp","posture.success","posture.error"],(.[]|[.id,.user.id,.user.email,.user.name,.key,.device_type,.name,.version,.updated,.created,.last_seen,.model,.mac_address,.os_version,.ip,.gateway_device_id,.serial_number,.posture.rule_name,.posture.timestamp,.posture.success,.posture.error])|@csv' \
> `date +%Y%m%d`_win_devices.csv

-------------
--- macOS ---
-------------
# Specify the posuture rule id of macOS New Root CA Cert Installed Check
export MAC_POSTURE_ID=$(curl -sX GET "https://api.cloudflare.com/client/v4/accounts/$ACCOUNT_ID/devices/posture?per_page=100" \
     -H "X-Auth-Email: $EMAIL" \
     -H "X-Auth-Key: $APIKEY" \
     -H "Content-Type: application/json" \
     | jq -r '.result[] | select(.name == "macOS New Root CA Cert Installed") | .id')
echo $MAC_POSTURE_ID

# Merge the posture check information into device list
echo '' > `date +%Y%m%d`_mac_devices.json
cat `date +%Y%m%d`_devices.json | jq -r '.[].id' | while read line
do
  curl -sX GET "https://api.cloudflare.com/client/v4/accounts/$ACCOUNT_ID/devices/$line" \
"https://api.cloudflare.com/client/v4/accounts/$ACCOUNT_ID/devices/$line/posture/check" \
       -H "X-Auth-Email: $EMAIL" \
       -H "X-Auth-Key: $APIKEY" \
       -H "Content-Type: application/json" \
       | jq -s 'select(.[0].result.device_type == "mac") | .[0].result * {posture: .[1].result."'$MAC_POSTURE_ID'"}' >> `date +%Y%m%d`_mac_devices.json
done

# Format JSON as CSV file
cat `date +%Y%m%d`_mac_devices.json \
| jq -r -s '["id","user.id","user.email","user.name","key","device_type","name","version","updated","created","last_seen","model","mac_address","os_version","ip","gateway_device_id","serial_number","posture.rule_name","posture.timestamp","posture.success","posture.error"],(.[]|[.id,.user.id,.user.email,.user.name,.key,.device_type,.name,.version,.updated,.created,.last_seen,.model,.mac_address,.os_version,.ip,.gateway_device_id,.serial_number,.posture.rule_name,.posture.timestamp,.posture.success,.posture.error])|@csv' \
> `date +%Y%m%d`_mac_devices.csv
参考 : Cloudflare Zero Trust Root CA 証明書のダウンロードページを Pages で作る
参考 : Cloudflare からのメール通知
- [Action Required] Reminder: Update Your Device Certificate Before Expiration on February 2, 2025
Zero Trust Account Name: My Enterprise Company, Inc.
Hello Cloudflare Zero Trust Admin,
This is a reminder that your Cloudflare Zero Trust device certificate will expire on February 2, 2025, at 16:05:00 GMT. You are receiving this email because we identified you as a Super Administrator or Administrator for an account that is still using the expiring certificate. Please update the device certificate before this expiration date so that your users will not experience disruptions while using Cloudflare’s Zero Trust protections.
What’s happening?
Cloudflare Zero Trust relies on user-side certificates for functionality like block pages for filtering (DNS and HTTP), HTTPS traffic inspection, data loss prevention (DLP), anti-virus scanning, sandboxing, and browser isolation. The current certificate is reaching its expiration date on February 2, 2025, requiring our customers to rotate certificates. If you are unable to update the device certificate before the expiry date your users will experience errors while trying to browse inspected domains and/or will not be able to view your block page.Action is required in the following cases:
- Your account has TLS decryption turned on in Zero Trust network settings.
- Your account has Gateway DNS policies configured to display a block page.
What do I need to do?
Please follow the instructions here to generate a new account-specific Cloudflare Zero Trust root Certificate Authority (CA). Then, use the CA to issue and deploy your own .cert and .pem device certificates for all devices. The required steps are below:
- Generate a new certificate (dashboard link) and activate it in the dashboard.
- Download and trust the new certificates on all user devices through WARP, mobile device management (MDM) software, or manually.
- Note: For customers updating certificates through WARP using the “Install CA to system certificate store” option, the most recent client versions (2024.12.554.0) on Windows, Linux & MacOS support multiple AVAILABLE certificates on the client at once to reduce potential disruptions. MacOS and certain Linux distros will still require the user to manually trust the downloaded certificate if deployed through WARP.
- For mobile deployments, if you are not deploying certificates through an MDM, iOS and Android devices will require manual installation.
- Mark the newly generated certificate as IN-USE in the dashboard.
New connections and block page instances will use this CA once you mark the certificate as IN-USE.
You can review our documentation and reference this short implementation demo for more information.
Need help?
We understand that this may be a large effort for some organizations. If any additional questions should arise, open a ticket in the Cloudflare Support Portal to contact our Support team.Best regards,
Cloudflare Zero Trust Team
