業務でCIツールとしてJenkinsを入れることになったので、その時の記録。
jenkinsの説明は、Jenkinsとはなんぞや?が簡潔でわかりやすかった。
バージョン
- nginx 1.16.1
- centOS 7.6.1810
- Jenkins 2.190.3
Jenkins導入方法
(1) install Java
Jenkinsはjavaで実装されており、javaの実行環境が必要があるためない場合はインストールする。
# openJDK
yum install java-1.8.0-openjdk
(2) install Jenkins
公式の手順。
# jenkinsのyumリポジトリを取得
wget -O /etc/yum.repos.d/jenkins.repo http://pkg.jenkins-ci.org/redhat/jenkins.repo

# 公開鍵追加
rpm --import https://jenkins-ci.org/redhat/jenkins-ci.org.key

# インストール
yum install jenkins
(3) 各種設定
設定ファイル: /etc/sysconfig/jenkins
各種設定はこのファイルで変更することができる。以下は、デフォルトの値。
# ポート
JENKINS_PORT=“8080"
# 実行ユーザ
JENKINS_USER="jenkins"
実行ユーザーの変更を行った場合以下のディレクトリ/ファイルの権限も同様に変更する必要がある。
/var/lib/jenkins/var/log/jenkins/var/cache/jenkins
(4) 起動
# 起動
systemctl start jenkins

# 再起動
systemctl restart jenkins

# 終了
systemctl stop jenkins

# 確認
systemctl status jenkins
起動して、statusがrunningになったら、http://{IP}:{PORT}で接続できる。外部からの接続が遮断されている場合は、解放することを忘れずに。
firewall設定 counfigure firewall 参照
Nginxでリバースプロキシ設定
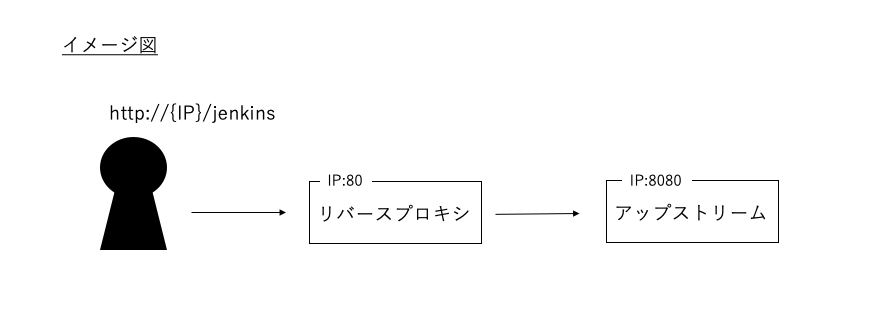
リバースプロキシとは受け取ったリクエストを転送する機能で、ロードバランスや、リクエストの書き換え、アクセス制限などに使われてる。
今回、毎回ポート番号指定する代わりに、http://{IP}/jenkinsで接続できるように以下の設定を行った。

(1) jenkins側の設定
設定ファイル(/etc/sysconfig/jenkin)を以下のように書き換える。
JENKINS_ARGS="--prefix=/jenkins"
(2) Nginx側の設定
- 共通設定:
/etc/nginx/nginx.conf - serverブロックごとの設定:
/etc/nginx/conf.d/ - デフォルトのlistenポート80番の設定:
/etc/nginx/conf.d/default.conf
/etc/nginx/conf.d/default.confで80番ポートをlistenしているserverディレクティブ内に以下を追記。nginxを経由することで、リクエスト情報が変わるので、headerをここでセットしてあげる必要がある。
location ~ /jenkins {
    proxy_redirect     off;
    proxy_set_header   Host $host;
    proxy_set_header   X-Forwarded-Proto $scheme;
    proxy_set_header   X-Real-IP         $remote_addr;
    proxy_set_header   X-Forwarded-For   $proxy_add_x_forwarded_for;
    proxy_pass         http://jenkins;
}
変数 ($がつくものはnginxの組み込み変数。)
L $scheme:リクエストされたスキーマ(http、https)
L $http_host:ポート番号付きホスト
L $remote_addr:アクセス元のIPアドレス
L $proxy_add_x_forwarded_for:ユーザーが経由したアドレス
L $host:マッチした、サーバ名/Hostヘッダの値。
ディレクティブ
L proxy_set_header ヘッダーフィールド名 値:リクエストをプロキシする際に特定のヘッダ情報を付与する。
L proxy_pass 転送先:転送先URL。
nginxで使える変数や、ディレクティブの一覧はここやここが参考になった。
/etc/nginx/conf.d/jenkins.confを作成し、以下を記載。127.0.0.1 は、ループバック・アドレス(自分自身を指すIPアドレス)のこと。default.confのproxy_pass http://jenkins;のjenkinsをここで定義。
upstream jenkins {
  server 127.0.0.1:8080 fail_timeout=0;
}
(3) 再起動
# jenkins再起動
systemctl restart jenkins

# nginx再起動
systemctl restart nginx
http://{IP}/jenkinsにアクセスして、jenkinsが無事に表示されたら完了。
jenkinsで"リバースプロキシの設定がおかしいようです"のエラーが出てたが、jenkinsの管理→システムの設定→JenkinsのURLを変更すると消えた。