前置き
先日Denoのアップデートでnpmサポート安定版がリリースされました。
そのドキュメントをなんとなしに見ていたらこんなものを発見。
これは試すしかないということで、現状の Deno + Vue の開発環境を構築してみようと思います。
前提
Denoバージョンはv1.28.3で確認を行っています。
$ deno --version
deno 1.28.3 (release, x86_64-unknown-linux-gnu)
v8 10.9.194.5
typescript 4.8.3
チュートリアル
こちらの記事の内容をほぼそのまま紹介します。
https://deno.land/manual@v1.28.3/node/how_to_with_npm/vue
雰囲気で説明を書いていますが日本語訳というわけではないのでご了承ください。
プロジェクトの作成
以下のコマンドをプロジェクトを実行します。
$ deno run --allow-read --allow-write --allow-env npm:create-vite-extra@latest
プロジェクト名はお好みで
Select a templateでdeno-vueを選びます。
フロント実行
$ cd {project_name}
$ deno task dev
viteのロゴを抱えたかわいいDenoが表示されました。
APIの作成
チュートリアル通りにAPIを作成します。
ファイルの作成
$ mkdir api && touch api/data.json && touch api/main.ts
こちらのリンク先のデータをapi/data.jsonに保存します。
以下のソースをapi/main.tsに保存します。
import { Application, Router } from "https://deno.land/x/oak/mod.ts";
import { oakCors } from "https://deno.land/x/cors/mod.ts";
import data from "./data.json" assert { type: "json" };

const router = new Router();
router
  .get("/", (context) => {
    context.response.body = "Welcome to dinosaur API!";
  })
  .get("/api", (context) => {
    context.response.body = data;
  })
  .get("/api/:dinosaur", (context) => {
    if (context?.params?.dinosaur) {
      const found = data.find(item => item.name.toLowerCase() === context.params.dinosaur.toLowerCase());
      if (found) {
        context.response.body = found;
        } else {
        context.response.body = "No dinosaurs found.";
      }
    }
  });

const app = new Application();
app.use(oakCors()); // Enable CORS for All Routes
app.use(router.routes());
app.use(router.allowedMethods());

await app.listen({ port: 8000 });
バックエンドの実行
$ deno run --allow-env --allow-net api/main.ts
localhost:8000/apiにアクセスするとこんなレスポンスが帰ってきます。
コンポーネントを追加する
ここでは3つのコンポーネントを作成します。
-
HomePage.vue, ホームページのコンポーネント -
Dinosaurs.vue, すべての恐竜の名前をアンカー リンクとしてリストするコンポーネント -
Dinosaur.vue, 個々の恐竜の名前と説明を表示するコンポーネント
以下のコマンドで各ファイルを作成します。
$ touch src/components/HomePage.vue src/components/Dinosaurs.vue src/components/Dinosaur.vue
状態を維持するstoreの追加
<Dinosaur>と<Dinosaurs>コンポーネント全体で状態を維持するためにstoreを作成します。
以下のコマンドでsrc/store.jsファイルを作成します。
$ touch src/store.js
内容はこちら
import { reactive } from "vue";

export const store = reactive({
  dinosaur: {},
  setDinosaur(name, description) {
    this.dinosaur.name = name;
    this.dinosaur.description = description;
  },
});
Vueコンポーネントの更新 Dinosaurs.vue
Dinosaursコンポーネントでは次のことをします。
-
GETリクエストで前述で作成したAPIからdinosaursを取得します -
dinosaursをループさせて<Dinasaur>へ向けた<router-link>をレンダリングします - リンクをクリックしたら
store.setDinosaur()を呼び出してdinosaurをstoreにセットします。
以下の内容をDinosaurs.vueファイルに保存します。
<script>
import { ref } from 'vue'
import { store } from '../store.js'
export default ({
  async setup() {
    const res = await fetch("http://localhost:8000/api")
    const dinosaurs = await res.json();
    return {
      dinosaurs
    }
  },
  data() {
    return {
      store
    }
  }
})
</script>

<template>
  <div class="container">
    <div v-for="dinosaur in dinosaurs" class="dinosaur-wrapper">
      <span class="dinosaur">
        <router-link :to="{ name: 'Dinosaur', params: { dinosaur: `${dinosaur.name.toLowerCase()}` }}">
          <span @click="store.setDinosaur(dinosaur.name, dinosaur.description)">
            {{dinosaur.name}}
          </span>
        </router-link>
      </span>
    </div>
  </div>
</template>

<style scoped>
.dinosaur {
}
.dinosaur-wrapper {
  display: inline-block;
  margin: 0.15rem 1rem;
  padding: 0.15rem 1rem;
}
.container {
  text-align: left;
}
</style>
Vueコンポーネントの更新 Dinosaur.vue
Dinosaurコンポーネントでは次のことをします。
-
storeのインポート -
store.dinosaurをレンダリング
以下の内容をDinosaur.vueファイルに保存します。
<script>
import { store } from '../store.js';
export default {
  data() {
    return {
      store
    }
  }
}
</script>

<template>
  Name: {{ store.dinosaur.name }}
  <br />
  Description: {{ store.dinosaur.description }}
</template>
Vueコンポーネントの更新 HomePage.vue
DinosaursコンポーネントはAPIからデータをフェッチする必要があるため、コンポーネントツリーで非同期依存関係を管理する Suspense を使用します。
以下の内容をHomePage.vueファイルに保存します。
<script>
import { ref } from 'vue'
import Dinosaurs from './Dinosaurs.vue'
export default {
  components: {
    Dinosaurs
  }
}
</script>

<template>
  <Suspense>
    <template #default>
      <Dinosaurs />
    </template>
    <template #fallback>
      <div>Loading...</div>
    </template>
  </Suspense>

  <p>
    Check out
    <a href="https://vuejs.org/guide/quick-start.html#local" target="_blank"
      >create-vue</a
    >, the official Vue + Vite starter
  </p>
  <p class="read-the-docs">Learn more about using Deno and Vite.</p>
</template>

<style scoped>
.read-the-docs {
  color: #888;
}
</style>
Vueコンポーネントの更新 src/App.vue
src/App.vueに各ページを表示するための変更をします。
以下の内容をsrc/App.vueファイルに保存します。
<script>も<style>も要りません。
<template>
  <router-view/>
</template>
ルーティングを追加
前述で出てきた<router-link>や<router-view>はvue-routerライブラリのコンポーネントです。
vite.config.mjsでvue-routerをインポートします。
以下の内容をvite.config.mjsに保存します。
import { defineConfig } from "npm:vite@^3.1.3";
import vue from "npm:@vitejs/plugin-vue@^3.2.39";

import "npm:vue@^3.2.39";
import "npm:vue-router@4";

// https://vitejs.dev/config/
export default defineConfig({
  plugins: [vue()],
});
ルーティングをするためにrouter/index.tsファイルを作成します。
$ mkdir router && touch router/index.ts
router/index.tsでHomeページとDinasaurページのルートを作成します。
以下の内容をrouter/index.tsファイルに保存します。
import { createRouter, createWebHistory } from "vue-router";
import HomePage from "../components/HomePage.vue";
import Dinosaur from "../components/Dinosaur.vue";

const routes = [
  {
    path: "/",
    name: "Home",
    component: HomePage,
  },
  {
    path: "/:dinosaur",
    name: "Dinosaur",
    component: Dinosaur,
    props: true,
  },
];

const router = createRouter({
  history: createWebHistory("/"),
  routes,
});

export default router;
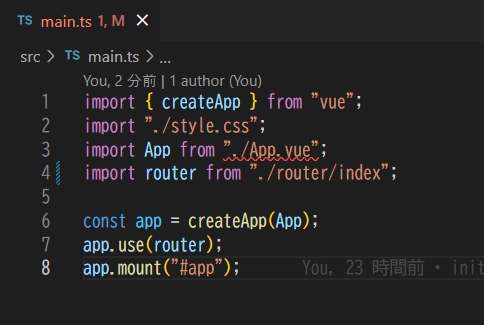
最後に上記で定義したrouterをsrc/main.jsにインポートします。
以下の内容をsrc/main.jsファイルに保存します。
import { createApp } from "vue";
import "./style.css";
import App from "./App.vue";
import router from "./router/index.ts";

const app = createApp(App);
app.use(router);
app.mount("#app");
VSCodeの設定
Volar拡張機能を入れる
ViteがVolarを推奨しているようなので、今回はこちらの拡張機能を紹介します。
リンクはこちら Vue Volar extension Pack
他のVue向け拡張機能を入れている方はお好みでどうぞ。
deno cliをapiディレクトリにのみ適用する
チュートリアルではAPI部分のみdenoで動いています。なのでapiディレクトリにだけdeno cliを有効にします。
以下の設定を.vscode/settings.jsonファイルに保存してください。
{
    "deno.enablePaths": [
        "api/"
    ],
    "deno.enable": true,
    "deno.unstable": true
}
気になったところを手直し
javascriptをtypescriptに直す
チュートリアル上で*.jsで作成されたファイルは*.tsに拡張子を変えれば概ね問題なく動きます。
多少のエラーは出ますがどれもすぐに解決できるでしょう。
*.vueファイル内の<script>は<script lang="ts">に置き換えることでtypescriptになります。
*.vueの型エラーを解消する
*.vueファイルをインポートしている箇所は以下のように型が解決できていません。

これを解消するために以下のファイルを用意します。
declare module '*.vue' {
  import type { DefineComponent } from 'vue'
  const component: DefineComponent<{}, {}, any>
  export default component
}
またtsconfig.jsonファイルを配置。中身は{}だけで良いです。
本来は色々設定を書くところですが一旦良しとします。
詳しくは別途調べてください。
Denoでnpmファイルはどのように管理されているか
-
deno.lock: denoのパッケージロックファイルです。deno.jsonが存在すると自動で生成されます。 -
node_modules: いつものやつとおもいきや、ちょっと違います。
本来denoにnode_modulesはありませんが、互換性のために--node-modules-dirというオプションが存在します。このチュートリアルではこのオプションが有効になっているため生成されました。
…あれ?
package.jsonが見当たりません。
そこはdenoの恩恵です。コード上で参照されているライブラリは初めて実行するときに自動でインストールされます。そのためpackage.jsonはお役御免です。
その他にも色々ありますが、こちらの記事に丁寧にまとめてくださっています。
https://qiita.com/rana_kualu/items/ac5471ecc45eed510446
Denoがnpmをサポートして思ったこと
今回Denoがnpmをサポートしてくれたことで、こうしてVueプロジェクトを立ち上げることができるようになりました。
実態としてはnpmのviteをdeno経由で実行しているので結局はnpmに逆戻りした感じはあります。
また安定版が出たとは言えまだまだ開発中の機能なので何かしらの問題も多分あるでしょう。
それでもやはりnpmに蓄積された技術をまるっとdenoで使えるようになったのは素直に嬉しいです。
これにより世の中のnpmプロジェクトがちょっとずつdenoに以降していけば、denoの最新機能を使えるところも増え次第にシェアが増えていくことも期待できるかも?


