はじめに
以前に自作ホロジュールアプリのバックエンド API を Flask で作成しましたが、リファクタリングするつもりが 1 から作り直してみたくなり、FastAPI を利用してみることにしました。
いまさら感はありますが、Poetry + pyenv + VSCode + FastAPI の手順が見つからなかったというのも試してみたきっかけです。
FastAPI
FastAPI は、Pythonの標準である型ヒントに基づいてPython 3.6 以降でAPI を構築するための、モダンで、高速(高パフォーマンス)な、Web フレームワークです。
最も高速な Python フレームワークの一つで、直感的に実装でき、堅牢性も高く、API のオープンスタンダードに基づいているとのことです。
開発環境
- Windows 11 22H2
- PowerShell 7.3.9
- Visual Studio Code 1.84
まずは、いつもの pyenv と Poetry を利用した環境で FastAPI を利用できることを確認します。
プロジェクトの作成
Poetry と pyenv が導入されていることを前提とします。
Windows で Python の開発環境を構築する(Poetry と pyenv を利用)
Poetry と pyenv のバージョンを確認しておきます。
PowerShell
> poetry --version
Poetry (version 1.4.2)
> pyenv --version
pyenv 3.1.1
Poetry を利用してプロジェクトを作成してディレクトリに入ります。
PowerShell
> poetry new fastapi_sample --name app
Created package app in fastapi_sample
> cd fastapi_sample
利用する Python をインストールします。
PowerShell
> pyenv install 3.11.3
プロジェクトのディレクトリ内で利用する Python のバージョンを指定します。
PowerShell
> pyenv local 3.11.3
バージョンが切り替わったかを確認します。
PowerShell
> python -V
Python 3.11.3
pyenv で実行している(仮想環境に指定したい) Python のパスを確認します。
PowerShell
> python -c "import sys; print(sys.executable)"
C:\Users\[UserName]\.pyenv\pyenv-win\versions\3.11.3\python.exe
Python のパスを指定して Poetry で仮想環境を構築します。
PowerShell
> poetry env use C:\Users\[UserName]\.pyenv\pyenv-win\versions\3.11.3\python.exe
Creating virtualenv app in D:\Develop\Git\fastapi_sample\.venv
Using virtualenv: D:\Develop\Git\fastapi_sample\.venv
指定した Python のパスで仮想環境が構築されたかを Poetry で確認します。
PowerShell
> poetry env info
Virtualenv
Python:         3.11.3
Implementation: CPython
Path:           D:\Develop\Git\fastapi01\.venv
Executable:     D:\Develop\Git\fastapi01\.venv\Scripts\python.exe
Valid:          True

System
Platform:   win32
OS:         nt
Python:     3.11.3
Path:       C:\Users\[UserName]\.pyenv\pyenv-win\versions\3.11.3
Executable: C:\Users\[UserName]\.pyenv\pyenv-win\versions\3.11.3\python.exe
Poetry 経由で Python を実行してみます。
PowerShell
> poetry run python -V
Python 3.11.3
ここまでで、Poetry と pyenv を利用してプロジェクトを作成できました。
モジュールの追加
FastAPI と Uvicorn のモジュールを追加します。
PowerShell
> poetry add fastapi
> poetry add "uvicorn[standard]"
uvicorn(ユーブイアイコーン)は、ASGI(Asynchronous Server Gateway Interface)と呼ばれる Python の Web サーバと Web アプリケーションが通信するための WSGI(Web Server Gateway Interface)の後継のインターフェース定義のこと。
サンプルコードの作成
Visual Studio Code を起動します。
PowerShell
> code .
app ディレクトリ直下に main.py ファイルを作成します。
FastAPIのチュートリアルのコードを参考にしています。
from enum import Enum
from typing import Union
from fastapi import FastAPI
from pydantic import BaseModel

# クラスサンプル
class Item(BaseModel):
    name: str
    description: Union[str, None] = None
    price: float
    tax: Union[float, None] = None

# 列挙サンプル
class ModelName(str, Enum):
    alexnet = "alexnet"
    resnet = "resnet"
    lenet = "lenet"

# FastAPIインスタンス生成
app = FastAPI()

# 基本
@app.get("/")
async def root():
    return {"message": "Hello World"}

# パスパラメーター1(数値)
# http://127.0.0.1:8000/items/3
@app.get("/items/{item_id}")
async def read_item(item_id: int):
    return {"item_id": item_id}

# パスパラメーター2(列挙型)
# http://127.0.0.1:8000/models/alexnet
@app.get("/models/{model_name}")
async def get_model(model_name: ModelName):
    if model_name is ModelName.alexnet:
        return {"model_name": model_name, "message": "Deep Learning FTW!"}
    if model_name.value == "lenet":
        return {"model_name": model_name, "message": "LeCNN all the images"}
    return {"model_name": model_name, "message": "Have some residuals"}

# パスパラメーター3(ファイルパス)
# http://127.0.0.1:8000/files/home/johndoe/myfile.txt
@app.get("/files/{file_path:path}")
async def read_file(file_path: str):
    return {"file_path": file_path}

fake_items_db = [{"item_name": "Foo"}, {"item_name": "Bar"}, {"item_name": "Baz"}]

# クエリパラメーター(スキップ+上限 デフォルト値あり)
# http://127.0.0.1:8000/querys/?skip=0&limit=10
@app.get("/querys/")
async def read_item(skip: int = 0, limit: int = 10):
    return fake_items_db[skip : skip + limit]

# パスパラメーターとクエリパラメーター(オプショナルあり デフォルトあり)
# http://127.0.0.1:8000/users/taro/items/1001?q=hoge&short=true
@app.get("/users/{user_id}/items/{item_id}")
async def read_user_item(
    user_id: int, item_id: str, q: Union[str, None] = None, short: bool = False
):
    item = {"item_id": item_id, "owner_id": user_id}
    if q:
        item.update({"q": q})
    if not short:
        item.update(
            {"description": "This is an amazing item that has a long description"}
        )
    return item

# リクエストボディ(内容解析含む)
@app.post("/sample_items/")
async def create_item(item: Item):
    item_dict = item.model_dump()
    if item.tax:
        price_with_tax = item.price + item.tax
        item_dict.update({"price_with_tax": price_with_tax})
    return item_dict

# パスパラメーターとリクエストボディとクエリパラメーター(内容解析含む)
@app.put("/dummy_items/{item_id}")
async def create_item(item_id: int, item: Item, q: Union[str, None] = None):
    result = {"item_id": item_id, **item.model_dump()}
    if q:
        result.update({"q": q})
    return result
ちなみに、下記の構文を忘れがちです。
- *list : リストやタプルをアンパック
- **dict : 辞書をアンパック
- Union[] : 型ヒントを複数指定
サンプルコードの実行
Poetry のシェルを起動し、uvicorn 経由でプログラムを実行します。
PowerShell
> poetry shell
(app-py3.11)> uvicorn app.main:app --reload
- app.main : 階層を含めた main.py ファイル(実行するモジュール)
- app : FastAPI インスタンス
- --reload : コードの変更時にサーバーを再起動させる(開発用)
下記のエラーメッセージが表示された場合は、既定のポートが利用されている可能性があります。
INFO:     Will watch for changes in these directories: ['D:\\Develop\\Git\\fastapi_sample']
ERROR:    [WinError 10013] アクセス許可で禁じられた方法でソケットにアクセスしようとしました。
その場合は他のポートを指定して実行します。
PowerShell
(app-py3.11)> uvicorn app.main:app --reload --port 8001
- --port : 使用するポート番号
実行できました。この状態になればブラウザからアクセス可能です。
INFO:     Will watch for changes in these directories: ['D:\\Develop\\Git\\fastapi_sample']
INFO:     Uvicorn running on http://127.0.0.1:8001 (Press CTRL+C to quit)
INFO:     Started reloader process [28088] using WatchFiles
INFO:     Started server process [28148]
INFO:     Waiting for application startup.
INFO:     Application startup complete.
docs を指定してブラウザからアクセスすると、対話的APIドキュメントを表示できます。
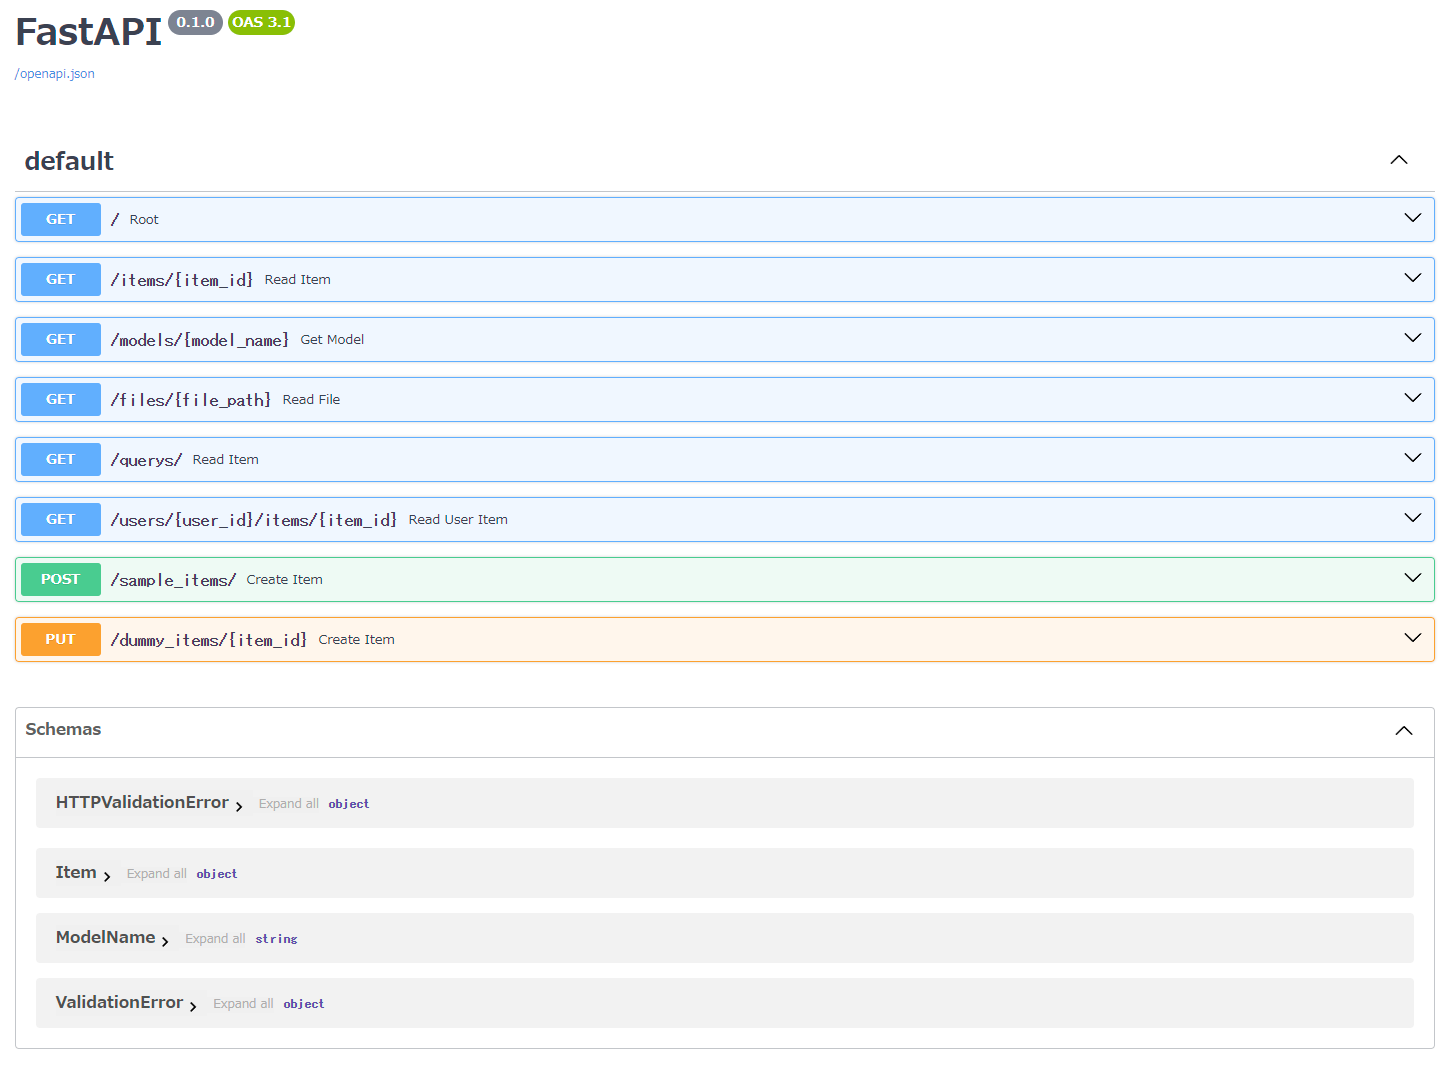
クエリパラメーターやパスパラメーターやリクエストボディを確認しながら動作確認できるのが便利です。

redoc を指定することもできます。

Visual Studio Code からのデバッグ実行
Visual Studio Code のメニューから [実行] - [構成の追加] をクリックし、[FastAPI] を選択して、アプリケーションのパスは [main.py] としておきます。
プロジェクトに launch.json が追加されるので、下記のように修正します。
(args を "main:app" から "app.main:app" に変更し、ポートを指定しています。)
{
    "version": "0.2.0",
    "configurations": [
        {
            "name": "Python: FastAPI",
            "type": "python",
            "request": "launch",
            "module": "uvicorn",
            "args": [
                "app.main:app",
                "--reload",
                "--port",
                "8001"
            ],
            "jinja": true,
            "justMyCode": true
        }
    ]
}
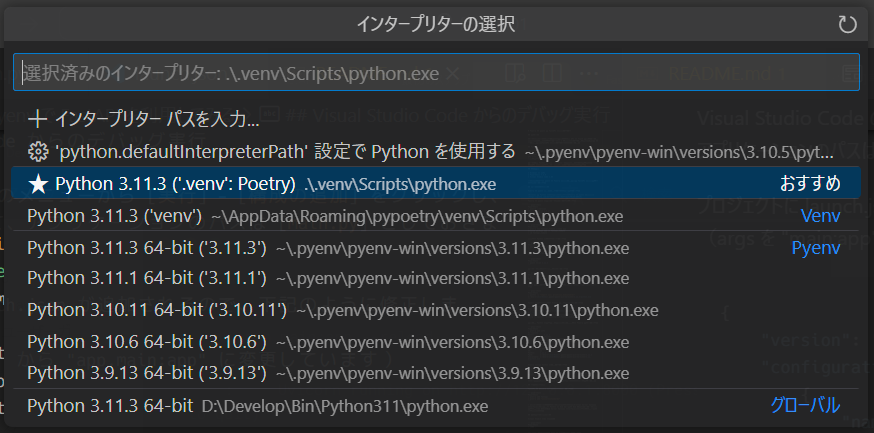
Visual Studio Code で利用する Python インタープリターを選択しておきます。
Visual Studio Code で [デバッグの開始] をします。
PowerShell から実行したときと同じように起動するので、ブラウザからアクセスできることを確認します。
さいごに
FastAPI を試してみましたが、直感的に利用できて良いですね。fastapi-jwt-auth を利用すれば JWT もシンプルに扱えそうです。
引き続き、自作ホロジュールアプリのバックエンド API の作り直しに取り掛かります。