1.インストール
1-1. ダウンロード
以下のサイトから「apache-maven-3.6.2-bin.zip」をダウンロード
https://maven.apache.org/download.cgi
1-2.導入
展開し、binにパスを通す。
今回は「D:\apache-maven-3.6.2\bin」とした。
1-3.確認
mvn -version
で起動したらOK。今回は以下が表示されたのでJDKをインストールした。
The JAVA_HOME environment variable is not defined correctly
This environment variable is needed to run this program
NB: JAVA_HOME should point to a JDK not a JRE
ダウンロードしたJDKは「Amazon Corretto 8」
Apache Maven 3.6.2 (40f52333136460af0dc0d7232c0dc0bcf0d9e117; 2019-08-28T00:06:16+09:00)
Maven home: D:\apache-maven-3.6.2\bin\..
Java version: 1.8.0_232, vendor: Amazon.com Inc., runtime: C:\Program Files\Amazon Corretto\jdk1.8.0_232\jre
Default locale: ja_JP, platform encoding: MS932
OS name: "windows 10", version: "10.0", arch: "amd64", family: "windows"
無事動いた。
1-4.用語
ゴール(Goal)
プラグインに定義された個々のタスク(処理)のこと。
フェーズに紐付けて実行することが可能。
2.設定
2-1.Mavenの設定
ローカルリポジトリを設定する。
Maven\conf\settings.xmlを開き、以下のように任意の場所をローカルリポジトリとして設定する。
<localRepository>D:/apache-maven-3.6.2/repository/</localRepository>
2-2.Eclipseの設定
1.[ウインドウ]-[設定]で設定画面を開く。
2.[Maven]-[ユーザー設定]を選択。
3.ユーザー設定でsettings.xmlのファイルを指定する。
3.プロジェクトの作成
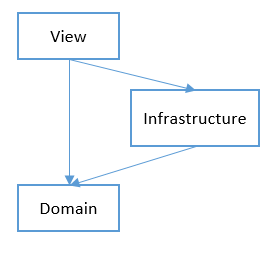
例として、SWTアプリケーションで住所録を作成する。
アプリケーションは3つのjarから構成する。
・View
・Domain
・Infrastructure
3-1.親プロジェクトの作成
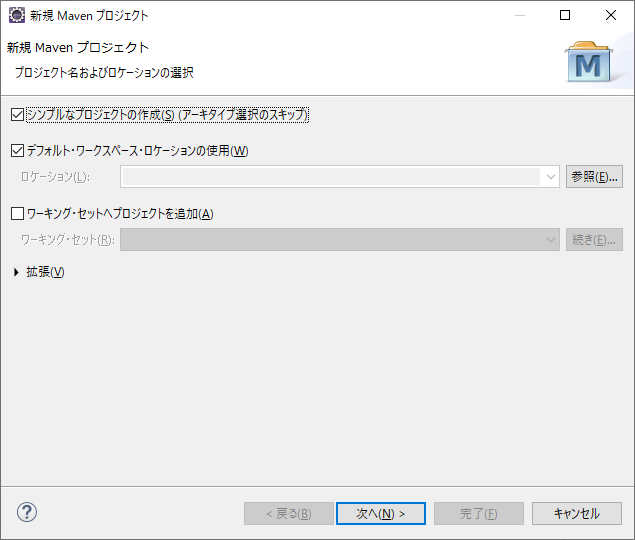
1.[新規]-[Mavenプロジェクト]
2.「新規Mavenプロジェクト」画面で、「シンプルなプロジェクトの作成」にチェックを付け、「次へ」
3.「パッケージング」を【pom】に変更し、グループid、アーティフィクトidに適当な値を入力し、「完了」

・グループId:すべてのプロジェクトと重複しない名称。パッケージ名(ドメイン+プロジェクト名)
・アーティファクトId:バージョンを含めないJarファイル名
4.完成。

3-2.子プロジェクトの作成
1.「親プロジェクト」を選択し、右クリック。
2.[新規]-[その他」
3.[Maveb]-[Mavenモジュール]
4.「モジュール名」を入力。

5.作成が完了すると以下のような構成になる。

4.Domainのコーディング
4-1.住所を格納するJavaソース
名前と住所1、住所2というStringと誕生日というDateと管理用のintを持つ。
package ml.kerotori.app.domain;

import java.util.Date;

public class Address {

	private int no;			// 管理用番号
	private String Name;		// 名前
	private String Address1;	// 住所1
	private String Address2;	// 住所2
	private Date Birthday;		// 誕生日
	public int getNo() {
		return no;
	}
	public void setNo(int no) {
		this.no = no;
	}
	public String getName() {
		return Name;
	}
	public void setName(String name) {
		Name = name;
	}
	public String getAddress1() {
		return Address1;
	}
	public void setAddress1(String address1) {
		Address1 = address1;
	}
	public String getAddress2() {
		return Address2;
	}
	public void setAddress2(String address2) {
		Address2 = address2;
	}
	public Date getBirthday() {
		return Birthday;
	}
	public void setBirthday(Date birthday) {
		Birthday = birthday;
	}

}
4-2.コンパイル
1.「Domain」プロジェクトを右クリック
2.[実行]-[Maven install]
3.以下のエラー出た。
[ERROR] ソース・オプション5は現在サポートされていません。6以降を使用してください。
[ERROR] ターゲット・オプション1.5は現在サポートされていません。1.6以降を使用してください。
4.親プロジェクト(「Domain」プロジェクトではなく親)のpom.xmlファイルでJavaのコンパイル設定を行う。
以下を追加する。
	<properties>
		<project.build.sourceEncoding>UTF-8</project.build.sourceEncoding>
		<java.version>1.8</java.version>
	</properties>

	<build>
		<plugins>
			<plugin>
				<groupId>org.apache.maven.plugins</groupId>
				<artifactId>maven-compiler-plugin</artifactId>
				<configuration>
					<source>${java.version}</source>
					<target>${java.version}</target>
				</configuration>
			</plugin>
		</plugins>
全体像は以下になる。

5.これでコンパイルが成功する。
[INFO] ------------------------------------------------------------------------
[INFO] BUILD SUCCESS
[INFO] ------------------------------------------------------------------------
[INFO] Total time:  3.125 s
[INFO] Finished at: 2019-11-03T22:29:41+09:00
[INFO] ------------------------------------------------------------------------
5. Infrastructureのコーディング
住所録をXMLファイルに保存し、読み込みできるようにする。
5-1.Save、Loadインタフェースの作成
package ml.kerotori.app.infrastructure.core;

import java.beans.XMLEncoder;
import java.io.BufferedOutputStream;
import java.io.FileNotFoundException;
import java.io.FileOutputStream;

public interface Save<T> {
	public static <T> boolean saveXml(String fileName, T obj) {
		// オブジェクトのデータを保存
		try (XMLEncoder encoder = new XMLEncoder(
				new BufferedOutputStream(
						new FileOutputStream(fileName)))) {
			encoder.writeObject(obj);
		} catch (FileNotFoundException e) {
			return false;
		}catch(Exception e) {
			return false;
		}
		return true;
	}
}
package ml.kerotori.app.infrastructure.core;

import java.beans.XMLDecoder;
import java.io.BufferedInputStream;
import java.io.FileInputStream;
import java.io.FileNotFoundException;

public interface Load<T> {
	@SuppressWarnings("unchecked")
	public static <T>  T loadXml(String fileName) {

		try (XMLDecoder decoder = new XMLDecoder(
				new BufferedInputStream(
						new FileInputStream(fileName)))) {
			return (T) decoder.readObject();
		} catch (FileNotFoundException e) {
			return null;
		}catch(Exception e) {
			return null;
		}
	}
}
5-2.AddressDaoの作成
package ml.kerotori.app.infrastructure.dao;

import java.io.Serializable;

import ml.kerotori.app.domain.Address;
import ml.kerotori.app.infrastructure.core.Load;
import ml.kerotori.app.infrastructure.core.Save;

public class AddressDao implements Serializable,Save<Address>, Load<Address> {

	private Address address;

	public Address getAddress() {
		return address;
	}

	public void setAddress(Address address) {
		this.address = address;
	}

	public static Address Load(int no) {
		return Load.loadXml(no + ".xml");
	}

	public boolean Save() {
		return Save.saveXml(this.address.getNo() + ".xml", address);
	}
}
5-2.Domainの参照
Infrastructureのpom.xmlに以下を追加する。
   <dependencies>
           <dependency>
            <groupId>ml.kerotori.app</groupId>
            <artifactId>Domain</artifactId>
            <version>${project.version}</version>
        </dependency>
   </dependencies>
5-3.テストコードの作成
package ml.kerotori.app.infrastructure.dao;

import static org.junit.jupiter.api.Assertions.*;

import java.text.ParseException;
import java.text.SimpleDateFormat;
import java.util.Date;

import org.junit.jupiter.api.Test;

import ml.kerotori.app.domain.Address;

class AddressDaoTest {

	@Test
	void SaveTest1() {
		Address address = new Address();
		address.setNo(1);
		address.setName("佐藤 一郎");
		address.setAddress1("北海道");
		address.setAddress2("札幌市");
		SimpleDateFormat sdf = new SimpleDateFormat("yyyy/MM/dd");
		Date date = null;
		try {
			date = sdf.parse("1990/10/11");
		} catch (ParseException e) {
			// TODO 自動生成された catch ブロック
			e.printStackTrace();
		}
		address.setBirthday(date);
		AddressDao dao = new AddressDao();
		dao.setAddress(address);
		assertTrue(dao.Save());


	}

	@Test
	void LoadTest1() {
		Address address = AddressDao.Load(1);
		assertEquals("佐藤 一郎", address.getName());

	}
}
5-4.テスト用pom.xml
			<plugin>
				<groupId>org.apache.maven.plugins</groupId>
				<artifactId>maven-surefire-plugin</artifactId>
				<version>2.7.2</version>
				<configuration>
					<workingDirectory>${project.basedir}/src/test/resources</workingDirectory>
				</configuration>
			</plugin>


			<plugin>
				<groupId>org.apache.maven.plugins</groupId>
				<artifactId>maven-surefire-plugin</artifactId>
				<version>2.19.1</version>
				<dependencies>
					<dependency>
						<groupId>org.junit.platform</groupId>
						<artifactId>junit-platform-surefire-provider</artifactId>
						<version>1.1.0</version>
					</dependency>
					<dependency>
						<groupId>org.junit.jupiter</groupId>
						<artifactId>junit-jupiter-engine</artifactId>
						<version>5.1.0</version>
					</dependency>
				</dependencies>
			</plugin>
テストが失敗するようなら、[Maven]-[プロジェクトの更新]を実行するで改善されるかもしれない。
6.Viewのコーディング
6-1.AddressViewの作成準備
1.「View」プロジェクトを右クリック。
2.[新規]-[その他]
3.[WindowsBuilder]-[SWTデザイナー]-[SWT]-[アプリケーション・ウインドウ]
6-2.メモ
6-2-1.SWTについて
Windows用のSWTについて、新しいバージョン(4.13)は64bit用で、32bit環境では動かない。
https://download.eclipse.org/eclipse/downloads/drops4/R-4.13-201909161045/
32bit版の最新は以下の3.8.2?
https://archive.eclipse.org/eclipse/downloads/drops/R-3.8.2-201301310800/
Eclipseマーケットプレースで、検索に「WindowBuilder」と入力して、インストール。
6-2-2.ダウンロード先について
6-2-3.Mavenのローカルリポジトリのクリアについて
フォルダを物理的に消すだけで良かった。
6-2-4.SWTの解決
あきらめて、自分でダウンロードして、手動でリポジトリに登録することにした。
6-3.参照設定
Viewのpom.xmlに以下を設定。
	<profiles>
		<profile>
			<id>windows_x86</id>
			<activation>
				<os>
					<family>Windows</family>
					<arch>x86</arch>
				</os>
			</activation>
			<dependencies>
				<dependency>
					<groupId>swt</groupId>
					<artifactId>swt-win32-x86</artifactId>
					<version>3.8.2</version>
					<type>jar</type>
				</dependency>
			</dependencies>
		</profile>
		<profile>
			<id>windows-x86_64</id>
			<activation>
				<os>
					<family>Windows</family>
					<arch>amd64</arch>
				</os>
			</activation>
			<dependencies>
				<dependency>
					<groupId>swt</groupId>
					<artifactId>swt-win32-x86_64</artifactId>
					<version>3.8.2</version>
					<type>jar</type>
				</dependency>
			</dependencies>
		</profile>
	</profiles>
「swt-3.8.2-win32-win32-x86.zip」と「swt-3.8.2-win32-win32-x86_64.zip」をダウンロードし、それぞれ展開すると「swt.jar」が入っているので、ファイル名を以下のように変更して、「D:\swt」フォルダに保存しておく。
swt-3.8.2-win32-x86.jar
swt-3.8.2-win32-x86_64.jar
以下のコマンドで手動でリポジトリに登録。
SET REPO_URL=file:D:/apache-maven-3.6.2/repository/
mvn deploy:deploy-file -DrepositoryId=ml.kerotori.app -Durl=%REPO_URL% -Dfile=d:\swt\swt-3.8.2-win32-x86.jar -DgroupId=swt -DartifactId=swt-win32-x86 -Dversion=3.8.2 -Dpackaging=jar
mvn deploy:deploy-file -DrepositoryId=ml.kerotori.app -Durl=%REPO_URL% -Dfile=d:\swt\swt-3.8.2-win32-x86_64.jar -DgroupId=swt -DartifactId=swt-win32-x86_64 -Dversion=3.8.2 -Dpackaging=jar
なぜかエラーが消えなかったが、エラーを消して実行したら正常に動いた。

6-4.AddressViewの作成
とりあえず正常系の動作のみ。入力値チェックは省略。
package ml.kerotori.app.view;

import java.util.Date;

import org.eclipse.swt.SWT;
import org.eclipse.swt.events.SelectionAdapter;
import org.eclipse.swt.events.SelectionEvent;
import org.eclipse.swt.layout.GridData;
import org.eclipse.swt.layout.GridLayout;
import org.eclipse.swt.widgets.Button;
import org.eclipse.swt.widgets.Display;
import org.eclipse.swt.widgets.Label;
import org.eclipse.swt.widgets.MessageBox;
import org.eclipse.swt.widgets.Shell;
import org.eclipse.swt.widgets.Text;

import ml.kerotori.app.domain.Address;
import ml.kerotori.app.infrastructure.dao.AddressDao;

public class AddressView {

	protected Shell shell;
	private Text txtNo;
	private Text txtName;
	private Text txtAddress1;
	private Text txtAddress2;
	private Text txtBirtyday;

	/**
	 * Launch the application.
	 * @param args
	 */
	public static void main(String[] args) {
		try {
			AddressView window = new AddressView();
			window.open();
		} catch (Exception e) {
			e.printStackTrace();
		}
	}

	/**
	 * Open the window.
	 */
	public void open() {
		Display display = Display.getDefault();
		createContents();
		shell.open();
		shell.layout();
		while (!shell.isDisposed()) {
			if (!display.readAndDispatch()) {
				display.sleep();
			}
		}
	}

	/**
	 * Create contents of the window.
	 */
	protected void createContents() {
		shell = new Shell();
		shell.setSize(450, 300);
		shell.setText("SWT Application");
		shell.setLayout(new GridLayout(2, false));

		Label lblNo = new Label(shell, SWT.NONE);
		lblNo.setText("No");
		txtNo = new Text(shell, SWT.BORDER);
		txtNo.setLayoutData(new GridData(SWT.FILL, SWT.CENTER, true, false, 1, 1));

		Label label = new Label(shell, SWT.NONE);
		label.setText("名前");
		txtName = new Text(shell, SWT.BORDER);
		txtName.setLayoutData(new GridData(SWT.FILL, SWT.CENTER, true, false, 1, 1));

		Label label_1 = new Label(shell, SWT.NONE);
		label_1.setText("住所1");
		txtAddress1 = new Text(shell, SWT.BORDER);
		txtAddress1.setLayoutData(new GridData(SWT.FILL, SWT.CENTER, true, false, 1, 1));

		Label label_2 = new Label(shell, SWT.NONE);
		label_2.setText("住所2");
		txtAddress2 = new Text(shell, SWT.BORDER);
		txtAddress2.setLayoutData(new GridData(SWT.FILL, SWT.CENTER, true, false, 1, 1));

		Label label_3 = new Label(shell, SWT.NONE);
		label_3.setText("誕生日");
		txtBirtyday = new Text(shell, SWT.BORDER);
		txtBirtyday.setLayoutData(new GridData(SWT.FILL, SWT.CENTER, true, false, 1, 1));

		Button btnSave = new Button(shell, SWT.NONE);
		btnSave.addSelectionListener(new SelectionAdapter() {
			@Override
			public void widgetSelected(SelectionEvent arg0) {
				AddressDao dao = new AddressDao();
				Address address = new Address();
				address.setNo(Integer.parseInt(txtNo.getText()));
				address.setName(txtName.getText());
				address.setAddress1(txtAddress1.getText());
				address.setAddress2(txtAddress2.getText());
				address.setBirthday(new Date(txtBirtyday.getText()));
				dao.setAddress(address);
				if(dao.Save()) {
					MessageBox msgBox = new MessageBox(shell, SWT.ICON_INFORMATION | SWT.OK);
					msgBox.setText("MessageBox");
					msgBox.setMessage("登録成功");
					int reply = msgBox.open();
				}else {
					MessageBox msgBox = new MessageBox(shell, SWT.ICON_ERROR | SWT.OK);
					msgBox.setText("MessageBox");
					msgBox.setMessage("登録失敗");
					int reply = msgBox.open();
				}

			}
		});
		btnSave.setLayoutData(new GridData(SWT.CENTER, SWT.CENTER, false, false, 2, 1));
		btnSave.setText("登録");

	}

}
6-5.DomainとInfrastructureの参照
<project xmlns="http://maven.apache.org/POM/4.0.0"
	xmlns:xsi="http://www.w3.org/2001/XMLSchema-instance"
	xsi:schemaLocation="http://maven.apache.org/POM/4.0.0 http://maven.apache.org/xsd/maven-4.0.0.xsd">
	<modelVersion>4.0.0</modelVersion>
	<parent>
		<groupId>ml.kerotori.app</groupId>
		<artifactId>SWTsample</artifactId>
		<version>0.0.1-SNAPSHOT</version>
	</parent>
	<artifactId>View</artifactId>

	<profiles>
		<profile>
			<id>windows_x86</id>
			<activation>
				<os>
					<family>Windows</family>
					<arch>x86</arch>
				</os>
			</activation>
			<dependencies>
				<dependency>
					<groupId>swt</groupId>
					<artifactId>swt-win32-x86</artifactId>
					<version>3.8.2</version>
					<type>jar</type>
				</dependency>
			</dependencies>
		</profile>
		<profile>
			<id>windows-x86_64</id>
			<activation>
				<os>
					<family>Windows</family>
					<arch>amd64</arch>
				</os>
			</activation>
			<dependencies>
				<dependency>
					<groupId>swt</groupId>
					<artifactId>swt-win32-x86_64</artifactId>
					<version>3.8.2</version>
					<type>jar</type>
				</dependency>
			</dependencies>
		</profile>
	</profiles>

	<dependencies>
		<dependency>
			<groupId>ml.kerotori.app</groupId>
			<artifactId>Domain</artifactId>
			<version>${project.version}</version>
		</dependency>
		<dependency>
			<groupId>ml.kerotori.app</groupId>
			<artifactId>Infrastructure</artifactId>
			<version>${project.version}</version>
		</dependency>
	</dependencies>
</project>
7.実行モジュール
親プロジェクトのpom.xmlを以下のようにしたらViewの中にモジュールができた。
<project xmlns="http://maven.apache.org/POM/4.0.0"
	xmlns:xsi="http://www.w3.org/2001/XMLSchema-instance"
	xsi:schemaLocation="http://maven.apache.org/POM/4.0.0 http://maven.apache.org/xsd/maven-4.0.0.xsd">
	<modelVersion>4.0.0</modelVersion>
	<groupId>ml.kerotori.app</groupId>
	<artifactId>SWTsample</artifactId>
	<version>0.0.1-SNAPSHOT</version>
	<packaging>pom</packaging>
	<modules>
		<module>View</module>
		<module>Infrastructure</module>
		<module>Domain</module>
	</modules>
	<properties>
		<project.build.sourceEncoding>UTF-8</project.build.sourceEncoding>
		<java.version>1.8</java.version>
	</properties>

	<build>
		<plugins>
			<plugin>
				<groupId>org.apache.maven.plugins</groupId>
				<artifactId>maven-compiler-plugin</artifactId>
				<configuration>
					<source>${java.version}</source>
					<target>${java.version}</target>
				</configuration>
			</plugin>

			<plugin>
				<groupId>org.apache.maven.plugins</groupId>
				<artifactId>maven-assembly-plugin</artifactId>
				<version>3.1.1</version>
				<configuration>
					<finalName>SWTsample</finalName>
					<appendAssemblyId>false</appendAssemblyId>
					<descriptorRefs>
						<descriptorRef>jar-with-dependencies</descriptorRef>
					</descriptorRefs>
					<archive>
						<manifest>
							<mainClass>ml.kerotori.app.view.AddressView</mainClass>
						</manifest>
					</archive>
				</configuration>
				<executions>
					<execution>
						<id>make-assembly</id>
						<phase>package</phase>
						<goals>
							<goal>single</goal>
						</goals>
					</execution>
				</executions>
			</plugin>
			<plugin>
				<groupId>org.apache.maven.plugins</groupId>
				<artifactId>maven-dependency-plugin</artifactId>
				<version>3.1.1</version>
				<executions>
					<execution>
						<id>copy-dependencies</id>
						<phase>package</phase>
						<goals>
							<goal>copy-dependencies</goal>
						</goals>
						<configuration>
							<!-- configure the plugin here -->
						</configuration>
					</execution>
				</executions>
			</plugin>
		</plugins>
	</build>


</project>
8.GitHubにコミット
以下を参考に設定。
https://qiita.com/cotrpepe/items/7cafaacb538425a78f1f
参考までに。
https://github.com/kero1976/SWTsample
9.TIPS
9-1. 自ライブラリの取込
Mavenの良いところはライブラリをインターネットから自動でダウンロードして取り込んでくれるところだが、公開されていないライブラリや自作のライブラリを取り込みたいこともあるので、対応方法を記載する。
9-1-1.mvnのローカルリポジトリーにインストール
この方法は開発環境とJenkinsなどのビルド環境でリポジトリーが異なる場合に面倒。
9-1-2.systemスコープ
<scope>タグにsystemと記載して、<systemPath>に${basedir}からの相対パスを指定する。
		<dependency>
			<groupId>hoge</groupId>
			<artifactId>foo</artifactId>
			<version>1.0.0</version>
			<scope>system</scope>
			<systemPath>${basedir}/lib/test.jar</systemPath>
		</dependency>
ただ、プロジェクト内のディレクトを指定するなと警告が表示される・・・
9-1-3.ローカルリポジトリーへのインストールを自動化
mvn cleanを行うと、libフォルダのtest.jarをmvnのローカルリポジトリーに登録する。
これで警告も出ない。
	<build>
		<plugins>
			<plugin>
				<groupId>org.apache.maven.plugins</groupId>
				<artifactId>maven-compiler-plugin</artifactId>
				<version>3.8.1</version>
				<configuration>
					<source>1.8</source>
					<target>1.8</target>
				</configuration>
			</plugin>

			<plugin>
				<groupId>org.apache.maven.plugins</groupId>
				<artifactId>maven-install-plugin</artifactId>
				<version>3.0.0-M1</version>
				<executions>
					<execution>
						<id>install-external</id>
						<phase>clean</phase>
						<configuration>
							<file>${basedir}/lib/test.jar</file>
							<repositoryLayout>default</repositoryLayout>
							<groupId>hoge2</groupId>
							<artifactId>foo</artifactId>
							<version>1.0.0</version>
							<packaging>jar</packaging>
							<generatePom>true</generatePom>
						</configuration>
						<goals>
							<goal>install-file</goal>
						</goals>
					</execution>
				</executions>
			</plugin>

		</plugins>
	</build>

	<dependencies>
		<dependency>
			<groupId>hoge2</groupId>
			<artifactId>foo</artifactId>
			<version>1.0.0</version>
		</dependency>
	</dependencies>
9-2.Testの依存関係
Test用の基本クラスを作成し、それを別プロジェクトでも使用したい場合の方法。
通常はsrc/test以下のクラスはjarにならないので、別モジュールからは見えない。
10.Mavenのプラグイン
10-1.maven-resources-plugin
ファイルのコピー。リネームはできなさそう。
参考URL:https://www.codeflow.site/ja/article/maven-resources-plugin
<plugin>
    <artifactId>maven-resources-plugin</artifactId>
    <version>3.2.0</version>
    <configuration>
        ...
    </configuration>
</plugin>
10-2.copy-rename-maven-plugin
			<plugin>
				<groupId>com.coderplus.maven.plugins</groupId>
				<artifactId>copy-rename-maven-plugin</artifactId>
				<version>1.0</version>
				<executions>
					<execution>
						<id>copy-file</id>
						<phase>generate-sources</phase>
						<goals>
							<goal>copy</goal>
						</goals>
						<configuration>
							<sourceFile>target/ExeControl-0.1.0.jar</sourceFile>
							<destinationFile>image/lib/ExeControl.jar</destinationFile>
						</configuration>
					</execution>
				</executions>
			</plugin>
10-3.maven-assembly-plugin
ZIPファイルを作成するために使用した。
ファイル名が「<pomで指定した名前>-<assemlyのid>.zip」という名前になる。
			<plugin>
				<artifactId>maven-assembly-plugin</artifactId>
				<version>3.1.0</version>
				<executions>
					<execution>
						<id>ZIPファイルの作成</id>
						<phase>install</phase>
						<goals>
							<goal>single</goal>
						</goals>
						<configuration>
							<finalName>hoge</finalName>
							<descriptors>
								<descriptor>assembly.xml</descriptor>
							</descriptors>
						</configuration>
					</execution>
				</executions>
			</plugin>
<assembly xmlns="http://maven.apache.org/ASSEMBLY/2.1.0" xmlns:xsi="http://www.w3.org/2001/XMLSchema-instance" xsi:schemaLocation="http://maven.apache.org/ASSEMBLY/2.1.0 http://maven.apache.org/xsd/assembly-2.1.0.xsd">
	<id>foo</id>

	<!-- プロジェクト名のフォルダを作成いない -->
	<includeBaseDirectory>false</includeBaseDirectory>

	<formats>
		<format>zip</format>
	</formats>
	<fileSets>
		<fileSet>
			<useDefaultExcludes>false</useDefaultExcludes>
			<directory>圧縮したいフォルダ</directory>
<!-- 圧縮したいフォルダの階層が深くて、階層を変更する場合 -->
<outputDirectory>変更後のフォルダ</outputDirectory>
		</fileSet>
	</fileSets>

</assembly>
11.トラブルシューティング
11-1. Eclipse環境でサブモジュール構成のMavenプロジェクトを取り込んだ際に、子プロジェクトを認識しない。
親プロジェクトしか認識していない場合は、以下の手順を試す。
- Eclipseから[ファイル]-[インポート]
- インポート画面で、[Maven]-[既存Mavenプロジェクト]
- ルートディレクトリーを指定
11-2.「Unexpected error (103) returned by AddToSystemClassLoaderSearch」エラー
以下のようなエラーが発生した。
[ERROR] Please refer to C:\Users\けろ\git\javaUtils\Domain\target\surefire-reports for the individual test results.
[ERROR] Please refer to dump files (if any exist) [date].dump, [date]-jvmRun[N].dump and [date].dumpstream.
[ERROR] The forked VM terminated without properly saying goodbye. VM crash or System.exit called?
[ERROR] Command was cmd.exe /X /C "C:\pleiades\java\11\bin\java -javaagent:C:\\Users\\けろ\\.m2\\repository\\org\\jacoco\\org.jacoco.agent\\0.8.6\\org.jacoco.agent-0.8.6-runtime.jar=destfile=C:\\Users\\けろ\\git\\javaUtils\\Domain\\target\\jacoco.exec -jar C:\Users\けろ\AppData\Local\Temp\surefire207478320860218725\surefirebooter2089625280193585507.jar C:\Users\けろ\AppData\Local\Temp\surefire207478320860218725 2020-12-15T00-00-19_944-jvmRun1 surefire16652285201338151811tmp surefire_017991549278350361155tmp"
[ERROR] Error occurred in starting fork, check output in log
[ERROR] Process Exit Code: 1
以下を試したが効果なし
- maven-surefire-pluginのバージョン更新
- eclipse.iniを修正し、メモリ割り当てを増やす
- jacocoのメモリ割り当てを指定
			<plugin>
				<groupId>org.jacoco</groupId>
				<artifactId>jacoco-maven-plugin</artifactId>
				<version>0.8.6</version>
				<executions>
					<execution>
						<id>prepare-agent</id>
						<goals>
							<goal>prepare-agent</goal>
						</goals>
					</execution>

				</executions>
				<configuration>
									<argLine>XX:MaxPermSize=4096m ${argLine}</argLine>
				</configuration>

			</plugin>
jacocoのプラグインを削除したらエラーは無くなった。
ただ、ログ出力を行っているので、それが関係している気がする。
11-3.Mavenプロジェクト作成後のpom.xmlでエラー
以下のエラーが出た。
Failure to transfer classworlds:classworlds:jar:1.1-alpha-2 from https://repo.maven.apache.org/maven2 was cached in the local repository, resolution will not be reattempted until the update interval of central has elapsed or updates are forced. オリジナル・エラー: Could not transfer artifact classworlds:classworlds:jar:1.1-alpha-2 from/to central (https://repo.maven.apache.org/maven2): 操作はキャンセルされました。
以下の手順で解決した。
- 「<ユーザー名>.m2」フォルダを削除
- Eclipseからプロジェクトを右クリックし、[Maven]-[プロジェクトの更新]を選択
- 以下の画面でOKを押す。だめなら「スナップショット/リリースの更新を強制」にチェックを付けてみる。
