はじめに
OpenVAS(現:Greenbone-Vulnerability-Manager)を使用する機会があり、忘れないうちにまとめます。
※ 以降、OpenVAS 表記で進めます
前提
- ローカル環境で脆弱性検査を実施する
- 攻撃手法を問わず、幅広く脆弱性検査可能なツールを選定する
- お手軽なのが良い...(本音)
上記条件でGoogleさんに聞くと、概ね OpenVAS が要件を満たしていました。従い、今回は OpenVAS で脆弱性検査をしてみたいと思います。
環境
- Windows10 with WLS2
- Docker on Ubuntu22.04 LTS
事前調査
まず初めに、OpenVAS をざっと理解するために公式ドキュメントを確認します。
はいっ?コミュニティエディション無くないですか?となりますが、GitHub あたりからこちらに飛べるはずです!
インストール要件を確認すると、最新のLinuxディストリビューションが列挙されています。
手元の環境を勘定して、Ubuntu22.04 を採用したいと思います。Ubuntu22.04 さえ用意できれば、後は yaml 食わせてコンテナ起動してドンっ!という感じです。
次に windows 上で Ubuntu22.04 環境の用意を考えます。本記事投稿時点では wls --list --online コマンドで Ubuntu22.04 LTS はリストされていません。
> wsl --list --online
インストールできる有効なディストリビューションの一覧を次に示します。
'wsl --install -d <Distro>' を使用してインストールします。

NAME            FRIENDLY NAME
Ubuntu          Ubuntu
Debian          Debian GNU/Linux
kali-linux      Kali Linux Rolling
openSUSE-42     openSUSE Leap 42
SLES-12         SUSE Linux Enterprise Server v12
Ubuntu-16.04    Ubuntu 16.04 LTS
Ubuntu-18.04    Ubuntu 18.04 LTS
Ubuntu-20.04    Ubuntu 20.04 LTS
Ubuntu-20.04 を Ubuntu22.04 に VerUP する方もいるようですが、Microsoft Store から Ubuntu22.04 LTS をダウンロードする方法が一番容易だと判明しました。
ここまでで環境が理解できましたので、早速手を動かしていきます。
Let's get started!!
まずは Microsoft Store から Ubuntu22.04 LTS をダウンロードします。

初回起動時に新規ユーザ作成が必要になります。
Installing, this may take a few minutes...
Please create a default UNIX user account. The username does not need to match your Windows username.
For more information visit: https://aka.ms/wslusers
Enter new UNIX username: user01
New password:
Retype new password:
passwd: password updated successfully
Installation successful!
To run a command as administrator (user "root"), use "sudo <command>".
See "man sudo_root" for details.

Welcome to Ubuntu 22.04.1 LTS (GNU/Linux 5.10.16.3-microsoft-standard-WSL2 x86_64)

 * Documentation:  https://help.ubuntu.com
 * Management:     https://landscape.canonical.com
 * Support:        https://ubuntu.com/advantage

This message is shown once a day. To disable it please create the
/home/user01/.hushlogin file.
$
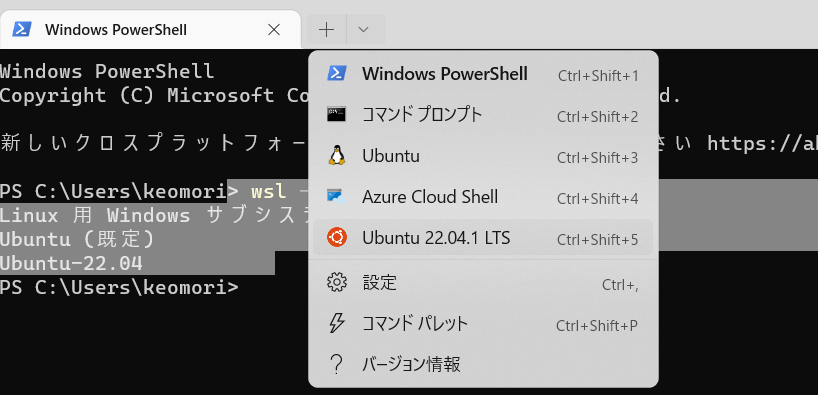
※ 補足ですが、Windows Terminal なるものがあるので合わせてインストールしてみます。

正しくインストールできたか確認します。
> wsl --list
Linux 用 Windows サブシステム ディストリビューション:
Ubuntu (既定)
Ubuntu-22.04
問題無いようですので、別タブで Ubuntu22.04 を起動します。

ここからは OpenVAS 公式ドキュメント通りに進めていきます...が、Docker インストール手順は別手順が必要なので注意が必要です。
実行コマンドを下記に列挙します。
$ sudo apt update
$ sudo apt install curl
$ sudo apt install docker.io
$ sudo apt install python3 python3-pip
$ sudo python3 -m pip install --user docker-compose
$ sudo usermod -aG docker $USER && su $USER
$ export DOWNLOAD_DIR=$HOME/greenbone-community-container && mkdir -p $DOWNLOAD_DIR
$ cd $DOWNLOAD_DIR && curl -f -L https://greenbone.github.io/docs/latest/_static/docker-compose-22.4.yml -o docker-compose.yml
この次は docker-compose コマンドを打つ必要がありますが、docker-compose 未インストールかつdocker が起動しない状態です。従い、WSL2のUbuntu 22.04でSystemdでDockerを起動させるの優良記事を基に docker を再インストールします。
$ sudo apt-get remove docker docker-engine docker.io containerd runc
$ sudo apt-get update
$ sudo apt-get install \
    ca-certificates \
    curl \
    gnupg \
    lsb-release
$ sudo mkdir -p /etc/apt/keyrings
$ sudo curl -fsSL https://download.docker.com/linux/ubuntu/gpg | sudo gpg --dearmor -o /etc/apt/keyrings/docker.gpg
$ echo \
  "deb [arch=$(dpkg --print-architecture) signed-by=/etc/apt/keyrings/docker.gpg] https://download.docker.com/linux/ubuntu \
  $(lsb_release -cs) stable" | sudo tee /etc/apt/sources.list.d/docker.list > /dev/null
$ sudo apt-get update
$ sudo apt-get install docker-ce docker-ce-cli containerd.io docker-compose-plugin
$ sudo apt purge needrestart
$ sudo /usr/libexec/wsl-systemd
$ sudo /usr/libexec/nslogin
$ ps ax | grep systemd
$ sudo systemctl start docker <--- docker 起動失敗
$ sudo update-alternatives --set iptables /usr/sbin/iptables-legacy
$ sudo update-alternatives --set ip6tables /usr/sbin/ip6tables-legacy
$ sudo update-alternatives --config iptables
$ sudo systemctl start docker
$ docker ps
ここまでで docker 起動確認はできました。OpenVAS 公式ドキュメント内の手順を消化していきます。
$ sudo apt install docker-compose
$ docker-compose -f $DOWNLOAD_DIR/docker-compose.yml -p greenbone-community-edition pull
$ docker-compose -f $DOWNLOAD_DIR/docker-compose.yml -p greenbone-community-edition up -d
$ docker-compose -f $DOWNLOAD_DIR/docker-compose.yml -p greenbone-community-edition logs -f
$ xdg-open "http://127.0.0.1:9392" 2>/dev/null >/dev/null &
ここまで来たらブラウザで http://127.0.0.1:9392 にアクセスして admin/admin でログインします。
まとめ
最初は手元のノートPC(メモリ8GB)で OpenVAS を動作させましたが、結構コンテナ起動するコンテナ数が多くて/スキャン実施時もシステムリソースを食うみたいで、最終的には検証環境をもう少し余裕のあるマシンに移行しました。
スキャン単発で CPU ファンが頑張っていたので、恐らく複数スキャンは厳しそうです。。。

