ダイソーのBTシャッターでコバエ取り装置をON、OFFさせる。
ボタンを押した後に手を放してもON状態を保持するスイッチにしたため、
「オルターネイト」にした。
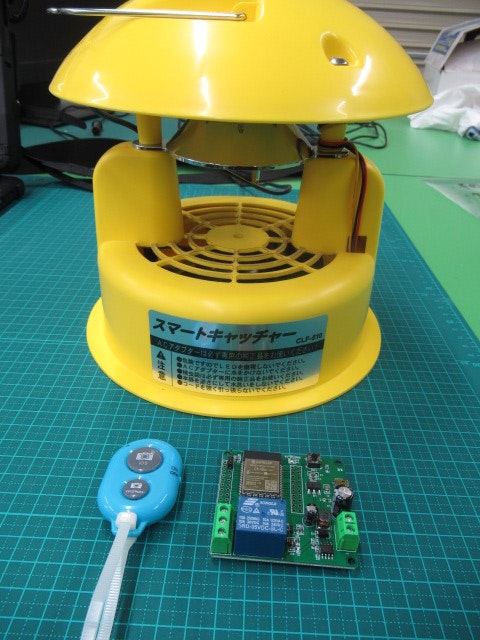
使用機器
①ダイソーのBTシャッターを送信機 ダイソー
②ESP32_Relay X1_V1.2 AliExpress
③スマートキャッチャー
④AE-TTL-232R 秋月電子 書き込み用
配線
電源 ESP32_Relay X1_V1.2 電源 コバエ取り装置
DC12V ------------------ VCC
DC 0V ------------------ GND
NO -----------------DC 0V__DC12 V ---------- +
COM ------------------------------------------- ー
スケッチの書き込み方法
ダイソー スマホシャッターリモコンでESP32の制御2
https://qiita.com/drafts/fa5d2531b8e59b79f78c/edit
スケッチ
#include "BLEDevice.h"
// The remote service we wish to connect to.
static BLEUUID serviceUUID("1812");
static boolean doConnect = false;
static boolean connected = false;
static boolean doScan = false;
static BLEAdvertisedDevice* myDevice;
#define LED_BUILTIN 16 //追記
#define LED_BUILTIN2 17 //追記
int button = 0; //スイッチを押したら1(HIGH)、指を離したら0(LOW)に切り替わる。
int button_keep = 0; //buttonの値を保存する。
int led = 0; //LEDを点灯させるときは1、消灯させるときは0を格納する。
static void notifyCallback(
BLERemoteCharacteristic* pBLERemoteCharacteristic,
uint8_t* pData,
size_t length,
bool isNotify) {
Serial.print("Notify callback for characteristic ");
Serial.print(pBLERemoteCharacteristic->getUUID().toString().c_str());
Serial.print("(");
Serial.print(pBLERemoteCharacteristic->getHandle());
Serial.print(") of data length ");
Serial.print(length);
Serial.print(" data: ");
for (int i = 0; i < length; i++) {
Serial.printf("%02X ", pData[i]);
}
Serial.println();
if (pData[0] == 1 && button_keep == LOW) {
button = 1;
led = 1 - led; //LEDの点灯、消灯の指示
delay(10); //チャタリング防止
}
if (pData[0] == 0 && button_keep == HIGH) {
button = 0;
delay(10);
}
button_keep = button; //buttonの状態をbutton_keepに反映させる
if (led == 1) {
digitalWrite(LED_BUILTIN, HIGH); // turn the LED on (HIGH is the voltage level)
digitalWrite(LED_BUILTIN2, HIGH);
} else {
digitalWrite(LED_BUILTIN, LOW); // turn the LED off by making the voltage LOW
digitalWrite(LED_BUILTIN2, LOW);
}
}
class MyClientCallback : public BLEClientCallbacks {
void onConnect(BLEClient* pclient) {
}
void onDisconnect(BLEClient* pclient) {
connected = false;
Serial.println("onDisconnect");
}
};
bool connectToServer() {
Serial.print("Forming a connection to ");
Serial.println(myDevice->getAddress().toString().c_str());
BLEClient* pClient = BLEDevice::createClient();
Serial.println(" - Created client");
pClient->setClientCallbacks(new MyClientCallback());
// Connect to the remove BLE Server.
pClient->connect(myDevice); // if you pass BLEAdvertisedDevice instead of address, it will be recognized type of peer device address (public or private)
Serial.println(" - Connected to server");
// Obtain a reference to the service we are after in the remote BLE server.
BLERemoteService* pRemoteService = pClient->getService(serviceUUID);
if (pRemoteService == nullptr) {
Serial.print("Failed to find our service UUID: ");
Serial.println(serviceUUID.toString().c_str());
pClient->disconnect();
return false;
}
Serial.println(" - Found our service");
std::map* mapCharacteristics = pRemoteService->getCharacteristicsByHandle();
for (std::map::iterator i = mapCharacteristics->begin(); i != mapCharacteristics->end(); ++i) {
if (i->second->canNotify()) {
Serial.println(" - Add Notify");
i->second->registerForNotify(notifyCallback);
}
}
connected = true;
return true;
}
//
// Scan for BLE servers and find the first one that advertises the service we are looking for.
//
class MyAdvertisedDeviceCallbacks : public BLEAdvertisedDeviceCallbacks {
//
// Called for each advertising BLE server.
//
void onResult(BLEAdvertisedDevice advertisedDevice) {
Serial.print("BLE Advertised Device found: ");
Serial.println(advertisedDevice.toString().c_str());
// We have found a device, let us now see if it contains the service we are looking for.
if (advertisedDevice.haveServiceUUID() && advertisedDevice.isAdvertisingService(serviceUUID)) {
BLEDevice::getScan()->stop();
myDevice = new BLEAdvertisedDevice(advertisedDevice);
doConnect = true;
doScan = true;
} // Found our server
} // onResult
}; // MyAdvertisedDeviceCallbacks
void setup() {
Serial.begin(9600);
Serial.println("Starting Arduino BLE Client application...");
BLEDevice::init("");
// Retrieve a Scanner and set the callback we want to use to be informed when we
// have detected a new device. Specify that we want active scanning and start the
// scan to run for 5 seconds.
BLEScan* pBLEScan = BLEDevice::getScan();
pBLEScan->setAdvertisedDeviceCallbacks(new MyAdvertisedDeviceCallbacks());
pBLEScan->setInterval(1349);
pBLEScan->setWindow(449);
pBLEScan->setActiveScan(true);
pBLEScan->start(5, false);
pinMode(LED_BUILTIN, OUTPUT);
pinMode(LED_BUILTIN2, OUTPUT);
} // End of setup.
// This is the Arduino main loop function.
void loop() {
// If the flag "doConnect" is true then we have scanned for and found the desired
// BLE Server with which we wish to connect. Now we connect to it. Once we are
// connected we set the connected flag to be true.
if (doConnect == true) {
if (connectToServer()) {
Serial.println("We are now connected to the BLE Server.");
} else {
Serial.println("We have failed to connect to the server; there is nothin more we will do.");
}
doConnect = false;
}
// If we are connected to a peer BLE Server, update the characteristic each time we are reached
// with the current time since boot.
if (connected) {
} else if (doScan) {
BLEDevice::getScan()->start(0); // this is just eample to start scan after disconnect, most likely there is better way to do it in arduino
}
delay(1000); // Delay a second between loops.
} // End of loop
結果
思惑通り動いた。
DC12Vで動作させるならば、前記事の方が簡単だ。
https://qiita.com/kenzoos/items/3a64e5067feda05b7274