概要
Pacemaker & Corosync による
AWS での Multi-AZ 間のEIP付け替えによる
フェイルオーバーについて実装したのでまとめます。
以下イメージです。
- 通常状態
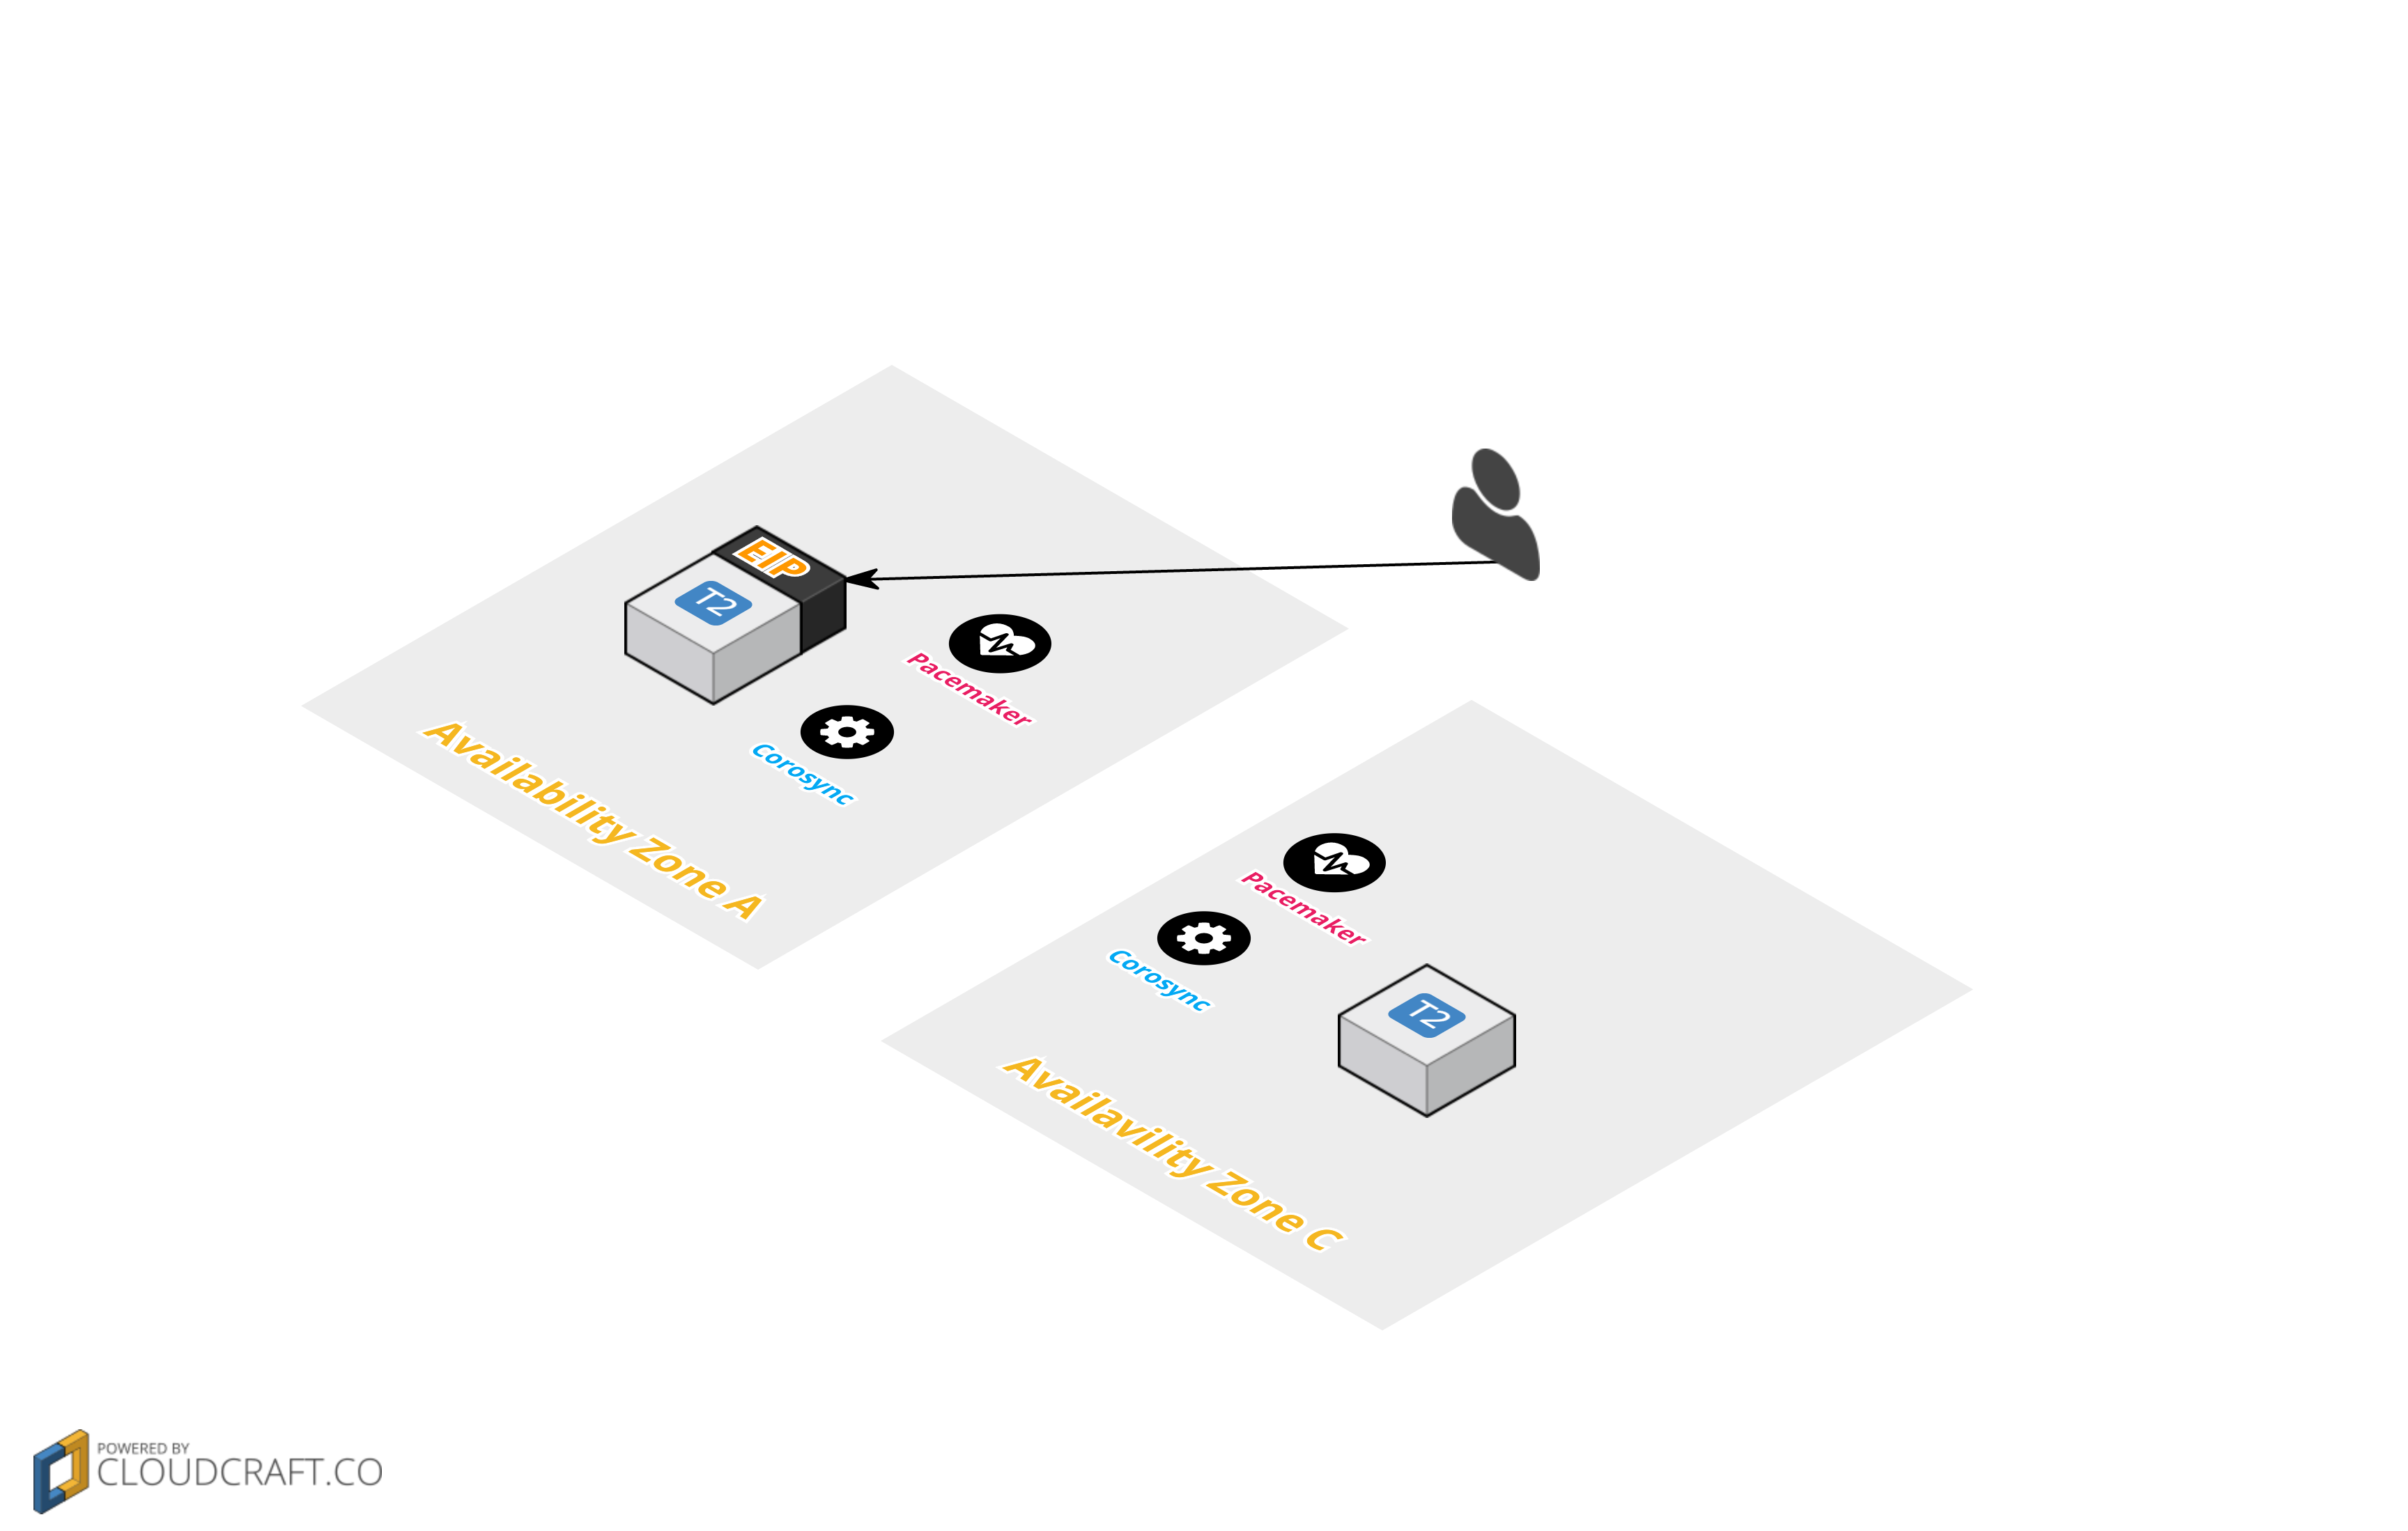
- Avalavility Zone A に配置された Instance A で障害が発生した場合
Avalavility Zone B に配置された Instance B に EIPを付け替え

ToDo
- VPC, Subnet 設定
- Pacemaker & Corosync インストール / 設定
- Cluster 構築
- EIP付け替えスクリプト作成
- フェイルオーバー試験
環境
- CentOS 7 (x86_64) with Updates HVM (t2.micro)
※ 検証用の為、 t2.microで実施しています。
VPC, Subnet 構築
以下記事にて非常によくまとめて頂いているので参考にしていただき
この設定を以降そのまま利用します。
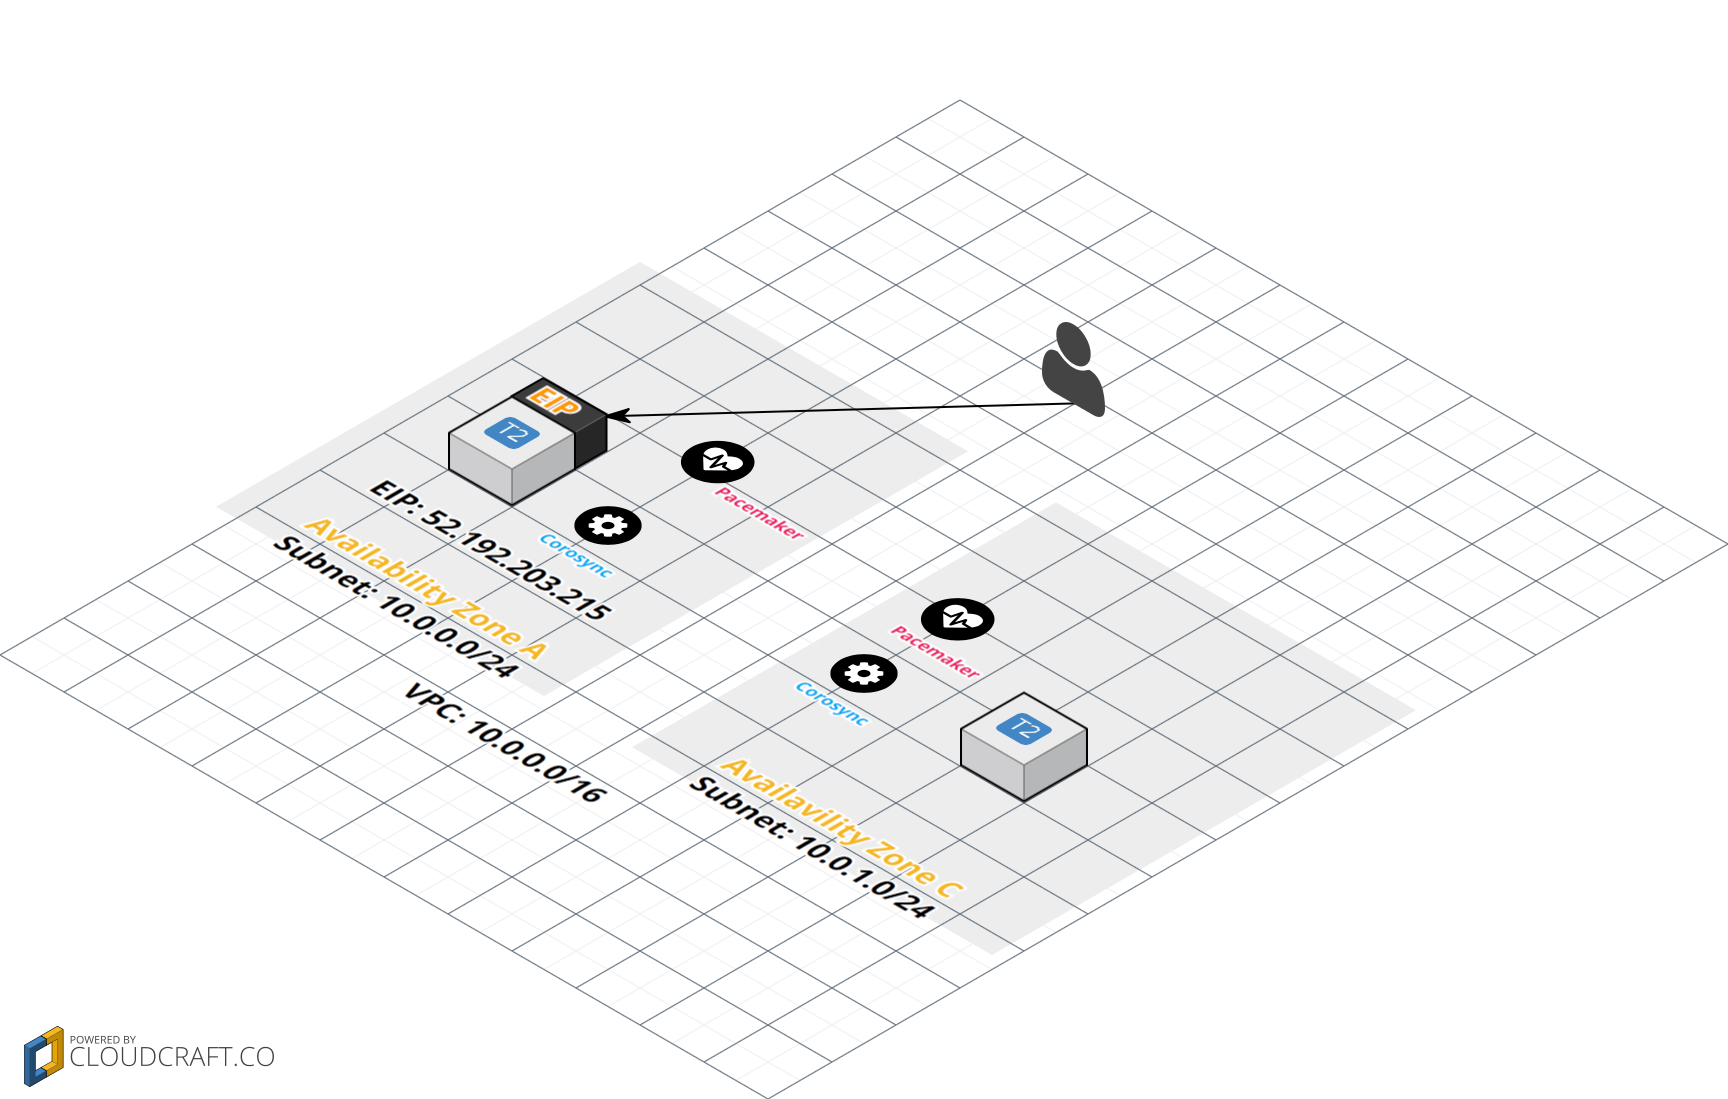
念のため、以下 VPC, Subnet 設定です。
- VPC 設定
| 項目 | 値 |
|---|---|
| Name tag | 任意 |
| CIDR | 10.0.0.0/16 |
| tenancy | Default |
- Subnet 設定
| 項目 | Subnet 1 | Subnet 2 |
|---|---|---|
| Name tag | 任意(VPCのタグ名と関連付けたほうが管理しやすい) | 任意(VPCのタグ名と関連付けたほうが管理しやすい) |
| VPC | 上記で作成したVPCを選択する | 上記で作成したVPCを選択する |
| Availability Zone | ap-northeast-1a | ap-northeast-1c |
| CIDR | 10.0.0.0/24 | 10.0.1.0/24 |
上記VPC設定に基づき以下設定していきます。
構築するイメージは以下になります。
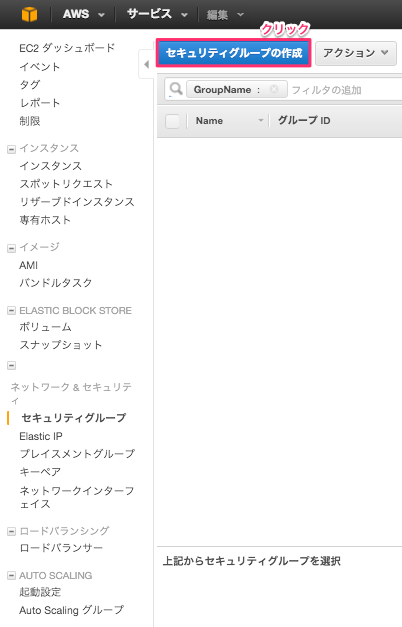
セキュリティグループ作成
今回作成するインスタンス2つにアタッチするセキュリティグループを事前に作成します。
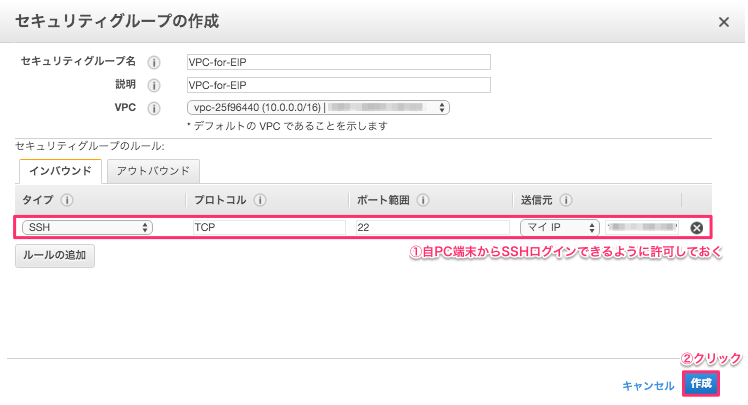
マイIPからのSSHログイン許可
| 項目 | 設定値 |
|---|---|
| セキュリティグループ名 | VPC-for-EIP(任意) |
| 説明 | VPC-for-EIP(任意) |
| VPC | 上記で作成したVPCを選択する |
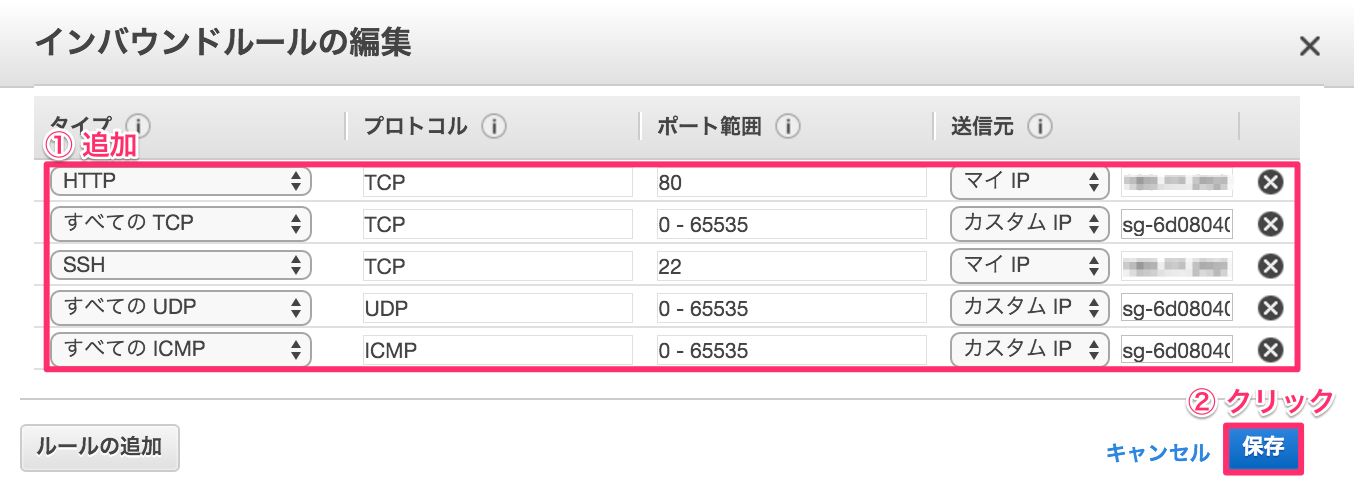
作成したセキュリティグループ編集
- フィルターで検索

※以下は状況により変更してください。
- 送信元を作成したグループIDとし以下追加し保存
| タイプ | プロトコル | ポート範囲 | 送信元 | 用途 |
|---|---|---|---|---|
| すべてのTCP | TCP | 0 - 65535 | 作成したセキュリティグループID | 今回は検証用の為、全解放。適宜設定変更してください。 |
| すべてのICMP | ICMP | 0 - 65535 | 作成したセキュリティグループID | ping疎通確認用。今回は検証用の為、全解放 適宜設定変更してください。 |
| すべてのUDP | UDP | 0 - 65535 | 作成したセキュリティグループID | corosyncで必要なポートはデフォルトで 5404 - 5405。 環境により設定変更する場合は注意が必要です。今回は検証用の為、全解放。適宜設定変更してください。 |
| SSH | TCP | 22 | マイIP | 自PC端末からSSHログイン用。実環境で設定する必要はありません。 |
| HTTP | TCP | 80 | マイIP | FailOver検証用。実環境で設定する必要はありません。 |
以上でインスタンスに適用するセキュリティグループの作成が完了しました。
ポリシー作成
今回、以下コマンドを実行する必要があります。
| コマンド | 用途 |
|---|---|
| aws ec2 associate-address | ElasticIPをインスタンスに関連付ける |
| aws ec2 disassociate-address | ElasticIPをインスタンス関連付け解除 |
| aws ec2 describe-addresses | IPアドレスについて詳細取得 |
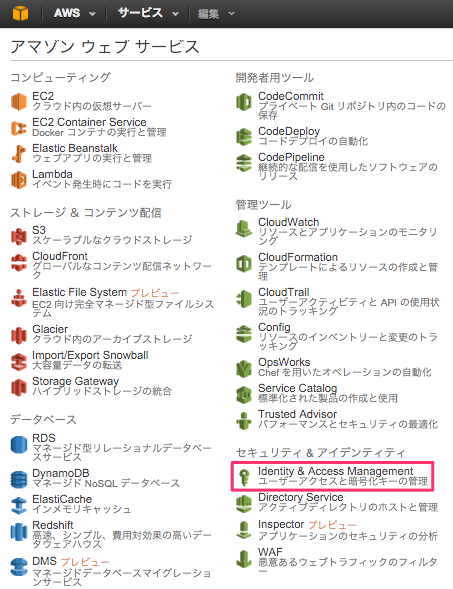
Identity & Access Management ページにアクセス
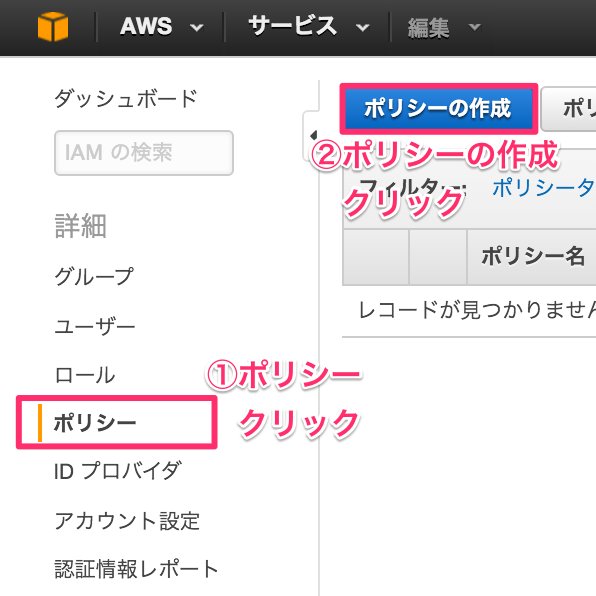
「ポシリー作成」クリック
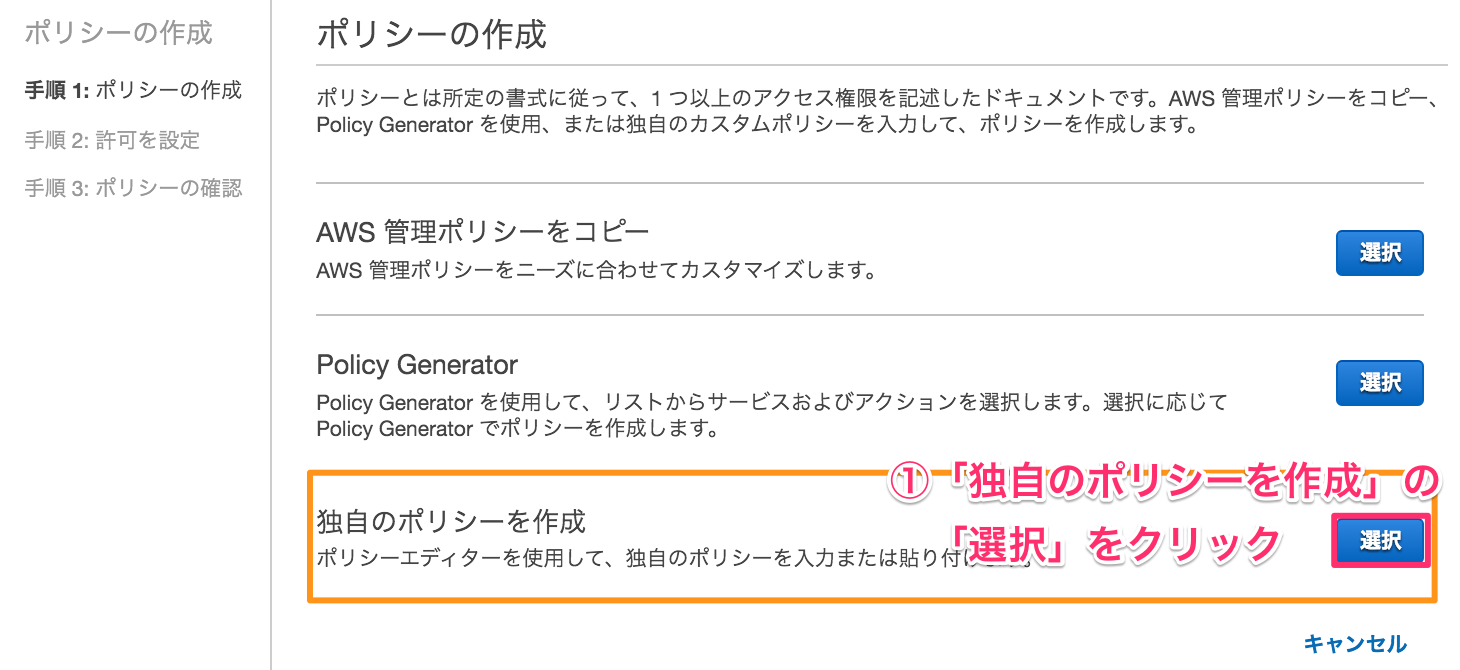
独自ポリシー作成
独自ポリシー情報入力
- ポリシー名(任意)
floatingElasticIP
- ポリシードキュメント
{
    "Version": "2012-10-17",
    "Statement": [
        {
            "Effect": "Allow",
            "Action": [
                "ec2:Describe*",
                "ec2:DisassociateAddress",
                "ec2:AssociateAddress"
            ],
            "Resource": [
                "*"
            ]
        }
    ]
}
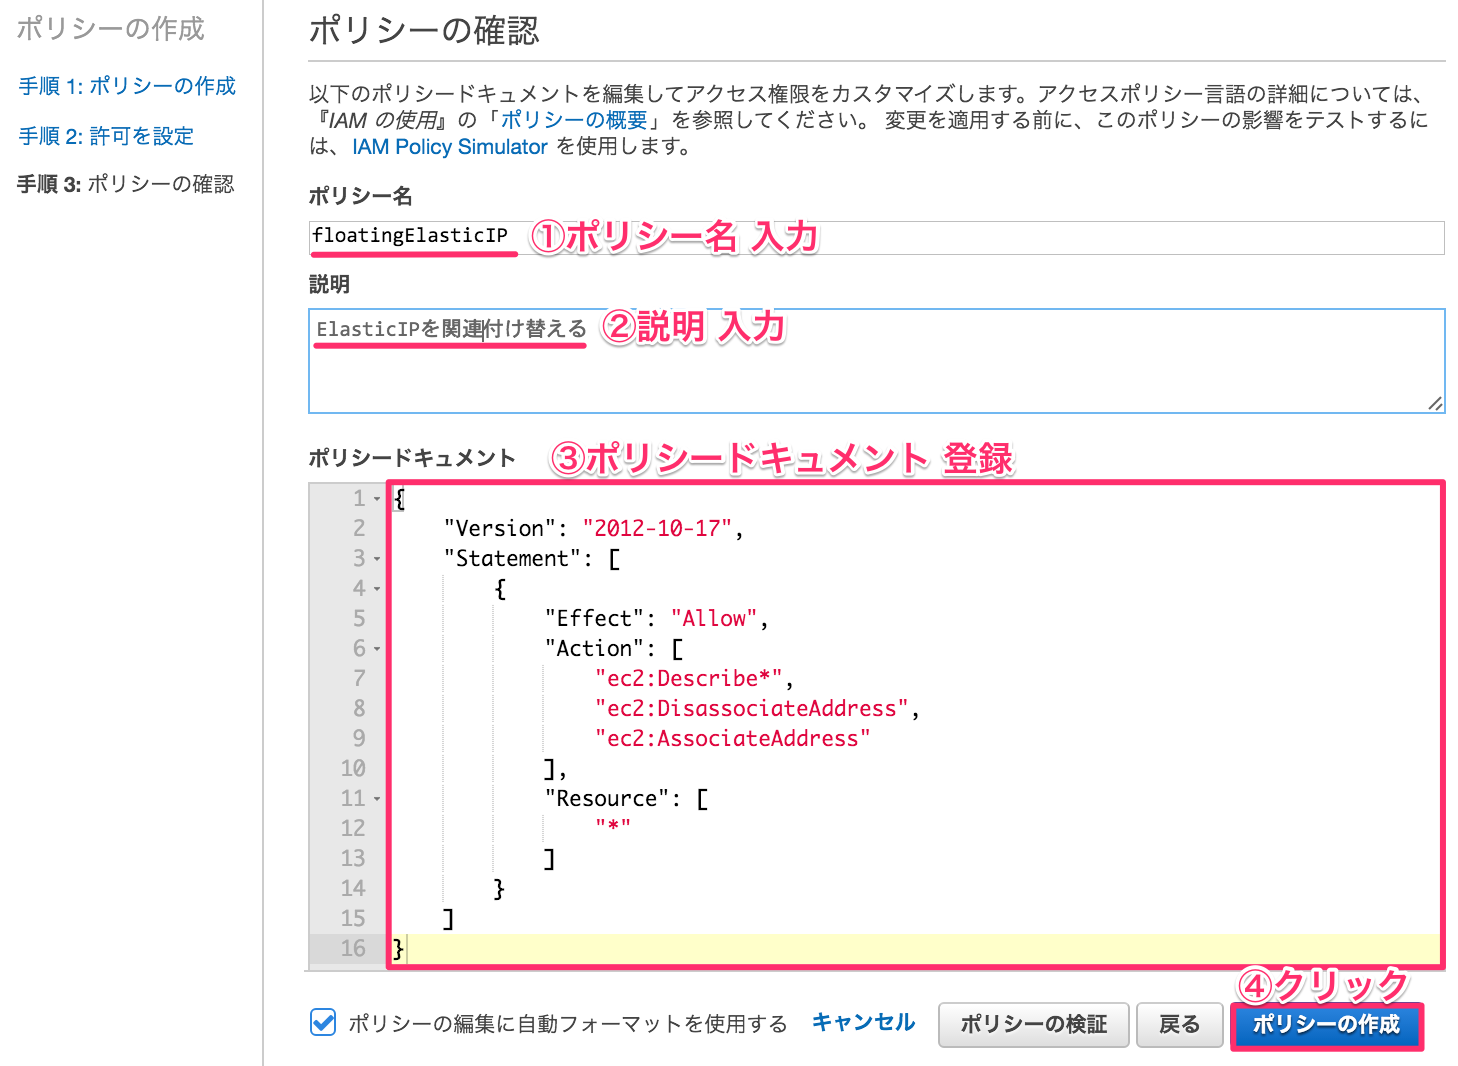
確認

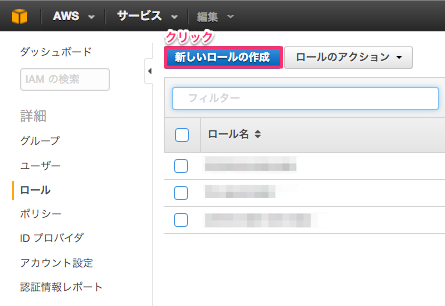
IAMロール作成
ElasticIPの付け替え権限を持ったロールを作成します。
新しいロールの作成 をクリック
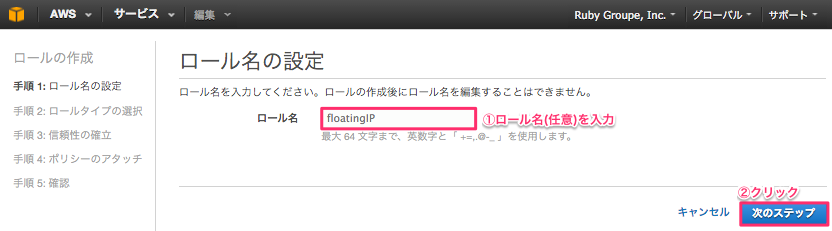
ロール名の設定
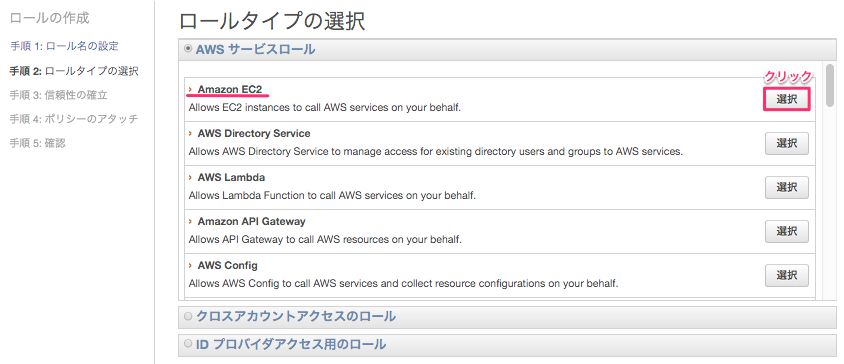
ロールタイプの選択
Amazon EC2 の「選択」ボタンをクリック
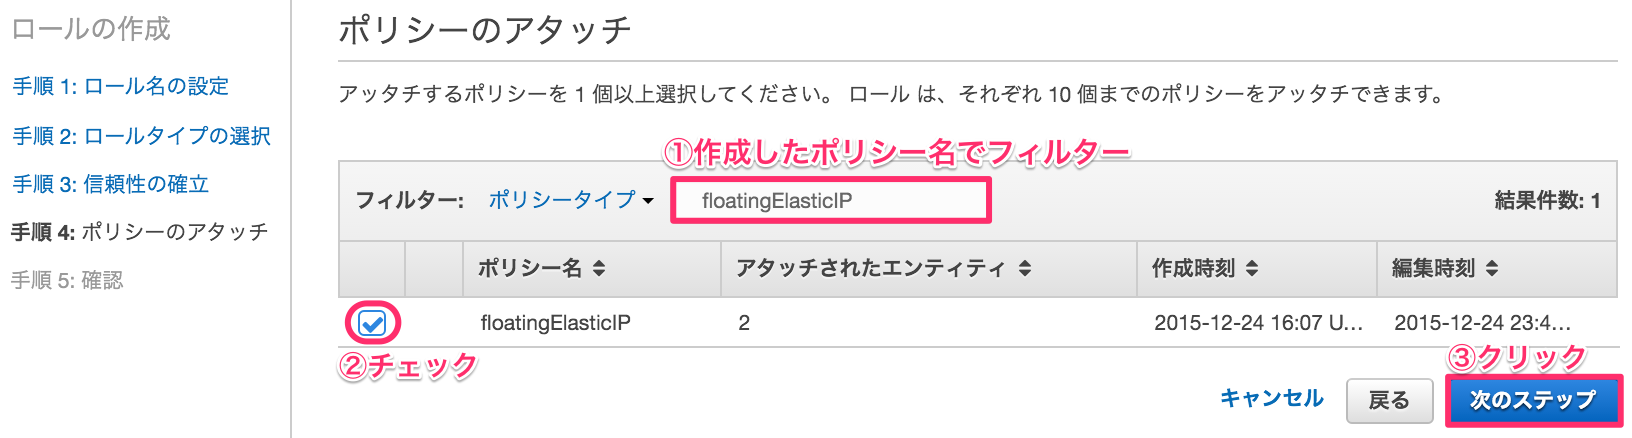
ポリシーのアタッチ
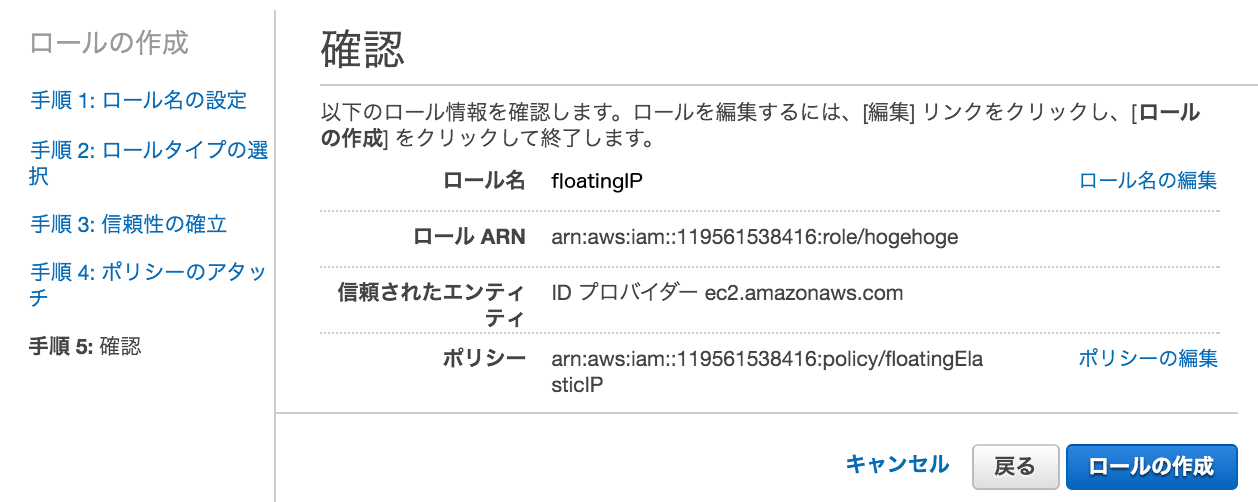
登録内容を確認しロールの作成
作成されたか確認

以上でインスタンスに適用するIAMロールの作成が完了しました。
ユーザ作成
Identity & Access Management ページにアクセス
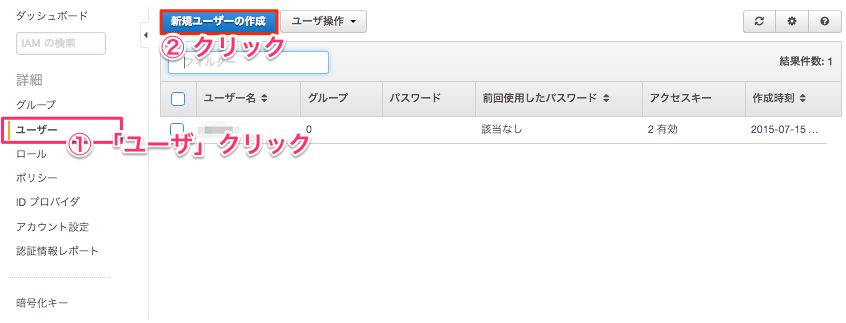
メニューからユーザクリック & 新規ユーザの作成 ボタンクリック
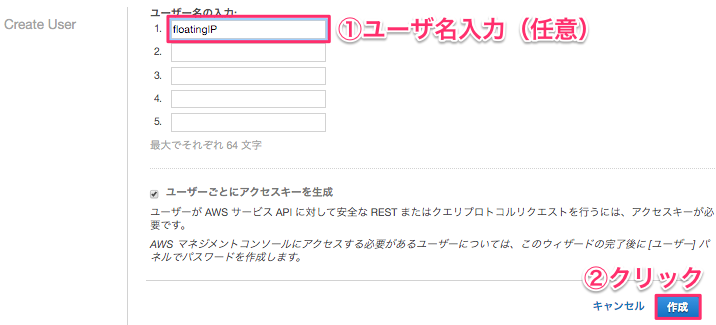
ユーザ名入力し作成ボタンクリック
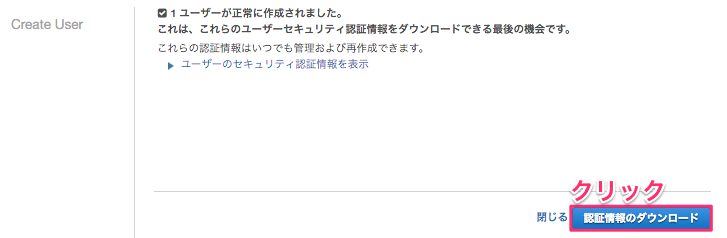
認証情報をダウンロードクリック
Access Key Id と Secret Access Key が記載されたCSVがダウンロードされます。
大切に保管しましょう。
作成されたユーザーにアクセス

ポリシーのアタッチ開始
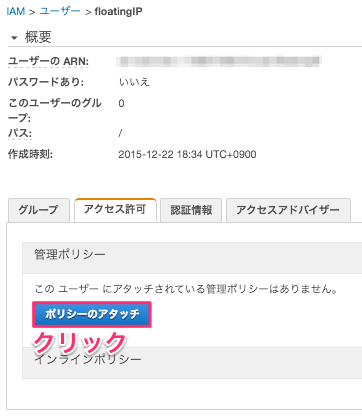
ポリシーにチェックを入れアタッチ
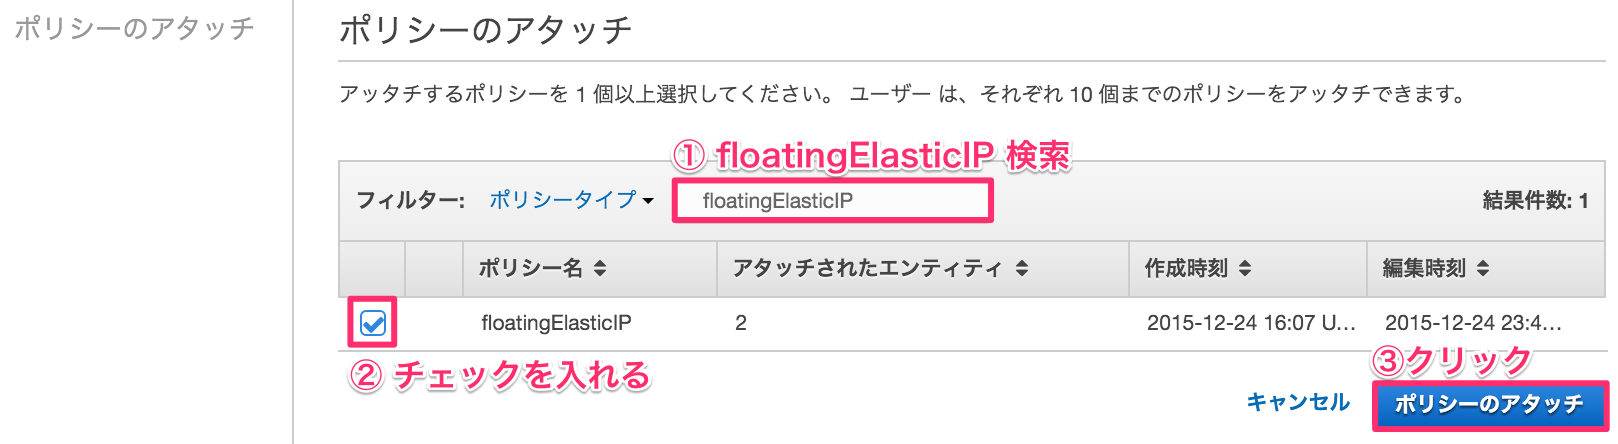
以上で
AmazonEC2FullAccess 権限を持ったユーザ floatingIP ユーザが作成されました。
上記ユーザの認証情報は 手順 aws-cli インストール で利用します。
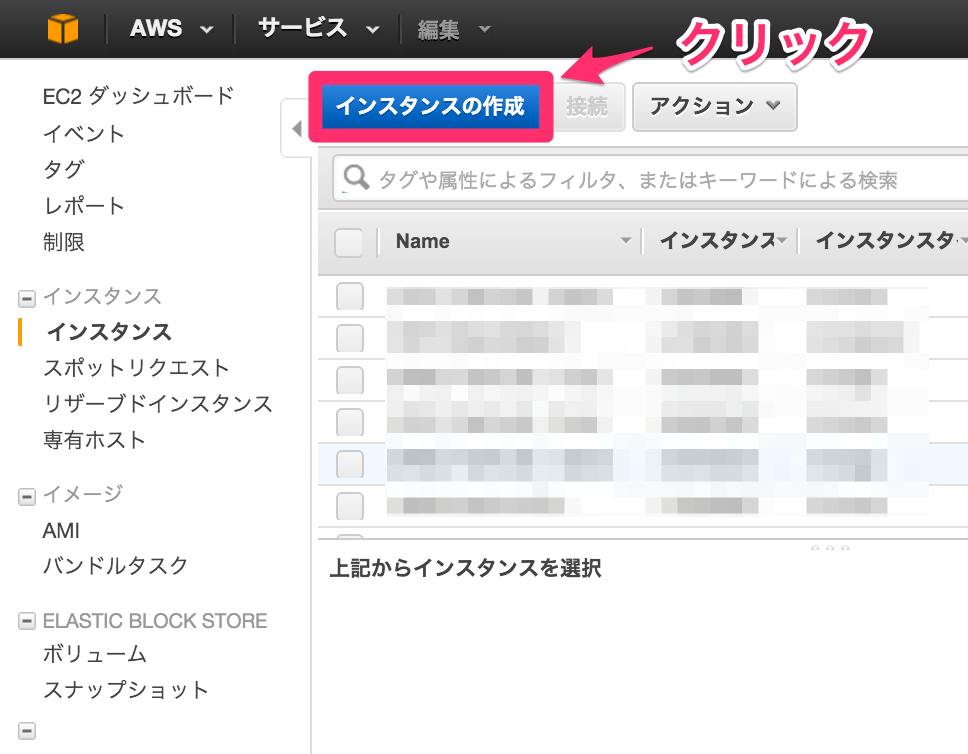
インスタンスの作成
- 上記で作成したVPCのSubnet (ap-northeast-1a)にインスタンス (以降Instance A)を作成します。
「インスタンスの作成」をクリック
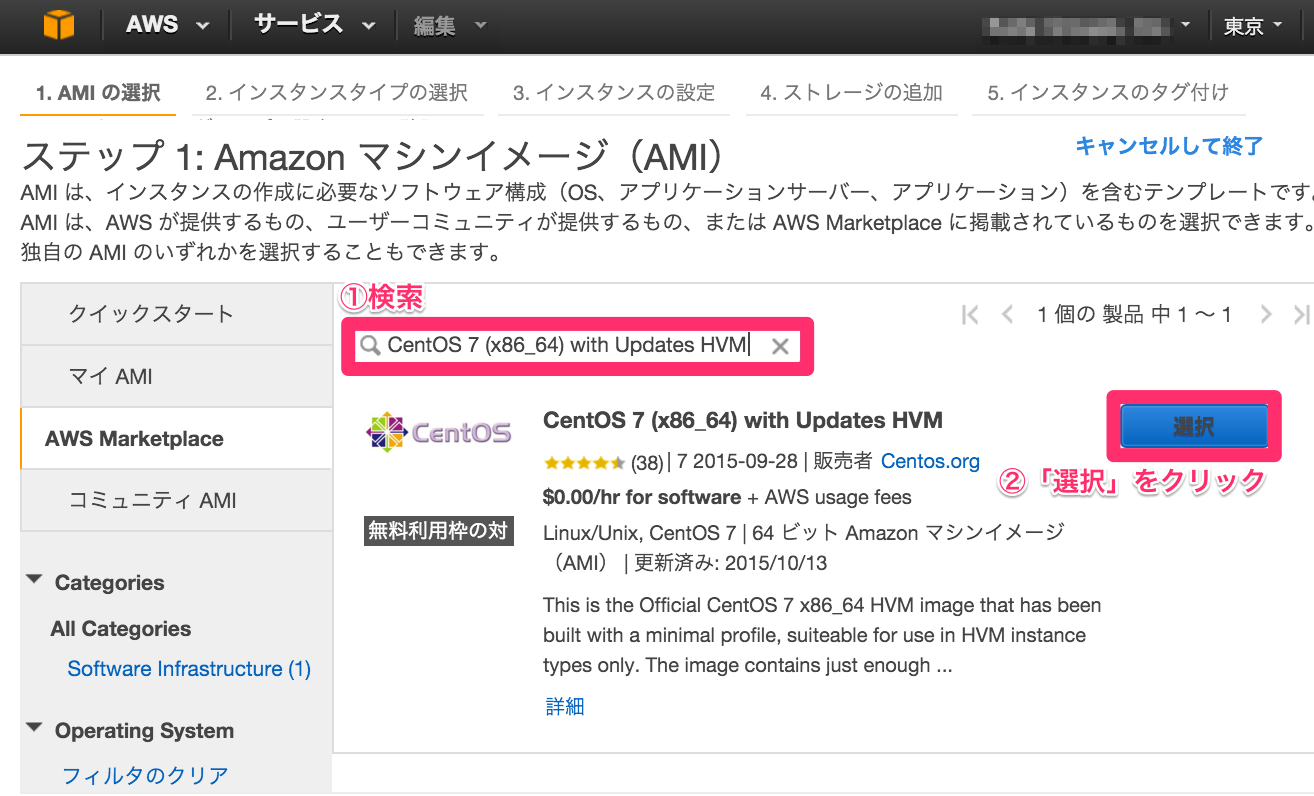
マシンイメージ選択
今回は CentOS 7 (x86_64) with Updates HVM を選択します。
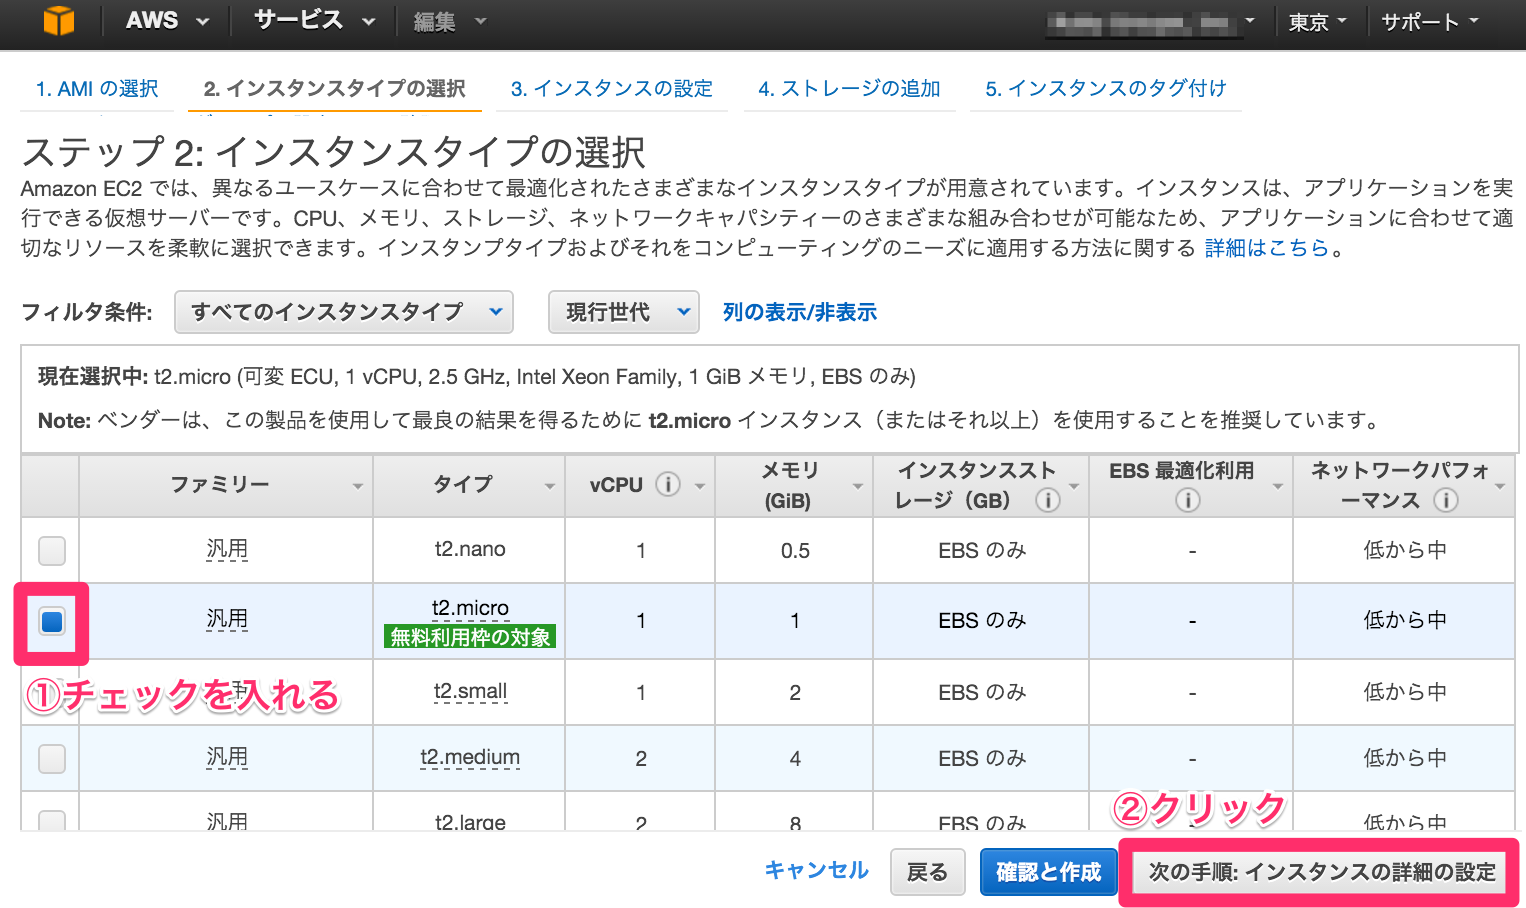
インスタンスタイプ選択
今回は検証用で無料枠として利用したいので t2.micro を選択します。
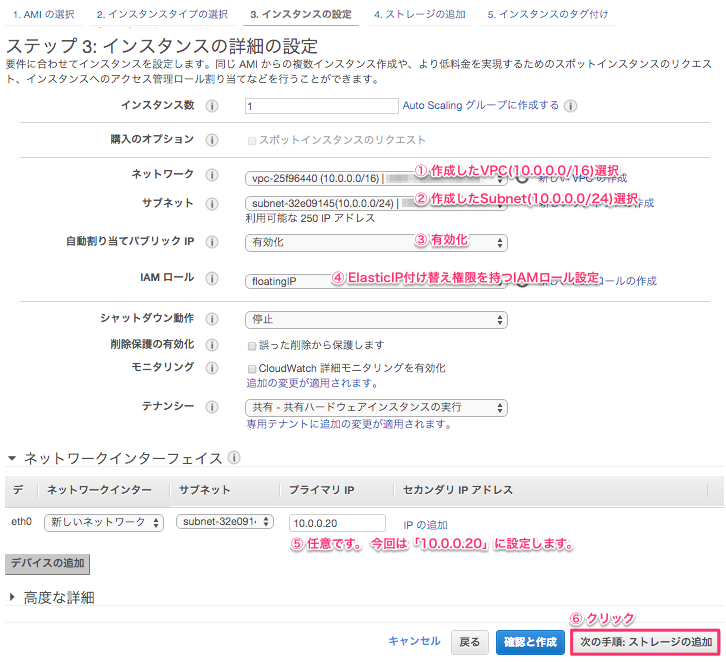
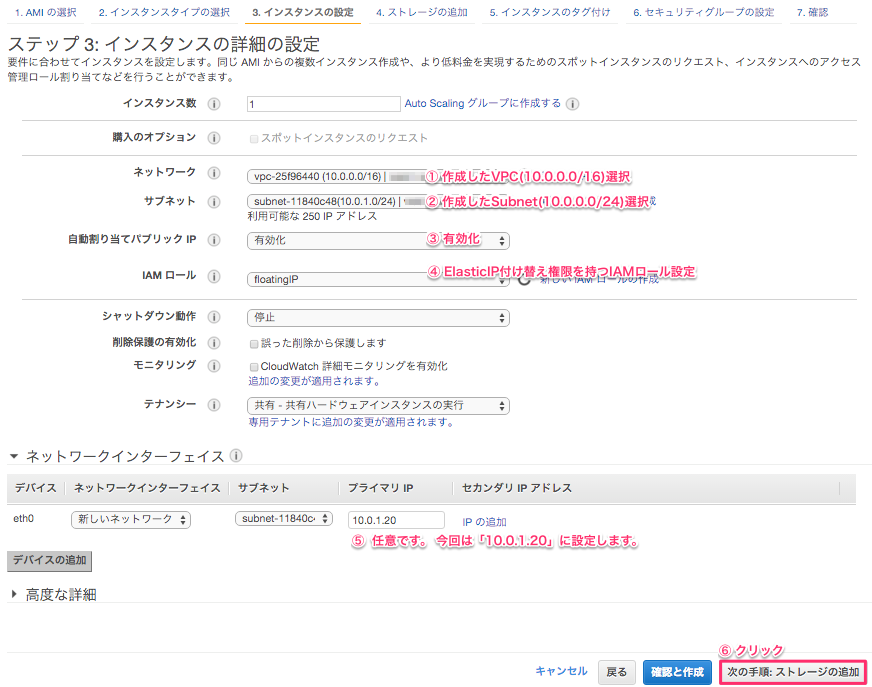
インスタンスの詳細の設定
ap-northeast-1a に作成する Instance A のプライマリIPを
10.0.0.20 とします。
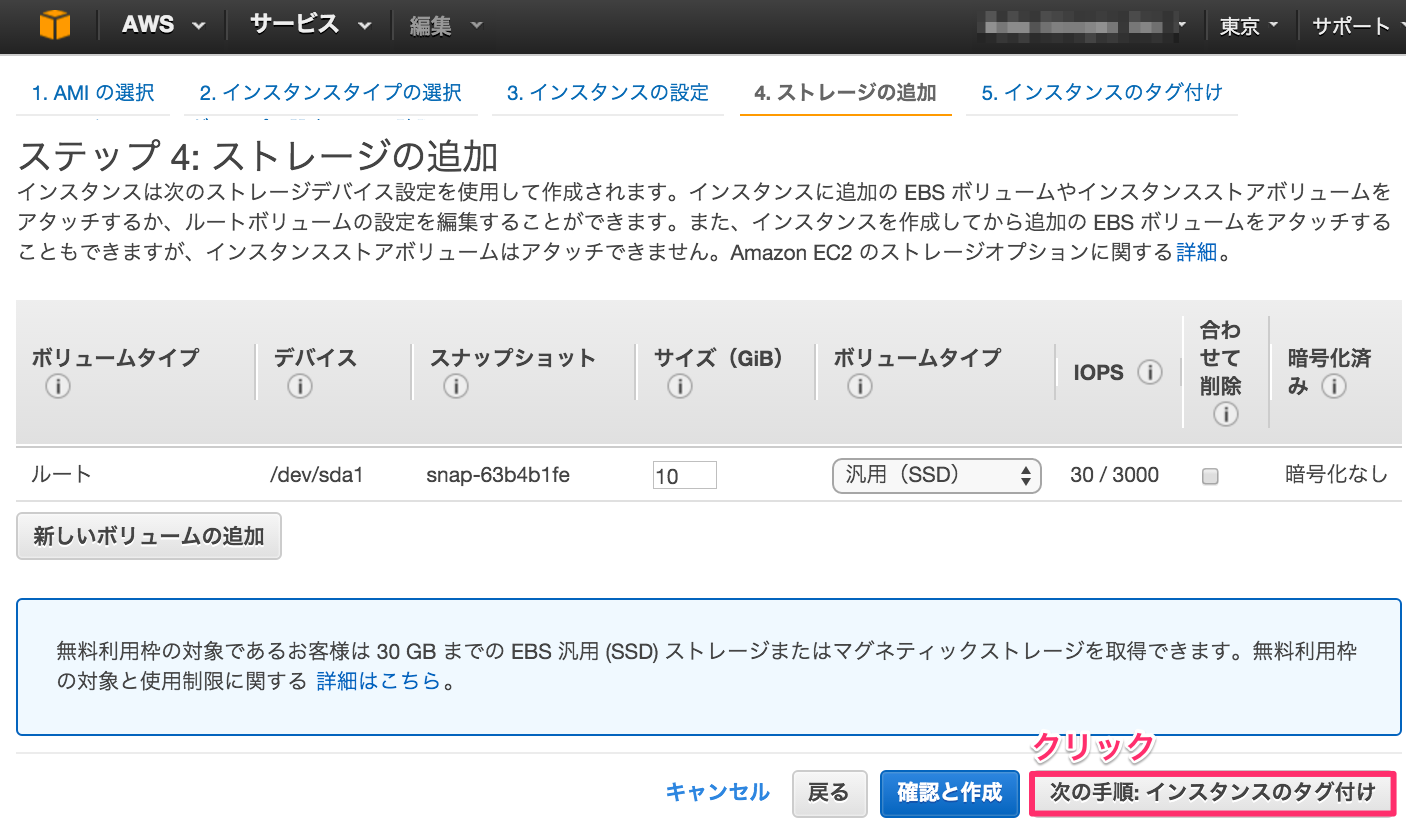
ストレージの追加
特に変更することなく次の手順へ
インスタンスのタグ付け
Name タグに Instance A と指定します。
※ 任意なのでわかりやすいテキストであれば良いです。
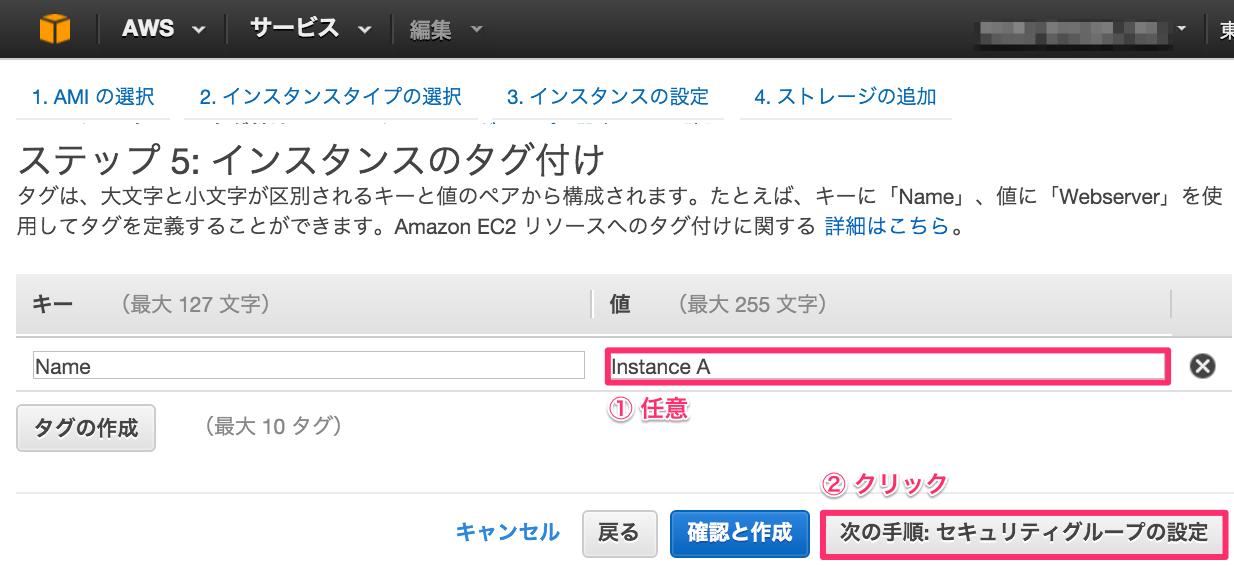
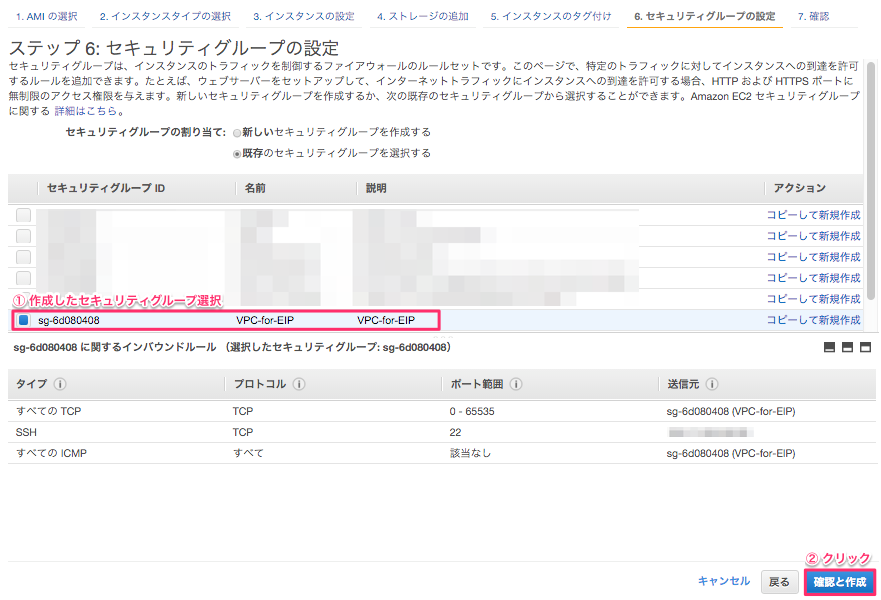
セキュリティグループの設定
- 事前に作成したセキュリティグループを選択
インスタンス作成の確認
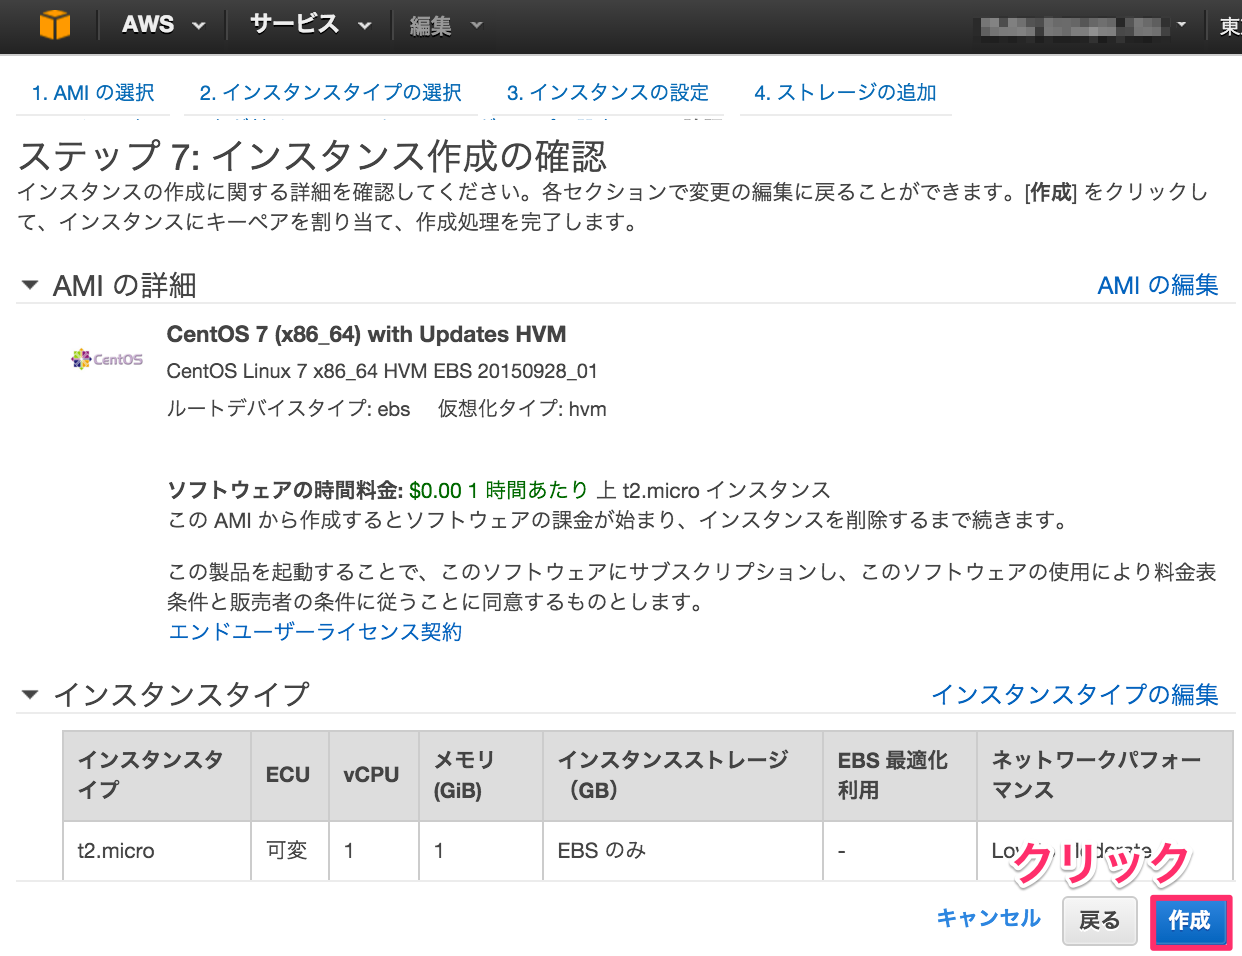
以上で Insntace A の作成が完了しました。
同様に Instance B 作成
Instance A との主な変更点
- Subnet
10.0.1.0/24を選択 - インスタンスのタグは
Instance Bとする
Instance B 設定時注意点
-
セキュリティグループはInstance Bでも同様Instance Aで設定した
セキュリティグループを選択する。
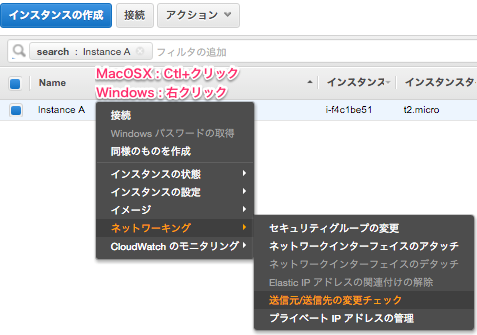
送信元/送信先の変更チェックを無効化
※上記 Instance A, B 共に Source/Destination Check (ネットワーク > 送信元/送信先の変更チェック) を Disabled (無効) に設定する必要があります。
インスタンス SSHログイン後まずやること
最低限必要なモジュールインストール
※ git は ElasticIP付け替え時のシェルをインストールする際に必要になります。
[Instance A & B ]# yum install -y git

[Instance A & B ]# git --version

git version 1.8.3.1
Fail Over 検証用に httpd, php インストール
あくまで Fail Over 時の動きを見る為の確認用にインストールし起動しています。
※必須工程ではありません。
[Instance A & B ]# yum --disableexcludes=main install -y gcc
[Instance A & B ]# yum install -y gmp gmp-devel
[Instance A & B ]# yum install -y php php-mysql httpd libxml2-devel net-snmp net-snmp-devel curl-devel gettext
[Instance A & B ]# echo '<?php print_r($_SERVER["SERVER_ADDR"]); ?>' > /var/www/html/index.php
[Instance A & B ]# systemctl start httpd
[Instance A & B ]# systemctl enable httpd
system clock 調整 JST設定
OS内の時間が現実の時間とずれていると
aws-cliが正常に動作しない可能性があるので
念の為、調整しておきます。
# バックアップ確保
[Instance A & B ]# cp /etc/sysconfig/clock /etc/sysconfig/clock.org

# 再起動しても設定維持する様にする。
[Instance A & B ]# echo -e 'ZONE="Asia/Tokyo"\nUTC=false' > /etc/sysconfig/clock

# バックアップ確保
[Instance A & B ]# cp /etc/localtime /etc/localtime.org

# Asia/Tokyo を localtime に設定
[Instance A & B ]# ln -sf  /usr/share/zoneinfo/Asia/Tokyo /etc/localtime

[Instance A & B ]# date
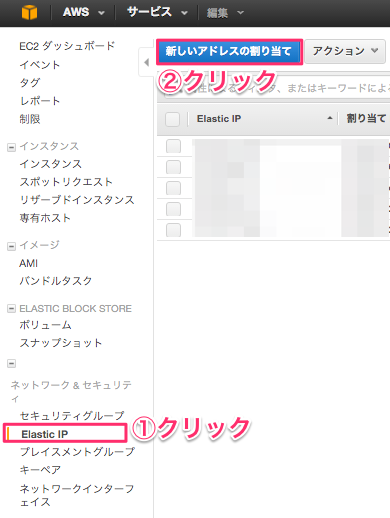
Elastic IP作成
Elastic IPを作成し Server A に関連付けます。
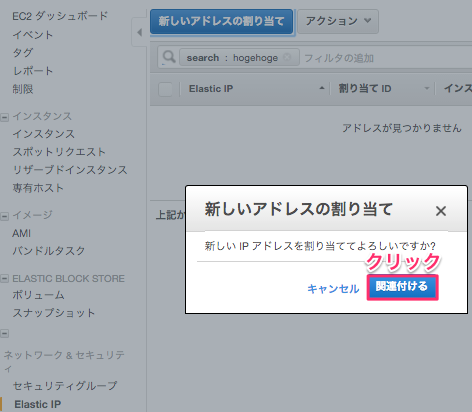
新しいアドレスを割り当てる
確認ポップアップで「関連付ける」をクリック
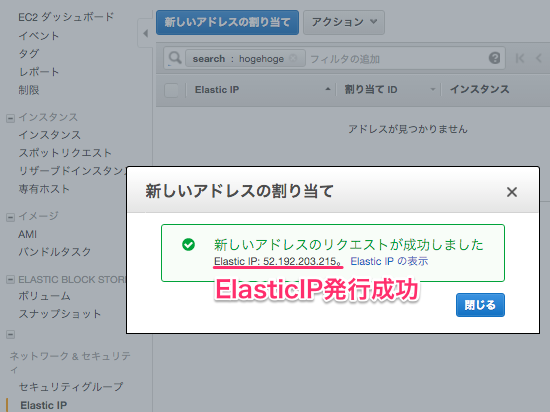
成功確認
インスタンスに関連付け
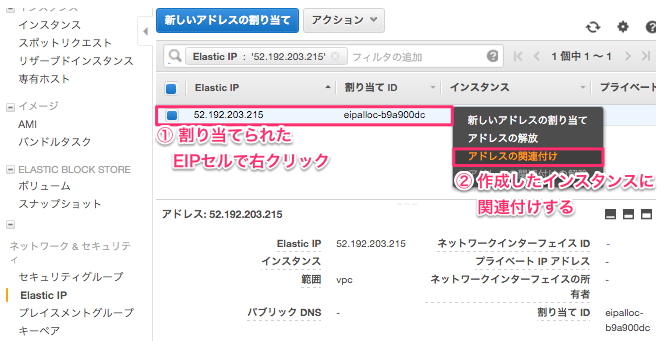
関連するインスタンス選択
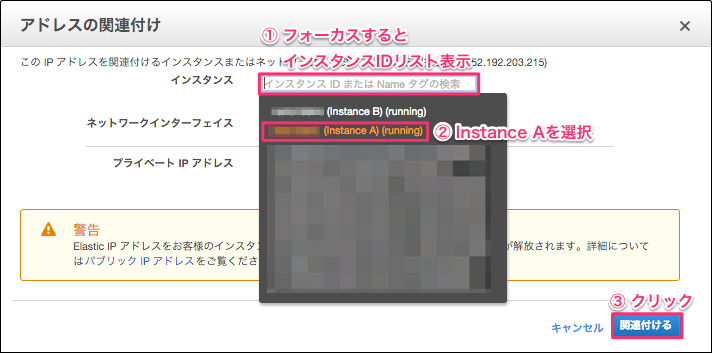
確認

以上で Instance A に ElasticIP が関連付けされました。
Instance A & B に SSHログイン
- Instance A に SSHログイン
[Local PC]# ssh -i aws.pem centos@<Instance AのPublic IP>
- Instance B に SSHログイン
[Local PC]# ssh -i aws.pem centos@<Instance BのPublic IP>
/etc/hosts設定
[Instance A ]# uname -n
ip-10-0-0-10.ap-northeast-1.compute.internal
[Instance B ]# uname -n
ip-10-0-1-10.ap-northeast-1.compute.internal
[Instance A & B ]# vi /etc/hosts
127.0.0.1   localhost localhost.localdomain localhost4 localhost4.localdomain4
::1         localhost localhost.localdomain localhost6 localhost6.localdomain6

# 以下追加
10.0.0.20 ip-10-0-0-20.ap-northeast-1.compute.internal
10.0.1.20 ip-10-0-1-20.ap-northeast-1.compute.internal
Pacemaker & Corosync インストール
- pcsは旧来のcrmshに代わるPacemakerクラスタ管理ツールであり、RHEL/CentOS7においてはpcsの使用が推奨されている。
[Instance A & B ]# yum -y install pcs fence-agents-all
- バージョン確認
[Instance A & B ]# pcs --version
0.9.143

[Instance A & B ]# pacemakerd --version
Pacemaker 1.1.13-10.el7
Written by Andrew Beekhof

[Instance A & B ]# corosync -v
Corosync Cluster Engine, version '2.3.4'
Copyright (c) 2006-2009 Red Hat, Inc.
hacluster パスワード設定
corosyncパッケージインストール時に自動で hacluster ユーザが追加される。
その hacluster のパスワードを設定する。
[Instance A & B ]# passwd hacluster
ユーザー hacluster のパスワードを変更。
新しいパスワード:
新しいパスワードを再入力してください:
passwd: すべての認証トークンが正しく更新できました。
pcsd 起動
cluster監視を実施する為
[Instance A & B ]# systemctl start pcsd
[Instance A & B ]# systemctl enable pcsd
[Instance A & B ]# systemctl status pcsd
cluster認証
クラスタを組む各ホストへのアクセス認証を検証します。
どちらか一方のInstanceから実行します。
以下はInstance Aから実行しています。
[Instance A ]# pcs cluster auth ip-10-0-0-20.ap-northeast-1.compute.internal ip-10-0-1-20.ap-northeast-1.compute.internal
Username: hacluster
Password:
ip-10-0-1-20.ap-northeast-1.compute.internal: Authorized
ip-10-0-0-20.ap-northeast-1.compute.internal: Authorized
上記のように Authorized (認証済み) と出力されていれば問題ありませんが
以下のような Unable to Communicate というエラーが出力されている場合は
各Instance の設定を見直してください。
- 認証エラーの例
[Instance A ]# pcs cluster auth ip-10-0-0-20.ap-northeast-1.compute.internal ip-10-0-1-20.ap-northeast-1.compute.internal -u hacluster -p ruby2015
Error: Unable to communicate with ip-10-0-0-20.ap-northeast-1.compute.internal
Error: Unable to communicate with ip-10-0-1-20.ap-northeast-1.compute.internal
cluster設定
クラスタ設定をします。
[Instance A ]# pcs cluster setup --name aws-cluster ip-10-0-0-20.ap-northeast-1.compute.internal ip-10-0-1-20.ap-northeast-1.compute.internal --force

Shutting down pacemaker/corosync services...
Redirecting to /bin/systemctl stop  pacemaker.service
Redirecting to /bin/systemctl stop  corosync.service
Killing any remaining services...
Removing all cluster configuration files...
ip-10-0-0-20.ap-northeast-1.compute.internal: Succeeded
ip-10-0-1-20.ap-northeast-1.compute.internal: Succeeded
Synchronizing pcsd certificates on nodes ip-10-0-0-20.ap-northeast-1.compute.internal, ip-10-0-1-20.ap-northeast-1.compute.internal...
ip-10-0-0-20.ap-northeast-1.compute.internal: Success
ip-10-0-1-20.ap-northeast-1.compute.internal: Success

Restaring pcsd on the nodes in order to reload the certificates...
ip-10-0-0-20.ap-northeast-1.compute.internal: Success
ip-10-0-1-20.ap-northeast-1.compute.internal: Success
cluster起動
全ホストに向け クラスタ起動します。
[Instance A ]# pcs cluster start --all

ip-10-0-1-20.ap-northeast-1.compute.internal: Starting Cluster...
ip-10-0-0-20.ap-northeast-1.compute.internal: Starting Cluster...
aws-cli インストール
手順: ユーザ作成 でダウンロードした credentials.csv に記載された
Access Key Id Secret Access Key を使用します。
[Instance A & B ]# rpm -iUvh http://dl.fedoraproject.org/pub/epel/7/x86_64/e/epel-release-7-5.noarch.rpm
[Instance A & B ]# yum -y install python-pip
[Instance A & B ]# pip --version
pip 7.1.0 from /usr/lib/python2.7/site-packages (python 2.7)

[Instance A & B ]# pip install awscli
[Instance A & B ]# aws configure
AWS Access Key ID [None]: *********************
AWS Secret Access Key [None]: **************************************
Default region name [None]: ap-northeast-1
Default output format [None]: json
EIP 付け替えリソース作成
heartbeat で問題検知した際に起動するリソースとして登録します。
OCF_ROOT が定数として指定されているが、存在しない為
[Instance A & B ]# cd /tmp
[Instance A & B ]# git clone https://github.com/moomindani/aws-eip-resource-agent.git
[Instance A & B ]# cd aws-eip-resource-agent
[Instance A & B ]# sed -i 's/\${OCF_ROOT}/\/usr\/lib\/ocf/' eip
[Instance A & B ]# mv eip /usr/lib/ocf/resource.d/heartbeat/
[Instance A & B ]# chown root:root /usr/lib/ocf/resource.d/heartbeat/eip
[Instance A & B ]# chmod 0755 /usr/lib/ocf/resource.d/heartbeat/eip
pacemaker 設定
stonish 無効化
[Instance A ]# pcs property set stonith-enabled=false
split-brain (スプリット・ブレイン) が発生しても quorum (クォーラム) が特別な動作を行わないように設定
[Instance A ]# pcs property set no-quorum-policy=ignore
split-brainとは
ハートビート通信を行うネットワークに断線などの問題が発生した場合、ホストに障害が起こったと勘違いし、
本来立ち上がってほしくないスタンバイ側のホストがアクティブになってしまうというもの
属性値更新時の待ち時間( crmd-transition-delay )を 0s(秒) 設定
[Instance A ]# pcs property set crmd-transition-delay="0s"
自動フェイルバックなし、同一サーバでリソースの再起動を試みる回数を 1 回に設定
[Instance A ]# pcs resource defaults resource-stickiness="INFINITY" migration-threshold="1"
EIP切り替え設定
今回作成し Instance A に関連付けした ElasticIP は 52.192.203.215 です。
以下設定に反映させます。
[Instance A ]# pcs resource create eip ocf:heartbeat:eip \
    params \
        elastic_ip="52.192.203.215" \
    op start   timeout="60s" interval="0s"  on-fail="stop" \
    op monitor timeout="60s" interval="10s" on-fail="restart" \
    op stop    timeout="60s" interval="0s"  on-fail="block"
cluster 設定確認
[Instance A ]# pcs config

pcs config
Cluster Name: aws-cluster
Corosync Nodes:
 ip-10-0-0-20.ap-northeast-1.compute.internal ip-10-0-1-20.ap-northeast-1.compute.internal
Pacemaker Nodes:
 ip-10-0-0-20.ap-northeast-1.compute.internal ip-10-0-1-20.ap-northeast-1.compute.internal

Resources:
 Resource: eip (class=ocf provider=heartbeat type=eip)
  Attributes: elastic_ip=52.192.203.215
  Operations: start interval=0s timeout=60s on-fail=stop (eip-start-interval-0s)
              monitor interval=10s timeout=60s on-fail=restart (eip-monitor-interval-10s)
              stop interval=0s timeout=60s on-fail=block (eip-stop-interval-0s)

Stonith Devices:
Fencing Levels:

Location Constraints:
Ordering Constraints:
Colocation Constraints:

Resources Defaults:
 resource-stickiness: INFINITY
 migration-threshold: 1
Operations Defaults:
 No defaults set

Cluster Properties:
 cluster-infrastructure: corosync
 cluster-name: aws-cluster
 crmd-transition-delay: 0s
 dc-version: 1.1.13-10.el7-44eb2dd
 have-watchdog: false
 no-quorum-policy: ignore
 stonith-enabled: false
Fail Over 実行確認
手順 Fail Over 検証用に httpd, php インストール にて
DocumentRoot (/var/www/html/) に
Private IP ($_SERVER["SERVER_ADDR"]) を表示させるindex.phpファイルを
配置しました。
ブラウザから Private IP を元に Instance A or B どちらのInstance に
アクセスしているかがわかります。
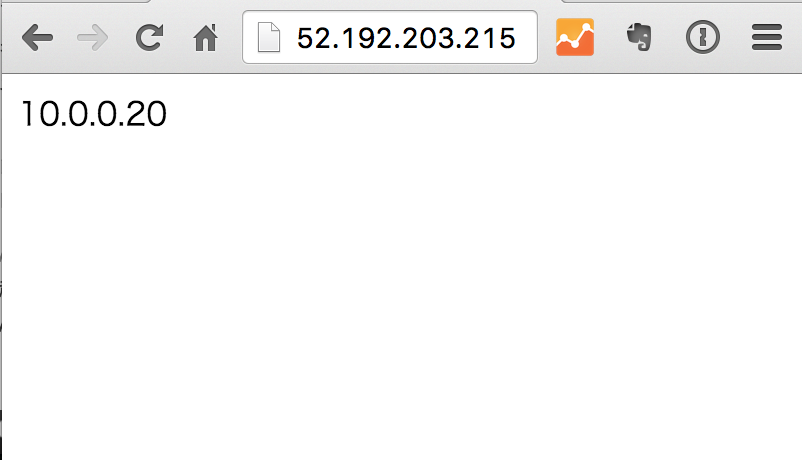
ブラウザから ElasticIP にアクセス
ElasticIP 52.192.203.215 にアクセスすると
Private IP 10.0.0.20 が表示されていることがわかります。
現状、ElasticIP は Instance A に関連付いていることがわかります。
Instance A の corosync 停止
[Instance A]# systemctl stop corosync
再度ブラウザから ElasticIP にアクセス
先ほど表示させていたブラウザを幾度かリロードすると
Private IP 10.0.1.20 が表示されていることがわかります。
ElasticIP は Instance B に関連付けられたことがわかります。
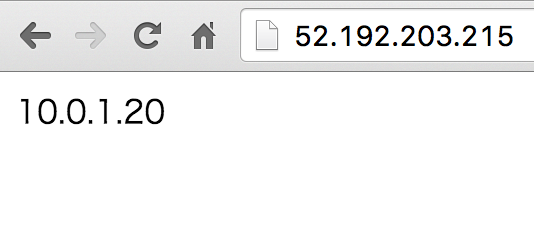
ElasticIP が Instance A から関連付けが解放され、 Instance B に関連付けされるようになりました。
コンソールページ上でも確認することができます。
以上で簡易的ではありますが
Cloud Design Pattern の floating IP (ElasticIP) が実現できました。