この記事は「Oracle Cloud Infrastructure Advent Calendar 2019」の12月17日の記事として書かれています。
この記事でやっていること
- Oracle Cloud Infrastructure のAlways Freeの環境にVCN/Compute インスタンス/Autonomous Database(ADW)の作成
- Compute インスタンスに Jupyter Notebook環境をセットアップ
- Autonomous Databaseのデータを使って機械学習(決定木・ランダムフォレスト)
環境構築手順
-
仮想クラウド・ネットワークの作成
-
Compute インスタンスの作成
-
Autonmous Database(今回はADW)の作成
-
Compute インスタンスにJupyter Notebook の環境セットアップ
-
Jupyter Notebook から Autonomous Databaseに接続し、機械学習の実施
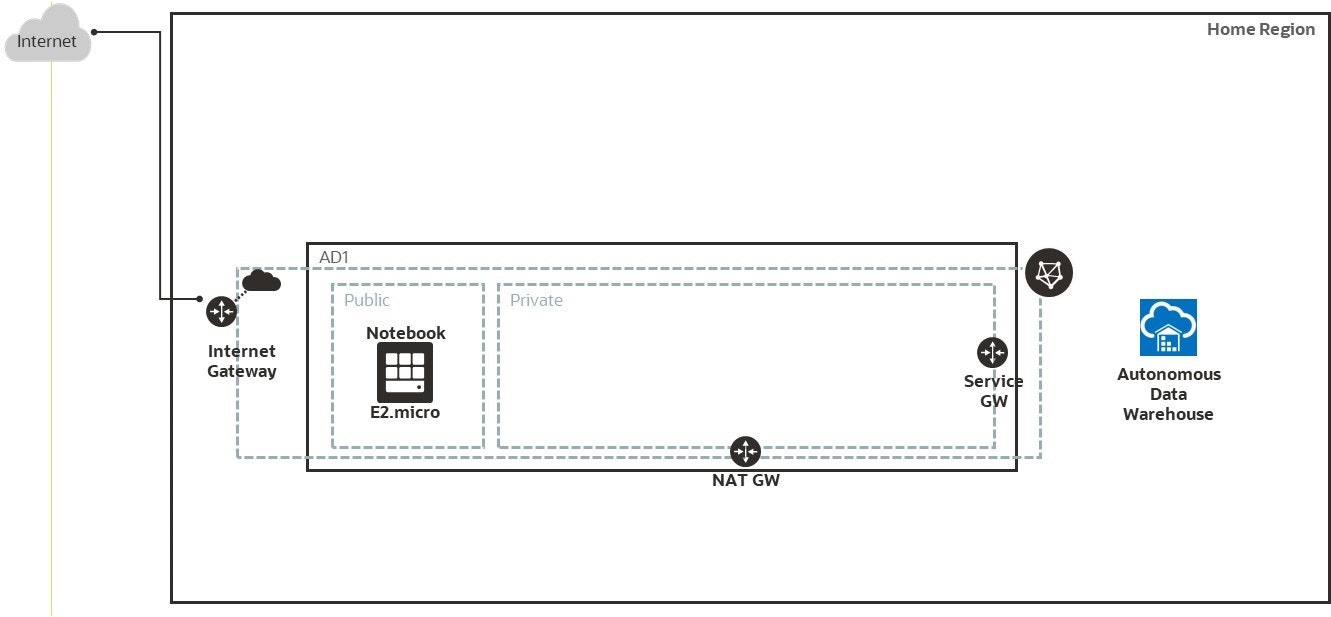
1. 仮想クラウド・ネットワークの作成
OCI Webコンソールで仮想クラウド・ネットワーク(VCN)を作成
2019年12月5日からVirtual networking quickstartが追加され、
「VCN名」、「VCN CIDR」、「パブリックサブネットCIDR」、「プライベートサブネットCIDR」の4つの入力項目で簡単にVCN作成が可能に。
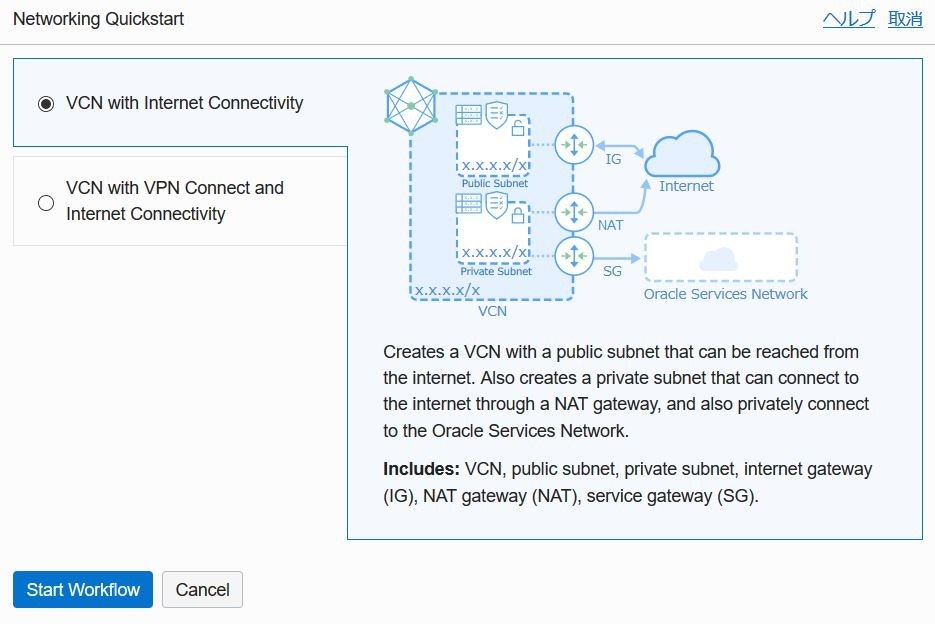
(QuickstartをつかってVCNを作成する場合 日本語表示で作成すると、サブネット名が「パブリック・サブネット-<VCN名>」のようになる表示言語を英語に変更することを推奨)
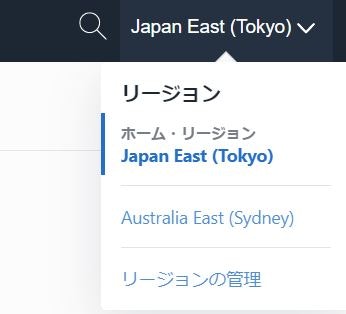
※ Always Free 環境はホームリージョンで作成可能です
2. Compute インスタンスの作成
Oracle Linux 7 をイメージとした Compute インスタンスを作成
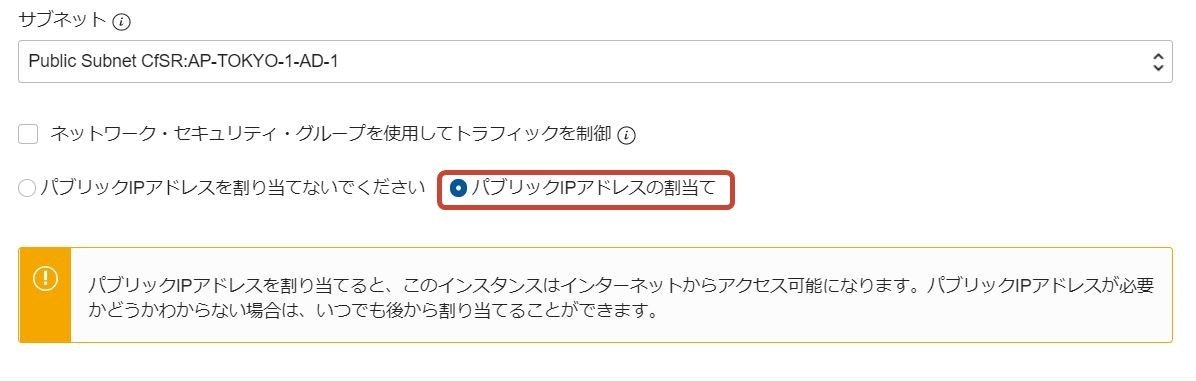
- 「シェイプ、ネットワークおよびストレージ・オプションの表示」をクリックし、ネットワーキングの構成で、1.で作成した仮想クラウド・ネットワーク、パブリックサブネットを選択
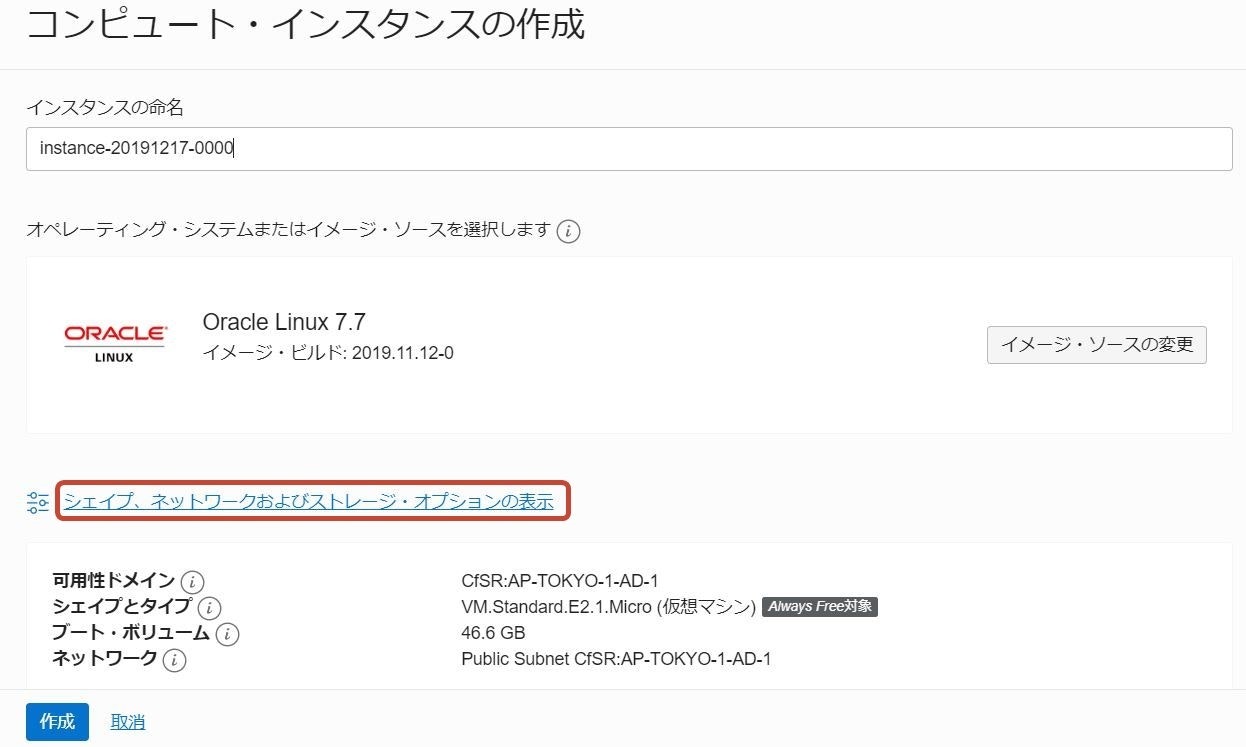
- あわせて、「パブリックIPアドレスの割当て」にチェックして作成
3. Autonmous Database(今回はADW)の作成
Autonomous Databaseの作成からワークロード・タイプを「データ・ウェアハウス」を選択して作成

SQL Develoer Webなどを使って作業用ユーザを作成
CREATE USER scott IDENTIFIED BY password;

GRANT DWROLE TO scott;
GRANT UNLIMITED TABLESPACE TO scott;

GRANT
    SELECT ANY TABLE,
    UPDATE ANY TABLE,
    DELETE ANY TABLE,
    INSERT ANY TABLE
TO scott;
4. Compute インスタンスにJupyter Notebook の環境セットアップ
2.で作成したCompute インスタンス(OracleLinux)に ssh で接続 (opcユーザ)しJupyter Notebookをインストール
4-1. Python 3をインストール
4-1-1. EPELリポジトリ・Python3.6のインストール
sudo yum install -y oracle-epel-release-el7 oracle-release-el7
sudo yum install -y python36
sudo yum install -y libSM.x86_64
sudo yum install -y libXext.x86_64
sudo yum install -y libXrender.x86_64
4-1-2. mlevn(Python仮想環境セットアップ・アクティブ化)
python3.6 -m venv mlenv
source mlenv/bin/activate
4-1-3. 機械学習で使用するライブラリをインストール(今回の手順実行のためのライブラリ)
pip3 install --upgrade pip
pip3 install pandas
pip3 install seaborn
pip3 install sklearn
4-1-4. Jupyterをインストール
python3 -m pip install jupyter
4-1-5. Oracle Instant Clientインストールと構成
sudo yum -y install oraclelinux-developer-release-el7
sudo yum -y install python-cx_Oracle
pip3 install cx_Oracle
sudo sh -c "echo /usr/lib/oracle/18.3/client64/lib > /etc/ld.so.conf.d/oracle-instantclient.conf"
sudo ldconfig
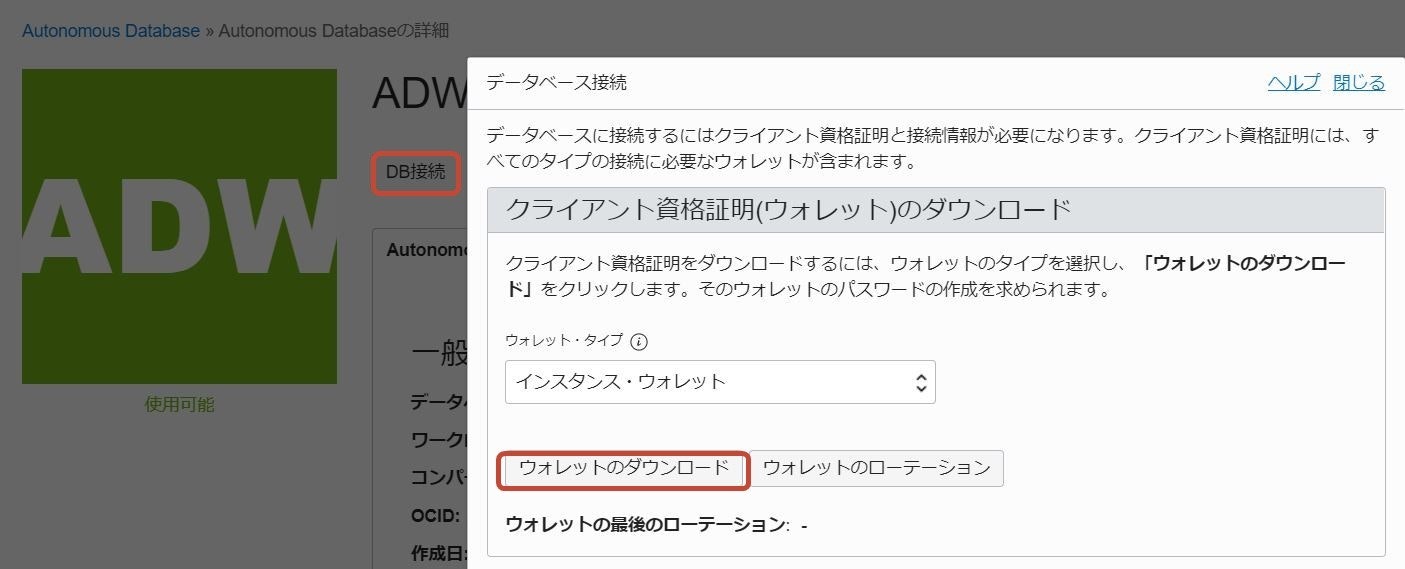
4-1-6. Autonomous Databaseのクライアント資格証明(ウォレット)のダウンロード
3.で作成したAutonomous Databaseの詳細画面から、「DB接続」をクリックし、「データベース接続」ダイアログから「ウォレットのダウンロード」をクリックし、Zipファイルをダウンロード
ダウンロードしたZipファイルを Compute インスタンスに転送(scpなど)し、解凍(解凍ディレクトリをメモ 例:/home/opc/wallet)
解凍したディレクトリにある sqlnet.ora ファイルを編集
「WALLET_LOCATION」行のDIRECTORYで指定している「~/network/admin」を解凍したディレクトリに変更
WALLET_LOCATION = (SOURCE = (METHOD = file) (METHOD_DATA = (DIRECTORY="/home/opc/wallet")))
SSL_SERVER_DN_MATCH=yes
4-1-7. ノートブックを実行
環境変数を設定(LD_LIBRARY_PATH にはInstance Clientのパス、TNS_ADMINにはウォレットを解凍したディレクトリを指定)
export LD_LIBRARY_PATH=/usr/lib/oracle/18.3/client64/lib:$LD_LIBRARY_PATH
export TNS_ADMIN=/home/opc/wallet
source mlenv/bin/activate
jupyter notebook --ip=0.0.0.0 &
jupyterノートブックを実行時に表示されるトークンキーをメモ
    To access the notebook, open this file in a browser:
        file:///home/opc/.local/share/jupyter/runtime/nbserver-2210-open.html
    Or copy and paste one of these URLs:
        http://compute01:8888/?token=0e701120a4e7319ae8b970ac069fbfee53e7b07f072cc2dc
     or http://127.0.0.1:8888/?token=0e701120a4e7319ae8b970ac069fbfee53e7b07f072cc2dc     ```
5. Jupyter Notebook から Autonomous Databaseに接続し、機械学習の実施
5-1. クライアントPCから別のsshセッションでトンネリングを確立
$ ssh –i <private_key> opc@<public_IP_address> -L 8000:localhost:8888
5-2. ローカルマシンでWebブラウザを開き以下URLにアクセス
http://localhost:8000
5-3. トークンの入力を求められたら、jupyter Notebookを実行時に表示されるトークンキーを入力

5-4. Jupyter NotebookからAutonomous Databaseに接続
Autonomous Databaseのユーザ名、パスワード および 解凍したウォレット内のtnsnames.oraから接続用サービス名を確認し、指定
Autonomous Databaseに接続し、DBバージョンを確認例
import cx_Oracle
con = cx_Oracle.connect('scott/<password>@orcl_medium')
print(con.version)
con.close()
Autonomous Databaseに接続し、shスキーマのSALES表の件数を確認例
import cx_Oracle
con = cx_Oracle.connect('scott/<password>@orcl_medium')
cur = con.cursor()        # opens cursor for statements to use
cur.execute('select count(*) from sh.sales')
for result in cur:        # prints all data
    print(result)
con.close()
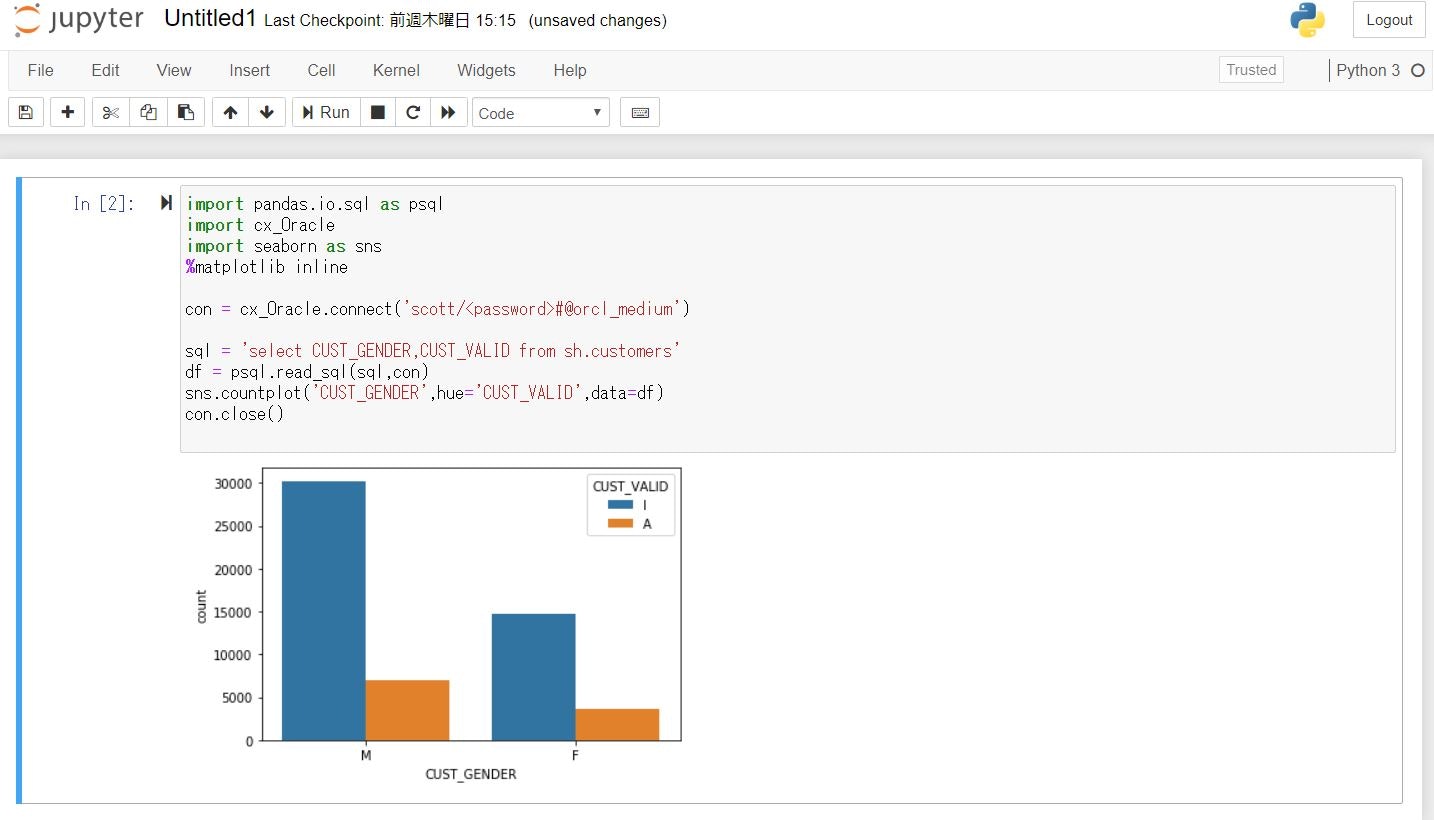
CUSTOMERS表から男女別のCUST_VALIDを比較
import pandas.io.sql as psql
import cx_Oracle
import seaborn as sns
%matplotlib inline

con = cx_Oracle.connect('scott/<password>@orcl_medium')

sql = 'select CUST_GENDER,CUST_VALID from sh.customers'
df = psql.read_sql(sql,con)
sns.countplot('CUST_GENDER',hue='CUST_VALID',data=df)
# 列名は大文字で表記
con.close()
機械学習
scikit-learnの中のライブラリtreeとscikit-learnのensembleの中のrandom forest classfierを使って
CUSTOMERS表のCUST_VALIDを予測する機械学習モデルを作成
- SELECT文で特徴量と目的変数を取得しDataFrameに格納
sql = 'select cust_id,cust_year_of_birth,CUST_GENDER,cust_postal_code,cust_valid from sh.customers'
df = psql.read_sql(sql,con)
- 欠損値処理とカテゴリ変数(文字)の変換処理
# 欠損値処理
df['CUST_YEAR_OF_BIRTH'] = df['CUST_YEAR_OF_BIRTH'].fillna(df['CUST_YEAR_OF_BIRTH'].median())
df['CUST_POSTAL_CODE'] = df['CUST_POSTAL_CODE'].fillna(df['CUST_POSTAL_CODE'].median())

# カテゴリ変数の変換
df['CUST_VALID']=df['CUST_VALID'].apply(lambda x:1 if x == 'I' else 0)
df['CUST_GENDER']=df['CUST_GENDER'].apply(lambda x:1 if x == 'M' else 0)
- 学習データとテストデータに分割(今回は9割を学習データにしている)
X = df.loc[:, ["CUST_YEAR_OF_BIRTH","CUST_GENDER","CUST_POSTAL_CODE"]]
Y = df.loc[:, "CUST_VALID"]
(train_X, test_X ,train_y, test_y) = train_test_split(X, Y, test_size = 0.1, random_state = 666)
- 決定木モデル作成とテストデータでの検証、精度の確認
clf = DecisionTreeClassifier(random_state=0)
clf = clf.fit(train_X, train_y) # モデル作成!
pred = clf.predict(test_X)
print("Prediction Score: {}".format(clf.score(test_X, test_y)))
- ランダムフォレストモデル作成とテストデータでの検証
from sklearn.ensemble import RandomForestClassifier
clf = RandomForestClassifier(random_state=0)
clf = clf.fit(train_X, train_y)
pred = clf.predict(test_X)
- 機械学習コード全体
import pandas.io.sql as psql
import cx_Oracle
from sklearn.model_selection import train_test_split
from sklearn.tree import DecisionTreeClassifier
from sklearn.metrics import (roc_curve, auc, accuracy_score)
from sklearn.metrics import classification_report
con = cx_Oracle.connect('scott/<password>@orcl_medium')

sql = 'select cust_id,cust_year_of_birth,CUST_GENDER,cust_postal_code,cust_valid from sh.customers'
df = psql.read_sql(sql,con)
# 欠損値処理
df['CUST_YEAR_OF_BIRTH'] = df['CUST_YEAR_OF_BIRTH'].fillna(df['CUST_YEAR_OF_BIRTH'].median())
df['CUST_POSTAL_CODE'] = df['CUST_POSTAL_CODE'].fillna(df['CUST_POSTAL_CODE'].median())

# カテゴリ変数の変換
df['CUST_VALID']=df['CUST_VALID'].apply(lambda x:1 if x == 'I' else 0)
df['CUST_GENDER']=df['CUST_GENDER'].apply(lambda x:1 if x == 'M' else 0)

X = df.loc[:, ["CUST_YEAR_OF_BIRTH","CUST_GENDER","CUST_POSTAL_CODE"]]
Y = df.loc[:, "CUST_VALID"]
(train_X, test_X ,train_y, test_y) = train_test_split(X, Y, test_size = 0.1, random_state = 666)

clf = DecisionTreeClassifier(random_state=0)
clf = clf.fit(train_X, train_y) # モデル作成!
pred = clf.predict(test_X)
fpr, tpr, thresholds = roc_curve(test_y, pred, pos_label=1)
auc(fpr, tpr)
accuracy_score(pred, test_y)
classification_report(pred, test_y, labels=None)
print("Prediction Score: {}".format(clf.score(test_X, test_y)))
print("決定木モデルの精度: {:.6f}".format(accuracy_score(pred, test_y)))

from sklearn.ensemble import RandomForestClassifier
clf = RandomForestClassifier(random_state=0)
clf = clf.fit(train_X, train_y)
pred = clf.predict(test_X)
fpr, tpr, thresholds = roc_curve(test_y, pred, pos_label=1)
auc(fpr, tpr)
print("ランダムフォレストモデルの精度: {:.6f}".format(accuracy_score(pred, test_y)))
con.close()
まとめと今後に向けて
Always Freeの環境(Compute インスタンスとAutonomous DB)を使ってJupyter Notebook で機械学習(決定木・ランダムフォレスト)の実施ができました。
2019年12月5日付けでOracle Databaseで機械学習、地理データ、グラフデータの分析機能が、有償オプションではなくなり、Standard Editionでも利用可能になりました。
Oracle Machine Learning API for Pythonは 「coming soon」ということなので、
Oralce Machine Learning for Pythonがリリースされた時点で比較できるようにしたいと思います。