こんにちは、LEDが大好きなkentya6です。
今回は、NexturnというLED電球をiOSから制御してみようと思います。
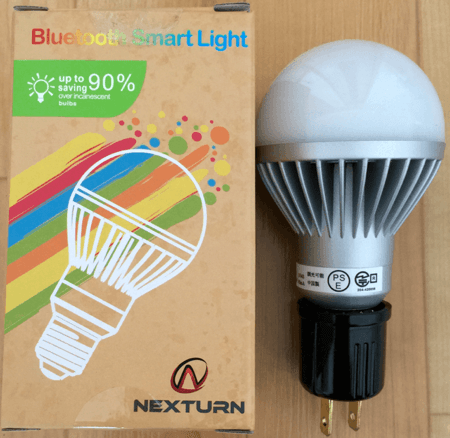
Nexturnは、下の写真のやつです。秋葉原のドスパラで買ってきました。
Nexturnは、見た感じ普通の電球ですが、BLE通信で様々な色に変化させることができます。
値段も3000円ちょっとなので、某スマートLED電球よりも安くスマートLED電球を手に入れられました。
ではNexturnを使って、イルミネーションっぽいクリスマスな雰囲気を感じることができるiOSアプリを作ってみます。
iOSでBLE通信をする流れ
今回は、大雑把ですが以下のようにBLE通信を行います。
- アプリ起動
- Nexturnを検索
- 接続
- Serviceを取得
- Characteristicを取得
- ユーザが押したボタンに対応するCharacteristicを指定してデータ通信し、LEDを点灯
Nexturnと接続するために、まずNexturnのデバイス情報を確認します。
Nexturnのデバイス情報を確認する
今回は、LightBlueというアプリを使用して、Nexturnのデバイス情報を確認してみます。
Nexturnの電源を入れ、LightBlueを起動します。すると、なにやらNexturnらしきデバイスが検出されました。
このNexturnの部分をタップすると、デバイス情報が次の画像のように出てきます。
画像に表示されているUUIDを使用して、iOSデバイスとNexturnを接続します。
デバイス情報をどんどん眺めていくと、何やらLEDの色を変化させることができそうな箇所が見つかりました。
これらの情報を使ってBLE通信をすれば点灯させられそうです!
というわけで、実際にこれらの情報を使ってアプリケーションを開発します。
アプリ開発
Nexturnとの接続に必要な情報と、LEDを点灯させるために必要な情報が分かったところで、これから実際にNexturnを制御するiOSアプリケーションを開発してみます。
今回開発するアプリケーションの機能は以下のようなものとしました。
- 赤、青、緑、白それぞれの色ごとに独立して点灯
- 全色同時に点灯
- 消灯
それぞれの色ごと、機能ごとにボタンを割り当てるので、必要なボタンは6個になります。
また、毎回同じ明るさだとちょっと単純過ぎるので、ボタンを押す度に255段階の明るさがランダムで決定されるようにします。
それでは、先ほど述べたBLE通信の流れに沿って、実際にNexturnを制御するコードを書いてみます。
プログラム構成
今回は、主に3つのクラスでアプリケーションを製作しました。
それでは、実際に書いたコードの説明を簡単に行いたいと思います。
1. ViewController
ViewControllerでは、以下の処理を行っています。
- ボタンを押したときの処理を記述
- CentralManagerインスタンスを作成し、Nexturnと通信する準備を開始
import UIKit

class ViewController: UIViewController {
    @IBOutlet private weak var redButton: UIButton!
    @IBOutlet private weak var greenButton: UIButton!
    @IBOutlet private weak var blueButton: UIButton!
    @IBOutlet private weak var whiteButton: UIButton!
    @IBOutlet private weak var randomButton: UIButton!
    @IBOutlet private weak var offButton: UIButton!
    var centralManager = CentralManager.alloc()

    override func viewDidLoad() {
        super.viewDidLoad()
        let queue = dispatch_get_global_queue(DISPATCH_QUEUE_PRIORITY_DEFAULT, 0)
        centralManager = CentralManager(delegate: self.centralManager, queue: queue, options: nil)
    }

    // 押されたボタンに対応したデータを渡す
    @IBAction func ledButtonTapped(sender: AnyObject) {
        centralManager.ledButtonTapped(sender.tag)
    }
}
2. CentralManager
CentralManagerでは、以下の処理を行っています。
- BLEデバイス(ペリフェラル側)を検索
- 検索したデバイスがNexturnだった場合、接続を開始
- Nexturnに接続後、Serviceを検索
- 押されたボタン情報をNexturnに通知
import Foundation
import CoreBluetooth

class CentralManager: CBCentralManager, CBCentralManagerDelegate {
    private var nexturnObject = NexturnObject()

    override init(delegate: CBCentralManagerDelegate!, queue: dispatch_queue_t!, options: [NSObject : AnyObject]!) {
        super.init(delegate: delegate, queue: queue, options: options)
        self.delegate = self
    }

    // MARK: - CBCentralManager Delegate Method
    // CBCentralManagerのステータス更新後に呼ばれる
    func centralManagerDidUpdateState(central: CBCentralManager!) {
        switch central.state {
        case .PoweredOn:
            let options = ["CBCentralManagerScanOptionAllowDuplicatesKey" : true]
            scanForPeripheralsWithServices(nil, options: options)
        default:
            break
        }
    }

    // ペリフェラル発見時に呼ばれる
    func centralManager(central: CBCentralManager!, didDiscoverPeripheral peripheral: CBPeripheral!, advertisementData: [NSObject : AnyObject]!, RSSI: NSNumber!) {
        switch peripheral.name {
        case nexturnObject.kNexturnName:
            peripheral.delegate = nexturnObject
            nexturnObject.peripheral = peripheral
            connectPeripheral(nexturnObject.peripheral, options: nil)
        default:
            break
        }
    }

    // ペリフェラルと接続後に呼ばれる
    func centralManager(central: CBCentralManager!, didConnectPeripheral peripheral: CBPeripheral!) {
        switch peripheral.name {
        case nexturnObject.kNexturnName:
            let UUID = CBUUID(string: nexturnObject.kNexturnLEDServiceUUID)
            nexturnObject.peripheral?.discoverServices([UUID])
            stopScan()
        default:
            break
        }
    }

    // MARK: - Call from IBAction
    // 押されたボタンに対応したデータを渡す
    func ledButtonTapped(tag: NSInteger) {
        nexturnObject.ledButtonTapped(tag)
    }
}
3. NexturnObject
NexturnObjectでは、以下の処理を行っています。
- NexturnのServiceを取得
- NexturnのCharacteristicを取得
- ボタンを押されたとき、各ボタンに対応するデータをNexturnに送信
各Characteristicに対してデータを送信することで、対応する色が光るという仕組みになっています。
指定するCharacteristicは、前述したデバイス情報で確認した「Red」や「Blue」といったプロパティです。
import Foundation
import CoreBluetooth

class NexturnObject: NSObject, CBPeripheralDelegate {
    // MARK: - Please Replace This UUID to Your's Nexturn UUID
    let kNexturnUUID = "F71FCA69-78A5-B654-9667-F27BF8E5CAC9"
    let kNexturnName = "Nexturn"
    let kNexturnLEDServiceUUID = "FFE0"
    var peripheral: CBPeripheral?
    private var characteristicArray = [CBCharacteristic]()

    private enum ledButtonTag: Int {
        case Red, Green, Blue, White, Random, Off

        private var type: NSData {
            get {
                switch self {
                case .Red, .Green, .Blue, .White:
                    return createLedData(UInt8(arc4random_uniform(255)))
                case .Random:
                    return createLedData(arc4random_uniform(UInt32.max))
                case .Off:
                    return createLedData(UInt32(0))
                }
            }
        }

        // LEDデータを作成
        func createLedData(hexData: UInt32) -> NSData {
            let red   = Byte((hexData & 0xFF000000) >> 24)
            let green = Byte((hexData & 0x00FF0000) >> 16)
            let blue  = Byte((hexData & 0x0000FF00) >> 8)
            let white = Byte(hexData & 0x000000FF)
            var data  = [red, green, blue, white]

            return NSData(bytes: &data, length: 4)
        }

        // LEDデータを作成
        func createLedData(hexData: UInt8) -> NSData {
            var data = Byte(hexData)

            return NSData(bytes: &data, length: 1)
        }
    }

    // 押されたボタンに対応したデータをNexturnに送信
    func ledButtonTapped(tag: NSInteger) {
        let buttonTag = ledButtonTag(rawValue: tag)!

        switch buttonTag {
        case .Red, .Green, .Blue, .White:
            self.peripheral?.writeValue(buttonTag.type, forCharacteristic: characteristicArray[tag], type: .WithResponse)
        case .Random, .Off:
            self.peripheral?.writeValue(buttonTag.type, forCharacteristic: characteristicArray[4], type: .WithResponse)
        }
    }

    // MARK: - CBPeripheralDelegate
    // Service発見時に呼ばれる
    func peripheral(peripheral: CBPeripheral!, didDiscoverServices error: NSError!) {
        for service in peripheral.services {
            self.peripheral?.discoverCharacteristics(nil, forService: service as CBService)
        }
    }

    // Characteristic発見時に呼ばれる
    func peripheral(peripheral: CBPeripheral!, didDiscoverCharacteristicsForService service: CBService!, error: NSError!) {
        for characteristic in service.characteristics {
            self.characteristicArray.append(characteristic as CBCharacteristic)
        }
    }
}
デモ
今回開発したアプリケーションは、このような画面にしました。
それぞれのボタンを押すと、ボタンに対応した色にNexturnが光ってくれます。
デモはこんな感じです。
押したボタンに応じてNexturnの色が変わっていますね!
今日はクリスマス・イブということで、クリスマスツリーを隣に置いただけですがクリスマス感を演出してみました。
今回作成したアプリケーションはGitHubで公開していますので、みなさん自由にNexturnを制御して遊んでみてください。


