概要
久しぶりの投稿です。
esp32 or esp8266を使用してアレクサとボタンでLチカをする方法です。
arudino IDEをまずespに書き込みできるようにしておきます。
内容
ライブラリーでEspalexaをインクルードしておきます。

恐らくスケッチ例でEspalexaが追加されていると思います。
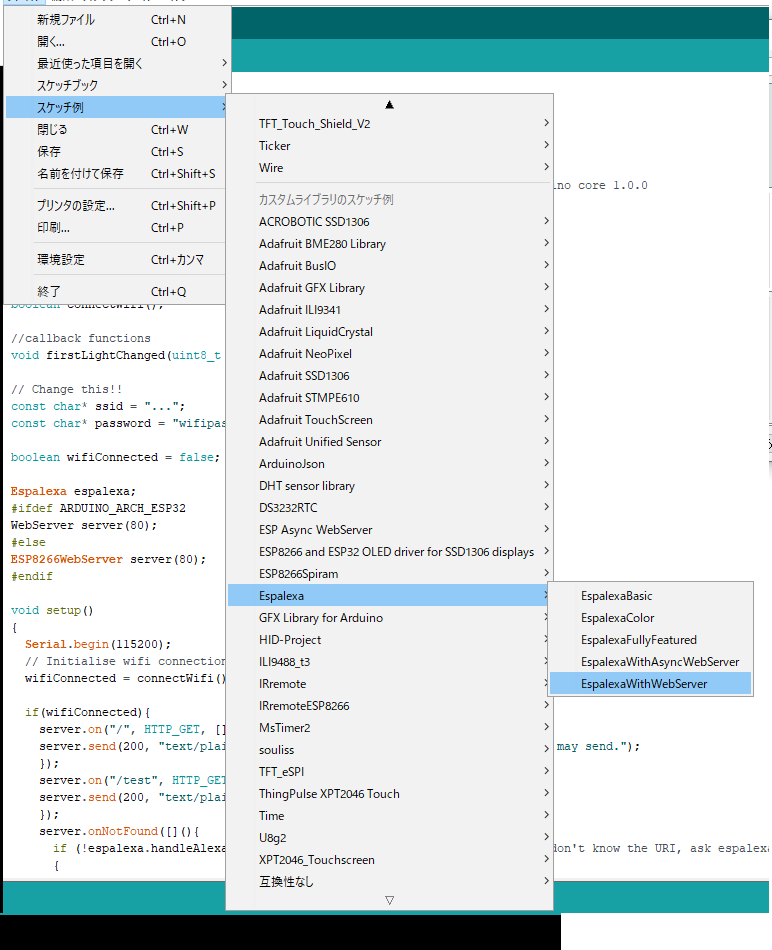
今後の汎用性も考えて今回はEspalexaWithWebServerで進めていきます。
// Change this!!
const char* ssid = "...";
const char* password = "wifipassword";
wifiのssidとパスワードをプログラムに書き込んでおきます。
さてボタンの入力をアレクサ上の値に反映するためには登録されているデバイスを読みだして値を更新させてあげる必要があります。
// alexa data update!!
EspalexaDevice* d = espalexa.getDevice(0); //this will get "Delta", the index is zero-based
d->setValue(255);
最初に登録したデバイスがgetDevice(0)で登録されていますので、その値をd->setValue()にて更新します。
ちなみに色を指定するsetColor()や割合のsetPercent()があります。
本文
今回はespの内臓ledを使用して、ボタンは0,4ピンを使用します。
/*
 * This is an example on how to use Espalexa alongside an ESP8266WebServer.
 */
#include <Espalexa.h>
 #ifdef ARDUINO_ARCH_ESP32
#include <WiFi.h>
#include <WebServer.h> //if you get an error here please update to ESP32 arduino core 1.0.0
#else
#include <ESP8266WiFi.h>
#include <ESP8266WebServer.h>
#endif

#define LED_BUILTIN 2 //追記

const int onPin = 0; //追記
const int offPin =  4;//追記
int buttonState = 0;//追記

// prototypes
boolean connectWifi();

//callback functions
void firstLightChanged(uint8_t brightness);

// Change this!!
//const char* ssid = "...";
//const char* password = "wifipassword";


boolean wifiConnected = false;

Espalexa espalexa;
#ifdef ARDUINO_ARCH_ESP32
WebServer server(80);
#else
ESP8266WebServer server(80);
#endif

void setup()
{
  Serial.begin(115200);
  pinMode(LED_BUILTIN, OUTPUT);
  pinMode(onPin, INPUT_PULLUP);
  pinMode(offPin, INPUT_PULLUP);
  // Initialise wifi connection
  wifiConnected = connectWifi();

  if(wifiConnected){
    server.on("/", HTTP_GET, [](){
    server.send(200, "text/plain", "This is an example index page your server may send.");
    });
    //追記-
    server.on("/on", HTTP_GET, [](){
    server.send(200, "text/plain", "on the led");
    led_turnon();
    });
    server.on("/off", HTTP_GET, [](){
    server.send(200, "text/plain", "off the led");
    led_turnoff();
    });
    //-
    server.on("/test", HTTP_GET, [](){
    server.send(200, "text/plain", "This is a second subpage you may have.");
    });
    server.onNotFound([](){
      if (!espalexa.handleAlexaApiCall(server.uri(),server.arg(0))) //if you don't know the URI, ask espalexa whether it is an Alexa control request
      {
        //whatever you want to do with 404s
        server.send(404, "text/plain", "Not found");
      }
    });

    // Define your devices here.
    espalexa.addDevice("My Light 1", firstLightChanged); //simplest definition, default state off

    espalexa.begin(&server); //give espalexa a pointer to your server object so it can use your server instead of creating its own
    //server.begin(); //omit this since it will be done by espalexa.begin(&server)
  } else
  {
    while (1)
    {
      Serial.println("Cannot connect to WiFi. Please check data and reset the ESP.");
      delay(2500);
    }
  }
}

void loop()
{
   //server.handleClient() //you can omit this line from your code since it will be called in espalexa.loop()
   espalexa.loop();
   //追記-
   if ( digitalRead(onPin) == LOW) {
    if(buttonState != 0){
      buttonState = 0;
      led_turnoff();
    }
   }
   if( digitalRead(offPin) == LOW)  {
    if(buttonState != 1){
      buttonState = 1;
      led_turnon();
    }
   }

    //-ここまで追記
   delay(1);
}

//追記-
void led_turnon(){
    digitalWrite(LED_BUILTIN, LOW);
    EspalexaDevice* d = espalexa.getDevice(0); //this will get "Delta", the index is zero-based
    d->setValue(255);
    Serial.println("LED on");
}

void led_turnoff(){
    digitalWrite(LED_BUILTIN, HIGH);
    EspalexaDevice* d = espalexa.getDevice(0); //this will get "Delta", the index is zero-based
    d->setValue(0);
    Serial.println("LED off");
}
//-ここまで追記

//our callback functions
void firstLightChanged(uint8_t brightness) {
    Serial.print("Device 1 changed to ");

    //do what you need to do here

    //EXAMPLE
    if (brightness == 255) {
      Serial.println("ON");
      digitalWrite(LED_BUILTIN, LOW);
    }
    else if (brightness == 0) {
      Serial.println("OFF");
      digitalWrite(LED_BUILTIN, HIGH);
    }
    else {
      Serial.print("DIM "); Serial.println(brightness);
    }
}

// connect to wifi – returns true if successful or false if not
boolean connectWifi(){
  boolean state = true;
  int i = 0;

  WiFi.mode(WIFI_STA);
  WiFi.begin(ssid, password);
  Serial.println("");
  Serial.println("Connecting to WiFi");

  // Wait for connection
  Serial.print("Connecting...");
  while (WiFi.status() != WL_CONNECTED) {
    delay(500);
    Serial.print(".");
    if (i > 20){
      state = false; break;
    }
    i++;
  }
  Serial.println("");
  if (state){
    Serial.print("Connected to ");
    Serial.println(ssid);
    Serial.print("IP address: ");
    Serial.println(WiFi.localIP());
  }
  else {
    Serial.println("Connection failed.");
  }
  delay(100);
  return state;
}
実行するとボタンとアレクサでledが制御することができます。
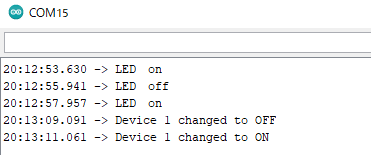
またアレクサ側の画面ではボタンの入力があると入力されてことが反映されます。
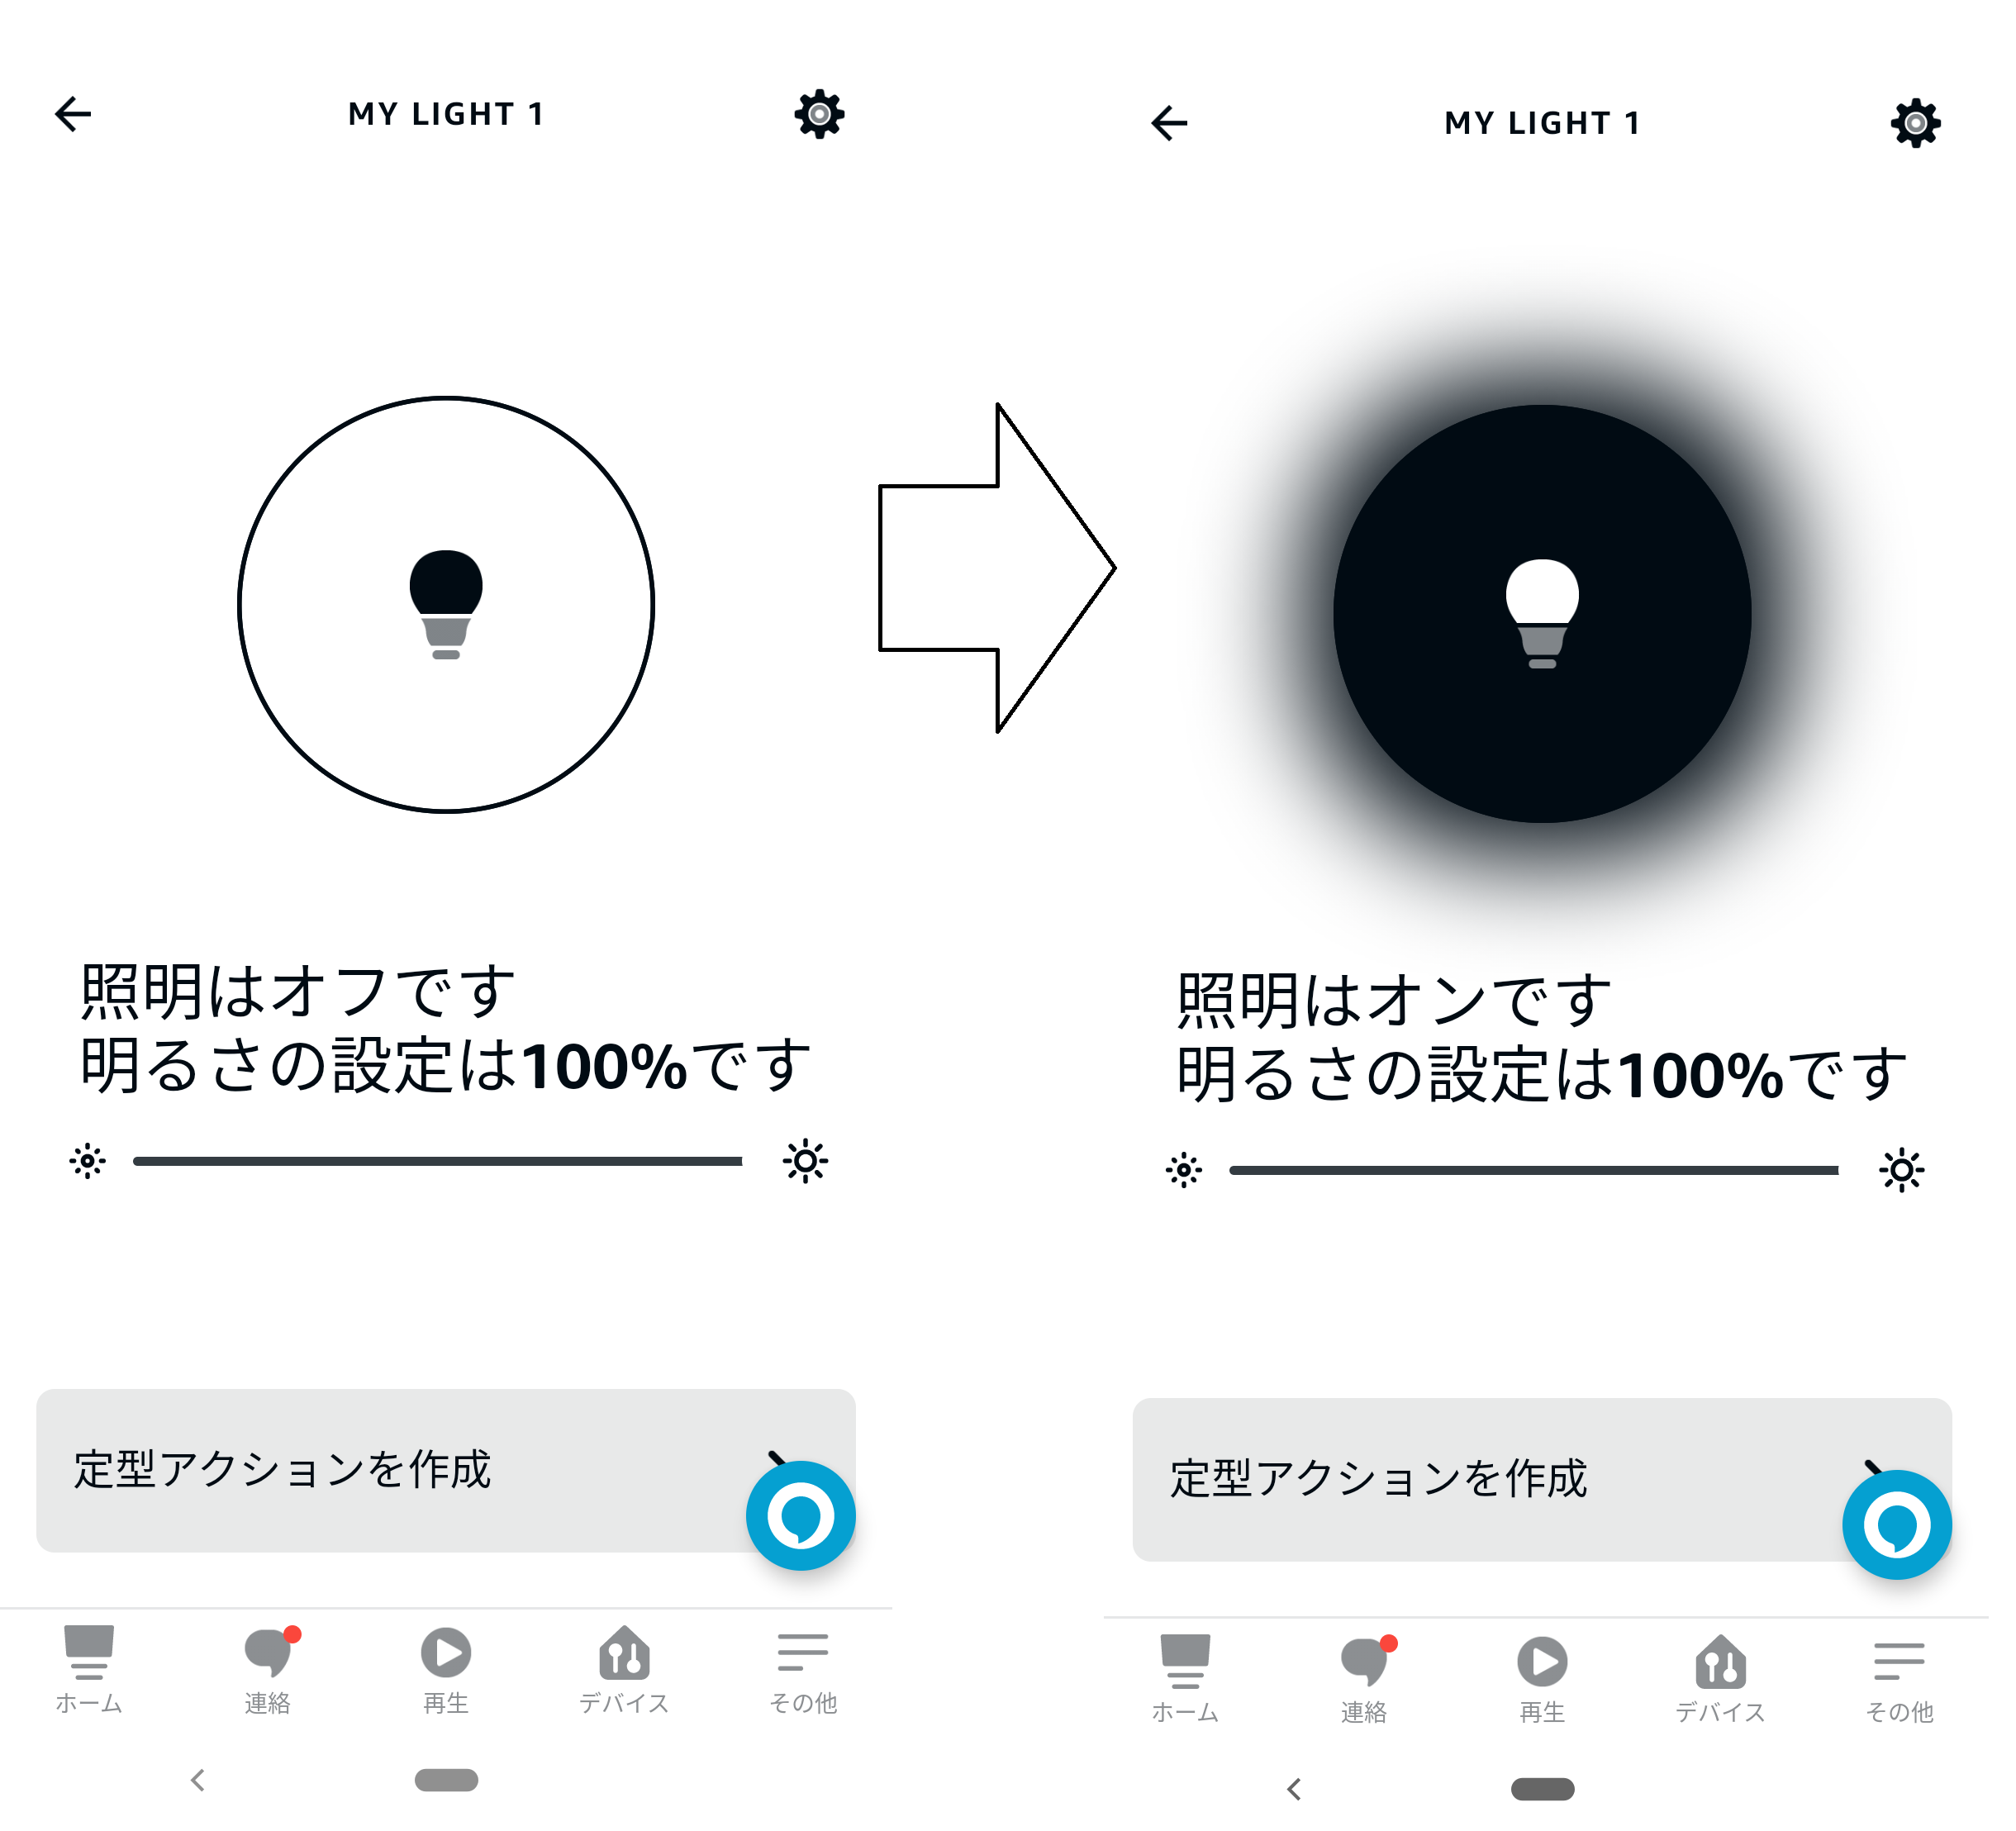
以上でアレクサに値の変更をすることができました。
アレクサとボタン入力によってライトの「入」「切」が簡単に反映することができます。
追記
ちなみにWebServerを立てているので
    //追記-
    server.on("/on", HTTP_GET, [](){
    server.send(200, "text/plain", "on the led");
    led_turnon();
    });
    server.on("/off", HTTP_GET, [](){
    server.send(200, "text/plain", "off the led");
    led_turnoff();
httpアクセスでもライトの「入」「切」ができます。