Vagrant + VirtualBox で使う Windows2016 の Boxイメージを作成します。
概要
Windows2016 の Boxイメージの入手方法は大きく3つあります。
(1) HashiCorp社 の Atlasサービス上で公開されている Boxイメージをダウンロードする
HashiCorp社は Vagrant・Packer(あとTerraformもですね!)の開発元です。Atlasのアカウントを取れば誰でも Boxイメージを登録可能です。
2017/05/16現在、"Vagrant Windwos2016"で Google先生に伺いを立てると『これをダウンロードすればいいじゃない』と以下の URL を教えてくださいます。
この方法が一番簡単な入手方法です。ただし、インターネット上の勝手サイトで公開されているイメージはその信頼性を吟味する必要があります。
(2) 以下の工程を全て手作業で行って、Boxイメージを作る
- Microsoftのサイトから評価版のWindows2016をダウンロード
- VirtualBoxに Windows2016 をインストール
- Windows2016に Vagrantで使うための設定実施
- PackerでBoxイメージ化
全て手作業でイメージを作成するので、信頼性が高いイメージが作れますが、手間と知識が必要です。この方法を試す場合は以下を参考にすると良いと思います。
Creating a Base Box
https://www.vagrantup.com/docs/boxes/base.html
Vagrant で作ったり壊したりできる Windows 環境を手に入れるまでの手順
http://tech.nitoyon.com/ja/blog/2014/02/20/vagrant-win-guest/
(3) Packerテンプレートを使ってほぼ自動でBoxイメージを作る
Box-CutterというCommunityがいくつかのOSのPackerテンプレートを公開してくれています。
https://github.com/boxcutter/windows.git
Packerテンプレートを使うと、適切なOSイメージのダウンロードから、VagrantBoxとなるための前提の設定まで全自動で作業してくれます。が、残念ながら2017/05/17現在 Windows2016用のPackerテンプレートは別ブランチで開発中のようでちゃんと動いてくれませんでした。
そこで、本記事ではChef社の中の人が公開している以下のブログに書いてある方法を試してみます。この方法では Vagrant Boxとなるための前提の設定を、一部Chefで実施しているようです。
Create a Windows Server 2016 Vagrant box with Chef and Packer
https://learn.chef.io/skills/packer-chef/
事前準備
Internetに接続可能なMacに Vagrant の Boxイメージを作成する環境を準備します。Macでなくても RedHatやCentOS上でもほぼ同じコマンドで作成可能です。ただし、Packerでのイメージ作成にVirtualBoxを利用しているので AWS EC2や Bluemix Infrastructure のVSIの上では動きません。
以下のソフトウェアを Macに導入してください。
- Vagrant (https://www.virtualbox.org/wiki/Downloads)
- Virtual Box (https://www.vagrantup.com/downloads.html)
- Packer (https://www.packer.io/downloads.html)
- Chef DK (https://downloads.chef.io/chefdk)
作ったBoxイメージは、同じ Vagrant + VirtualBoxの環境であれば、どこに持っていっても動きます。Macで作ったBoxイメージが、Windows上の Vagrant + VirtualBoxで動きます。便利ですね。
Box 作成
vagrant plugin導入
まず、Windows接続する際に必要なので、Vagrant の WinRM用のプラグインを導入します。
$ vagrant plugin install vagrant-winrm
Installing the 'vagrant-winrm' plugin. This can take a few minutes...
Fetching: minitar-0.6.1.gem (100%)
The `minitar` executable is no longer bundled with `minitar`. If you are
expecting this executable, make sure you also install `minitar-cli`.
Fetching: vagrant-winrm-0.7.0.gem (100%)
Installed the plugin 'vagrant-winrm (0.7.0)'!

$ vagrant plugin list
vagrant-share (1.1.8, system)
vagrant-winrm (0.7.0)
Packer テンプレートファイル入手
それでは早速Boxイメージの作成を始めます。
ありがたいことに、Chef社の中の人が Windows用のPackerテンプレートファイルを含むGithubリポジトリを公開してくれていますので、そちらを利用したいと思います。
適当なディレクトリに移動して、git clone します。
$ git clone https://github.com/mwrock/packer-templates.git
Cloning into 'packer-templates'...
remote: Counting objects: 865, done.
remote: Total 865 (delta 0), reused 0 (delta 0), pack-reused 865
Receiving objects: 100% (865/865), 152.09 KiB | 264.00 KiB/s, done.
Resolving deltas: 100% (480/480), done.
Chef Cookbook の入手
Packer での Box イメージ作成中に、Chef と Powershell を利用して Vagrant で使うための様々な設定をしています。ここでは Chef を使った設定で使う Chef の Cookbook をダウンロードします。こちらもコマンド一発で必要なもの全てがダウンロードされます。
git clone で作成された packer-templates から更に下に cookbooks/packer-templates に潜ると Berksfile が置かれています。Berksfile が置かれているカレントディレクトリ上で berks してください。
$ cd packer-templates/cookbooks/packer-templates/

$ ls
Berksfile      Berksfile.lock chefignore     metadata.rb    recipes        templates

$ berks vendor ../../vendor/cookbooks
Resolving cookbook dependencies...
Fetching 'packer-templates' from source at .
Using packer-templates (0.1.0) from source at .
Using chef_handler (1.4.0)
Using windows (1.44.1)
Using wsus-client (1.2.1)
Vendoring chef_handler (1.4.0) to ../../vendor/cookbooks/chef_handler
Vendoring packer-templates (0.1.0) to ../../vendor/cookbooks/packer-templates
Vendoring windows (1.44.1) to ../../vendor/cookbooks/windows
Vendoring wsus-client (1.2.1) to ../../vendor/cookbooks/wsus-client
git clone した packer-templates の直下に vendor/cookbooks というディレクトリが作られており、その下に必要な Cookbookがダウンロードされました。
(2017/05/16現在)テンプレートファイルの修正
2017/05/16現在、Windows2016 の Boxイメージを作る際にテンプレートファイル(vbox-2016.json)の以下の37行目を削除する必要があります。
    28	  "provisioners": [
    29	    {
    30	      "type": "chef-solo",
    31	      "cookbook_paths": ["cookbooks", "vendor/cookbooks"],
    32	      "guest_os_type": "windows",
    33	      "run_list": [
    34	        "wsus-client::configure",
    35	        "packer-templates::install_ps_modules",
    36	        "packer-templates::vbox_guest_additions",
    37	        "packer-templates::uninstall_powershell_ise", <- この行を削除
    38	        "packer-templates::delete_pagefile"
    39	      ]
    40	    },
この問題は以下のIssueに記載されています。Windows Cookbook と Windows2016の互換性の問題に起因するようです。
https://github.com/mwrock/packer-templates/issues/84
Packer実行
いよいよ Packerを実行します。
MSのサイトから評価版のWindows2016のISOイメージをダウンロードしたり、他にもいろんな処理をしているのでわたしの MacBookAir では 3時間かかりました。。
$ packer build -force -only virtualbox-iso ./vbox-2016.json
virtualbox-iso output will be in this color.

==> virtualbox-iso: Downloading or copying Guest additions
    virtualbox-iso: Downloading or copying: file:///Applications/VirtualBox.app/Contents/MacOS/VBoxGuestAdditions.iso
==> virtualbox-iso: Downloading or copying ISO

(中略)

    virtualbox-iso (vagrant): Compressing: packer-virtualbox-iso-1494901795-disk1.vmdk
Build 'virtualbox-iso' finished.

==> Builds finished. The artifacts of successful builds are:
--> virtualbox-iso: VM files in directory: output-virtualbox-iso
--> virtualbox-iso: 'virtualbox' provider box: windows2016min-virtualbox.box
ログが約1100行ぐらいあるので、ログ全量は以下を参照してください。
https://github.com/kentarok/openfiles/blob/master/packer_win2016.log
packerコマンドを実行したカレントディレクトリに BoxファイルができていればOKです。
$ ls -l windows2016min-virtualbox.box
-rw-r--r--  1 kentarok  staff  5359876424  5 16 13:36 windows2016min-virtualbox.box
ここまでくればBoxファイルだけ移動させて、git clone した packer-templates ディレクトリは削除しちゃってもOKです。
作成したBoxイメージから仮想OSの起動
作ったBoxイメージから Windows2016 を起動してみましょう。
box add
まず、お手元のMacの Vagrantに Boxイメージを box add します。
$ ls -l windows2016min-virtualbox.box
-rw-r--r--  1 kentarok  staff  5359876424  5 16 13:36 windows2016min-virtualbox.box

$ vagrant box add windows-2016min ./windows2016min-virtualbox.box
==> box: Box file was not detected as metadata. Adding it directly...
==> box: Adding box 'windows-2016min' (v0) for provider:
    box: Unpacking necessary files from: file:///Users/kentarok/packer-templates/windows2016min-virtualbox.box
==> box: Successfully added box 'windows-2016min' (v0) for 'virtualbox'!
vagrant box list で表示されればOKです。
ちなみに add された Boxイメージは ユーザのホームディレクトリ/.vagrant.d/boxes 配下にコピーされています。addしちゃえば、その環境ではBoxイメージは不要なので削除してもOKです。
$ vagrant box list
bento/centos-6.7 (virtualbox, 2.2.7)
bento/centos-7.2 (virtualbox, 2.3.1)
private/RHEL-7.3 (virtualbox, 0)
windows-2016min  (virtualbox, 0)

$ ls -l ~/.vagrant.d/boxes/
total 0
drwxr-xr-x  4 kentarok  staff  136  3 28 10:37 bento-VAGRANTSLASH-centos-6.7
drwxr-xr-x  4 kentarok  staff  136 12  9 12:15 bento-VAGRANTSLASH-centos-7.2
drwxr-xr-x  3 kentarok  staff  102  4  4 14:19 private-VAGRANTSLASH-RHEL-7.3
drwxr-xr-x  3 kentarok  staff  102  5 16 13:41 windows-2016min
Vagrantファイル作成
Vagrant ファイルは以下のような感じに作成します。
作成した Vagrantfile は windows2016 とかディレクトリ作って、その下においてください。
# -*- mode: ruby -*-
# vi: set ft=ruby :

Vagrant.configure("2") do |config|
  config.vm.define "vagrant-windows-2016min"
  config.vm.box = "windows-2016min"

  # Port forward WinRM and RDP
  config.vm.network :forwarded_port, guest: 3389, host: 3389, id: "rdp", auto_correct:true
  config.vm.communicator = "winrm"
  config.vm.guest = :windows
  config.vm.network :forwarded_port, guest: 5985, host: 5985, id: "winrm", auto_correct:true
  # Port forward SSH
  #config.vm.network :forwarded_port, guest: 22, host: 2222, id: "ssh", auto_correct:true

  config.vm.provider :virtualbox do |v, override|
    v.gui = false
    v.customize ["modifyvm", :id, "--memory", 1536]
    v.customize ["modifyvm", :id, "--cpus", 1]
    v.customize ["modifyvm", :id, "--vram", "256"]
    v.customize ["setextradata", "global", "GUI/MaxGuestResolution", "any"]
    v.customize ["setextradata", :id, "CustomVideoMode1", "1024x768x32"]
  end
end
vagrant up
いよいよ Windows2016を起動します。
Vagrantfileをおいたカレントディレクトリに移動して、vagrant up コマンドを実行してみてください。
$ vagrant up
Bringing machine 'vagrant-windows-2016min' up with 'virtualbox' provider...
==> vagrant-windows-2016min: Importing base box 'windows-2016min'...
==> vagrant-windows-2016min: Matching MAC address for NAT networking...
==> vagrant-windows-2016min: Setting the name of the VM: win2016min_vagrant-windows-2016min_1494910281246_24672
==> vagrant-windows-2016min: Clearing any previously set network interfaces...
==> vagrant-windows-2016min: Preparing network interfaces based on configuration...
    vagrant-windows-2016min: Adapter 1: nat
==> vagrant-windows-2016min: Forwarding ports...
    vagrant-windows-2016min: 3389 (guest) => 3389 (host) (adapter 1)
    vagrant-windows-2016min: 5985 (guest) => 5985 (host) (adapter 1)
    vagrant-windows-2016min: 5986 (guest) => 55986 (host) (adapter 1)
    vagrant-windows-2016min: 22 (guest) => 2222 (host) (adapter 1)
==> vagrant-windows-2016min: Running 'pre-boot' VM customizations...
==> vagrant-windows-2016min: Booting VM...
==> vagrant-windows-2016min: Waiting for machine to boot. This may take a few minutes...
    vagrant-windows-2016min: WinRM address: 127.0.0.1:5985
    vagrant-windows-2016min: WinRM username: vagrant
    vagrant-windows-2016min: WinRM execution_time_limit: PT2H
    vagrant-windows-2016min: WinRM transport: negotiate
==> vagrant-windows-2016min: Machine booted and ready!
==> vagrant-windows-2016min: Checking for guest additions in VM...
    vagrant-windows-2016min: No guest additions were detected on the base box for this VM! Guest
    vagrant-windows-2016min: additions are required for forwarded ports, shared folders, host only
    vagrant-windows-2016min: networking, and more. If SSH fails on this machine, please install
    vagrant-windows-2016min: the guest additions and repackage the box to continue.
    vagrant-windows-2016min:
    vagrant-windows-2016min: This is not an error message; everything may continue to work properly,
    vagrant-windows-2016min: in which case you may ignore this message.
==> vagrant-windows-2016min: Mounting shared folders...
    vagrant-windows-2016min: /vagrant => /Users/kentarok/Documents/BoxSync/Vagrant/win2016min
Linuxと違って、Windowsは少々お時間がかかります。。が、無事起動したようです。
起動後の確認
RemoteDesktop Clientで以下のようなConfigを作成し、RemoteDesktop接続してください。Vagrantfile に記載した通り、Windowsサーバの 3389Portへのアクセスは、localhostの 3389Portから Forwardingされます。
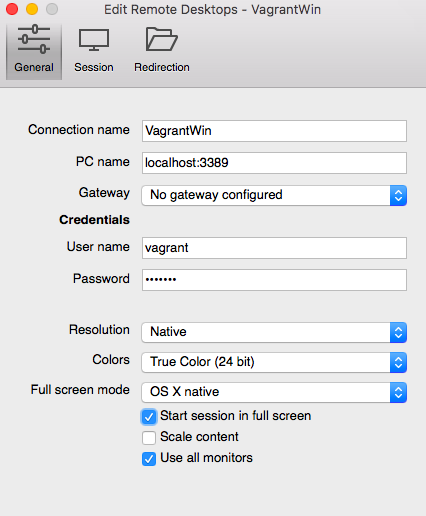
接続できたでしょうか。
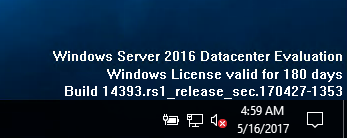
ちなみに、ライセンス周りもばっちりでした。
最後に
しれっと3時間待たされたりしますが、Windowsのダウンロード含めて簡単に自動でBoxイメージ作れるのは便利ですね!