この記事の内容
前回、Sound font2の解析までやらせたので今回はそのSound fontを鳴らしてみる。
Sound fontはPreset->(Zone)->Instrument->(Zone)->Sampleの様につながっており、Preset/Instrumentは複数のZoneを持っている。今回はSound fontのの構造を詳しく見て実際にSampleの音を鳴らす。
音楽系を触っている部分よりHTML、JavaScript一般を触ってる部分が大半になってしまった。
sf2Class解説
前回はあまり使わないがSound font系Classについて簡単に説明しておく。sf2系クラスは、SoundFontをトップにsf2Preset、sf2Zone、sf2Instrument、sf2Generator、sf2Modulator、sf2Sapmleの6個ある。sf2Generator、sf2Modulator、sf2Sampleは終端でその下にクラスを持たない。これらのクラスは
export default class sf2Sample{
    constructor(obj){ for( let key of Object.keys(obj) ){ this[key]=obj[key]; }; };
}
の様に受け取ったオブジェクトのコピーを作る。現段階では意味がないが、実装をここに集約させる。
import sf2Info from "./sf2Info.js";
import sf2Preset from "./sf2Preset.js";

export default class SoundFont{
    constructor(info, presets){
        this.info=new sf2Info(info);
        this.presets=[];
        for( const preset of presets ){
            this.presets.push(new sf2Preset(preset));
        }
    }

    getPreset(name){
        for( let i=0, len=this.presets.length; i<len; i++ ) if( this.presets[i].name===name ) return this.presets[i];
        return;
    }
};
前回も載せたがSoundFontクラス、名前検索だけつけた。Classはオブジェクトの糖衣構文なのでメンバ(と言っていいかわからないが)のアクセス系はつける必要がない。
import sf2Zone from "./sf2Zone.js";

export default class sf2Preset{
    constructor(obj){
        this.name=obj.name;
        this.MIDInumber=obj.MIDInumber;
        this.bank=obj.bank;
        this.library=obj.library;
        this.morphology=obj.morphology;
        if( obj.global_zone ) this.global_zone=new sf2Zone(obj.global_zone);
        this.zones=[];
        for( let z of obj.zones ) this.zones.push(new sf2Zone(z));
    }
};
基本的にユーザーに公開されるべきクラス。
import sf2Generator from "./sf2Generator.js"
import sf2Modulator from "./sf2Modulator.js"
import sf2Instrument from "./sf2Instrument.js"
import sf2Sample from "./sf2Sample.js"

export default class sf2Zone{
    constructor(obj){
        if( Object.keys(obj.generators).length>0 ) this.generator=new sf2Generator(obj.generators);
        this.modulators=[];
        for( let m of obj.modulators ) this.modulators.push(new sf2Modulator(m));
        if( obj.instrument ) this.child=new sf2Instrument(obj.instrument);
        else if( obj.sample ) this.child=new sf2Sample(obj.sample);
    }
}
Generatorはenum定義に従って名前付けてある。また、Instrument/Sampleしか持たないZoneは空になっているのでconsole.log等で確認するとき邪魔になったのでからの場合はスキップするようにした、Instrument/Sampleはchildとし共通化する。
import sf2Zone from "./sf2Zone.js"

export default class sf2Instrument{
    constructor(obj){
        this.name=obj.name;
        if( obj.global_zone ) this.global_zone=new sf2Zone(obj.global_zone);
        this.zones=[];
        for( let z of obj.zones ) this.zones.push(new sf2Zone(z));
    }
}
構造はsf2Presetとほぼ同じだが持っている情報はこっちのほうが少ない。
Sound font2の構造をHTMLで表す。
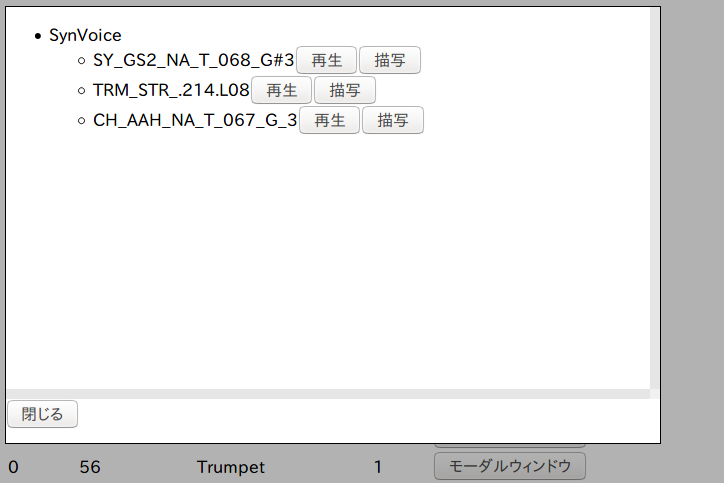
Sound font2の構造をHTMLを使って表すと以下のようになる。
以下のようになり、Instrumentの情報を出す。閉じる場合は閉じるか灰色の枠をクリックすると消える。
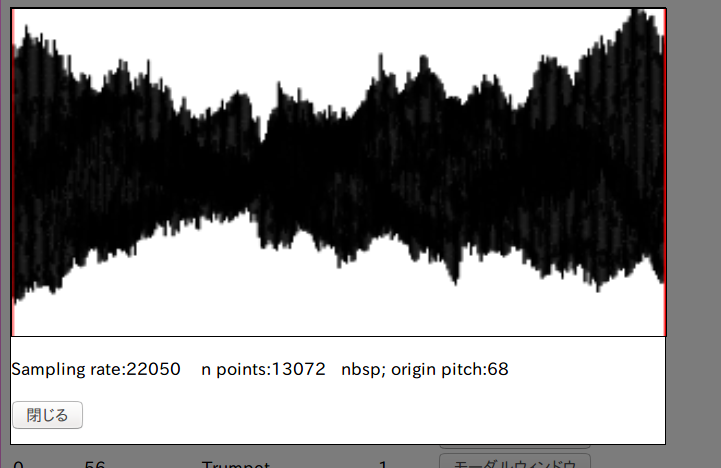
描写をクリックすると

となりサンプルの波形データをグラフにする。赤いラインはループの範囲を示している。
以下のHTMLとそれを制御しているJavaScriptは最後に解説する。
サンプル音源を鳴らす。
実際にサンプル音源を鳴らしてみる。
export default class sf2Sample{
    constructor(obj){
        for( let key of Object.keys(obj) ){ this[key]=obj[key]; };
        this.loop_start_time=this.loop_start/this.sampling_rate
        this.loop_end_time=this.loop_end/this.sampling_rate
    };

    createBufferSource(audioCtx, noteNo, time){
        const scale= noteNo ? Math.pow(2, (noteNo-origin_pitch)/12.): 1.0;
        const buffer=audioCtx.createBuffer(1, this.sample.length, scale*this.sampling_rate);
        buffer.getChannelData(0).set(this.sample);
        const source=audioCtx.createBufferSource();
        source.buffer=buffer;
        return source;
    };
}
sf2Sampleに以下のcreateBufferSourceを追加する。noteNoは音程を表すMIDIの規格でtimeは音を鳴らす時間を表しているが現在は使っていない(一応、音程計算のルーチンは入れているがテストはしていないので実用ではない)。
export function get(sf2){
    const audioCtx=new(window.AudioContext || window.webkitAudioContext)();

    ........... 中略 .......

    function playSample(sample, notoNo, time){
        console.log(audioCtx);
        const source=sample.createBufferSource(audioCtx, notoNo, time);
        source.connect(audioCtx.destination);
        source.start();
    }

    .......... 中略 ........

                input.addEventListener("click", ()=>{ playSample(sample_zone.child) });
sf2SampleのcreateBufferSourceを利用してる場所、AudioBufferはAudioContextから生成し、それをAudioBufferSourceに渡す。それをAudioContextのdestination(出力先)につないでstart()を呼ぶと音が出る。
使い方自体はMDNのAudioBufferそのほぼままである。
本体部分は終わり
三回目にしてやっとWebAudioAPIがチラ見しましたが、ほぼWebAudioAPIと関係ない内容でした。
今回使ったHTMLとその制御用JavaScriptを後ろに書いておきます。(半分書捨てなのでかなり汚いです)。
表示用HTMLとJavaScript
<!DOCTYPE html>
<html>
  <head>
    <meta charset="utf-8"/>
    <title>Music library</title>
    <link rel="stylesheet" href="css/style_sf2.css">
    <script src="dist/bundle.js"></script>
  </head>

  <body>
    <div id="modal-overlay"></div>
    <div id="modal-box">
      <div id="modal-content"></div>
      <form>
        <input type="button" id="modal-close" value="閉じる"></input>
      </form>
    </div>

    <div id="modal2-overlay"></div>
    <div id="modal2-box">
      <div id="modal2-content">
        <canvas align="center" id="waveform"></canvas>
        <div id="sample-info">

        </div>
      </div>
      <form>
        <input type="button" id="modal2-close" value="閉じる"></input>
      </form>
    </div>
  </body>
</html>
idがmodal-overlay``modal-boxとなっているのがモーダルウィンドウと言われるものです。
実装はここを参考にしましたが一部変更しています。(参考元はoverlayを動的に作っているがindex.htmlに直接書き込みました。modal-overlay,modal-boxは2を含め、stylesheetでdisplay: none;で初期状態では見えなくして、z-index: nを使うことにより本体より全面に表示させます。
export function get(sf2){
const audioCtx=new(window.AudioContext || window.webkitAudioContext)();
const wrapper=document.createElement("div");
wrapper.id="wrapper"
let table=document.createElement('table');
table.appendChild(makeTH());
wrapper.appendChild(table);
for( const preset of sf2.presets ){
table.appendChild(makePresetTD(preset));
}
document.getElementById("modal-overlay").addEventListener("click", ()=>{ offModal(); });
document.getElementById("modal-close").addEventListener("click", ()=>{ offModal(); });
document.getElementById("modal2-overlay").addEventListener("click", ()=>{ offModal2(); });
document.getElementById("modal2-close").addEventListener("click", ()=>{ offModal2(); });
return wrapper;
function playSample(sample, notoNo, time){
console.log(audioCtx);
const source=sample.createBufferSource(audioCtx, notoNo, time);
source.connect(audioCtx.destination);
source.start();
}
function drawWaveForm(sample){
const canvas=document.getElementById("waveform");
const ctx=canvas.getContext("2d");
const height=canvas.height;
ctx.strokeStyle="black";
ctx.beginPath();
ctx.moveTo(0, 0.3*height*(sample.sample[0]+1.0));
const deltax=canvas.width/sample.sample.length;
for( let i=1; i<sample.sample.length; i++ ){
ctx.lineTo(i*deltax, 0.5*height*(sample.sample[i]+1.0));
ctx.moveTo(i*deltax, 0.5*height*(sample.sample[i]+1.0));
}
ctx.closePath();
ctx.stroke();
ctx.strokeStyle="red";
ctx.beginPath();
ctx.moveTo(sample.loop_start*deltax, 0);
ctx.lineTo(sample.loop_start*deltax, height);
ctx.moveTo(sample.loop_end*deltax, 0);
ctx.lineTo(sample.loop_end*deltax, height);
ctx.closePath();
ctx.stroke();
}
function setSampleInfo(sample){
const div=document.getElementById("sample-info");
div.textContent="";
console.log(sample);
div.innerHTML="<p>Sampling rate:"+sample.sampling_rate+" "
+"n points:"+sample.sample.length+" nbsp; "
+"origin pitch:"+sample.origin_pitch+"</p>";
}
function offModal2(){
const canvas=document.getElementById("waveform");
const ctx=canvas.getContext("2d");
ctx.clearRect(0, 0, canvas.width, canvas.height);
document.getElementById("modal2-overlay").style.display="none";
document.getElementById("modal2-box").style.display="none";
}
function onModal2(sample){
document.getElementById("modal2-overlay").style.display="block";
document.getElementById("modal2-box").style.display="block";
drawWaveForm(sample);
setSampleInfo(sample);
}
function makeModalTable(preset){
const modalContent=document.getElementById("modal-content");
const mother=document.createElement("ul");
for( let zone of preset.zones ){
const inst=document.createElement("li");
console.log(zone);
inst.textContent=zone.child.name;
const samples=document.createElement("ul");
for( const sample_zone of zone.child.zones ){
const sample=document.createElement("li");
sample.textContent=sample_zone.child.name;
const input=document.createElement("input");
input.type="button";
input.value="再生";
input.addEventListener("click", ()=>{ playSample(sample_zone.child) });
sample.appendChild(input);
const draw=document.createElement("input");
draw.type="button";
draw.value="描写";
draw.addEventListener("click", ()=>{ onModal2(sample_zone.child); });
sample.appendChild(draw);
samples.appendChild(sample);
}
inst.appendChild(samples);
mother.appendChild(inst);
}
modalContent.appendChild(mother);
}
function offModal(){
document.getElementById("modal-overlay").style.display="none";
document.getElementById("modal-box").style.display="none";
document.getElementById("modal-content").textContent=null;
}
function onModal(name){
document.getElementById("modal-overlay").style.display="block";
document.getElementById("modal-box").style.display="block";
makeModalTable(sf2.presets.filter(a=>{ return a.name===name; })[0]);
}
function makePresetTD(preset){
const tr=document.createElement("tr");
let td=document.createElement("td");
td.insertAdjacentHTML('afterbegin', preset.bank);
tr.appendChild(td);
td=document.createElement("td");
td.insertAdjacentHTML('afterbegin', preset.MIDInumber);
tr.appendChild(td);
td=document.createElement("td");
td.insertAdjacentHTML('afterbegin', preset.name);
tr.appendChild(td);
td=document.createElement("td");
td.insertAdjacentHTML('afterbegin', preset.zones.length);
tr.appendChild(td);
td=document.createElement("td");
let input=document.createElement("input");
input.type="button";
input.className=preset.name;
input.value="モーダルウィンドウ";
input.addEventListener("click", ()=>{ onModal(input.className); });
tr.appendChild(input);
return tr;
};
function makeTH(){
let tr=document.createElement("tr");
let th=document.createElement("th");
th.insertAdjacentHTML('afterbegin', 'bank ID');
tr.appendChild(th);
th=document.createElement("th");
th.insertAdjacentHTML('afterbegin', 'MIDI number');
tr.appendChild(th);
th=document.createElement("th");
th.insertAdjacentHTML('afterbegin', 'name');
tr.appendChild(th);
th=document.createElement("th");
th.insertAdjacentHTML('afterbegin', 'n zone');
tr.appendChild(th);
th=document.createElement("th");
th.insertAdjacentHTML('afterbegin', 'Modal');
tr.appendChild(th);
return tr;
};
}
表示用JavaScript本体、makeTH()はテーブルのヘッダーをmakePresetTD(preset)はsf2Presetから情報を引き出してテーブルの列を返しています。中身は泥臭くdocumentでth,tdなどを作って値をセットしています。
drawWaveFormはSampleの波形の書き出し部分でcanvas要素を使った。HTML系の座標は(何故か?)右下がxyの正になっている。(普通は右上だと思うが...)、その他全体のスケールにcanvas要素のwidthとheightを使っている。2DのcontextはlineToとmoveToを繰り返して動く自分自身を動かさないとclosePath()した時に初期位置で閉じてしまうので変な線が入る。
どうしてもHTML、CSS、JavaScriptをすべて使うと冗長になってしまう。久しぶりにHTML、CSS使うと忘れている...。HTMLを直に操作するJavaScriptも泥臭さが出てくる。
今回は直接、Sampleを触って音を出したがSound fontの概念からいうとPresetに適切な命令、MIDIコマンドを入れればサンプルを鳴らしてくれるのが正しい挙動である。これらのメソッドはつけていないのでそれらは次回以降の課題である。
次回は、Sound fontを使うためのMIDIファイルの解析をする予定である。
使ったサンプル
サウンドフォントファイルのサンプルはtimidy付属のA320U.sf22を用いた。

