概要
本記事ではDatabricks Asset Bundles (DABs)をCI/CD(GitHub Actions)に組み込み、Lakeflow Declarative Pipelineを実行する手順を解説します
Databricks Asset Bundles (DABs)とは
Databricksリソース(ex. Notebook, Python file)や設定(ex. Lakeflow Jobs)などを各ワークスペースにデプロイ、バリデーションやジョブの実行をするためのツールです。 Infrastructure as Code (IaC)を原則にデザインされているためインフラ管理のバージョン管理などを可能にします。実際どのようにデプロイされるのかを下記のセクションで見ていきます。
Databricks Asset BundlesをCI/CDフローに組み込む
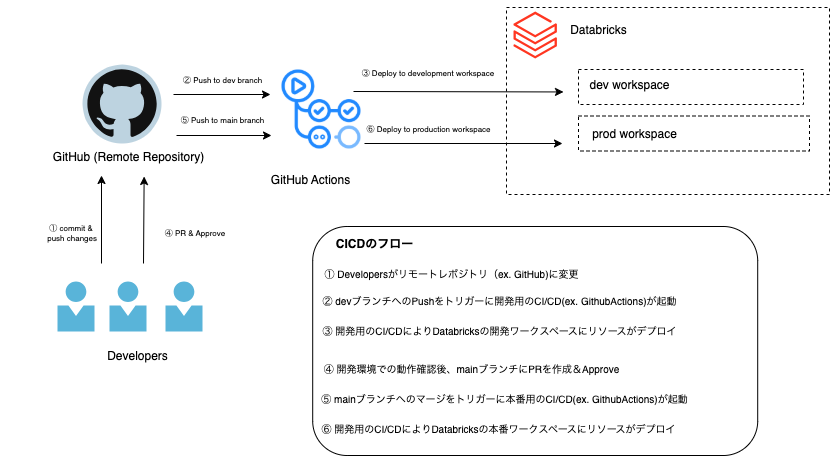
このセクションでは下記の図のCI/CDを構築するためのステップを記載します。
最終目標:Github Actionsを介してDatabricks Asset Bundlesを実行し、Databricksのワークスペースにリソース(Notebook)をデプロイしLakeflowジョブを実行する
Step 0 (前提):Databricks CLIのインストール
Databricks Asset BundlesはCLIを介して実行されるため、CLIのインストールが必要となります。公式ドキュメント参考にインストールをします。
https://docs.databricks.com/aws/ja/dev-tools/cli/install
Step 1:認証の設定
Databricks Asset Bundlesは OAuth tokensを利用してターゲットとなるワークスペースとの認証を行います。認証方法には下記の2つの方法が存在します。
- user-to-machine (U2M) authentication
- machine-to-machine (M2M) authentication
user-to-machine (U2M) authentication
ユーザーがOAuth tokenを介して直接ワークスペースにリソースをデプロイするための方法となります。各ユーザーが素早くテストをするためにローカルからDatabricks開発環境にリソースをデプロイする場合などに便利です。一方でユーザーが簡単にデプロイやジョブの実行ができてしまうので本番環境で利用するのは適していません。(本番環境では後述するmachine-to-machine (M2M) authenticationを利用します)
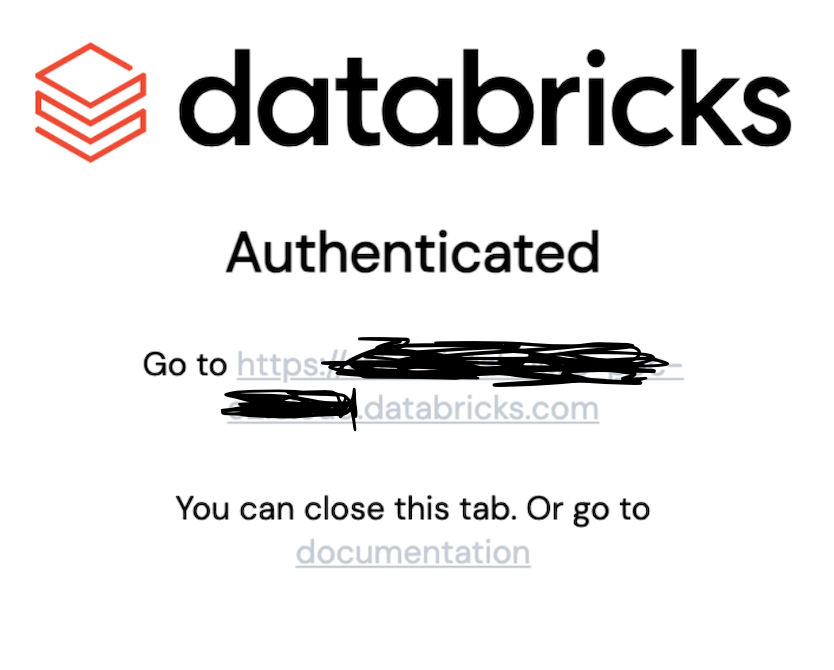
- ログインをする
下記のコマンド実行
$ databricks auth login --host <workspace-url>
上記コマンドを実行するとプロフィールの記入が求められます。
Databricks profile name [xxxx]: dev # devは例です。適切な値に変更してください。
Profile dev was successfully saved
上記の入力が完了すると認証用のページにリダイレクトされ認証が完了します。
上記のプロフィール情報の記入が完了すると、~/.databrickscfgに下記の情報が記載されます。
[dev]
host      = https://xxxx.databricks.com
auth_type = databricks-cli
例えば、下記のコマンドを実行(profileオプションでdevを指定すると)プロフィールに記載されたワークスペース(dev)にリソースをデプロイすることができます。(指定しないと[DEFAULT]のワークスペースが利用されます)
$ databricks bundle deploy –-profile dev
machine-to-machine (M2M) authentication
Service Principalsを利用して認証を行います。CI/CDに組み込む方法として適しています。
- 認証を行うためのService Principalを作成します。その後に作成したService Principalをデプロイ対象のワークスペース(dev, prod)に追加してください。
- Service PrincipalがDatabricks APIを使用可能にする。APIを利用するには下記2つの方法が存在します
- Databricks Secretsを利用
- Workload identity federationを利用
このセクションではSecretsを管理しなくても良いよりセキュアな2の方法を説明します。
下記のコマンドを実行して、開発用と本番用の2つのfederation policyを作成します。
## 開発用ポリシーの作成
$ databricks account service-principal-federation-policy create <Service Principal ID> --json '{
  "oidc_policy": {
	"issuer": "https://token.actions.githubusercontent.com",
	"audiences": [
  	  "https://github.com/my-org"
	],
	"subject": "repo:my-github-org/my-repo:environment:dev"
  }
}'
## 本番用ポリシーの作成

$ databricks account service-principal-federation-policy create <Service Principal ID> --json '{
  "oidc_policy": {
	"issuer": "https://token.actions.githubusercontent.com",
	"audiences": [
  	  "https://github.com/my-org"
	],
	"subject": "repo:my-github-org/my-repo:environment:prod"
  }
}'
各設定項目の内容はドキュメントを参照してください。
Step 2:バンドルの作成
バンドルの作成には下記の3つの方法が存在します。
- デフォルトのバンドルテンプレートを利用
- カスタムバンドルテンプレートを利用
- 手動での作成
このセクションでは2の方法を取ります。
下記のコマンドを実行し、default-pythonをテンプレートとして指定します。プロジェクト名は適切な値を設定してください。(ex. sample_dab)
$ databricks bundle init
$ tree ./sample_dab

sample_dab
├── README.md
├── databricks.yml # エントリーポイントとなるファイル
├── fixtures
├── pyproject.toml
├── resources # デプロイするたのリソースを定義
│   ├── sample_dab.yml
│   └── sample_dab.pipeline.yml
├── scratch
│   ├── README.md
│   └── exploration.ipynb
└── src
    └── dlt_pipeline.ipynb
- databricks.yml
エントリーポイントとなるファイル.バンドルプロジェクトフォルダのルートに databricks.yml という名前の設定ファイルが1つ(1つだけ)含まれている必要があります - resources
デプロイするたのリソースを配置するディレクトリ - src
Python notebooksやSQL scriptsを配置するディレクトリ
各設定ファイルの中身は以下にします。
- databricks.yml
# This is a Databricks asset bundle definition for sample_dab.
# See https://docs.databricks.com/dev-tools/bundles/index.html for documentation.
bundle:
  name: sample_dab
  uuid: xxxxxx # bundleを識別するためのユニークとなる値。databricks.yml作成時に自動で割り当てられる。

include: # デプロイするリソースファイルのパスを指定します。
  - resources/*.yml
  - resources/*/*.yml

targets: # ターゲットの定義。(ex. ワークスペース、クラスター、変数)
  dev:
    # The default target uses 'mode: development' to create a development copy.
    # - Deployed resources get prefixed with '[dev my_user_name]'
    # - Any job schedules and triggers are paused by default.
    # See also https://docs.databricks.com/dev-tools/bundles/deployment-modes.html.
    mode: development
    default: true
    workspace:
      host: https://mtd-databricks-poc-e2.cloud.databricks.com
  prod:
    mode: production
    workspace:
      host: https://mtd-databricks-poc-e2.cloud.databricks.com
- sample_dab.yml
Lakeflow Jobsを定義するファイル
# The main job for sample_dab.
# This job runs my_first_dab_pipeline on a schedule.
resources:
  jobs:
    high_temp_job:
      name: high_temp_job_${bundle.target} # ${bundle.target}にはdev or prodの値が入る

      trigger:
        # Run this job every day, exactly one day from the last run; see https://docs.databricks.com/api/workspace/jobs/create#trigger
        periodic:
          interval: 1
          unit: DAYS

      email_notifications:
        on_failure:
          - your_email@example.com

      tasks:
        - task_key: refresh_pipeline
          pipeline_task:
            pipeline_id: ${resources.pipelines.weather_history.id}
- sample_dab.pipeline.yml
Lakeflow Declarative Pipelinesを定義するファイル
# The main pipeline for sample_dab
resources:
  pipelines:
    weather_history:
      name: weather_history_pipeline
      ## Catalog is required for serverless compute
      catalog: xxxx
      schema: weather_history
      serverless: true
      libraries:
        - notebook:
            path: ../src/dlt_pipeline.ipynb # 実行するNotebookが存在するパス

      configuration:
        bundle.sourcePath: ${workspace.file_path}/src
- dlt_pipeline.ipynb
実際のパイプラインで実行されるNotebook。
内容:2015/1/1~2018/9/30のシアトルで計測された最高気温を記録したデータを読み取り、Medalion構成のLakeflow Declarative Pipelineを作成します。(CI/CD詳細は割愛します)
# DLT pipeline
# This Delta Live Tables (DLT) definition is executed using a pipeline defined in resources/sample_dab.pipeline.yml.


import dlt
from pyspark.sql.functions import avg,col, month
from pyspark.sql import SparkSession
from pyspark.sql.types import DateType, IntegerType, StructType, StructField


# Bronze layer: tableの作成
@dlt.table(
  name="high_temps_raw",
  comment="A table that contains raw data of high temperature",
  table_properties={
        "quality": "bronze"
    },
  # schema=bronze_table_schema,
  temporary = False)
def high_temps_raw():
    return spark.read.format("csv").option('header', True).option("delimiter", ",").option("inferSchema", "True").load("dbfs:/databricks-datasets/weather/high_temps").select(
          col("date").alias("target_date"),
          "temp"
      )

# Silver layer: tableの作成
@dlt.table(
  name="high_temps_in_2018",
  comment="A table that contains high temperature in 2018",
  table_properties={
        "quality": "silver"
    },
  temporary = False)
def high_temps_in_2018():
    return spark.read.table("high_temps_raw").filter(col("target_date").between("2018-01-01", "2018-12-31"))


# Gold layer: tableの作成
@dlt.table(
  name="monthly_high_temps_in_2018",
  comment="A table that contains high temperature in 2018",
  table_properties={
        "quality": "gold"
    },
  temporary = False)
def monthly_high_temps_in_2018():
    return spark.read.table("high_temps_in_2018").groupby(month("target_date").alias("target_month")).agg(avg("temp").alias("average_temperature"))
Step3: GitHubActionsの定義
各CI/CDではAsset Bundleを実行して、各ワークスペースにリソースのデプロイとLakeflow Jobの実行を行います。
./<Gitローカルディレクトリ>
├── .github
│   └── workflows
│       ├── dev_deployment.yml # 開発用のCI/CD設定ファイル
│       └── prod_deployment.yml # 本番用のCI/CD設定ファイル
├── README.md
├── dabs
│   └── sample_dab # Asset Bundleが定義されたディレクトリ
- dev_deployment.ymlの中身
name: "DABs in Action"

on:
   push:
      branches:
         - dev

permissions:
  id-token: write
  contents: read

jobs:
   bundle-and-deploy:
      name: "DAB Deployment Job"
      runs-on: ubuntu-latest
      environment: dev

      steps:
         - uses: actions/checkout@v5
         - uses: databricks/setup-cli@main
         - run: databricks bundle deploy --target dev
           working-directory: ./dabs/sample_dab
           env:
              DATABRICKS_AUTH_TYPE: github-oidc
              DATABRICKS_HOST: https://xxxxx.databricks.com
              DATABRICKS_CLIENT_ID: xxxxxxxx

   run-workflow:
      name: "Run the deployed pipeline workflow"
      runs-on: ubuntu-latest
      environment: dev

      needs:
         - bundle-and-deploy

      steps:
         - uses: actions/checkout@v5
         - uses: databricks/setup-cli@main
         - run: databricks bundle run high_temp_job --target dev
           working-directory: ./dabs/sample_dab
           env:
              DATABRICKS_AUTH_TYPE: github-oidc
              DATABRICKS_HOST: https://xxxxx.databricks.com
              DATABRICKS_CLIENT_ID: xxxxxxxx # Service PrincipalのUUIDを指定
- prod_deployment.ymlの中身
name: "DABs in Action"

on:
   push:
      branches:
         - main

permissions:
  id-token: write
  contents: read

jobs:
   bundle-and-deploy:
      name: "DAB Deployment Job"
      runs-on: ubuntu-latest
      environment: prod

      steps:
         - uses: actions/checkout@v5
         - uses: databricks/setup-cli@main
         - run: databricks bundle deploy --target prod
           working-directory: ./dabs/sample_dab
           env:
              DATABRICKS_AUTH_TYPE: github-oidc
              DATABRICKS_HOST: https://xxxxx.databricks.com
              DATABRICKS_CLIENT_ID: xxxxxxxx

   run-workflow:
      name: "Run the deployed pipeline workflow"
      runs-on: ubuntu-latest
      environment: prod

      needs:
         - bundle-and-deploy

      steps:
         - uses: actions/checkout@v5
         - uses: databricks/setup-cli@main
         - run: databricks bundle run high_temp_job_job --target prod
           working-directory: ./dabs/sample_dab
           env:
              DATABRICKS_AUTH_TYPE: github-oidc
              DATABRICKS_HOST: https://xxxxx.databricks.com
              DATABRICKS_CLIENT_ID: xxxxxxxx
Step4: リソースの実行とLakeflow Jobの実行
-
上記のソースコードをGitHubレポジトリにPushし、devブランチにマージします。このマージをトリガーにDatabricks開発用のワークスペースにリソースがデプロイされLakeflow Jobの実行が開始されます
-
Databricks開発用のワークスペースでの動作確認完了後に、mainブランチに向けてPRを作成します。チーム内での承認後(もしあれば)、PRをマージします。マージをトリガーにDatabricks本番用のワークスペースにリソースがデプロイされLakeflow Jobの実行が開始されます
まとめ
以上がDatabricks Asset Bundlesを利用したCI/CDの構築方法となります。ミス、より良い方法など存在したらコメントをぜひお願いします。