模写サイト
COFFEE / ストアサイト(カフェ)
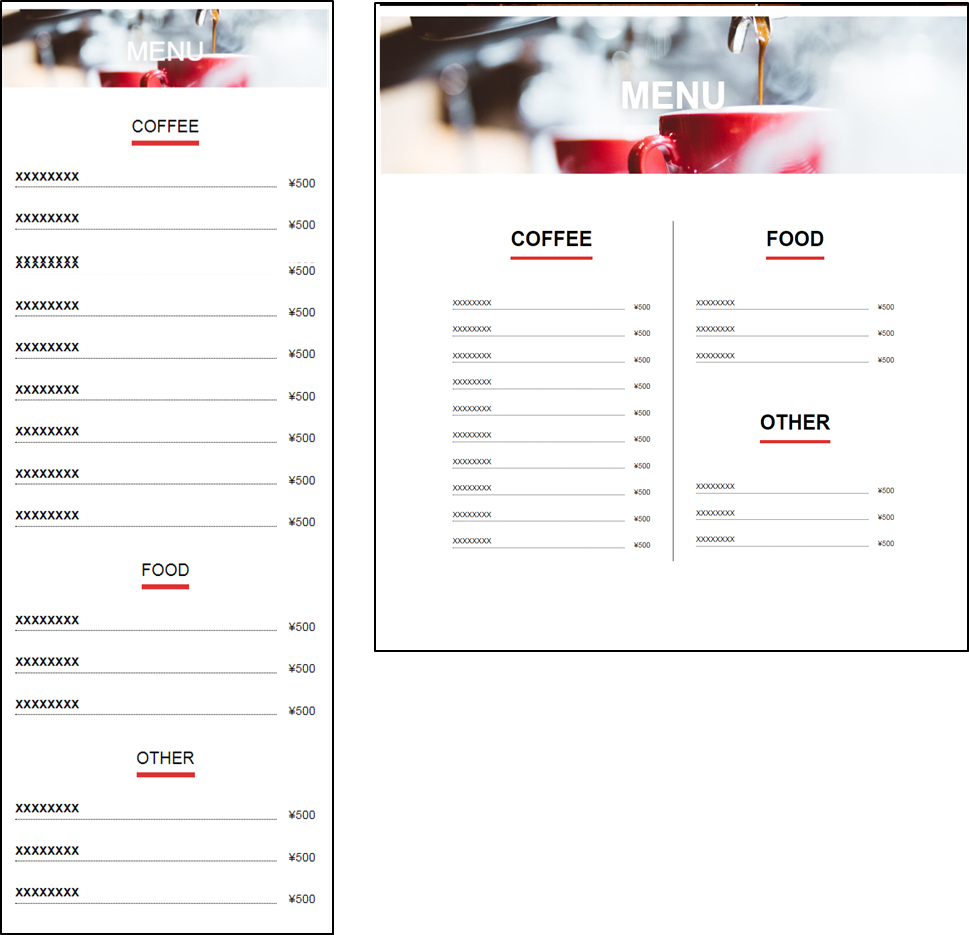
スマホサイズとPCサイズ(完成図)

<link rel="stylesheet" href="https://cdn.jsdelivr.net/npm/destyle.css@1.0.15/destyle.css" />
全体のスタイル
<style>
        html{
            font-size: 100%;
        }
        body{
            font-family: "Helvetica Neue", "Arial", "Hiragino Sans", "Hiragino Kaku Gothic ProN", "Meiryo", sans-serif;
            font-size: 0.9rem;
            line-height: 1.7;
        }
        a{
            text-decoration: none;
        }
        img{
            max-width: 100%;
        }
</style>
header
    <header id="header">
        <nav>
            <ul>
                <li><a href="#menu">MENU</a></li>
                <li><a href="#about">ABOUT</a></li>
                <li><a href="#location">LOCATION</a></li>
            </ul>
        </nav>
        <h1 class="site-title"><img src="https://code-step.com/demo/html/store/img/logo.svg" alt=""></h1>
    </header>
    <style>
        .site-title {
            /*text-align: center;*/
    /*position: relative;は親要素の#header*/
            position: absolute;
            top: 50%;
            left: 50%;
            transform: translate(-50%, -50%);
            filter: drop-shadow(1px 1px 10px #c0c0c0);
        }

        #header {
   /*position: absolute;は子要素のh1.site-title*/
            position: relative;

            background-image: url('https://code-step.com/demo/html/store/img/mainvisual.jpg');
            width: 100%;
            height: 100vh;

            background-size: cover;
            background-position: center center;
            background-repeat: no-repeat;
            padding: 20px 40px;

        }

        nav ul {
            display: flex;
            justify-content: flex-end;
        }

        nav li {
            margin-left: 30px;
        }

        nav li a {
            color: #fff;
            font-weight: bold;
            transition: all 0.3s ease;

            filter: drop-shadow(1px 1px 2px #121212);
        }

        nav li a:hover {
            color: #e03131;
        }

    </style>
.container {
/*背景画像は高さを持たないため、heightの指定が必要*/
    height: 1280px;
/*相対パスで画像ファイルを指定*/
    background-image: url(../img/background-image.jpg);
}
section#menu
<section id="menu">
<div class="menu-img fixed-bg">
<h2 class="sec-title">MENU</h2>
</div>
<div class="menu-content wrapper">
<div class="menu-item">
<h3 class="item-title">COFFEE</h3>
<dl>
<dt>XXXXXXXX</dt>
<dd>¥500</dd>
{{-- -繰り- --}}
<dt>XXXXXXXX</dt>
<dd>¥500</dd>
</dl>
</div>
<div class="menu-item">
<h3 class="item-title">FOOD</h3>
<dl class="food">
<dt>XXXXXXXX</dt>
<dd>¥500</dd>
{{-- -繰り- --}}
</dl>
<h3 class="item-title">OTHER</h3>
<dl>
<dt>XXXXXXXX</dt>
<dd>¥500</dd>
{{-- -繰り- --}}
</dl>
</div>
</div>
</section>
    <style>
        .wrapper {
            max-width: 1000px;
            padding: 30px 16px 60px 16px;
            margin: 0 auto;
            text-align: center;
        }

        #menu {
            margin-top: 10px;
        }

        #menu .menu-img {
            background-image: url('https://code-step.com/demo/html/store/img/menu.jpg');

            /*absoluteは子要素のh3.sec-title*/
            position: relative;
        }

        .fixed-bg {
            /*div.menu-imgのheight*/
            height: 94px;

            /* スマホ時は背景をスクロールするように変更 */
            background-attachment: scroll;
            background-size: cover;
            background-position: center;
        }

        .sec-title {
            font-size: 2rem;
            color: #fff;
            filter: drop-shadow(1px 1px 10px #c0c0c0);

            /*absoluteは親のdiv.menu-img*/
            position: absolute;
            top: 26%;

            /*width:100%で親のdiv.menu-imgと同じ幅になる*/
            /*left:0;right:0;でも同じ結果になる*/
            width: 100%;
            /*上の結果余白が生じてセンター揃えになる*/
            text-align: center;
        }

        .item-title {
            font-size: 1.25rem;
            margin-bottom: 25px;
            display: inline-block;
            border-bottom: solid 6px #e03131;
        }

        #menu .menu-item dl {
            display: flex;
            flex-wrap: wrap;
            margin-bottom: 10px;
        }

        #menu .menu-item dt {
            width: 87%;
            text-align: left;
            border-bottom: dotted 1px #000;
            margin-bottom: 25px;
        }

        #menu .menu-item dd {
            width: 13%;
            text-align: right;
            padding-top: 8px;
        }

        #menu .menu-item dl.food {
            margin-bottom: 10px;
        }

    </style>
    <style>
        @media screen and (min-width: 767px) {
            .wrapper {
                padding: 90px 16px 150px 16px;
            }
            #menu {
                margin-top: 20px;
            }
            .sec-title {
                font-size: 4.5rem;
                top: 30%;
            }
            .fixed-bg {
                height: 300px;
 /* PC時は背景を固定するように変更 */
                background-attachment: fixed;
            }
            .item-title {
                font-size: 2.5rem;
                margin-bottom: 70px;
            }
            #menu .menu-content {
                display: flex;
            }

            #menu .menu-item {
                width: 50%;
                padding: 0 45px;
            }
            #menu .menu-item dl {
                margin-bottom: 0px;
            }

            #menu .menu-item:first-child {
                border-right: solid 1px #000;
            }

            #menu .menu-item dl.food {
                margin-bottom: 55px;
            }
        }
    </style>
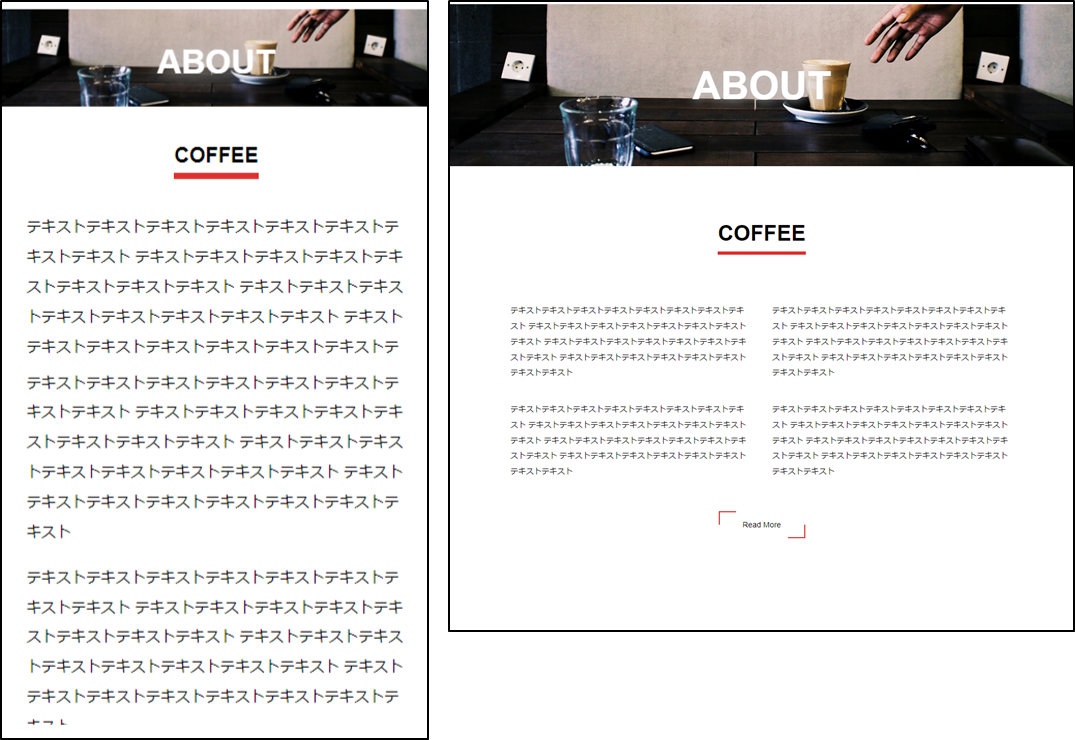
section#about
    <section id="about">
        <div class="about-img fixed-bg">
            <h2 class="sec-title">ABOUT</h2>
        </div>

        <div class="about-content wrapper">
            <div class="about-item">
                <h3 class="item-title">COFFEE</h3>
                <ul>
                    <li>
                        テキストテキストテキストテキストテキストテキストテキストテキスト
                        テキストテキストテキストテキストテキストテキストテキストテキスト
                        テキストテキストテキストテキストテキストテキストテキストテキスト
                        テキストテキストテキストテキストテキストテキストテキストテキスト
                    </li>
                    <li>
                        <!-- 上と同じ -->
                    </li>
                    <li>
                        <!-- 上と同じ -->
                    </li>
                    <li>
                        <!-- 上と同じ -->
                    </li>
                </ul>
                <a class="Btn" href="#"><span>Read More</span></a>
            </div>
        </div>
    </section>
追加CSS .sec-title{ position:absolute }のrelativeは#about .about-imgになる。

②のスタイルを以下に変更すると

レスポンシブ設定
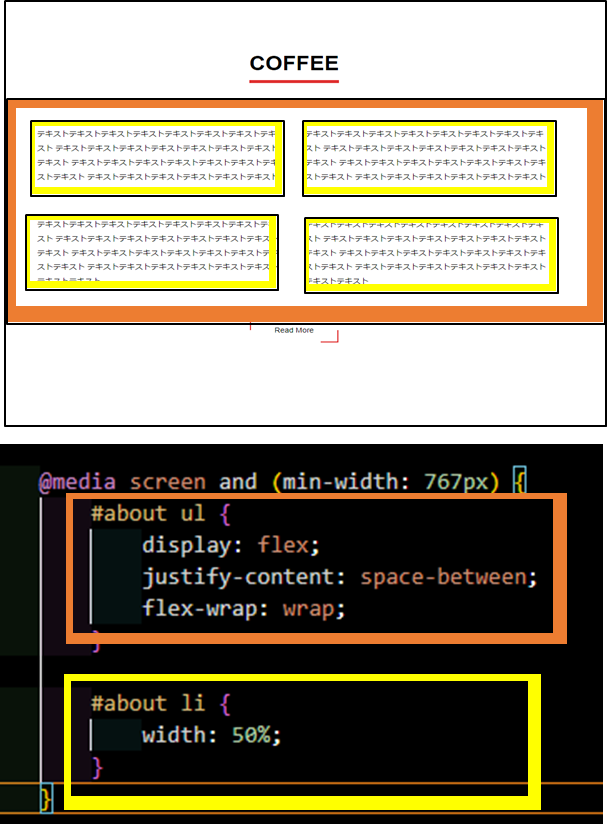
liが50%なので完全にマージンは0。余白はliのpadding:2%;

    <style>
        #about {
            margin-top: 20px;
        }

        #about .about-img {
            background-image: url('https://code-step.com/demo/html/store/img/about.jpg');
            /*absoluteは子要素のh2.sec-title{ABOUT}*/
            position: relative;
        }

        #about ul {
            margin-bottom: 40px;
        }

        #about li {
            line-height: 2;
            text-align: left;
            padding: 2%;
        }

        .Btn {
            margin: 0 auto;
            display: table;
            padding: 10px 50px;
            position: relative;
        }

        .Btn::before {
            content: '';
            width: 15%;
            height: 30%;
            position: absolute;
            top: 0;
            left: 0;
            border-top: 3px solid #f0001f;
            border-left: 3px solid #f0001f;
            transition: 0.5s;
        }

        .Btn::after {
            content: '';
            position: absolute;
            width: 15%;
            height: 30%;
            bottom: 0;
            right: 0;
            border-bottom: 3px solid #f0001f;
            border-right: 3px solid #f0001f;
            transition: 0.5s;
        }

        .Btn:hover::before {
            width: 100%;
            height: 100%;
        }

        .Btn:hover::after {
            width: 100%;
            height: 100%;
        }

        @media screen and (min-width: 767px) {
            #about ul {
                display: flex;
                justify-content: space-between;
                flex-wrap: wrap;
            }

            #about li {
                width: 50%;
            }
        }
    </style>
section#location
    <section id="location">
        <div class="location-img fixed-bg">
            <h2 class="sec-title">LOCATION</h2>
        </div>

        <div class="location-content wrapper">
            <div class="location-item">
                <h3 class="item-title">OUR STORE</h3>
                <div class="item-map">
                    <iframe
                        src="https://www.google.com/maps/embed?pb=!1m12!1m8!1m3!1d13123.424218274253!2d135.514589058137!3d34.683582270400244!3m2!1i1024!2i768!4f13.1!2m1!1z5aSn6Ziq5Z-O!5e0!3m2!1sja!2sjp!4v1642362333213!5m2!1sja!2sjp"
                        width="600" height="450" style="border:0;" allowfullscreen="" loading="lazy"></iframe>
                </div>
                <div class="item-info">
                    <p>
                        X-XX-XX, Ebisuminami, Shibuya-ku, Tokyo 150-0022<br>
                        東京都渋谷区恵比寿南X-XX-XX
                    </p>
                    <p>
                        Open 7 days a Week<br>
                        9:00am to 10:00pm
                    </p>
                    <p>Tel : XX-XXXX-XXXX</p>
                </div>
            </div>
        </div>
    </section>
スマホとPCのスタイル 黄色のsec-titleと水色のitem-titleはすでに設定済み

  <style>
        #location {
            margin-top: 20px;
        }

        #location .location-img {
            background-image: url('https://code-step.com/demo/html/store/img/location.jpg');
            position: relative;
        }

        #location .item-map {
/* グーグルマップをグレースケールにする */
            /* 画像をグレースケールにする */
            filter: grayscale(1);
            margin-bottom: 20px;
        }

/* グーグルマップのサイズを設定 */
        #location .item-map iframe {
            width: 100%;
            height: 400px;
            border: 0;
        }

        #location .item-info {
            text-align: left;
        }

        #location .item-info p {
            margin-bottom: 10px;
        }
    </style>
footer
<style>
#footer {
font-size: 0.5rem;
padding: 10px 0;
text-align: center;
}
</style>
<footer id="footer">
<p>© COFFEE</p>
</footer>
JQUERY(スムーススクロール)
$(function(){
  /*=================================================
  スムーススクロール
  ===================================================*/
  // ページ内リンクをクリックした時,
  $('a[href^="#"]').click(function(){
    // リンクを取得
    let href= $(this).attr("href");
    // ジャンプ先のhashを取得
    let target = $(href == "#" || href == "" ? 'html' : href);
//上の$()のなかは三項演算子
//if(href == "#" || href == ""){
//    target = $('html');
//}else{
//       target = $(href);
//}

    // トップからジャンプ先の要素までの距離を取得
    let position = target.offset().top;
    // animateでスムーススクロールを行う
    // 600はスクロール速度で単位はミリ秒
    $("html, body").animate({scrollTop:position}, 600, "swing");

//$(window).scrollTop(300);で上から300pxまで移動できる
//これをアニメーションにすると
//$('html, body').animate({scrollTop:300},function(){終了後の処理});
//600,swingはオプション秒数とアニメの演出
    return false;
  });
})
ランディングページ
参考サイト
<link rel="stylesheet" href="https://cdn.jsdelivr.net/npm/destyle.css@1.0.15/destyle.css" />
全体のスタイル
    <style>
        html {
            font-size: 100%;
        }

        body {
            color: #333;
            font-family: "游ゴシック体", "YuGothic", "游ゴシック Medium", "Yu Gothic Medium", "游ゴシック", "Yu Gothic", "メイリオ", sans-serif;
            letter-spacing: 0.1em;
        }

        a {
            color: #333;
            text-decoration: none;
        }

        img {
            max-width: 100%;
            vertical-align: bottom;
        }

        li {
            list-style: none;
        }
    </style>
header
完成図
naviが閉じているとき
スマホとPC

naviが開いているとき
スマホとPC

    <header id="header">

        <h1 class="site-title">
            <a href="#"><img src="https://code-step.com/demo/html/lp/img/logo-r.svg" alt="BBB英会話スクール"></a>
        </h1>

        <nav id="navi">
            <img class="logo" src="https://code-step.com/demo/html/lp/img/logo-w.svg" alt="BBB英会話スクール">
            <ul class="menu">
                <li><a href="#reason">BBBが選ばれる理由</a></li>
                <li><a href="#voice">受講生の声</a></li>
                <li><a href="#summary">スクールの概要</a></li>
            </ul>
            <a class="btn" href="#">無料体験に申し込む</a>
        </nav>

        <div class="hamburger">
            <span></span>
            <span></span>
            <span></span>
        </div>

    </header>
jqueryのtoggleClass() humbergerをactiveでtoggleして#naviもactiveでtoggleさせている。
    <script>
        $('.hamburger').on('click', function() {
            // ハンバーガーメニューの共通処理を呼び出す
            hamburger();
        });
        // メニューのリンクをクリックした時
        $('#navi a').on('click', function() {
            // ハンバーガーメニューの共通処理を呼び出す
            hamburger();
        });

        function hamburger() {
            // toggleClassを使用することで、hamburgerクラスにactiveクラスが存在する場合は削除、
            // 存在しない場合を追加する処理を自動で行ってくれる
            $('.hamburger').toggleClass('active');

            if ($('.hamburger').hasClass('active')) {
                // hamburgerクラスにactiveクラスが存在する場合は、naviにもactiveクラスを追加する
                $('#navi').addClass('active');
            } else {
                // hamburgerクラスにactiveクラスが存在しない場合は、naviからactiveクラスを削除する
                $('#navi').removeClass('active');
            }
        }
    </script>
 html構造 3つの画像リストがあるが、表示されているのは1つだけで交互にfadeIn,fadeOutする。
 css構造
text(titleとbtn)
 ul.fade>li>img*3のアニメーション以外のCSS
これで画像3枚の座標が一致するため重なって表示される。

メモ1/4:下のコードでいいと思ったら画像の通りになったので調べてみた。
メモ2/4:li要素を100%にしてimg要素をautoにした。
● li要素はtop:0;right:0;を起点に横幅が#mainvisualと一緒になった。
● その下のimgはli要素を起点にtop:0;left:0;の普段通りの位置になっている。
● -->これでimg要素を100%にしたらobj-fit-coverでイメージ通りになるのか。
メモ3/4:どうでもいいメモ:li,img要素ともにautoにした場合。
●li要素はpos-absoluteでblock要素のwidth:100%;を喪失して、子要素の幅だけになった。
●上は分かっていたので、img要素でwidth:100%;にして、幅一杯に広げようと思ったんです。
●そうすると、li要素は子要素のimgと同じ幅になるから、横幅一杯になると思ったんです。
●実動作は、img要素100%はli要素100%の幅であって、li要素の幅はimg要素の幅なので変わらない。
メモ4/4:結局、最初に想定していたのはこっちの動作だった。気持ち悪いけど、こっちのほうが直感的
メモ総括:普通ul要素にrelativeがあるが、今回はその上の#mainvisualにrelativeがあったりもした。
そういういみでもli要素ではなくてliの下のimg要素にpos-absoluteしてもいいと思う。
ul.fade>li>img*3のアニメーション以外のレスポンシブに係るCSS
メモ②:なんでレスポンシブの時になんで#mainvisualにheight:720px;なんてやるのか疑問になったので調べてみた。
メモ②1/2:まずはある時、
メモ②1/2:ない時、高さが喪失している。が、形は大きくは崩れていないが、
●マージンボトム120px;は完全に効いていない。
メモ②結論:position:relative;したら子要素と同じ高さをrelative要素にも設定した方がいいと思う。
マージンをもたせたかったら必須。
ある時とない時、マージンボトムがなくなってもうてる。
ul.fade>li>img*3のアニメーションに係るCSS
3枚の画像を15秒かけて一周してまた、最初から繰り返すアニメーション。
だから、33%以内に表示非常時を繰り返す必要がある。
流石に5秒かけてゆっくり表示したら遅いので半分ぐらいの15%で表示させている。
よって、5枚なら、20%以内に表示非表示させることになる。
    <style>
        #mainvisual {
            height: 490px;
            margin-bottom: 80px;
            position: relative;
        }

        #mainvisual .text {
            position: absolute;
            /* 両端に16pxづつ余白を作る */
            width: calc(100% - 32px);
            top: 310px;
            left: 16px;
            z-index: 10;
        }

        /* 「text-shadow」で文字の輪郭に白い影をつけることで、 */
        /* 文字が背景画像に埋もれないようにする */
        #mainvisual .text .title {
            font-size: 1.75rem;
            font-weight: bold;
            text-shadow: 0 4px 6px #fff;

            margin-bottom: 10px;
        }

        #mainvisual .text .btn {
            background-color: #ff2a2a;

            /* 文字の下に影をつけてボタンに立体感を出す */
            border-bottom: 6px solid #9a0413;
            border-radius: 10px;

            color: #fff;
            font-size: 1.5rem;

            display: block;
            padding: 15px 35px;
            text-align: center;

            transition: 0.3s;
            position: relative;
        }

        #mainvisual .text .btn::after {
            content: "";
            width: 16px;
            height: 16px;
            border-top: solid 3px #fff;
            border-right: solid 3px #fff;
            transform: rotate(45deg);
            position: absolute;
            top: 26px;
            right: 30px;
        }

        /* ホバー時は、opacityで透過させながら「transform: scale(1.05);」で */
        /* 少しだけボタンのサイズを大きくする */

        #mainvisual .text .btn:hover {
            opacity: 0.9;
            transform: scale(1.05);
        }

        #mainvisual .fade li {
            position: absolute;
            top: 0;
            right: 0;
            /* pos-relativeの要素の幅 */
            width: 100%;

            /* 最初は3枚の画像を非表示にしておく */
            opacity: 0;

            /* アニメーションを実行 */
            /* fade:下で定義している「@keyframes fade」を実行 */
            /* 15s:「@keyframes fade」の処理を15秒かけて実行 */
            /* infinite:アニメーションの処理を無限に繰り返す */
            animation: fade 15s infinite;
        }

        #mainvisual .fade li img {
            width: 100%;
            height: 300px;
            object-fit: cover;
        }


        /* 1枚目の画像のアニメーション実行タイミングを設定 */
        /* 「animation-delay: 0s;」ですぐに実行 */
        #mainvisual .fade li:nth-child(1) {
            animation-delay: 0s;
        }

        /* 2枚目の画像のアニメーション実行タイミングを設定 */
        /* 「animation-delay: 5s;」で5秒後に実行 */
        #mainvisual .fade li:nth-child(2) {
            animation-delay: 5s;
        }

        /* 3枚目の画像のアニメーション実行タイミングを設定 */
        /* 「animation-delay: 10s;」で10秒後に実行 */
        #mainvisual .fade li:nth-child(3) {
            animation-delay: 10s;
        }

        /* 「box-shadow」で画像のまわりをぼかす */
        #mainvisual .fade li::after {
            content: "";
            position: absolute;
            top: 0;
            bottom: 0;
            /* 親要素の.fade liの幅になる left:0;right:0;*/
            left: 0;
            right: 0;
            box-shadow: inset 0px 0px 20px 20px #fff;
        }

        /* アニメーション処理 */
        /* 上の「animation」で15sを指定しているので下記の処理を15秒かけて実行 */
        /* 0%が0秒を表し、100%が15秒後を表す。 */

        /* 0%の「opacity: 0;」で非表示の状態からスタートし、 */
        /* 15%になるまでの間に少しづつ画像を表示(フェードイン)させる。 */
        /* そこから30%の時点までは画像を表示させたままの状態を維持し、 */
        /* 45%の時点に向けて画像を非表示(フェードアウト)する。 */
        /* そこから100%まで非表示の状態を維持する。 */
        @keyframes fade {
            0% {
                opacity: 0;
            }
            15% {
                opacity: 1;
            }
            30% {
                opacity: 1;
            }
            45% {
                opacity: 0;
            }
            100% {
                opacity: 0;
            }
        }

        @media screen and (min-width: 900px) {
            #mainvisual {
                /* height: 720px; */
                margin-bottom: 120px;
            }

            #mainvisual .text {
                top: 280px;
                left: 10%;
                width: auto;
            }

            #mainvisual .text .title {
                font-size: 2.875rem;
                margin-bottom: 30px;
            }

            #mainvisual .fade li {
                width: 75%;
            }

            #mainvisual .fade li img {
                width: 100%;
                height: 720px;
            }
        }

    </style>
    <div id="mainvisual">
        <div class="text">
            <p class="title">話して学ぼう!<br>BBB英会話スクール</p>
            <a class="btn" href="#">無料体験はこちら</a>
        </div>
        <ul class="fade">
            <li><img src="https://code-step.com/demo/html/lp/img/mainvisual1.jpg" alt=""></li>
            <li><img src="https://code-step.com/demo/html/lp/img/mainvisual2.jpg" alt=""></li>
            <li><img src="https://code-step.com/demo/html/lp/img/mainvisual3.jpg" alt=""></li>
        </ul>
    </div>
section#reason
完成図
htmlの構造
cssの構造 スマホアニメーション以外のCSS
cssの構造 アニメーション以外のレスポンシブCSS
アニメーションにかかるCSSとJQUERY
JQUERYのinViews.min.jsを使用している。
これは、メチャクチャ便利。
section#voice
完成図
htmlの構造 スマホ時、コメントと画像の順番が逆になっている。
CSSの構造 スマホ
- 横並びにすることが多いd-flexを順序を入れ替えるのに使用してある。
- その際、横向きをセンターにするのにjustify-content:center;ではなく.align-items:center;になる。
- いつも横向きは
justify-content:centerだが、軸方向が縦になったため、align-items:center

- d-flexの軸方向が縦なら平行方向は縦。横なら横。
- 平行方向の位置はjustify-contentプロパティで決定する。
- 今回は軸方向は縦で横向きへの(交差方向への)移動なのでalign-items:center;を使ってcenterにする。
#voice .item-left,rightにalign:items:center;がある時(textの位置はleft、centerではない)
#voice .item-left,rightにalign:items:center;がない時
交差方向にはデフォルトでストレッチがかかる。
レスポンシブに係るCSS
-
.student { text-left }は意味ないよね・・・。

section#summary
完成図
html構造
css構造 スマホ アニメーション以外のCSS
- span要素をd-blockにして幅を効かせている。inline要素はpもmも持てない。
-
$samary .menu .li{ width:100%; }は消し忘れ。不必要。
 2つともinlineの時
 上がblockで下がinlineの時 block要素にすると改行がかかる。
 上がblockで下がinline-blockの時 lessonの幅の下の所だけにmargineがかかっている。

<style>
        #summary {
            background: url("https://code-step.com/demo/html/lp/img/bg.gif");

            margin-bottom: 80px;
            padding: 60px 0;
            margin-bottom: 120px;

            animation: fall 10s infinite linear;
        }
        /* アニメーション処理 */
        /* 10秒かけて背景画像の位置「background-position」を移動させる動作を繰り返す */
        @keyframes fall {
            0% {
                background-position: 0 0;
            }

            100% {
                background-position: -700px 700px;
            }
        }
        #summary .menu li {
            background-color: #fff;
            margin-bottom: 32px;

            border-radius: 20px;
            padding: 30px;
        }

        #summary .menu li:nth-child(3) {
            margin-bottom: 32px;
        }
        #summary .menu-title {
            font-weight: bold;
            line-height: 1;
            text-align: center;
        }

        #summary .menu-title .ja {
            font-size: 1.5rem;

            display: block;
            margin-bottom: 15px;
        }

        #summary .menu-title .en {
            font-size: 1rem;

            /* display: block; */
            display: inline-block;
            margin-bottom: 30px;
        }

        @media screen and (min-width: 900px) {

            #summary .menu {
                display: flex;
                flex-wrap: wrap;
                justify-content: space-between;
            }

            #summary .menu li {
                width: 48%;
                padding: 60px;
            }

            /* 3つ目以降はmargin-bottomを設定しない */
            #summary .menu li:nth-child(n + 3) {
                margin-bottom: 0;
            }

            #summary .menu-title .ja {
                font-size: 1.75rem;
            }

            #summary .menu-title .en {
                font-size: 1.125rem;
            }
        }
    </style>
    <!-- スクールの概要 -->
    <section id="summary">
        <div class="wrapper">
            <h2 class="section-title">スクールの概要</h2>

            <ul class="menu">
                <li>
                    <h3 class="menu-title">
                        <span class="ja">レッスン内容</span>
                        <span class="en">LESSON</span>
                    </h3>
                    <p>テキストテキストテキストテキストテキストテキストテキストテキストテキスト</p>
                </li>
                <li>
                    <h3 class="menu-title">
                        <span class="ja">料金プラン</span>
                        <span class="en">PRICE</span>
                    </h3>
                    <p>テキストテキストテキストテキストテキストテキストテキストテキストテキスト</p>
                </li>
                <li>
                    <h3 class="menu-title">
                        <span class="ja">講師のご紹介</span>
                        <span class="en">TEACHER</span>
                    </h3>
                    <p>テキストテキストテキストテキストテキストテキストテキストテキストテキスト</p>
                </li>
                <li>
                    <h3 class="menu-title">
                        <span class="ja">BBBのQ&A</span>
                        <span class="en">Q&A</span>
                    </h3>
                    <p>テキストテキストテキストテキストテキストテキストテキストテキストテキスト</p>
                </li>
            </ul>
        </div>
    </section>
footer
完成図
htmlの構造
CSSの構造 スマホ
CSSの構造 レスポンシブ設定
コーポレートサイト
<link rel="stylesheet" href="https://unpkg.com/ress/dist/ress.min.css">
全体のhtmlとスタイル and headerとcontainerのスタイル

header
スマホ

スマホ・open 時

PC

0.5x でレスポンシブ
See the Pen Untitled by y0sh1m0t0 (@y0sh1m0t0) on CodePen.
container
See the Pen Untitled by y0sh1m0t0 (@y0sh1m0t0) on CodePen.
video
要素を移動させる必要がないときはtop,left等は不要
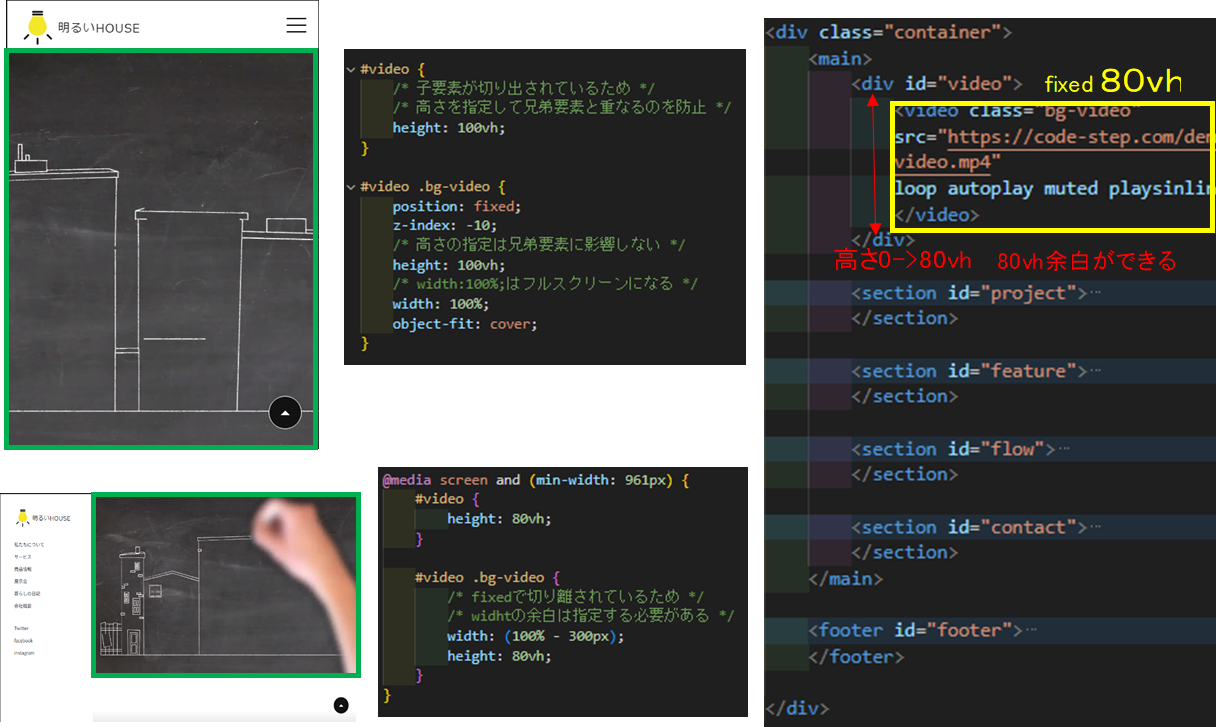
0.5x でレスポンシブ
See the Pen Untitled by y0sh1m0t0 (@y0sh1m0t0) on CodePen.
section 共通のスタイル
project

feature

step
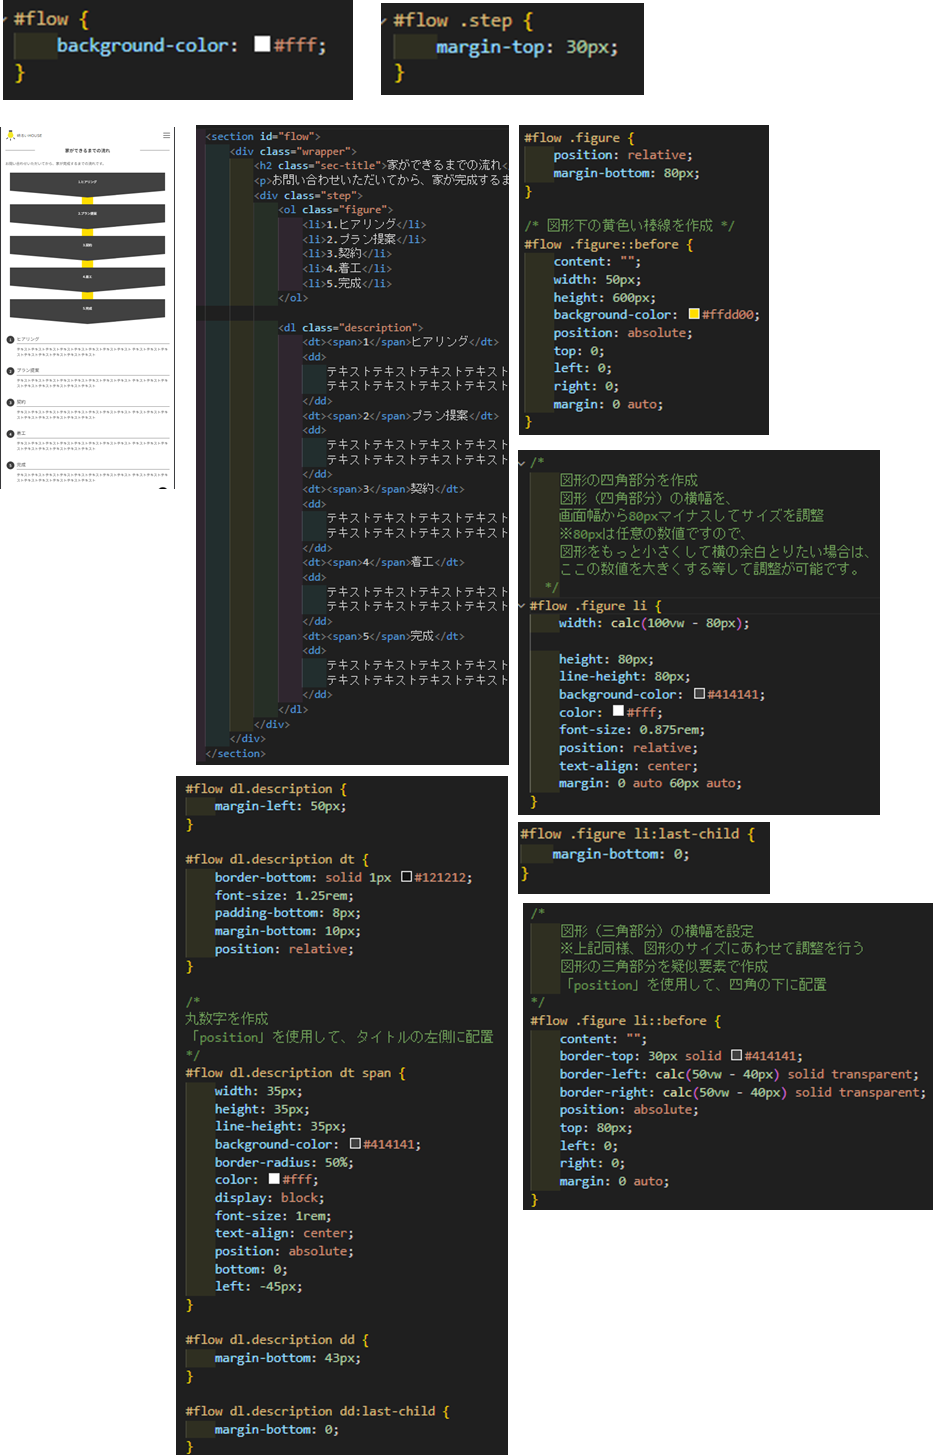
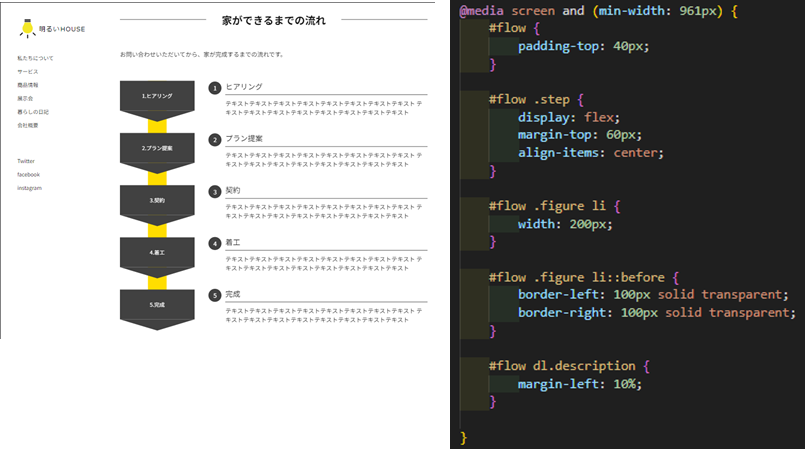
- ボーダーによる三角形
- 1pxのボーダーは線になるが、
- 100pxとかになると線というより方形になる。heigth:100px;なら正方形。
- 作りたい三角形は底辺calc(100vw-80px) * 高さ30pxの三角形
- 高さ30pxのborder-top (boder:30pxは上と下で60pxになる)
- pos-absoluteの幅はright:0;left:0;でpos-relativeと同じになって、この場合calc(100vw-80px)になる。
- leftとrightを半分の幅で透明にしてやると下向き三角形ができる。上向きや左右も同じ原理
トップとレフト トップとライト
レフトとライトを空白にすると三角形になる。
contact
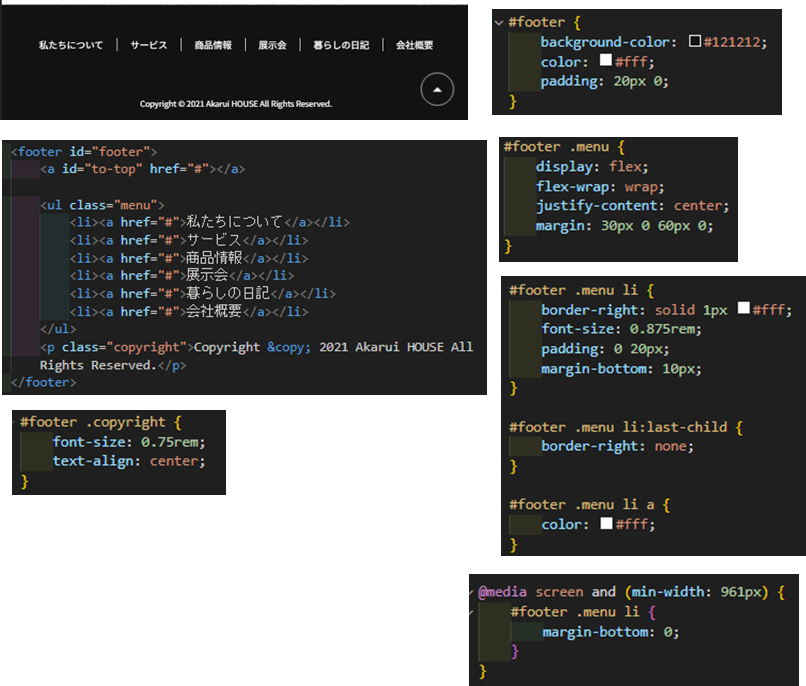
footer
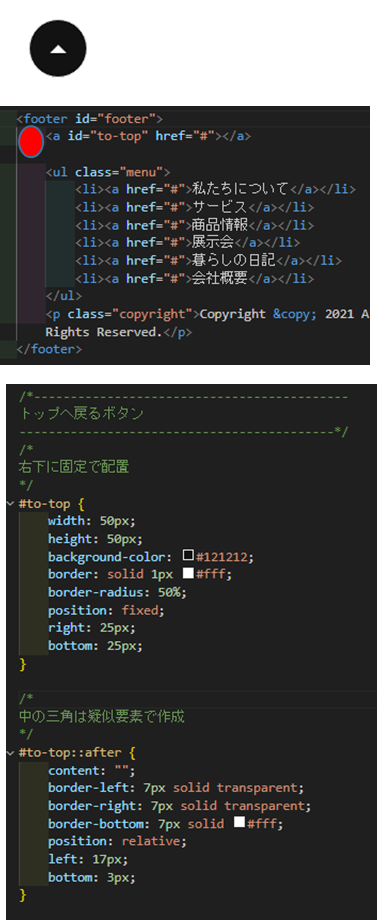
to-top
See the Pen Untitled by y0sh1m0t0 (@y0sh1m0t0) on CodePen.

