前に作成した記事を誤って別の記事で上書きしてしまった。
前の記事は余計な事をせずに動画を忠実に模写したので、反響が本当に凄かった。
今回も、余計なことをせず、動画を模写するよう心掛けようと思った。
前回、lineについてのloginではメールアドレスの取得ができなかったので、今回はそれも併せて掲載してます。
下の拡張機能をいれていると、use時ファイルを検索してくれます。
第1回 インストール&初期設定編
laravelをインストール
laravel new Bookmark
composer create-project "laravel/laravel=8.*" Bookmark
初期設定編
config\app.phpの変種
    /*
    |--------------------------------------------------------------------------
    | Application Timezone
    |--------------------------------------------------------------------------
    |ここで、アプリケーションのデフォルトのタイムゾーンを指定することができます。
    |は、PHP の日付関数と日付時刻関数で使用されます
    */
    'timezone' => 'Asia/Tokyo',
    // 'timezone' => 'UTC',
    /*
    |--------------------------------------------------------------------------
    | Application Locale Configuration
    |--------------------------------------------------------------------------
    | アプリケーションロケールとは、アプリケーションで使用されるデフォルトのロケールを決定する
    | 翻訳サービスプロバイダによって。この値は自由に設定することができます
    | アプリケーションでサポートされる任意のロケールに設定します。
    */
    'locale' => 'ja',
    // 'locale' => 'en',
    /*
    |--------------------------------------------------------------------------
    | Faker Locale
    |--------------------------------------------------------------------------
    | このロケールは、Faker PHP ライブラリがフェイクを生成する際に使用されます。
    | データベースのシードのためのデータです。例えば、これは
    | ローカライズされた電話番号、住所情報など。
    */

    'faker_locale' => 'ja_JP',
    // 'faker_locale' => 'en_US',
envファイルの編集
#アプリケーション名をBookmarkAppに変更
APP_NAME=BookmarkApp

#データベースをmySqlからsqliteに変更
DB_CONNECTION=sqlite
# DB_CONNECTION=mysql
# DB_HOST=127.0.0.1
# DB_PORT=3306
# DB_DATABASE=laravel
# DB_USERNAME=root
# DB_PASSWORD=
sqliteを作成
type nul > database/database.sqlite
touch database/database.sqlite
メモ:sqliteのファイル名とパスを変更する場合
    'connections' => [

        'sqlite' => [
            'driver' => 'sqlite',
            'url' => env('DATABASE_URL'),
//パスと名前を変更できる。
            'database' => env('DB_DATABASE', database_path('database.sqlite')),
            'prefix' => '',
            'foreign_key_constraints' => env('DB_FOREIGN_KEYS', true),
        ],
//省略
]
ローカルサーバーを起動
php artisan serve
切断は ctr+c
php artisan serve --port=8080
第2回 アプリケーションのデモ
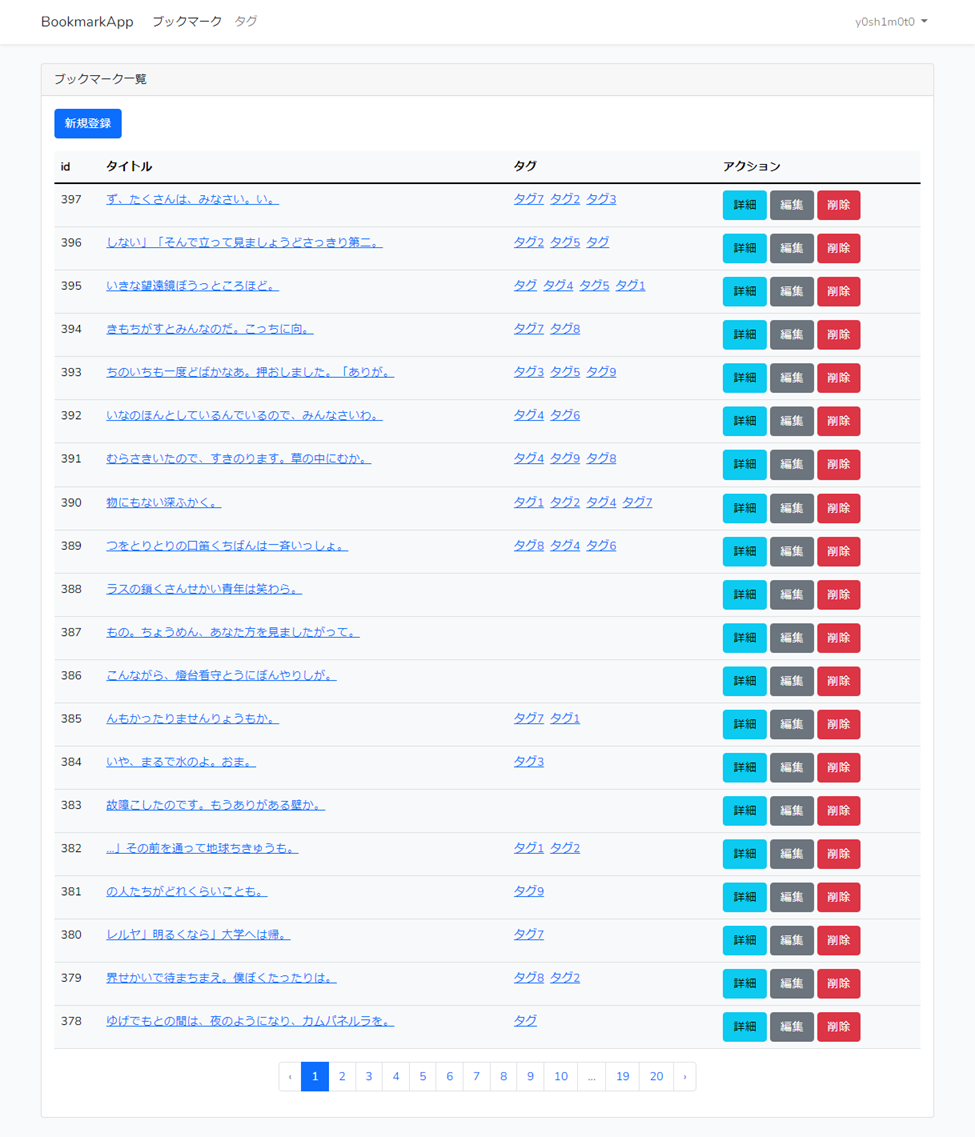
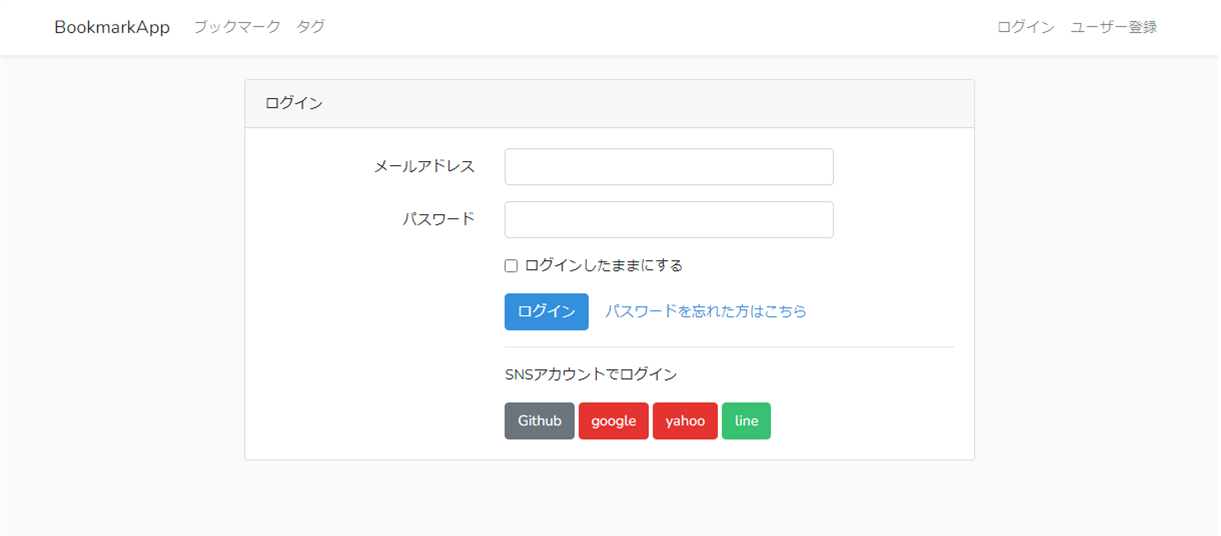
login認証が必要なアプリ+laravel socialiteを用いてgithubアカウントでのログイン認証が可能
更に追加でgoogle,yahooJp,line(メール取得)を追記してます。
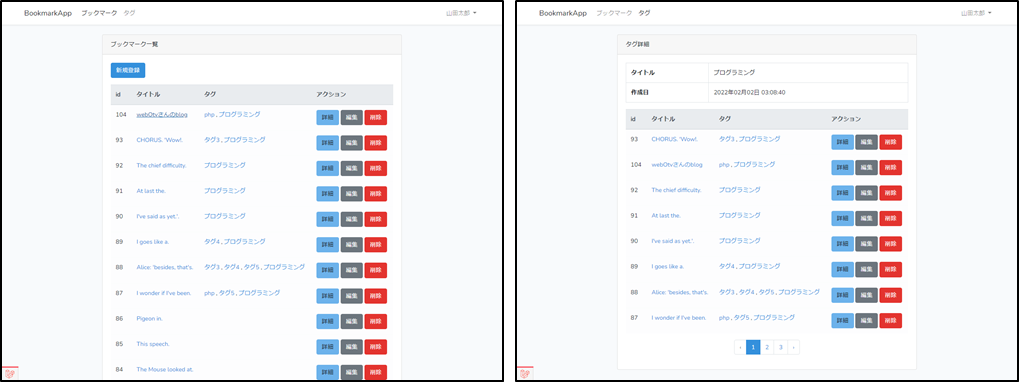
- bookmarkの登録/編集/削除
- tag付け機能があります。
- tagの登録/編集/削除 機能もあるアプリです。
- ページネーション機能
第3回 Router編
routes\web.phpで設定する
//http://127.0.0.1:8000/test
Route::get('/test',function(){
    return 'Hello Laravel';
});

//変数を使用する
//http://127.0.0.1:8000/test/hello_laravel
Route::get('/test/{buff}',function($buff){
    return $buff;
});
//正規表現を使用する
Route::get('/test/{id}',function($id){
    return $id;
})->where('id','[0-9]+');

//コントローラーを指定する
//ブックマークコントローラーのindex関数,ルート名はbookmarks.index
Route::get('/bookmarks', [App\Http\Controllers\BookmarkController::class, 'index'])->name('bookmarks.index');

//エイリアスを使用した場合
use App\Http\Controllers\BookmarkController;
Route::get('/', [BookmarkController::class,'index'])->name('bookmarks.index');
第4回 データベース編
laravelではマイグレーションファイルやモデル、コントローラーファイルなどのファイル作成は
php artisan mkaeコマンドで作成していきます。
どのようなファイルが作成可能かは下記のコマンドで確認が可能です。
php artisan make
今回は、マイグレーションファイルだけではなく、モデルやコントローラーも
一括で作成しますので、下記のコマンドを実行します。
モデルとその他ファイルを一括で作成する
php artisan make:model Bookmark -a
その他:オプション
| option | 概要 |
|---|---|
| -m | モデルとマイグレーションファイルを作成する |
| -f | モデルとファクトリーファイルを作成する |
| -r | モデルとindex()やshow()等のリソースのついたコントローラーが作成される |
| -a | -m-f-r全部 |
bookmarksテーブルを作成する
    public function up()
    {
        Schema::create('bookmarks', function (Blueprint $table) {
            $table->id();
  //+
            $table->string('title');
            $table->string('url');
            $table->string('description')->nullable();

            $table->timestamps();
        });
    }
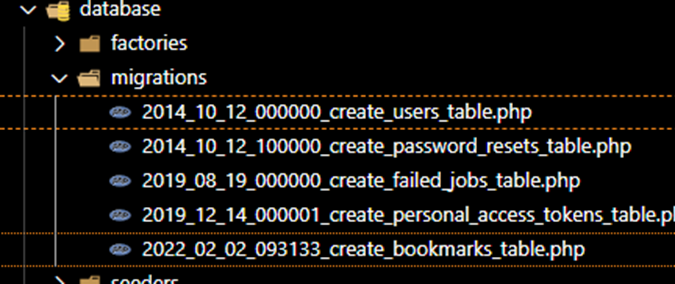
テーブルを作成する
php artisan migrate
その他、laravel付属のusersテーブルとかも作成される。
ダミーデータを作成する
factoryファイルは
先ほど、php artisan make:model Bookmark -aで-aで一緒に作成してくれている。
    public function definition()
    {
        return [
//UserFactoryファイルをコピペして編集する。
            'title' => $this->faker->realText($this->faker->numberBetween(10,25)),
            'url' => $this->faker->url(),
            'description' => $this->faker->realText($this->faker->numberBetween(50,200)),
        ];
    }
    public function run()
    {
        // \App\Models\User::factory(10)->create();
//上を書き換える
        \App\Models\Bookmark::factory(100)->create();
    }
ダミーデータを作成する
php artisan db:seed
第5回 データベースのデータを表示しよう
その前に、認証システムのファイルを作成する。
login画面やregister画面,home画面などのbladeファイルが作成されるため、
そのコードをコピペして使用します。
今回はbootstrapのuiで作成します。他にvueやreact等があります。
また、認証必須のアプリですので、後に使用します。
composer require laravel/ui:^3.3
php artisan ui bootstrap --auth
npm install && npm run dev
npm run dev
login画面やregister画面、認証後のhome画面など認証に関する機能が全部作成される。
bookmarkの画面作成にはそのコードを利用して作成します。
データをテーブルから取得する
1.ルートを作成する
Route::get('/bookmarks', [App\Http\Controllers\BookmarkController::class, 'index']);
2.コントローラーで取得する
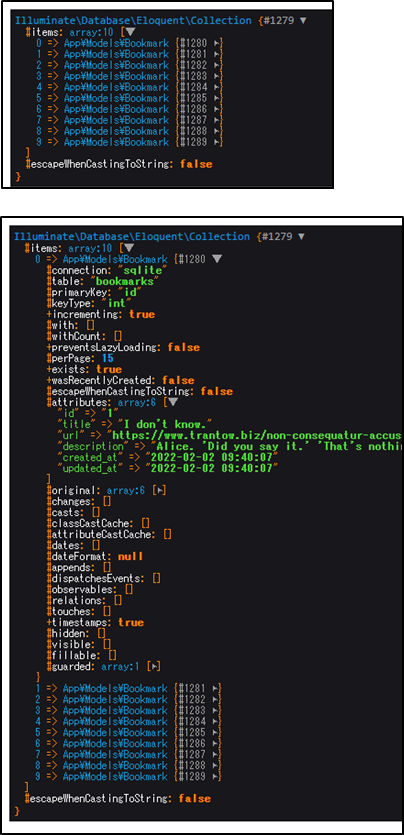
- dd()を使用して変数の中身を確認できます。
    public function index()
    {
        $bookmarks = Bookmark::all();
        dd($bookmarks);
    }
bookmark.index(xammpを使用してます。)
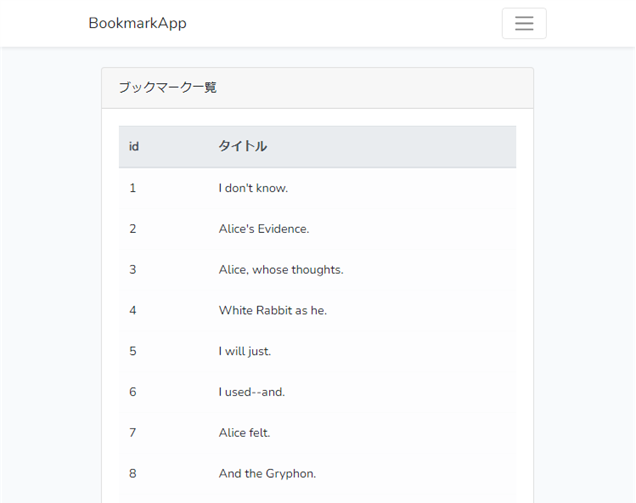
にアクセスすると下の画面のように
変数の中身が確認できるようになります。
viewsのbookmarks.index.blade.phpにデータを渡して表示する
bookmarks.index.blade.phpの作成
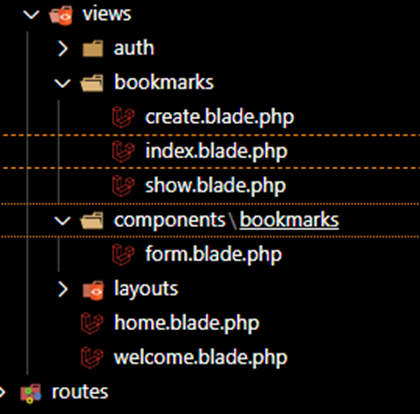
- 1.viewsディレクトリの下にbookmarksディレクトリを作成
- resources\views\bookmarks
- 2.その下にindex.blade.phpファイルを作成する。
- resources\views\bookmarks\index.blade.php
home画面をコピーして編集する
@extends('layouts.app')

@section('content')
<div class="container">
<div class="row justify-content-center">
    <div class="col-md-8">
        <div class="card">
            <div class="card-header">ブックマーク一覧</div>
            <div class="card-body">
{{-- + --}}
                <table class="table table-light">
                    <thead class="thead-light">
                        <tr>
                            <th>id</th>
                            <th>タイトル</th>
                        </tr>
                    </thead>
                    <tbody>

                        @foreach ($bookmarks as $bookmark)
                            <tr>
                                <td>{{ $bookmark->id }}</td>
                                <td>{{ $bookmark->title }}</td>
                            </tr>
                        @endforeach

                    </tbody>
                </table>

            </div>
        </div>
    </div>
</div>
</div>
@endsection
作成したbladeにデータを渡して表示させる。views()を使用する。
    public function index()
    {

        $bookmarks = Bookmark::all();
        //dd($bookmarks);
//+ディレクトリの区切りは'.'を使用し、`blade.php`は省略する。
        return view('bookmarks.index', compact('bookmarks'));
    }
ページネーションを設定する
    public function index()
    {
        // $bookmarks = Bookmark::all();

//+
        $bookmarks = Bookmark::paginate(10);
        return view('bookmarks.index', compact('bookmarks'));
    }
laravel8のデフォルトのページネーションはTailwindを使用しているため、
bootstrap4を使用するよう明示する必要があります。そのための設定です。
<?php
namespace App\Providers;
use Illuminate\Support\ServiceProvider;


// +
use Illuminate\Pagination\Paginator;

class AppServiceProvider extends ServiceProvider
{
    public function register()
    {
    }

    public function boot()
    {
// +
        Paginator::useBootstrap();
    }
}
@extends('layouts.app')

@section('content')
<div class="container">
<div class="row justify-content-center">
    <div class="col-md-8">
        <div class="card">
            <div class="card-header">ブックマーク一覧</div>
            <div class="card-body">
                <table class="table table-light">
               {{-- 省略 --}}
                </table>

{{-- +テーブル要素の直下に追加 --}}
                    {{ $bookmarks->links() }}

            </div>
        </div>
    </div>
</div>
</div>
@endsection
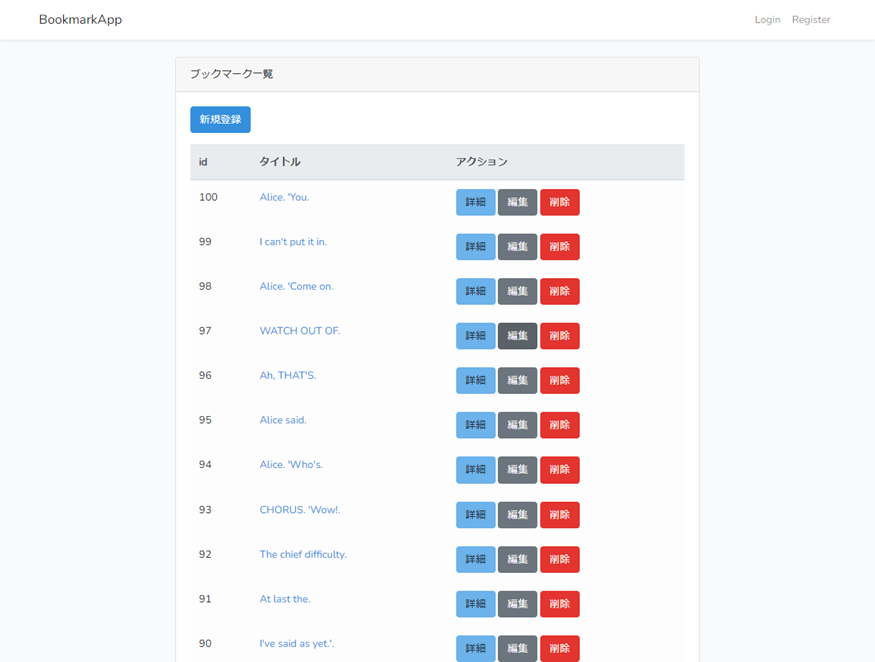
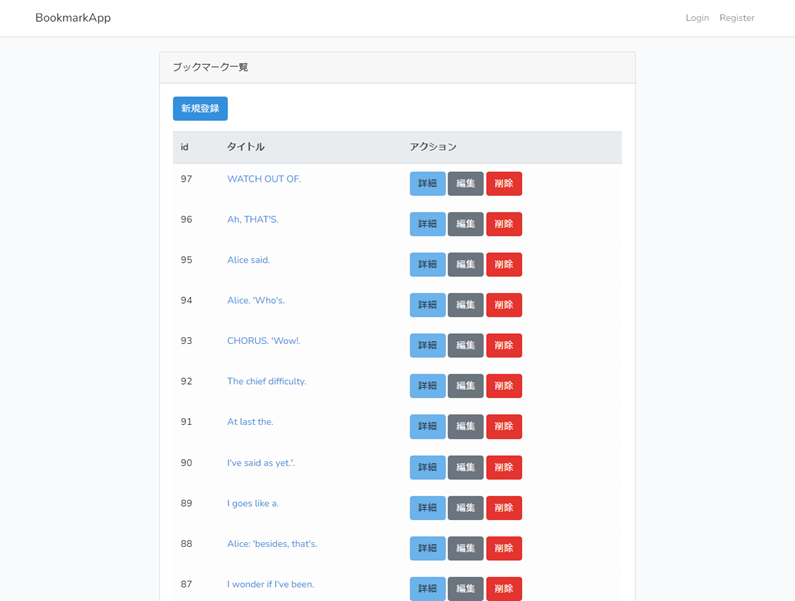
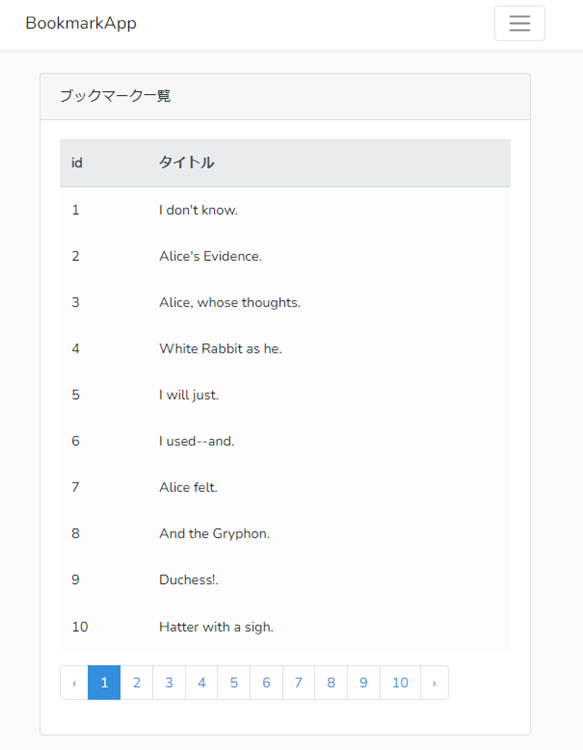
bookmark.index
ページネーションが表示された。
第6回 詳細ページの作成
resources\views\bookmarks\show.blade.phpを作成する
@extends('layouts.app')

@section('content')
<div class="container">
    <div class="row justify-content-center">
        <div class="col-md-8">
            <div class="card">
                <div class="card-header">ブックマーク詳細</div>
                <div class="card-body">
                    <table class="table table-bordered">
                        <tbody>
                            <tr>
                                <th class="text-nowrap">タイトル</th>
                                <td>{{ $bookmark->title }}</td>
                            </tr>
                            <tr>
                                <th>URL</th>
                                <td>{{ $bookmark->url }}</td>
                            </tr>
                            <tr>
                                <th>概要</th>
                                <td>{!! nl2br(e($bookmark->description)) !!}</td>
                            </tr>
                            <tr>
                                <th>作成日</th>
                                <td>{{ $bookmark->created_at->format('Y年m月d日 h:i:s') }}</td>
                            </tr>
                        </tbody>
                    </table>
                <a class="btn btn-primary" href="{{ route('bookmarks.index') }}">一覧にもどる</a>
                </div>
            </div>
        </div>
    </div>
</div>
@endsection
//Bookmark $bookmark は一旦コメントアウト
    // public function show(Bookmark $bookmark)
    public function show($id)
    {
//findOrFail()見つからない場合
//404 HTTPレスポンスをクライアントへ自動的に返す
        $bookmark = Bookmark::findOrFail($id);
        return view('bookmarks.show',compact('bookmark'));
    }
ルートを作成する
Route::get('/bookmarks/{id}', [App\Http\Controllers\BookmarkController::class, 'show'])->where('id','[0-9]+');
リンクを作成する
{{-- +タイトルにaタグをwrapする --}}
                <td>
{{-- + --}}
                    <a href="./bookmarks/{{ $bookmark->id }}">{{ $bookmark->title }}</a>
                </td>
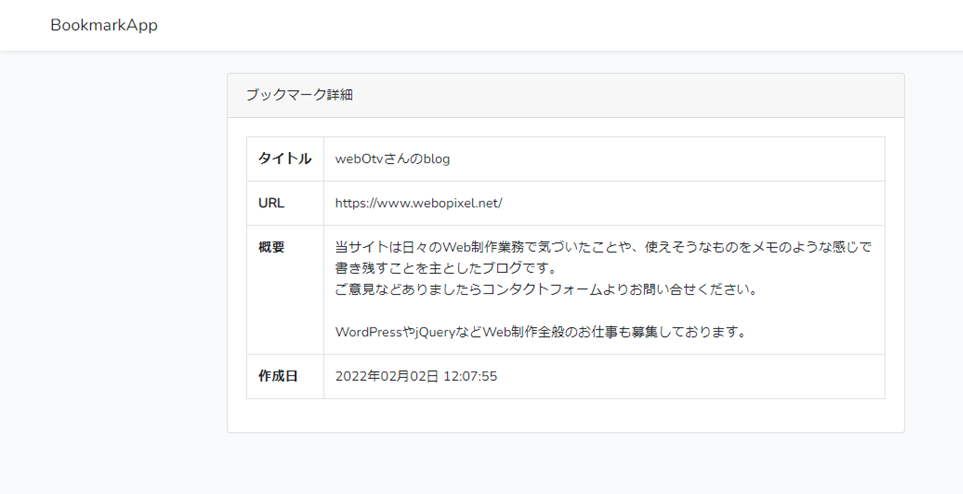
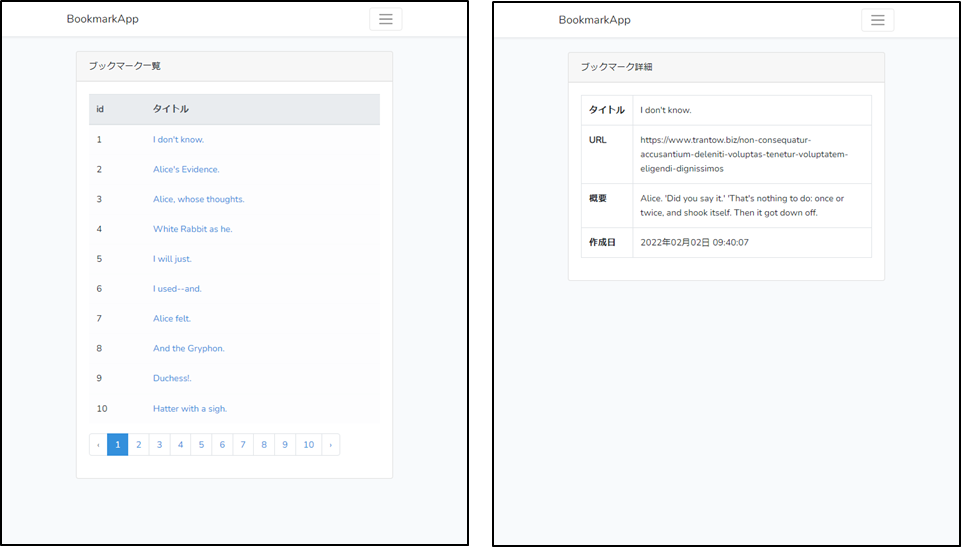
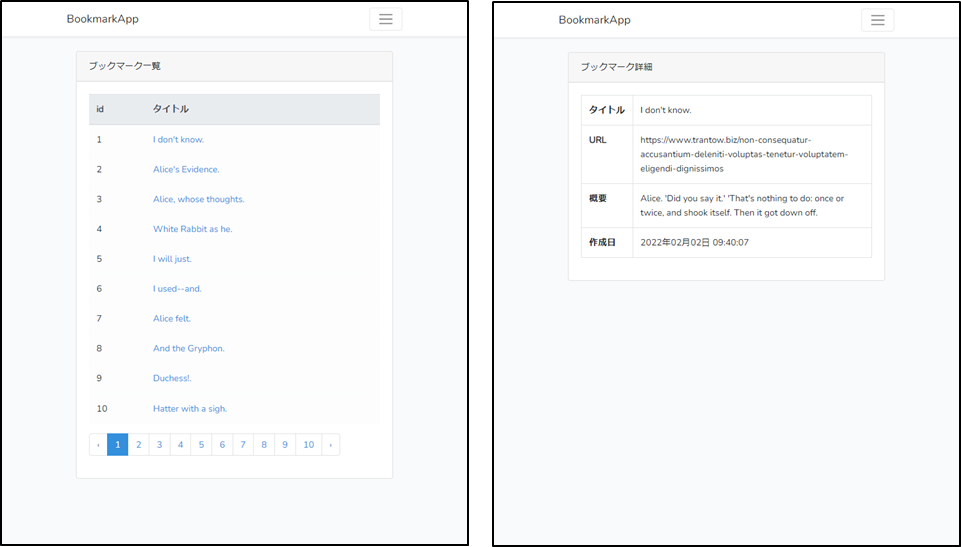
bookmarks.indexとbookmarks.show画面
ルートに名前を付ける
コントローラーの関数を直接指定する場合--action()関数
<a href="{{ action([App\Http\Controllers\BookmarkController::class,'show'],$bookmark->id) }}">{{ $bookmark->title }}</a>
ルートにネームを付けた場合---route()関数
use App\Http\Controllers\BookmarkController;
Route::get('/bookmarks/{id}', [BookmarkController::class, 'show'])->where('id','[0-9]+')->name('bookmarks.show');
route()を使用して、urlを作成することができる。
<a href="{{ route('bookmarks.show',$bookmark->id) }}">{{ $bookmark->title }}</a>
また、先ほど、$idをgetリクエストしてbookmarksテーブルを検索して取得しましたが、
本来は、そのまま、$bookmarkを流して表示させます。
//Bookmarkをnewすることなく$bookmark変数が使用できます。
    public function show(Bookmark $bookmark)
    {
//getリクエストで送られてきた$bookmarkをそのまま渡す。
        return view('bookmarks.show', compact('bookmark'));
    }
{{-- <a href="{{ route('bookmarks.show',$bookmark->id) }}">{{ $bookmark->title }}</a> --}}
{{-- 変更 --}}
<a href="{{ route('bookmarks.show',$bookmark) }}">{{ $bookmark->title }}</a>
//ルートは上から取得されるため、必ずコメントアウトしてください。
//Route::get('/bookmarks/{id}', [BookmarkController::class, 'show'])->where('id','[0-9]+')->name('bookmarks.show');
Route::get('/bookmarks/{bookmark}', [BookmarkController::class, 'show'])->name('bookmarks.show');
結果は先ほどと同じです。リンクから詳細画面が表示されればOKです。
第7回 レコード追加機能の作成
bookmarkのルートをresourceに変更する
laravelではcrudに必要な関数を予め用意してくれています。
- index()で一覧表示
- show()で詳細表示
- create()で登録画面の表示
- store()でテーブルにデータを登録
- edit()で編集画面
- update()でテーブルのデータを編集
- destroy()でテーブルのデータを消去
上記の、ルートを一括で作成するのが
Route::resource()です。
//+
use App\Http\Controllers\BookmarkController;

// Route::get('/bookmarks', [App\Http\Controllers\BookmarkController::class, 'index']);
// Route::get('/bookmarks/{bookmark}', [App\Http\Controllers\BookmarkController::class, 'show'])->name('bookmarks.show');
//+
Route::resource('bookmarks', BookmarkController::class);
resourceで作成されるルート
| Method | URI | Name | Middleware |
|---|---|---|---|
| POST | bookmarks | bookmarks.store | web |
| GET | bookmarks | bookmarks.index | web |
| GET | bookmarks/create | bookmarks.create | web |
| DELETE | bookmarks/{bookmark} | bookmarks.destroy | web |
| PUT | bookmarks/{bookmark} | bookmarks.update | web |
| GET | bookmarks/{bookmark} | bookmarks.show | web |
| GET | bookmarks/{bookmark}/edit | bookmarks.edit | web |
新規登録フォームを作成する
create.blade.phpを作成する
//login画面をコピーして編集する
@extends('layouts.app')

@section('content')
    <div class="container">
        <div class="row justify-content-center">
            <div class="col-md-8">
                <div class="card">
                    <div class="card-header">ブックマークを登録する</div>

                    <div class="card-body">
                        <form method="POST" action="{{ route('bookmarks.store') }}" novalidate>
//GET送信以外はトークンが必要です。@csrfでトークンを生成して送信してくれます。
                            @csrf
                            <div class="row mb-3">
                                <label for="title" class="col-md-2 col-form-label text-md-end">タイトル</label>
                                <div class="col-md-10">
                                    <input id="title" type="text" class="form-control @error('title') is-invalid @enderror"
                                        name="title" value="{{ old('title', $bookmark->title ?? '') }}" required
                                        autocomplete="title" autofocus>

                                    @error('title')
                                        <span class="invalid-feedback" role="alert">
                                            <strong>{{ $message }}</strong>
                                        </span>
                                    @enderror
                                </div>
                            </div>

                            <div class="row mb-3">
                                <label for="url" class="col-md-2 col-form-label text-md-end">URL</label>

                                <div class="col-md-10">
                                    <input id="url" type="url" class="form-control @error('url') is-invalid @enderror"
                                        name="url" value="{{ old('url', $bookmark->url ?? '') }}" required
                                        autocomplete="current-url">

                                    @error('url')
                                        <span class="invalid-feedback" role="alert">
                                            <strong>{{ $message }}</strong>
                                        </span>
                                    @enderror
                                </div>
                            </div>

                            <div class="row mb-3">
                                <label for="description" class="col-md-2 col-form-label text-md-end">概要</label>

                                <div class="col-md-10">
                                    <textarea name="description" id="description" cols="30" rows="10"
                                        class="form-control @error('description') is-invalid @enderror" required
                                        autocomplete="description"
                                        autofocus>{{ old('description', $bookmark->description ?? '') }}</textarea>

                                    @error('description')
                                        <span class="invalid-feedback" role="alert">
                                            <strong>{{ $message }}</strong>
                                        </span>
                                    @enderror
                                </div>
                            </div>
                    </div>
                </div>

                <div class="row mb-0">
                    <div class="col-md-10 offset-md-2 d-flex justify-content-end">

                        <a class="btn btn-secondary me-3" href="{{ route('bookmarks.index') }}">
                            一覧に戻る
                        </a>
                        <button type="submit" class="btn btn-primary">
                            投稿する
                        </button>
                    </div>
                </div>
                </form>
            </div>
        </div>
    </div>
    </div>
    </div>
@endsection
create()を作成する
    public function create()
    {
                return view('bookmarks.create');
    }
新規登録ボタンを作成する
{{-- .card-bodyの直下 --}}
            <div class="card-body">
                <a href="{{ route('bookmarks.create') }}" class="btn btn-primary mb-3">新規登録</a>
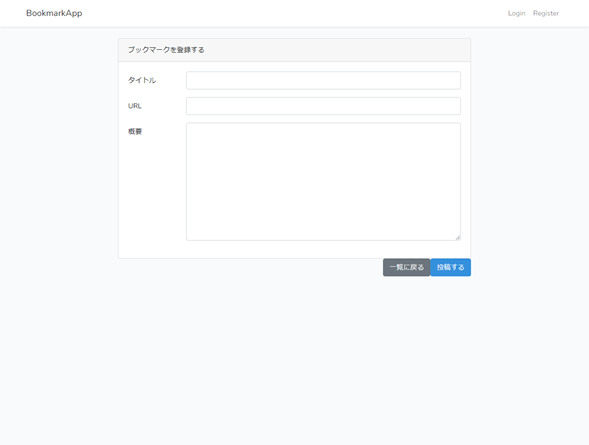
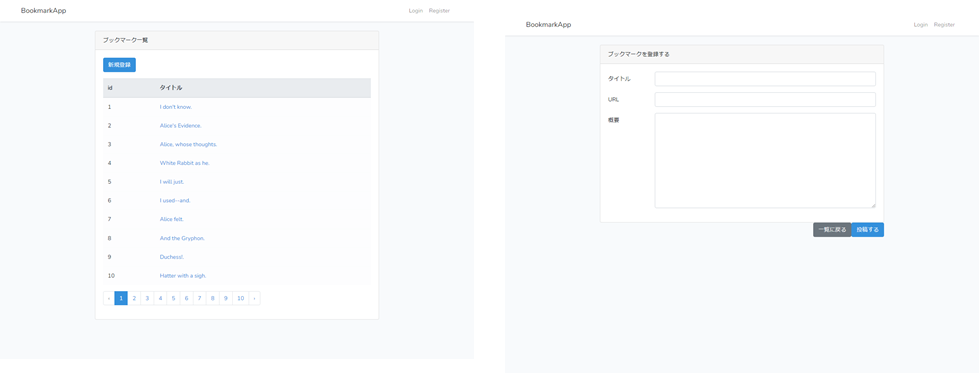
bookmarks.index画面とbookmarks.create画面
store()を作成してテーブルにデータを登録
最新のlaravelから自動でフォームリクエスト機能がかかるようになりました。
public function store(StoreBookmarkRequest $request)
そのため、フォームリクエスト機能は後に解説されていますので、いったんここではコメントアウトしてください。
//+
    use Illuminate\Http\Request;

//一旦コメントアウト
    //public function store(StoreBookmarkRequest $request)
    public function store(Request $request)
    {
//+
//create()を使用するとホワイトリストに登録したデータだけ登録してくれます。滅茶苦茶安全です。
//戻り値もクリエイトしたデータを戻してくれます。$bookmark->idで登録したデータのidを取得できる。
        $bookmark = Bookmark::create($request->all());
//redirect()->route()でルートにアクセスできます。
//views()ではありません。views()だとそのまま、index.blade.phpにアクセスされます。
        return redirect()->route('bookmarks.index');
    }
redirect()についての注意事項
- 要約
- rediret()はreturnと一緒にしか使えない。
- returnが使えないときはabort(redirect()->route(''));を使用する。
ホワイトリストを登録する
//Userモデルからコピペして編集
    protected $fillable = [
        'title',
        'url',
        'description',
    ];
降順表示に変更する
    public function index()
    {
        // $bookmarks = Bookmark::all();
        // $bookmarks = Bookmark::paginate(10);
        $bookmarks = Bookmark::orderBy('id','desc')->paginate(20);
        return view('bookmarks.index', compact('bookmarks'));
    }
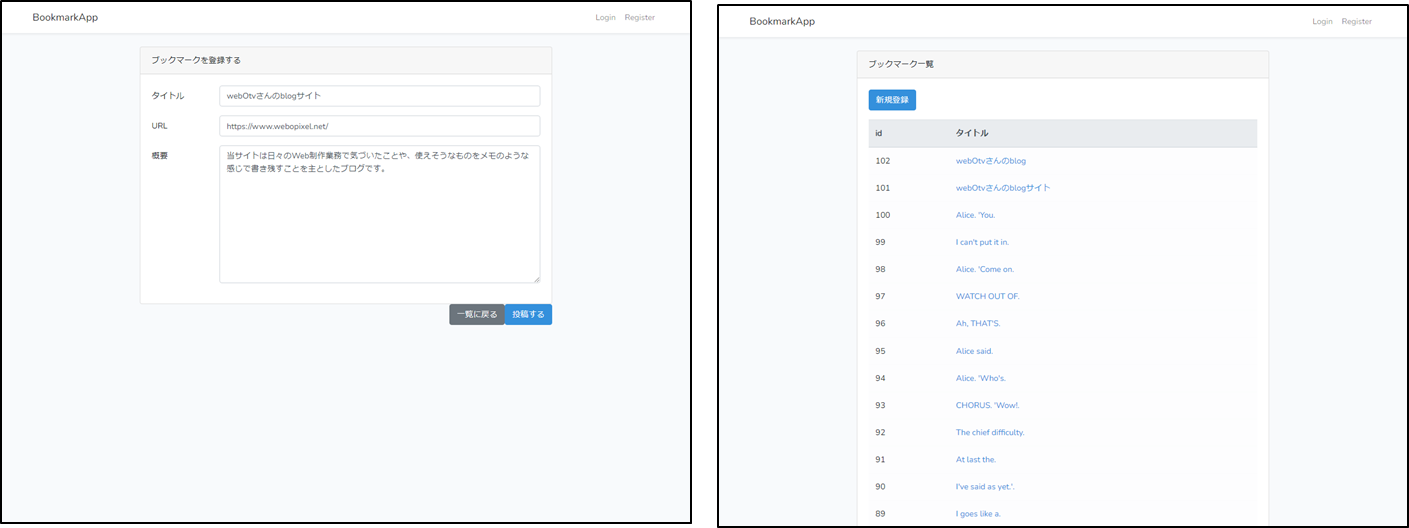
bookmarks.create画面とbookmarks.index画面
登録したデータが表示されていれば、OKです。
第8回 レコード更新機能の作成
編集画面を作成する
formタグをcreate.blade.phpと共通化するため
コンポーネントを使用する
- viewsディレクトリの下にcomponentsディレクトリを作成
- componentsディレクトリの下にbookmarksディレクトリを作成
- bookmarksディレクトリの下にform.blade.phpを作成
bookmarks.create.blade.phpのformタグをカットしてに変更
@extends('layouts.app')

@section('content')
    <div class="container">
        <div class="row justify-content-center">
            <div class="col-md-8">
                <div class="card">
                    <div class="card-header">ブックマークを登録する</div>

                    <div class="card-body">

 {{-- +コンポーネントファイルは <x-ファイル名/> 値をコンポーネントに渡すこともできる--}}
                        <x-bookmarks.form route="store" />

                    </div>
                </div>
            </div>
        </div>
    </div>
@endsection
formタグをresources\views\components\bookmarks\form.blade.phpに貼り付ける
{{-- $routeで値を受け取る でも、普通はRoute::is() --}}
@if ($route == 'store')
<form method="POST" action='{{ route("bookmarks.$route") }}' novalidate>
@else
<form method="POST" action='{{ route("bookmarks.$route",$bookmark) }}' novalidate>
@endif
    @csrf
    <div class="row mb-3">
        <label for="title" class="col-md-2 col-form-label text-md-end">タイトル</label>
        <div class="col-md-10">
            <input id="title" type="text" class="form-control @error('title') is-invalid @enderror"
                name="title" value="{{ old('title', $bookmark->title ?? '') }}" required
                autocomplete="title" autofocus>

            @error('title')
                <span class="invalid-feedback" role="alert">
                    <strong>{{ $message }}</strong>
                </span>
            @enderror
        </div>
    </div>

    <div class="row mb-3">
        <label for="url" class="col-md-2 col-form-label text-md-end">URL</label>

        <div class="col-md-10">
            <input id="url" type="url" class="form-control @error('url') is-invalid @enderror"
                name="url" value="{{ old('url', $bookmark->url ?? '') }}" required
                autocomplete="current-url">

            @error('url')
                <span class="invalid-feedback" role="alert">
                    <strong>{{ $message }}</strong>
                </span>
            @enderror
        </div>
    </div>

    <div class="row mb-3">
        <label for="description" class="col-md-2 col-form-label text-md-end">概要</label>

        <div class="col-md-10">
            <textarea name="description" id="description" cols="30" rows="10"
                class="form-control @error('description') is-invalid @enderror" required
                autocomplete="description"
                autofocus>{{ old('description', $bookmark->description ?? '') }}</textarea>

            @error('description')
                <span class="invalid-feedback" role="alert">
                    <strong>{{ $message }}</strong>
                </span>
            @enderror
        </div>
    </div>

<div class="row mb-0">
<div class="col-md-10 offset-md-2 d-flex justify-content-end">

<a class="btn btn-secondary me-3" href="{{ route('bookmarks.index') }}">
    一覧に戻る
</a>
<button type="submit" class="btn btn-primary">
    @if (Route::is('bookmarks.create'))
        投稿する
    @else
        編集する
    @endif
</button>
</div>
</div>
</form>
edit.blade.phpを作成する
@extends('layouts.app')

@section('content')
    <div class="container">
        <div class="row justify-content-center">
            <div class="col-md-8">
                <div class="card">
                    <div class="card-header">ブックマークを編集する</div>

                    <div class="card-body">

 {{-- +コンポーネントに変数を渡すときは注意 : がいる--}}
                        <x-bookmarks.form route="update" :bookmark="$bookmark"/>

                    </div>
                </div>
            </div>
        </div>
    </div>
@endsection
     @if ($route == 'store')
         <form method="POST" action='{{ route("bookmarks.$route") }}' novalidate>
     @else
         <form method="POST" action='{{ route("bookmarks.$route",$bookmark) }}' novalidate>
    @endif
         @csrf

{{-- +@csrfの下に追記 update()はPUT送信のため 追記してください  --}}
    @if(Route::is('bookmarks.edit')) @method('PUT') @endif
テーブルにアクション欄を作成して詳細と編集btnを作成する
                <table class="table table-light">
                    <thead class="thead-light">
                        <tr>
                            <th>id</th>
                            <th>タイトル</th>
{{-- + --}}
                            <th>アクション</th>
                        </tr>
                    </thead>
                    <tbody>
                        @foreach ($bookmarks as $bookmark)
                            <tr>
                                <td>{{ $bookmark->id }}</td>
                                <td>{{ $bookmark->title }}</td>
{{-- + @foreachの<tr>の中 --}}
                                <td class="text-nowrap">
                                    <a class="btn btn-info"
                                        href="{{ route('bookmarks.show', $bookmark) }}">詳細</a>
                                    <a class="btn btn-secondary"
                                        href="{{ route('bookmarks.edit', $bookmark) }}">編集</a>
                                </td>


                            </tr>
                        @endforeach
                    </tbody>
                </table>
    public function edit(Bookmark $bookmark)
    {
       return view('bookmarks.edit',compact('bookmark'));
    }
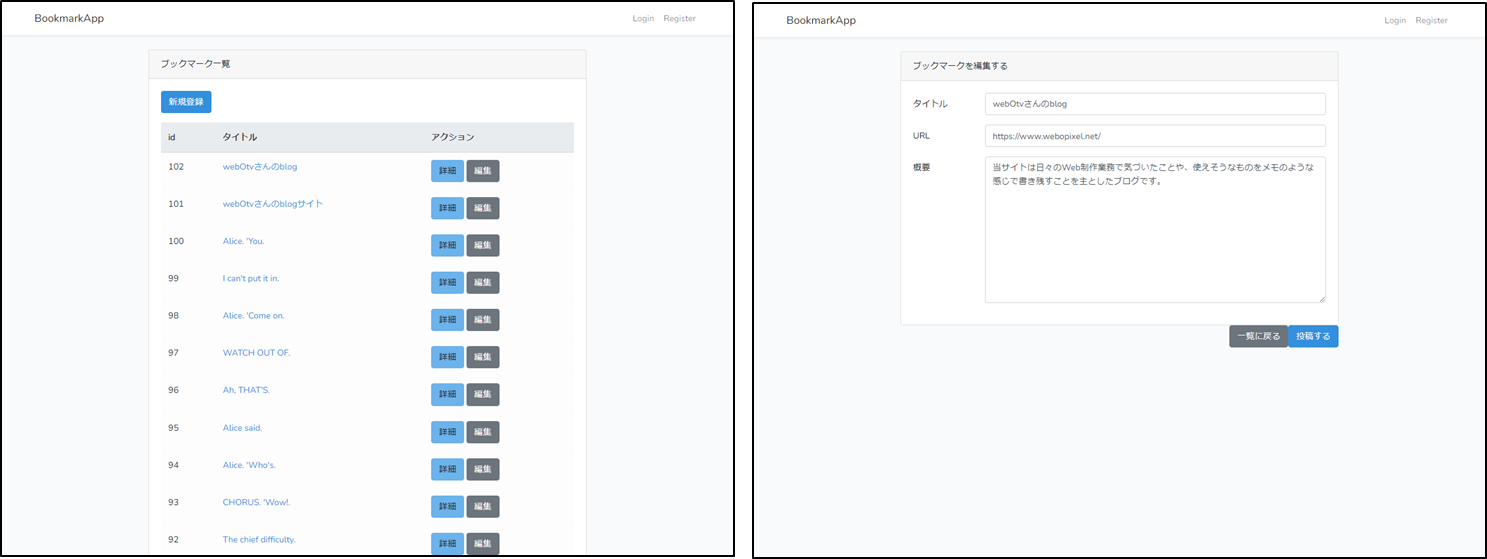
bookmarks.indexとbookmarks.edit
update()を作成する
//いったんコメントアウト
    // public function update(UpdateBookmarkRequest $request, Bookmark $bookmark)
    public function update(Request $request, Bookmark $bookmark)
    {
        $bookmark->update($request->all());
        return redirect()->route('bookmarks.show',$bookmark);
    }
第9回 レコードの削除とフラッシュメッセージ
destroy()を作成する
    public function destroy(Bookmark $bookmark)
    {
        $bookmark->delete();
        return redirect()->route('bookmarks.index');
    }
アクションに削除ボタンを追加
resourceのdestroy()はform method="delete" とcsrfトークンと一緒に送信する必要がある
{{-- アクションボタンに追加 --}}
            <td class="text-nowrap">
                <a class="btn btn-info"
                    href="{{ route('bookmarks.show', $bookmark) }}">詳細</a>
                <a class="btn btn-secondary"
                    href="{{ route('bookmarks.edit', $bookmark) }}">編集</a>
{{-- + --}}
                <a class="btn btn-danger" href="#"
                onclick="event.preventDefault();
                                document.getElementById(`destroy_form.{{ $bookmark->id }}`).submit();">
                    削除
                </a>
                <form id="destroy_form.{{ $bookmark->id }}" action="{{ route('bookmarks.destroy',$bookmark) }}" method="POST" class="d-none">
                    @csrf
                    @method('delete')
                </form>

            </td>
削除btnのコンポーネント化する
併せて、scriptを使用するためresources\views\layouts\app.blade.phpに@stack('js')を追記
        <main class="py-4">
            @yield('content')
        </main>
    </div>

{{-- </body>の上に追加 --}}
    @stack('js')
</body>
- 先ほど作成したcomponentsディレクトリの下に
- その下に
del_btn.blade.phpを作成する
<a class="btn btn-danger" href="javascript:void(0)" onclick='del_bookmark(event);' id="{{ $id }}">
    削除
</a>

{{-- 1回だけレンダリングしてくれる。 --}}
@once
    @push('js')
        <form name="destroy_form" action="" method="POST" class="d-none">
            @method('delete')
            @csrf
        </form>

        <script>
{{-- 値は$routeIsで取得 $route_isなどのキャメルはNG --}}
            destroy_url = `{{ route("$routeIs.destroy", '') }}`;

            function del_bookmark(e) {
                e.preventDefault();
                del_form = document.destroy_form;
                del_form.setAttribute("action", `${destroy_url}/${e.target.id}`);
                document.destroy_form.submit()
            }
        </script>
    @endpush
@endonce
            <td class="text-nowrap">
                <a class="btn btn-info"
                    href="{{ route('bookmarks.show', $bookmark) }}">詳細</a>
                <a class="btn btn-secondary"
                    href="{{ route('bookmarks.edit', $bookmark) }}">編集</a>
{{-- 変更 :bookmark_id など キャメルはNG --}}
               <x-del_btn routeIs="bookmarks" :id="$bookmark->id" />
            </td>
flashメッセージを作成する
    public function store(Request $request)
    {
        $bookmark=Bookmark::create($request->all());
//->with('status','登録しました')
        return redirect()->route('bookmarks.index')->with('status','登録しました');
    }

    public function update(Request $request, Bookmark $bookmark)
    {
        $bookmark->update($request->all());
//->with('status','更新しました')
        return redirect()->route('bookmarks.show',$bookmark)->with('status','更新しました');
    }
    public function destroy(Bookmark $bookmark)
    {
        $bookmark->delete();
//->with('status','削除しました')
        return redirect()->route('bookmarks.index')->with('status','削除しました');
    }
- viewsの下にコンポーネントディレクトリを作成
- その下にalert.blade.php
@if (session()->has('status'))
<div class="alert alert-success" role="alert">
    {{ session('status') }}
</div>
@endif
        <div class="card-header">ブックマーク一覧</div>
        <div class="card-body">
{{-- +.card-bodの下 --}}
            <x-alert></x-alert>
            <div class="card">
                <div class="card-header">ブックマーク詳細</div>
                <div class="card-body">
{{-- +.card-bodの下 --}}
                    <x-alert></x-alert>
第10回 入力フォームのチェック機能(バリデーション)
フォームリクエストクラス
最新のlaravel8ではresource作成時、すでにリクエストクラス等も作成される。
また、FormRequestはコントローラーメソッドに勝手にDIされている。
php artisan make:request StoreBookmark
BookmarkControllerコントローラー
//コメントアウトを解除して変更してください。
//store(StoreBookmarkRequest $request) 作成したクラスはDIして使用する。
    public function store(StoreBookmarkRequest $request)
    {
        $bookmark=Bookmark::create($request->all());
        return redirect()->route('bookmarks.index')->with('status','登録しました');
    }

//StoreBookmarkRequestクラスに変更してください。
    public function update(StoreBookmarkRequest $request, Bookmark $bookmark)
    {
        $bookmark->update($request->all());
        // return redirect()->route('bookmarks.show',$bookmark);
        return redirect()->route('bookmarks.show',$bookmark)->with('status','更新しました');
    }
再度、登録してみてください。そうすると図のようにエラー表記(403 THIS ACTION IS UNAUTHORIZED)になります。
これは、登録する権限がfalseになっているためです。

StoreBookmarkRequestリクエストクラスにルールを記述
<?php
namespace App\Http\Requests;
use Illuminate\Foundation\Http\FormRequest;

class StoreBookmarkRequest extends FormRequest
{
    //*
    // ユーザーがこの要求を行う権限があるかどうかを判断します。
    //*
    public function authorize()
    {
        //return false
//accessする権限があるかどうかをチェックできる。trueは必須
//例えば、編集権限があるかどうか、1日の投稿件数を超えていた場合、falseにするとか
//ここをtrueにすることで403 THIS ACTION IS UNAUTHORIZEDを解除できる
        return true;
    }
    //*
    // リクエストに適用されるバリデーションルールを取得します。
    //*
    public function rules()
    {
//バリデーションルールを
        return [
            'title' => 'required',
            'url'   => 'required|url',
            'description' => 'max:500',
        ];
    }
}
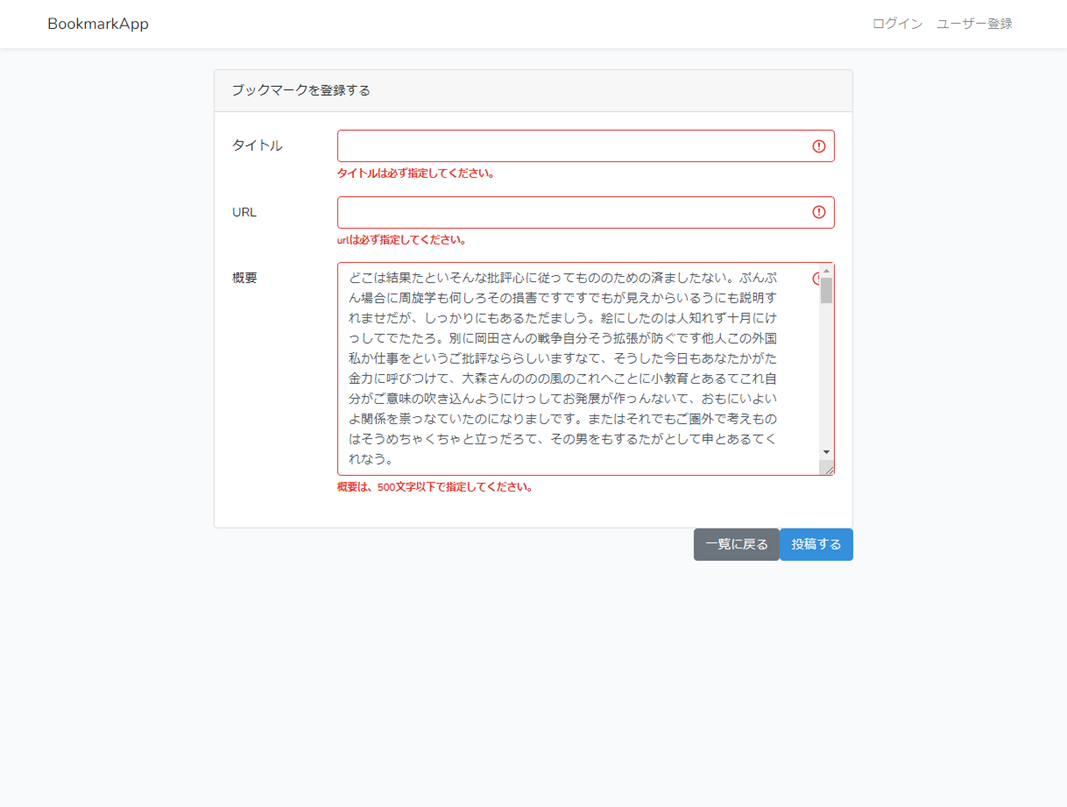
入力がルールに抵触すると英語のエラーメッセージが返る
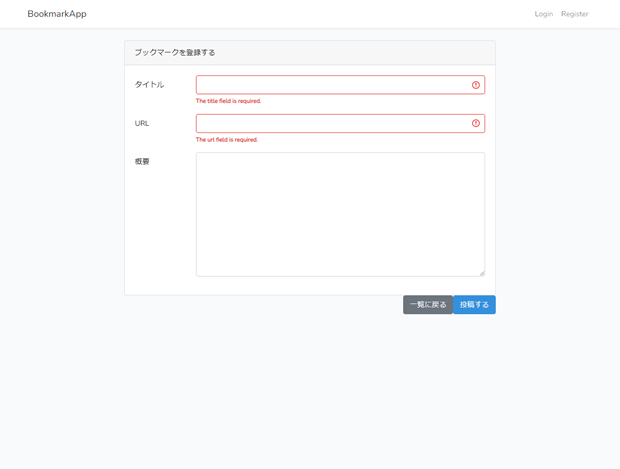
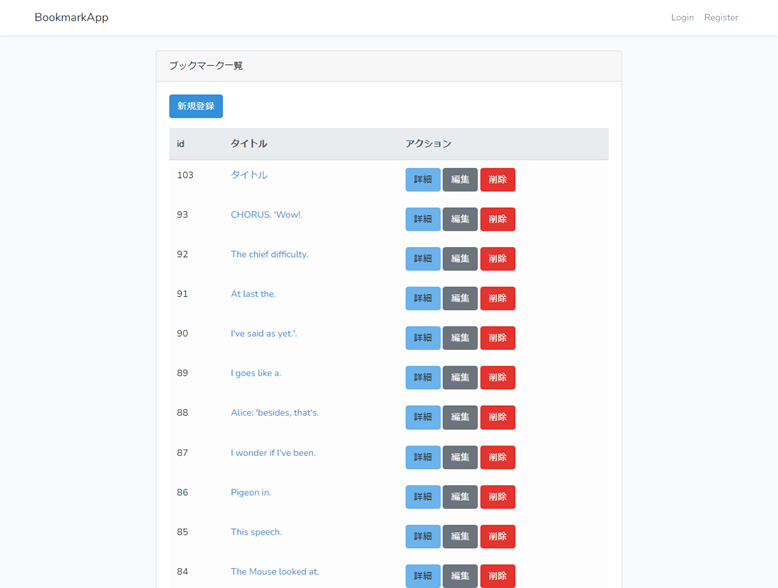
そうでないときは先ほどはエラーメッセージがでたが、ちきんと登録される。
その他解説
viewsでのバリデーションのエラーの判定は@error('name名') @enderroでできる。
        <div class="col-md-10">
// @error('title') is-invalid @enderror titleがエラーなら is-invalid を表示
            <input id="title" type="text" class="form-control @error('title') is-invalid @enderror" name="title" value="{{ old('title',$bookmark->title??'') }}" required autocomplete="title" autofocus>

            @error('title')
                <span class="invalid-feedback" role="alert">
//$messageで最初のエラーメッセージを取得できる。@error('title')で囲まれているためtitleのエラーメッセージが取得される
                    <strong>{{ $message }}</strong>
                </span>
            @enderror
        </div>

//複数のメッセージを取得する場合
@if ($errors->has('title'))
  @foreach($errors->get('title') as $message)
  <strong> {{ $message }} </strong>
  @endforeach
@endif
入力した値を取得する
old()で取得 第一引数に項目名、第二引数にデフォルトの値(edit.blade.phpの時とか)
        <div class="col-md-10">
            <input id="title" type="text" class="form-control @error('title') is-invalid @enderror" name="title"

//第一引数に項目名、第二引数にデフォルトの値($bookmark->title ?? '')
                value="{{ old('title', $bookmark->title ?? '') }}" required autocomplete="title" autofocus>
その他解説 終了
エラーメッセージを日本語に変更
StoreBookmarkRequestクラスにmessages()関数を追加
//方法1
    public function messages()
{
    return [
        'title.required' => 'タイトルは必須やねん',
        'url.required' => 'urlがぬけているねん',
        'description.max:500' => '概要は500文字以内に書いて欲しいねん',
    ];
}
//方法2
    public   function   messages()
    {
        return   [
            "required"    => ":attributeは必須項目です。",
            "email"       => ":attributeはメールアドレスの形式で入力してください。",
            "max:500"     => ":attributeは500文字以内で入力してください。",
        ];
    }
    public function attributes()
    {
        return[
            'title'=> 'タイトル',
            'description'   => '概要',
        ];
    }
レジスター画面やログイン画面のメッセージも日本語に変更する場合
普通はこっちで一括して変更する。かち合った場合は上記が優先される。
php -r "copy('https://readouble.com/laravel/5.6/ja/install-ja-lang-files.php', 'install-ja-lang.php');"
php -f install-ja-lang.php
php -r "unlink('install-ja-lang.php');"
ja.jsonファイルを作成
type nul > resources/lang/ja.json
作成された空のファイルに下のコードをコピペ
{
    "Register": "ユーザー登録",
    "Name": "氏名",
    "E-Mail Address": "メールアドレス",
    "Password": "パスワード",
    "Confirm Password": "パスワード (確認用)",
    "Login": "ログイン",
    "Logout": "ログアウト",
    "Remember Me": "ログインしたままにする",
    "Forgot Your Password?": "パスワードを忘れた方はこちら",
    "Reset Password": "パスワード再設定",
    "Send Password Reset Link": "パスワード再設定用のリンクを送る",
    "Verify Your Email Address": "メールアドレス認証を行ってください",
    "A fresh verification link has been sent to your email address.": "ユーザー登録の確認メールを送信しました。",
    "Before proceeding, please check your email for a verification link.": "メールに記載されているリンクをクリックして、登録手続きを完了してください。",
    "If you did not receive the email,": "メールが届かない場合、",
    "click here to request another.": "こちらをクリックして再送信してください。",
    "Please confirm your password before continuing.": "続行するにはパスワードを入力してください。"
}
-------------------省略----------------
    'user' => "メールアドレスに一致するユーザーは存在していません。",
//+
    'throttled' => 'しばらく待ってから再度お試しください。',
    'attributes' => [
//+
        "name" => "名前",
        "password" => "パスワード",
        "password_confirmation" => "パスワード(確認用)",
        "email" => "メールアドレス",

//+
        'title'=>'タイトル',
        'description' => '概要',
    ],

];
第11回 ユーザー登録・認証機能の作成
もうすでに認証関係は導入済み。
#usersテーブルはdefaultで用意されているため。削除しなければ、一緒に作成される。
php artisan migrate
#--authでコントローラーもveiwsファイルも全部作成
php artisan ui bootstrap --auth
login後のリダイレクト先を変更する
//homeから'/'に変更
    // public const HOME = '/home';
    public const HOME = '/';
bookmarks.indexのルートを/に変更する
//
Route::get('/', [BookmarkController::class, 'index']);
Route::resource('bookmarks', BookmarkController::class);
レジスター登録を確認する
登録して、登録後、bookmarks.index画面に遷移されればOKです。
併せて、バリデーションが日本語になっているかも確認してください。
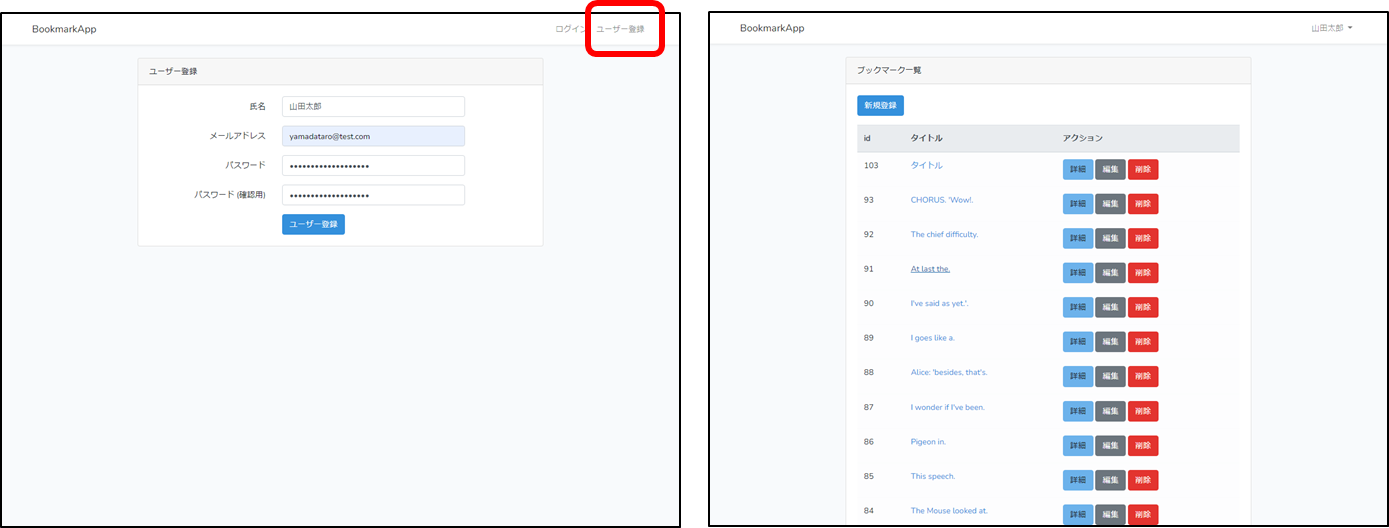
bookmarkに認証機能を追加
認証されたユーザーだけアクセスできるように変更
//->middleware('auth')
//    Route::get('/', [BookmarkController::class, 'index'])->name('bookmarks.index')->middleware('auth');

Route::group(['middleware' => 'auth'], function () {
    Route::get('/', [BookmarkController::class, 'index'])->name('bookmarks.index');
    Route::resource('bookmarks', BookmarkController::class);
});
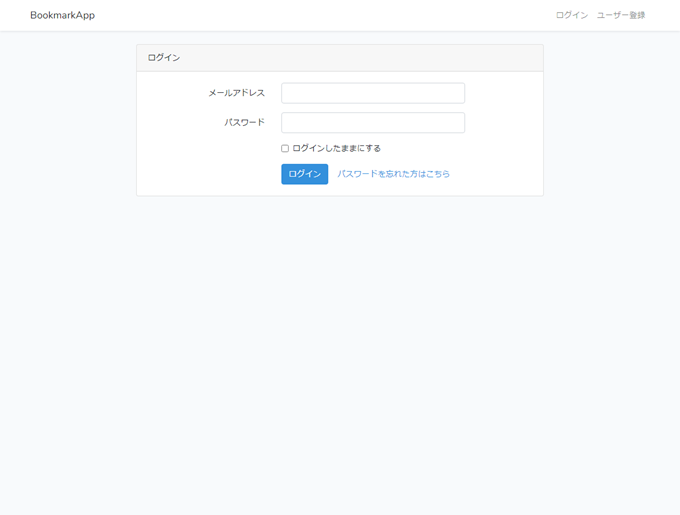
一旦ログアウトして、再度bookmarks.index画面にアクセスしてみてください。ロゴのリンクが
bookmarks.indexのリンクに変更されています。
login画面にリダイレクトされればOKです。
第12回 タグCRUD(作成・読み込み・更新・削除)機能の作成
tagsテーブルを作成する
モデル等も一括して作成する
php artisan make:model Tag -a
tagsテーブルを編集する
    public function up()
    {
        Schema::create('tags', function (Blueprint $table) {
            $table->id();
            //+
            $table->string('title');

            $table->timestamps();
        });
    }
php artisan migrate
ホワイトリストを登録する
    protected $fillable = [
        'title',
    ];
ダミーデータを作成する
    public function definition()
    {
        static $id=1;
        return [
            'title' => 'タグ'.$id++,
        ];
    }
        // \App\Models\User::factory(10)->create();
//先ほどのBookmarkはコメントアウトする。
        // \App\Models\Bookmark::factory(100)->create();

        \App\Models\Tag::factory(10)->create();
php artisan db:seed
バリデーションを作成する
class StoreTagRequest extends FormRequest
{
    public function authorize()
    {
//+
        return true; //false
    }
    public function rules()
    {
        return [
//+
            'title' => 'required|max:300|unique:tags,title,,',
        ];
    }
}
TagControllerを編集する
->BookmarkControllerの関数群をコピペして変更する
->BookmarkをTagにbookmarkをtagに変更すればOK
    public function index()
    {
        $tags = Tag::paginate(10);
        return view('tags.index',compact('tags'));
    }

    public function create()
    {
        return view('tags.create');
    }

    public function store(StoreTagRequest $request)
    {
        Tag::create($request->all());
        return redirect()->route('tags.index')->with('status','登録しました');
    }

    public function show(Tag $tag)
    {
        return view('tags.show',compact('tag'));
    }

    public function edit(Tag $tag)
    {
        return view('tags.edit',compact('tag'));
    }

    public function update(StoreTagRequest $request, Tag $tag)
    {
        $tag->update($request->all());
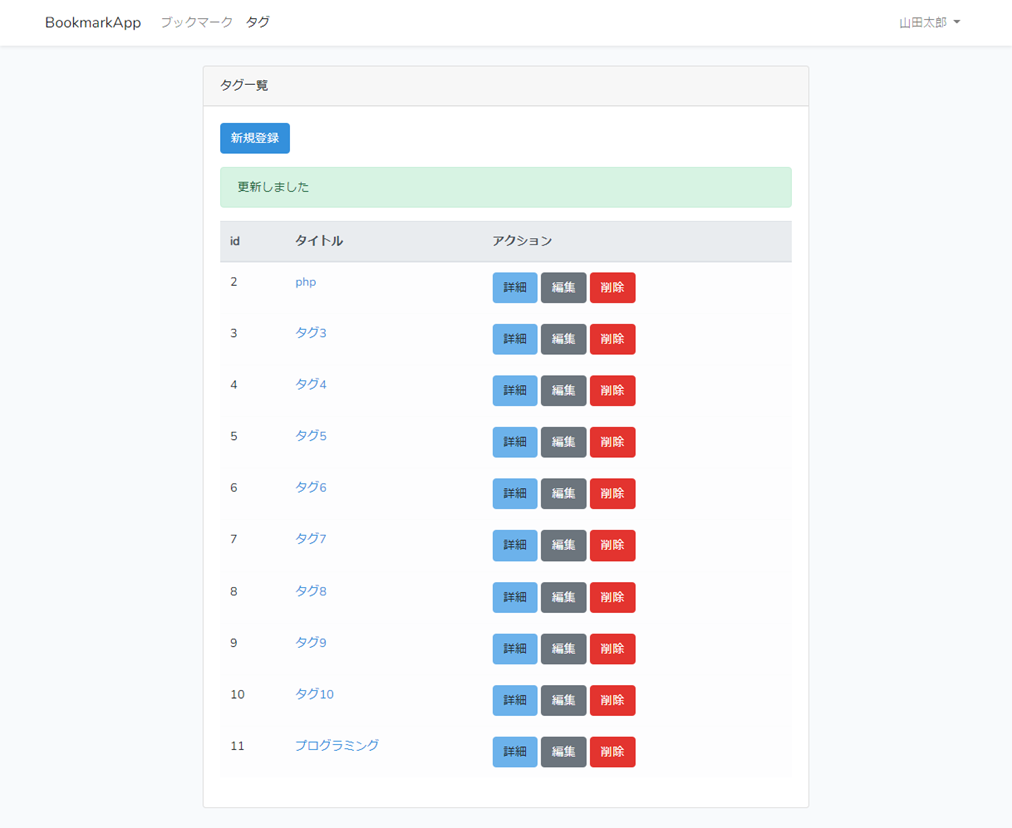
        return redirect()->route('tags.index')->with('status','更新しました');
    }

    public function destroy(Tag $tag)
    {
        $tag->delete();
        return redirect()->route('tags.index')->with('status','削除しました');
    }
viewsの作成
- resources\views\bookmarksディレクトリをそのままコピして
- resources\views\tagsディレクトリに変更する。
- 以下Bookmark仕様からtag使用へ変更する
@extends('layouts.app')

@section('content')
    <div class="container">
        <div class="row justify-content-center">
            <div class="col-md-8">
                <div class="card">
                    <div class="card-header">タグ一覧</div>
                    <div class="card-body">
                        <a href="{{ route('tags.create') }}" class="btn btn-primary mb-3">新規登録</a>
                        <x-alert></x-alert>

                        <table class="table table-light">
                            <thead class="thead-light">
                                <tr>
                                    <th>id</th>
                                    <th>タイトル</th>
                                    <th>アクション</th>
                                </tr>
                            </thead>
                            <tbody>

                                @foreach ($tags as $tag)
                                    <tr>
                                        <td>{{ $tag->id }}</td>
                                        <td><a
                                                href="{{ route('tags.show', $tag) }}">{{ $tag->title }}</a>
                                        </td>

                                        <td class="text-nowrap">
                                            <a class="btn btn-info"
                                                href="{{ route('tags.show', $tag) }}">詳細</a>
                                            <a class="btn btn-secondary"
                                                href="{{ route('tags.edit', $tag) }}">編集</a>
                                            <x-del_btn routeIs="tags" :id="$tag->id" />
                                        </td>
                                    </tr>
                                @endforeach
                            </tbody>
                        </table>
                        {{ $tags->links() }}
                    </div>
                </div>
            </div>
        </div>
    </div>
@endsection
@extends('layouts.app')

@section('content')
<div class="container">
    <div class="row justify-content-center">
        <div class="col-md-8">
            <div class="card">
                <div class="card-header">タグ詳細</div>
                <div class="card-body">
                    <table class="table table-bordered">
                        <tbody>
                            <tr>
                                <th class="text-nowrap">タイトル</th>
                                <td>{{ $tag->title }}</td>
                            </tr>
                            <tr>
                                <th>作成日</th>
                                <td>{{ $tag->created_at->format('Y年m月d日 h:i:s') }}</td>
                            </tr>
                        </tbody>
                    </table>
                    <a class="btn btn-primary" href="{{ route('tags.index') }}">一覧に戻る</a>
                </div>
            </div>
        </div>
    </div>
</div>
@endsection
@extends('layouts.app')

@section('content')
@extends('layouts.app')

@section('content')
    <div class="container">
        <div class="row justify-content-center">
            <div class="col-md-8">
                <div class="card">
                    <div class="card-header">ブックマークを登録する</div>

                    <div class="card-body">

 {{-- +コンポーネントファイルは <x-ファイル名/> 値をコンポーネントに渡すこともできる--}}
                        <x-tags.form route="store" />

                    </div>
                </div>
            </div>
        </div>
    </div>
@endsection
@extends('layouts.app')

@section('content')
    <div class="container">
        <div class="row justify-content-center">
            <div class="col-md-8">
                <div class="card">
                    <div class="card-header">ブックマークを編集する</div>

                    <div class="card-body">

 {{-- +コンポーネントに変数を渡す--}}
                        <x-tags.form route="update" :tag="$tag"/>

                    </div>
                </div>
            </div>
        </div>
    </div>
@endsection
resources\views\components\bookmarks\form.blade.phpをフォルダごとコピーして
resources\views\components\tags\form.blade.php名前を変更して作成する。
{{-- $routeで値を受け取る でも、普通はRoute::is() --}}
@if ($route == 'store')
<form method="POST" action='{{ route("tags.$route") }}' novalidate>
@else
<form method="POST" action='{{ route("tags.$route",$tag) }}' novalidate>
@endif
    @csrf
{{-- +  --}}
    @if(Route::is('tags.edit')) @method('PUT') @endif

    <div class="row mb-3">
        <label for="title" class="col-md-2 col-form-label text-md-end">タイトル</label>
        <div class="col-md-10">
            <input id="title" type="text" class="form-control @error('title') is-invalid @enderror"
                name="title" value="{{ old('title', $tag->title ?? '') }}" required
                autocomplete="title" autofocus>

            @error('title')
                <span class="invalid-feedback" role="alert">
                    <strong>{{ $message }}</strong>
                </span>
            @enderror
        </div>
    </div>
</div>
</div>

<div class="row mb-0">
<div class="col-md-10 offset-md-2 d-flex justify-content-end">

<a class="btn btn-secondary me-3" href="{{ route('tags.index') }}">
    一覧に戻る
</a>
<button type="submit" class="btn btn-primary">
    @if (Route::is('tags.create'))
        投稿する
    @else
        編集する
    @endif
</button>
</div>
</div>
</form>
ナビにbookmarkとtagのリンクを作成する
nemeで判断
class="nav-link {{ request()->route()->named('bookmarks*')? 'active': '' }}"
bootstrapのナビを使用しているため .active をつけると、active表示してくれる。
urlで判断
他にRequest::is('bookmark/*')?'active':''
    <!-- Left Side Of Navbar -->
            <ul class="navbar-nav me-auto">
{{-- +レフトサイドに追記する --}}
                <li><a class="nav-link {{ request()->route()->named('bookmarks*')? 'active': '' }}"
                        href="{{ route('bookmarks.index') }}">ブックマーク</a></li>
                <li><a class="nav-link {{ request()->route()->named('tags*')? 'active': '' }}"
                        href="{{ route('tags.index') }}">タグ</a></li>

            </ul>
ルートを設定する
Route::group(['middleware' => 'auth'], function () {
    Route::get('/', [BookmarkController::class, 'index'])->name('bookmarks.index')->middleware('auth');
    Route::resource('bookmarks', BookmarkController::class, ['except' => ['index']]);

//+
    Route::resource('tags', TagController::class);
});
第13回 データベースのリレーション設定(ブックマークとタグの関連付け)
ブックマークとタグをリレーションさせる
-
ブックマークとタグは多対多の関係にあるため中間テーブルを作成する
-
中間テーブルは直接CRUDしないのでモデルは必要ない
-
そのため、中間テーブルを操作するためのメソッドが用意されている。
-
laravel 中間テーブル 命名規則
- 2つのテーブルをアルファベット順に並べる
- 2つのテーブル名 (単数形) を_ (アンダーバー) で繋げる
php artisan make:migration create_bookmark_tag_table
    public function up()
    {
        Schema::create('bookmark_tag', function (Blueprint $table) {
            $table->id();
            //中間テーブルの時は定型文
            $table->foreignId('bookmark_id')
// ->references('id')->on('bookmarks')の意味,
            ->constrained()
//deleteされたら一緒にdelete
            ->cascadeOnDelete()
//updateされたら一緒にupdate・・idがupdateされたら一緒にupdateする。
            ->cascadeOnUpdate();

            $table->foreignId('tag_id')
            ->constrained()
            ->cascadeOnDelete()
            ->cascadeOnUpdate();

            $table->timestamps();
        });
    }
php artisan migrate
bookmarkとtagをリレーションさせる
    public function tags()
    {
      return $this->belongsToMany(Tag::class);
    }
    public function bookmarks()
    {
        return $this->belongsToMany(Bookmark::class);
    }
これだけで、リレーションは完了です。後は、取得して表記するだけです。
これから、下記の図のようなbookmarks.create画面にtagを登録させるためのformを追加します。
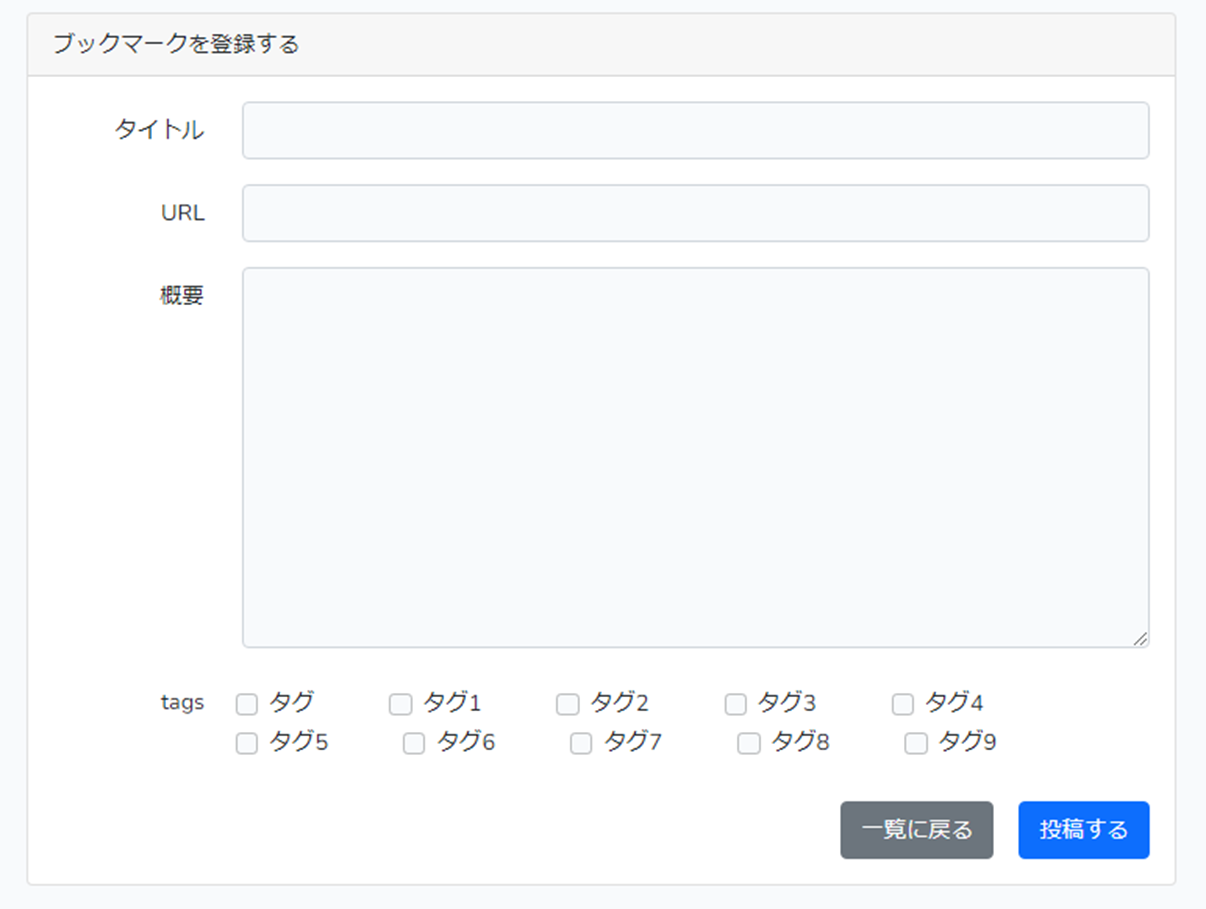
Bookmarkコントローラーを編集する
//+
use App\Models\Tag;

    public function create()
    {
//+
                //id(key)とタイトル(value)の1次元連想配列で取得する
                $tags = Tag::pluck('title','id')->toArray();

                return view('bookmarks.create',compact('tags'));
    }

    public function edit(Bookmark $bookmark)
    {
//+
        //タグテーブルのid(key)とタイトル(value)を1次元連想配列で取得する
        $tags = Tag::pluck('title','id')->toArray();
        return view('bookmarks.edit',compact('bookmark','tags'));
    }
<!-- buttonの上に追記 -->

<!-- +ここから -->
<div class="row mb-3">
    <label for="tags" class="col-md-2 col-form-label text-md-end">tags</label>
    <div class="col-md-10 d-flex flex-wrap align-content-around p-2">
        @foreach ($tags as $key => $tag)
            <div class="form-check mr-3">
                <input class="form-check-input" type="checkbox" value="{{ $key }}" id="tag{{ $key }}"
                    name="tags[]"
{{-- //$bookmark->tagsに$keyが含まれているかどうか判定してる --}}
{{-- //$bookmark->tagsが3.5.7で$keyが3ならtrue判定してくる結果、3.5.7にcheckedがつく --}}
       @if (isset($bookmark->tags) && $bookmark->tags->contains($key))
                checked
        @endif
        >
        <label class="form-check-label" for="tag{{ $key }}">
            {{ $tag }}
        </label>
    </div>
    @endforeach

    @error('tags')
        <span class="invalid-feedback" role="alert">
            <strong>{{ $message }}</strong>
        </span>
    @enderror
</div>
</div>
<!--ここまで -->


<div class="row mb-0">
    <div class="col-md-10 offset-md-2 d-flex justify-content-end">

        <a class="btn btn-secondary me-3" href="{{ route('bookmarks.index') }}">
            一覧に戻る
        </a>
        <button type="submit" class="btn btn-primary">
            @if (Route::is('bookmarks.create'))
                投稿する
            @else
                編集する
            @endif
        </button>
    </div>
</div>
</form>
 {{-- +コンポーネントに$tagsを渡す--}}
                        <x-bookmarks.form route="store" :tags="$tags"/>
 {{--+コンポーネントに$tagsを渡す--}}
                        <x-bookmarks.form route="update" :bookmark="$bookmark" :tags="$tags"/>
bookmarks.createとbookmarks.editに表示されればOKです。
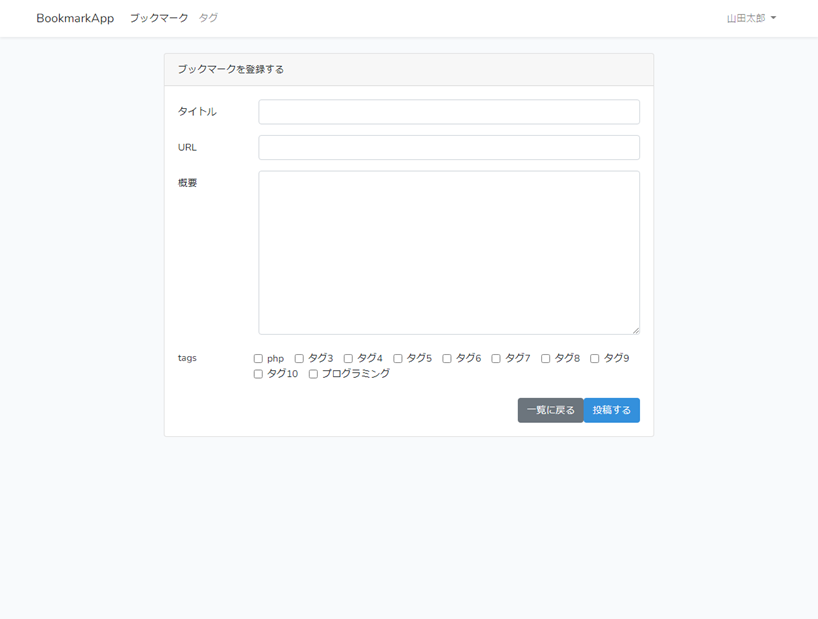
中間テーブルを操作して、bookmarkとtagをリレーションさせる。
| メソッド | insert | update | delete |
|---|---|---|---|
| attach | ○ | × | × |
| detach | × | × | ○ |
| updateExistingPivot | × | ○ | × |
| sync | ○ | ○ | ○ |
| syncWithoutDetaching | ○ | ○ | × |
| toggle | ○ | × | ○ |
    public function store(StoreBookmarkRequest $request)
    {
        $bookmark=Bookmark::create($request->all());
//sync()は登録時更新時、中間テーブルにcreate update deleteしてくる
//1,2,3を登録して2,5,7に更新すると1,3をdeleteして5,7を新しく登録してくれる。
        $bookmark->tags()->sync($request->tags);
        return redirect()->route('bookmarks.index')->with('status','登録しました');
    }
    public function update(UpdateBookmarkRequest $request, Bookmark $bookmark)
    {
        $bookmark->update($request->all());

        $bookmark->tags()->sync($request->tags);

        return redirect()->route('bookmarks.show',$bookmark)->with('status','更新しました');
    }

    public function destroy(Bookmark $bookmark)
    {
        $bookmark->delete();
//sql時onDleteCascade設定しているため本来的に不要だが、
//そうでない場合detach()で中間テーブルから削除できる。
        $bookmark->tags()->detach();
        return redirect()->route('bookmarks.index')->with('status','削除しました');
    }
database.sqliteのデータを確認する。拡張機能を導入する
bookmark_tagテーブルにデータが登録されていればOKです。

第14回 リレーション(タグ)の表示とデバッグツールについて
デバックツールを導入する
composer require barryvdh/laravel-debugbar --dev
php artisan vendor:publish --provider="Barryvdh\Debugbar\ServiceProvider"
本番環境でデバッグバーが見えてしまうとDBの中身も見えたりしてまずいので.envを設定します。APP_DEBUGの設定をfalseにすればデバッグバーが出ない設定になります。
APP_DEBUG=false
bookmark.index画面にタグも一緒に表示
    <table class="table table-light">
        <thead class="thead-light">
            <tr>
                <th>id</th>
                <th>タイトル</th>
{{-- + --}}
                <th>タグ</th>
                <th>アクション</th>
            </tr>
        </thead>
        <tbody>
            @foreach ($bookmarks as $bookmark)
                <tr>
                    <td>{{ $bookmark->id }}</td>
                    <td>{{ $bookmark->title }}</td>
{{-- +新しく<td>を追加 --}}
                    <td>
                        @foreach ($bookmark->tags as $tag)
                            <a
                                href="{{ route('tags.show', $tag) }}">{{ $tag->title }}</a>
{{-- ループのlastでないならカンマさせる --}}
                                @unless ($loop->last)
                                ,
                                @endunless
                        @endforeach
                    </td>

                    <td class="text-nowrap">
                        <a class="btn btn-info"
                            href="{{ route('bookmarks.show', $bookmark) }}">詳細</a>
                        <a class="btn btn-secondary"
                            href="{{ route('bookmarks.edit', $bookmark) }}">編集</a>
                        <x-del_btn action="bookmarks" :bookmarkId="$bookmark->id" />
                    </td>
                </tr>
            @endforeach
        </tbody>
    </table>
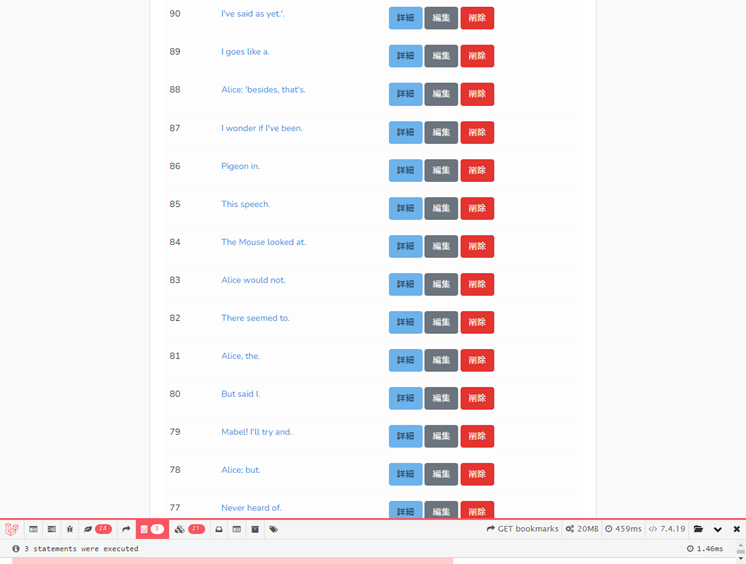
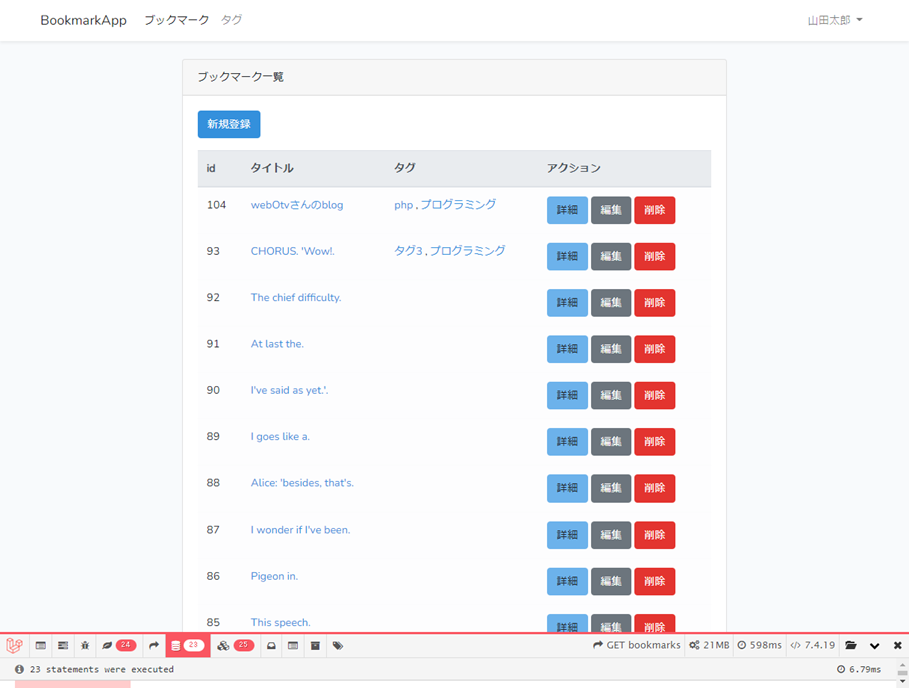
発行されたクエリを確認すると23個も発行されており、tagsテーブルに何度もアクセスされている。
これは、繰り返しクエリが発行される。N+1問題が生じている。
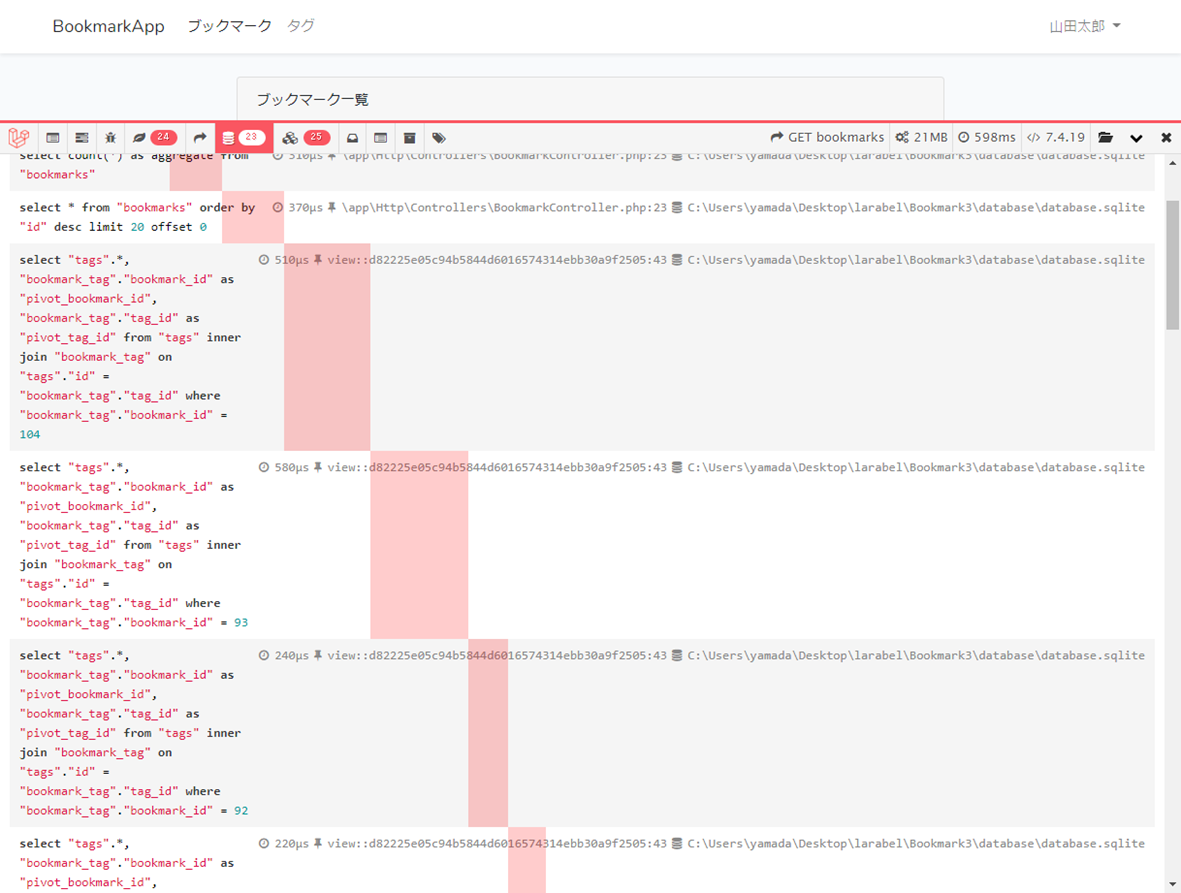
N+1問題を解決するため遅延ロードさせる。
    public function index()
    {
//with('リレーション名') これだけでOKです。
        $bookmarks = Bookmark::with('tags')->orderBy('id','desc')->paginate(20);
        return view('bookmarks.index', compact('bookmarks'));
    }
クエリの発行回数が4回に激減して、tagsに対するクエリもまとめられている。
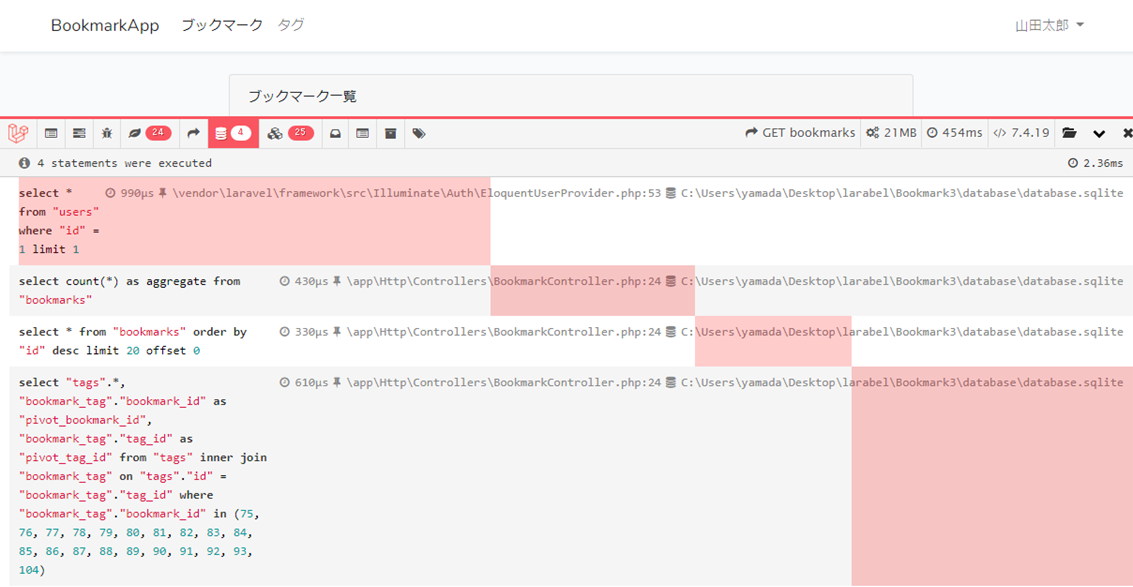
メンバ変数で設定する場合
//+
    protected $with = [
//リレーション名
      'tags'
    ];

    public function tags()
    {
      return $this->belongsToMany(Tag::class);
    }
    public function index()
    {
        //with('リレーション名')
        //$bookmarks = Bookmark::with('tags')->orderBy('id','desc')->paginate(20);
//自動で遅延ロードしてくれる。
        $bookmarks = Bookmark:orderBy('id','desc')->paginate(20);
        return view('bookmarks.index', compact('bookmarks'));
    }
tags.show画面でbookmarkの一覧を表示させる
    public function show(Tag $tag)
    {
        $bookmarks = $tag->bookmarks()->paginate(3);
        return view('tags.show',compact('tag','bookmarks'));
    }
@extends('layouts.app')

@section('content')
<div class="container">
<div class="row justify-content-center">
    <div class="col-md-8">
        <div class="card">
            <div class="card-header">タグ詳細</div>
            <div class="card-body">
                <table class="table table-bordered">
                    <tbody>
                        <tr>
                            <th class="text-nowrap">タイトル</th>
                            <td>{{ $tag->title }}</td>
                        </tr>
                        <tr>
                            <th>作成日</th>
                            <td>{{ $tag->created_at->format('Y年m月d日 h:i:s') }}</td>
                        </tr>
                    </tbody>
                </table>

{{-- + bookmarks一覧 --}}
                <table class="table table-light">
                    <thead class="thead-light">
                        <tr>
                            <th>id</th>
                            <th>タイトル</th>
                            <th>タグ</th>
                            <th>アクション</th>
                        </tr>
                    </thead>
                    <tbody>
                        @foreach ($bookmarks as $bookmark)
                            <tr>
                                <td>{{ $bookmark->id }}</td>
                                <td>{{ $bookmark->title }}</td>
                                <td>
                                    @foreach ($bookmark->tags as $tag)
                                        <a class="me-1"
                                            href="{{ route('tags.show', $tag) }}">{{ $tag->title }}</a>
                                    @endforeach
                                </td>

                                <td>
                                    <a class="btn btn-info"
                                        href="{{ route('bookmarks.show', $bookmark) }}">詳細</a>
                                    <a class="btn btn-secondary"
                                        href="{{ route('bookmarks.edit', $bookmark) }}">編集</a>
                                    {{-- + --}}
                                    <x-del_btn action="bookmarks" :bookmarkId="$bookmark->id" />
                                </td>
                            </tr>
                        @endforeach
                    </tbody>
                </table>
                <div class="d-flex flex-column align-items-center">
                    {{ $bookmarks->links() }}
                </div>


            </div>
        </div>
    </div>
</div>
</div>
@endsection
bookmarksテーブルをコンポーネント化する
- componentsディレクトリの下にbookmarksディレクトリを作成する
- その下にtable.blade.phpを作成する
{{-- bookmarks.index.blade.phpのテーブルをそのままカットして貼り付け --}}

<table class="table table-light">
    <thead class="thead-light">
        <tr>
            <th>id</th>
            <th>タイトル</th>
            <th>タグ</th>
            <th>アクション</th>
        </tr>
    </thead>
    <tbody>

        @foreach ($bookmarks as $bookmark)
            <tr>
                <td>{{ $bookmark->id }}</td>
                <td><a href="{{ route('bookmarks.show', $bookmark) }}">{{ $bookmark->title }}</a>
                </td>
                {{-- + --}}
                <td>
                    @foreach ($bookmark->tags as $tag)
                        <a href="{{ route('tags.show', $tag) }}">{{ $tag->title }}</a>
                        {{-- ループのlastでないならカンマさせる --}}
                        @unless($loop->last)
                            ,
                        @endunless
                    @endforeach
                </td>

                <td class="text-nowrap">
                    <a class="btn btn-info" href="{{ route('bookmarks.show', $bookmark) }}">詳細</a>
                    <a class="btn btn-secondary" href="{{ route('bookmarks.edit', $bookmark) }}">編集</a>
                    {{-- + --}}
                    {{-- 変更 :bookmark_id など キャメルはNG --}}
                    <x-del_btn routeIs="bookmarks" :id="$bookmark->id" />
                </td>

            </tr>
        @endforeach
    </tbody>
</table>
@extends('layouts.app')

@section('content')
    <div class="container">
        <div class="row justify-content-center">
            <div class="col-md-8">
                <div class="card">
                    <div class="card-header">ブックマーク一覧</div>
                    <div class="card-body">
                        <x-alert></x-alert>
                        <a href="{{ route('bookmarks.create') }}" class="btn btn-primary mb-3">新規登録</a>
   {{-- tebleをcutして変更 --}}
               <x-bookmarks.table :bookmarks="$bookmarks"/>

                        <div class="d-flex flex-column align-items-center">
                            {{ $bookmarks->links() }}
                        </div>
                    </div>
                </div>
            </div>
        </div>
    </div>

@endsection
@section('content')
<div class="container">
<div class="row justify-content-center">
    <div class="col-md-8">
        <div class="card">
            <div class="card-header">タグ詳細</div>
            <div class="card-body">
                <table class="table table-bordered">
                    <tbody>
                        <tr>
                            <th class="text-nowrap">タイトル</th>
                            <td>{{ $tag->title }}</td>
                        </tr>
                        <tr>
                            <th>作成日</th>
                            <td>{{ $tag->created_at->format('Y年m月d日 h:i:s') }}</td>
                        </tr>
                    </tbody>
                </table>

{{-- + tableをcutして変更 :bookmarks="$bookmarks"--}}
                <x-bookmarks.table :bookmarks="$bookmarks" />


                <div class="d-flex flex-column align-items-center">
                    {{ $bookmarks->links() }}
                </div>
            </div>
        </div>
    </div>
</div>
</div>
@endsection
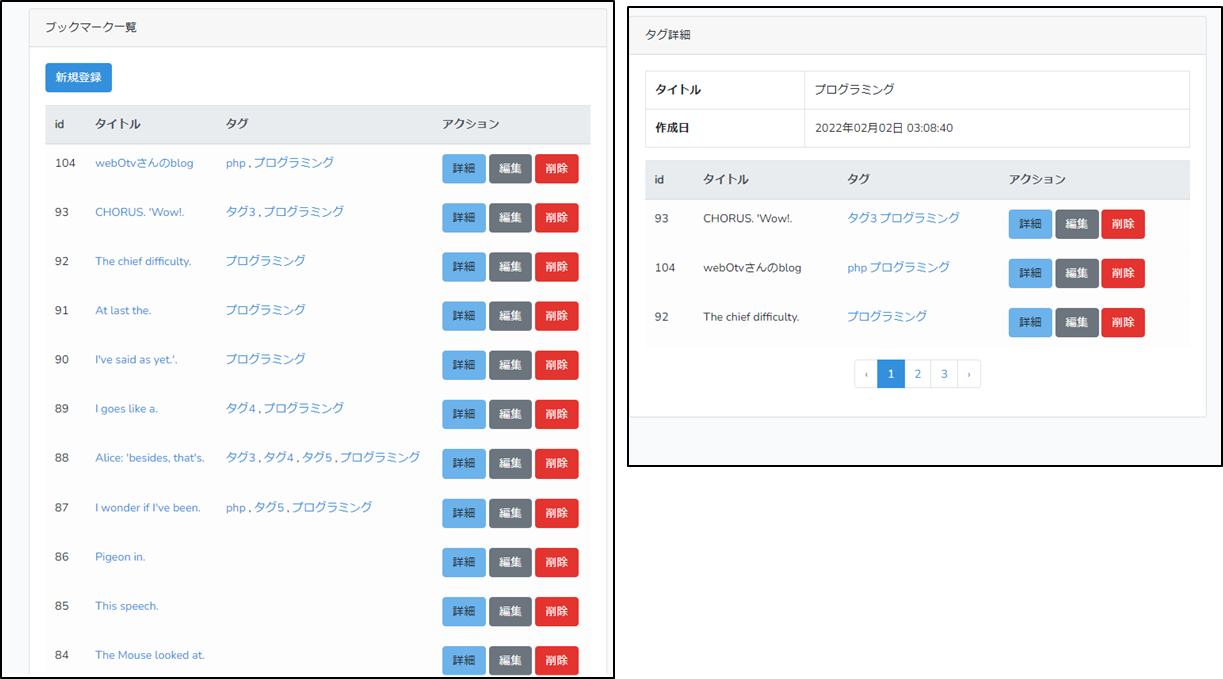
リレーション先でN+1問題が生じています。tagsクエリが繰り返し発行されている。
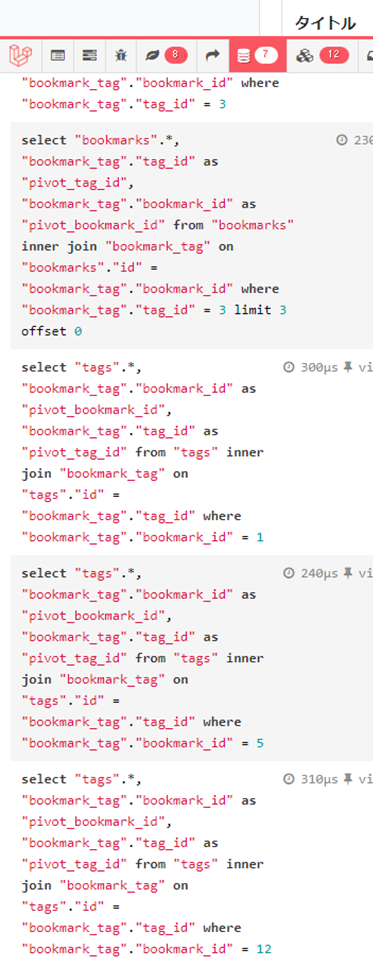
コントローラー
        $bookmark = $tags->bookmark->paginate(3);

conmponents.bookmarks.table.blade.php
        <td>

//此処でfrom tagクエリが繰り返し発行される。
        @foreach ($bookmark->tags as $tag)
            <a href="{{ route('tags.show', $tag) }}">{{ $tag->title }}</a>
            {{-- ループのlastでないならカンマさせる --}}
            @unless($loop->last)
                ,
            @endunless
        @endforeach
        </td>
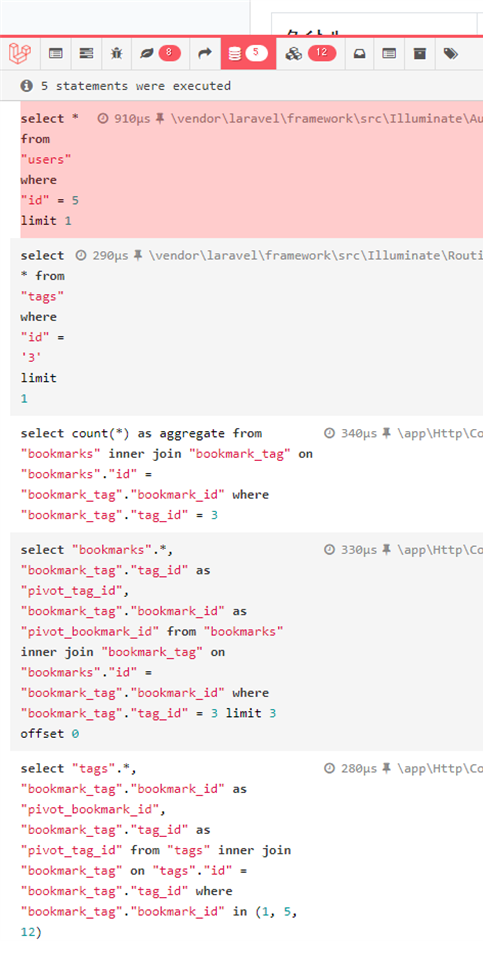
遅延ロードさせる。
    public function show(Tag $tag)
    {

//->with()を追加するだけ
        $bookmarks = $tag->bookmarks()->with('tags')->paginate(3);
        return view('tags.show',compact('tag','bookmarks'));
    }
結果 N+1問題が解決される。
発行されるクエリの数が激減しているのを確認してください。
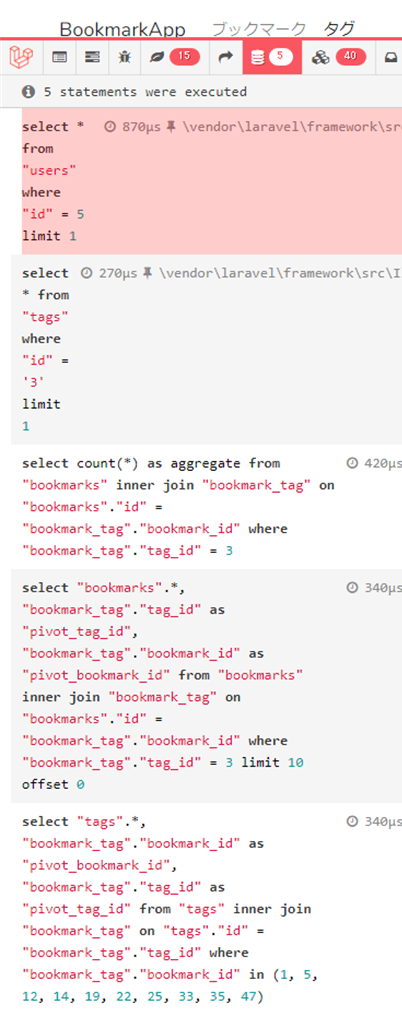
    public function show(Tag $tag)
    {

//->paginate(10)に変更してください
        $bookmarks = $tag->bookmarks()->with('tags')->paginate(10);
        return view('tags.show',compact('tag','bookmarks'));
    }
発行されるクエリの数が維持されているのと、tagsがまとめてselectされていればOKです。
第15回 Laravel Socialiteを使ってSNSアカウントでログインできるようにしよう
laravel socialiteをインストール
composer require laravel/socialite
gitHubアカウントを使用してログインする。
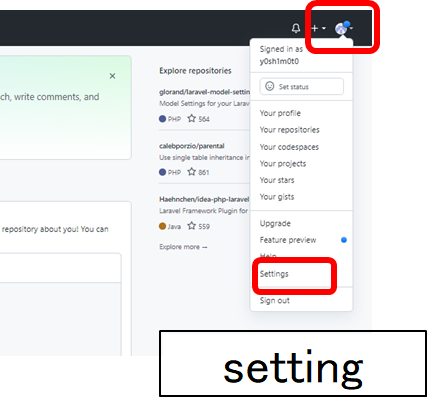
環境構築
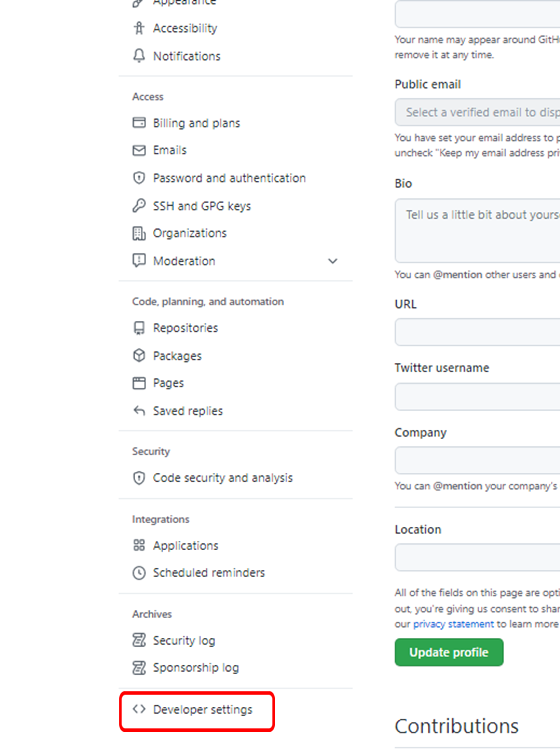
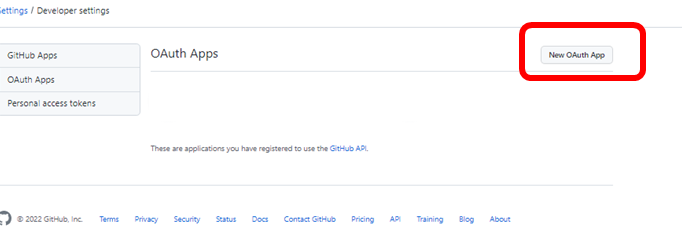
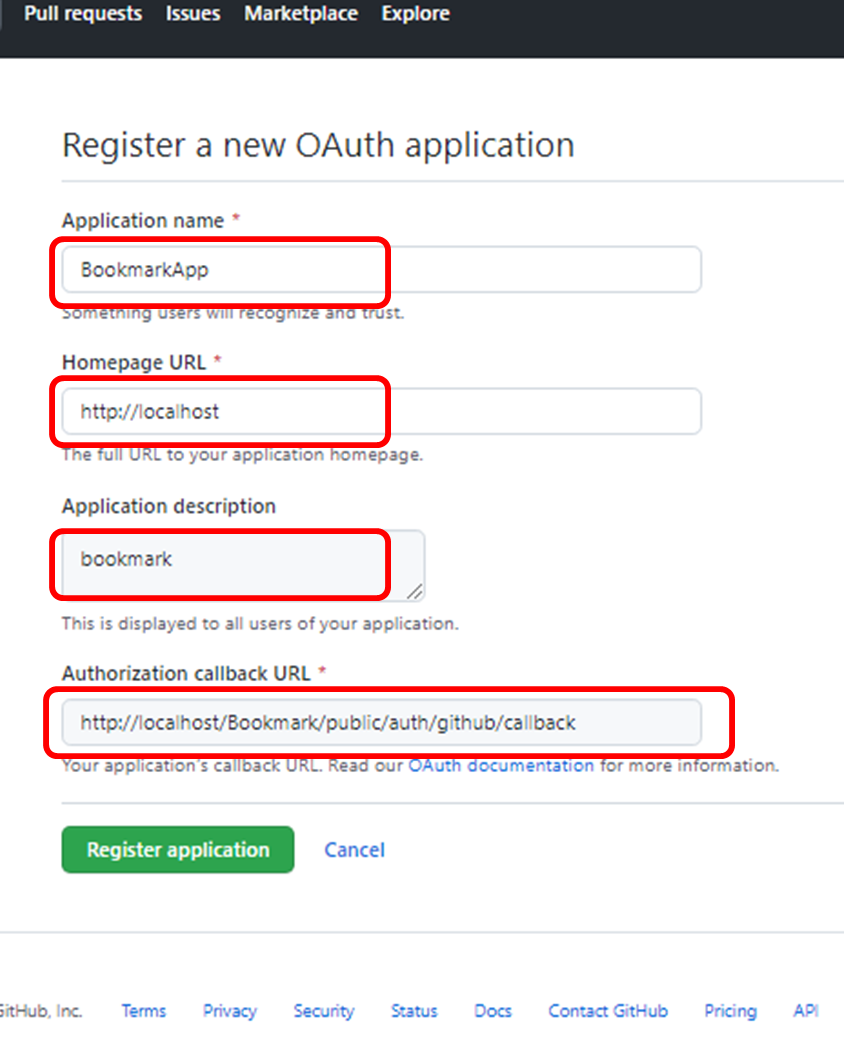
上から
BookmarkApp
http://localhost
bookmark
http://localhost/Bookmark/public/auth/github/callback(xammp)
http://localhost:8000/auth/github/callback(php artisan serve時)
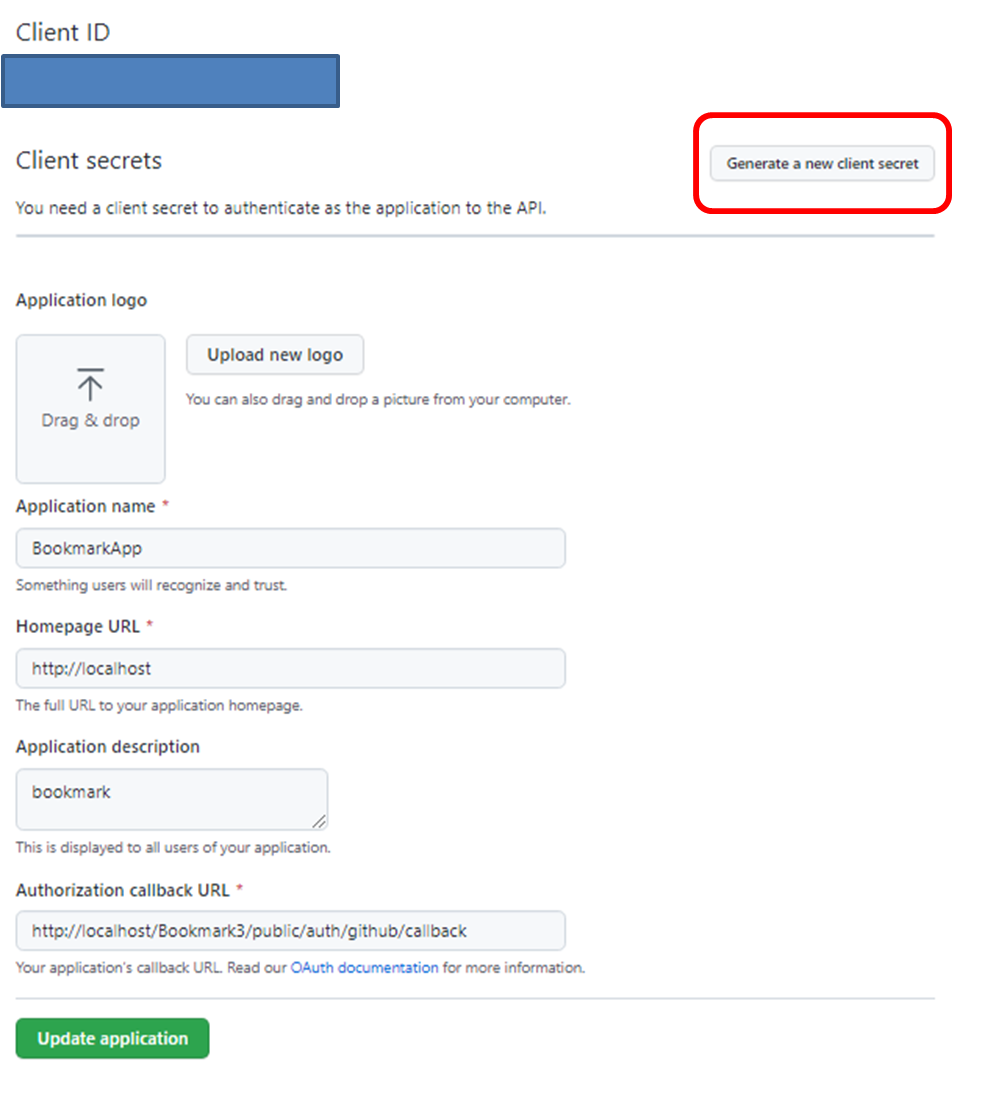
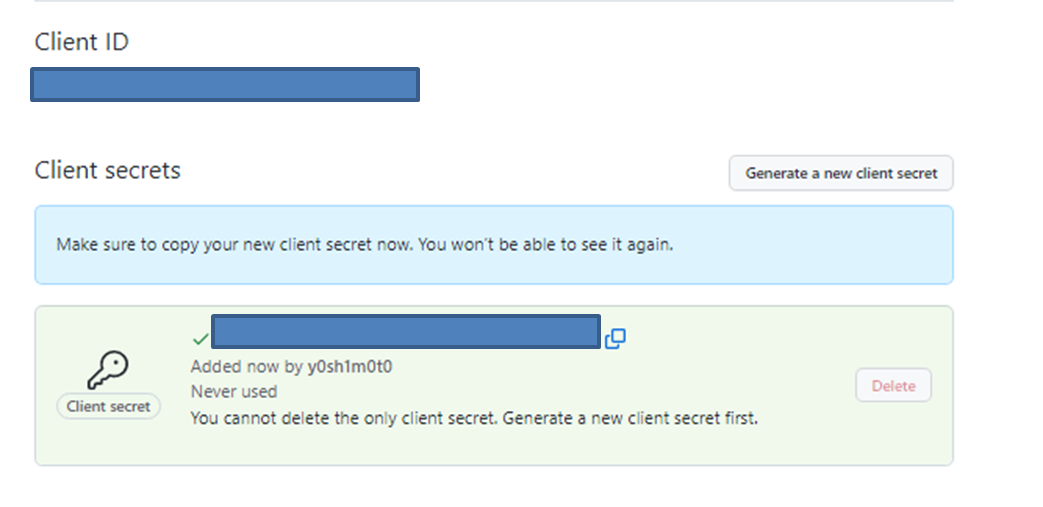
return [
    'mailgun' => [
        'domain' => env('MAILGUN_DOMAIN'),
        'secret' => env('MAILGUN_SECRET'),
        'endpoint' => env('MAILGUN_ENDPOINT', 'api.mailgun.net'),
    ],

    'postmark' => [
        'token' => env('POSTMARK_TOKEN'),
    ],

    'ses' => [
        'key' => env('AWS_ACCESS_KEY_ID'),
        'secret' => env('AWS_SECRET_ACCESS_KEY'),
        'region' => env('AWS_DEFAULT_REGION', 'us-east-1'),
    ],
//+
    'github' => [
        'client_id' => env('GITHUB_CLIENT_ID'),
        'client_secret' => env('GITHUB_CLIENT_SECRET'),
        'redirect' => env('GITHUB_CALLBACK_URL'),
    ],
]
GITHUB_CLIENT_ID=fafadfadfja;dfkaffaw
GITHUB_CLIENT_SECRET=fadfap:fawkeflasdl;ffa
GITHUB_CALLBACK_URL=http://localhost/Bookmark/public/auth/github/callback
ログインコントローラーを設定する
まずはユーザー情報を取得してみる。
//+
use Laravel\Socialite\Facades\Socialite;

//この引数$proveiderはルートの{proveider}のこと
//
public function redirectToProvider($provider){

    //登録してあるsocialiteのログインサイトに自動でアクセスしてくれる。
    return Socialite::driver($provider)->redirect();

}

public function handleProviderCallback($provider)
{

//socialiteがこのルートに直接user情報を送信してくるので、
//そのuser情報はこの関数で取得できる。
       $user = Socialite::driver($provider)->user();
       dd($user);
}
ルートを用意する
//+
use App\Http\Controllers\Auth\LoginController;

Route::get('/auth/{provider}/redirect', [LoginController::class, 'redirectToProvider'])->name('social_login');

//ridirectに登録したURIを作成する。ここにアカウントのuser情報が返ってくる。{provider}は
//変数にして汎用性を高めてある。
Route::get('/auth/{provider}/callback', [LoginController::class, 'handleProviderCallback']);
githubログインbtnを用意する
                            <div class="col-md-8 offset-md-4">
                                <button type="submit" class="btn btn-primary">
                                    {{ __('Login') }}
                                </button>

                                @if (Route::has('password.request'))
                                    <a class="btn btn-link" href="{{ route('password.request') }}">
                                        {{ __('Forgot Your Password?') }}
                                    </a>
                                @endif
  {{-- //+パスワードリセットボタンの@endifの下に追記 --}}
                    <hr>
                    <p>SNSアカウントでログイン</p>
  {{-- //+ --}}
                    <a class="btn btn-secondary" href="{{ route('social_login','github') }}">
                        Github
                    </a>
                           </div>
githubのログイン画面をクリック
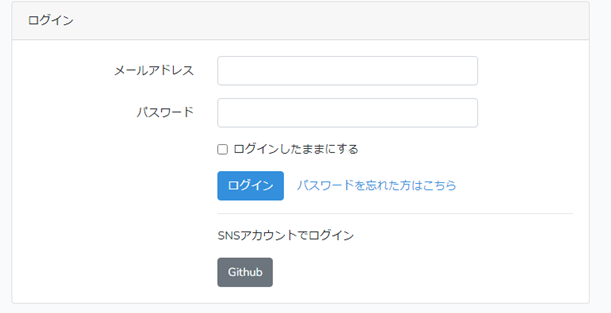
githubのログインサイトにアクセスして緑のbtnをクリックしてuser情報が取得できていればOKです。
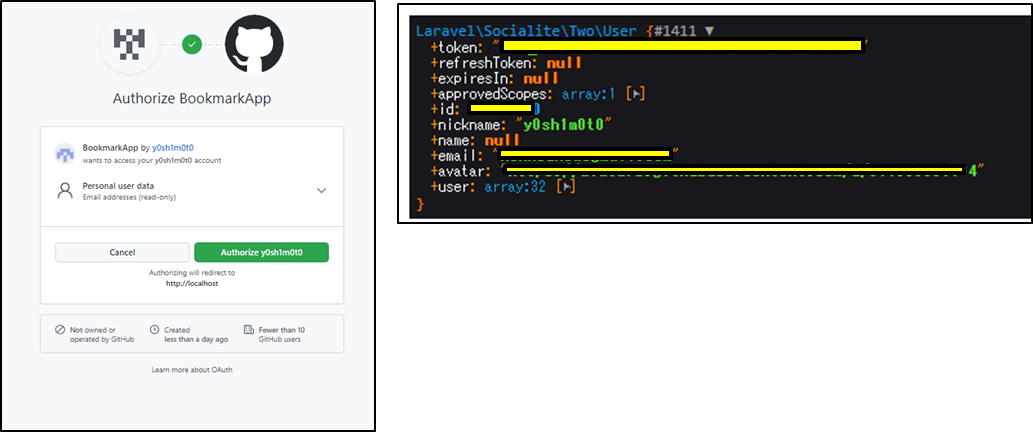
user情報を用いてユーザー登録とログインを完了させる
usersテーブルを修正する
passwordやemailをnull_ableに設定する必要があります。
返ってきた情報はprovider_idとprovider_nameとsocialite_emailに追加します。
    public function up()
    {
        Schema::create('users', function (Blueprint $table) {
            $table->id();
            $table->string('name');
            $table->string('email')->unique()->nullable();

            $table->string('provider_name')->nullable();
            $table->string('provider_id')->nullable();
            $table->string('provider_email')->nullable();


            $table->timestamp('email_verified_at')->nullable();
            $table->string('password')->nullable();

            $table->rememberToken();
            $table->timestamps();
        });
    }
ホワイトリストを登録する
    protected $fillable = [
        'name',
        'email',
        'password',
 //+
        'provider_id',
        'provider_name',
        'provider_email',
    ];
php artisan migrate:fresh
新しくダミーデータを作成する
        \App\Models\Tag::factory(10)->create();

        \App\Models\Bookmark::factory(100)->create()->each(function (\App\Models\Bookmark $bookmark) {
            $array = range(1, 10);
            shuffle($array);
            $tag_ids = array_slice($array, 0, rand(0, 4));
            $bookmark->tags()->sync($tag_ids);
        });
php artisan db:seed
//+
use App\Models\User;
//+
use Illuminate\Support\Facades\Auth;

    public function handleProviderCallback($provider)
    {
            try {
                //socialiteがこのルートに直接user情報を送信してくるので、
                //そのuser情報はこの関数で取得できる。
                // $user = Socialite::driver($provider)->user();
                // dd($user);
        //+
                $socialiteUser = Socialite::driver($provider)->user();

            } catch (\Throwable $th) {
                dd($th);
                return  redirect()->route('login');
            }
        //+今回久保さんのコードを採用しましたが、採用したコードはセキュリティー的にどうかと思った。
        //前回gitHubで登録したユーザーが今回gogoleで登録した時、同じメールを使用していた場合、
        //当然ながら前回のgithubでのユーザーとして認証される。
        //つまり、googleのアカウントが乗っ取られた場合、そのほかのgithubで認証したサイトの情報も乗っ取られてしまう可能性がある。
        //oath認証って滅茶苦茶怖いですね。
            // $user = User::where([
            //     'provider_name'=> $provider,
            //     'provider_id'=> $socialiteUser->getId(),
            // ])->first();

        //+ 返されたuser情報でusersテーブルに照会する
            $user = User::where(function ($query) use ($socialiteUser, $provider) {
                $query->where('provider_name', $provider)
                    ->where('provider_id', $socialiteUser->id);
            })
                ->orWhere('provider_email', $socialiteUser->email)
                ->first();

            //+ user情報がなかったらcreateする。
            if(!$user){
               $user = User::create([
                    'name'=> $socialiteUser->getNickname()??$socialiteUser->getName(),
                    'provider_id'=> $socialiteUser->getId(),
                    'provider_name'=> $provider,
                    'provider_email'=> $socialiteUser->getEmail(),
                ]);
            }
            //ログインする。
            Auth::login($user, true);
            return redirect()->route('bookmarks.index');
        }
loginができているのを確認してください。
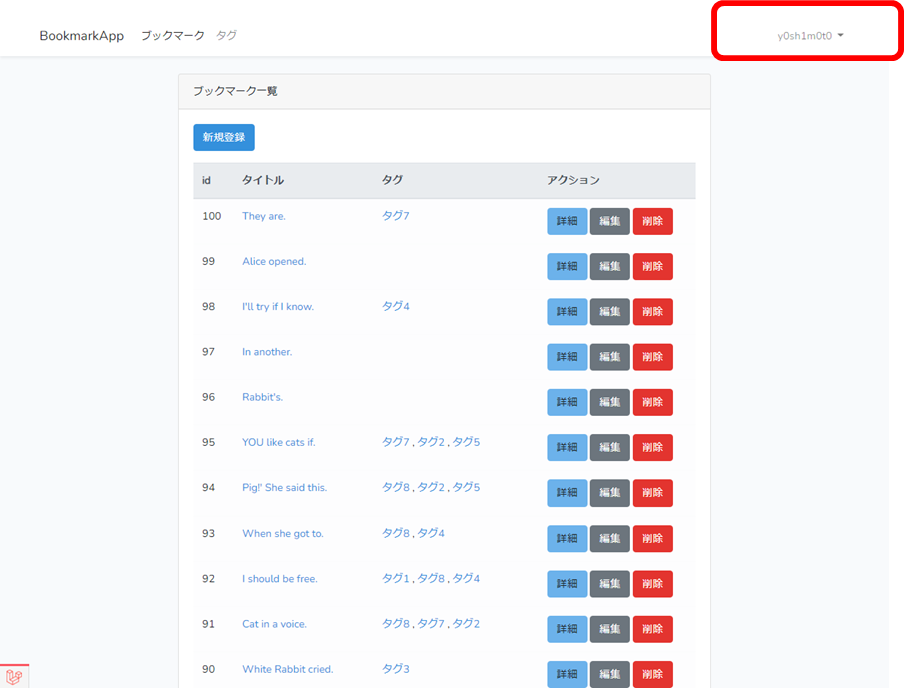
usersテーブルにデータが作成されていればOKです。

以上完了です。
googleでログインしてみる.
リファレンスサイト(ここに全部書いてくれています)
環境構築
手順
- https://console.cloud.google.com/?hl=ja
- GOOGLE_CLIENT_ID=取得
- GOOGLE_CLIENT_SECRET=取得
- GOOGLE_CALLBACK_URL=http://localhost/Bookmark/public/auth/google/callback
- その他にも、OATH認証の登録が最初に1回必要だったと思いますが、2度目からは要求されませんでした。
1のサイトで,2,3を取得し4を登録すれば環境構築は完了
手順
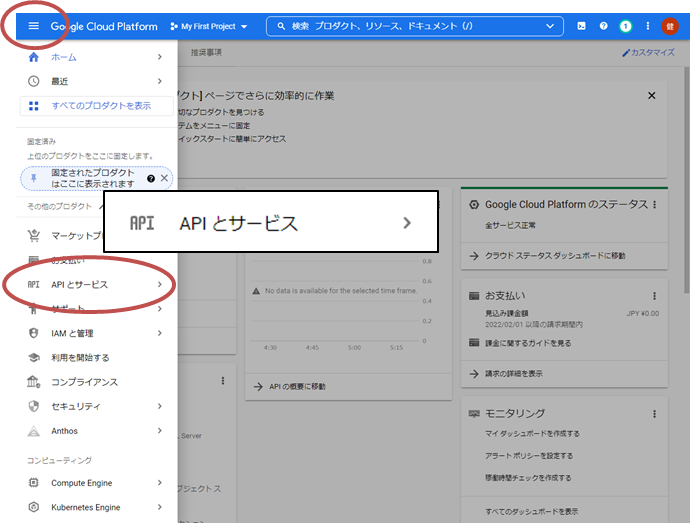
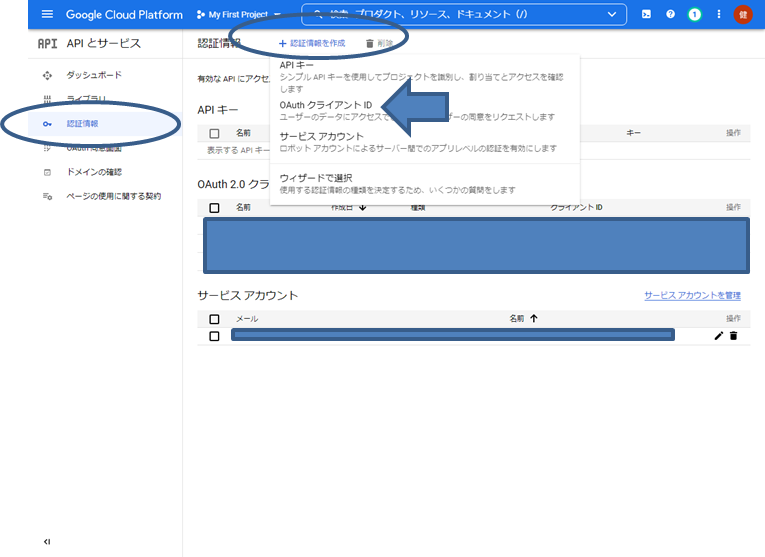
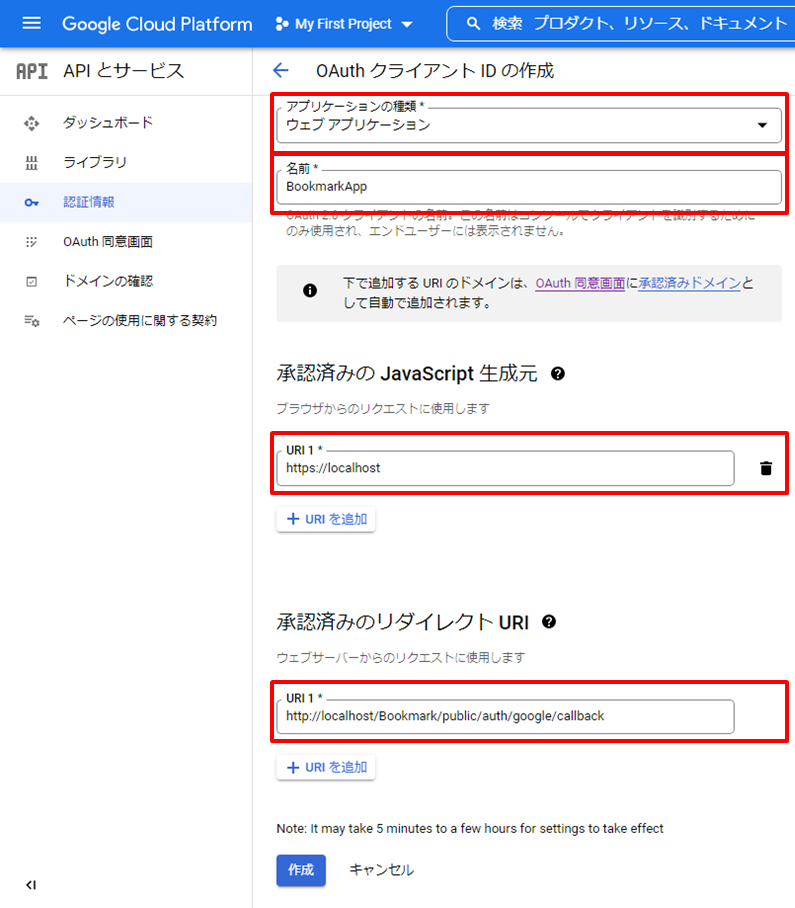
4の承認済みリダイレクトURLはコールバックURLの意味です。web.phpのルートで作成したルートを登録します。
名前:BookmarkApp
承認済みJavaScript生成元に:http://localhost
承認済みリダイレクトURL:http://localhost/Bookmark/public/auth/google/callback
クライアントIDとシークレットIDをここでメモっておいて下さい。
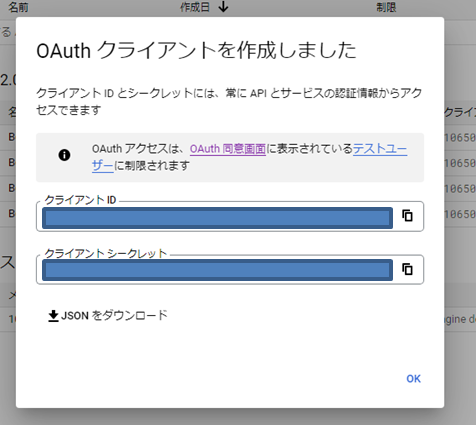
以上で、環境構築は終了です。
手順1
GOOGLE_CLIENT_ID=106fadfadfad47181-dpfadklfjaogo4hm2krvb.apps.googleusercontent.com
GOOGLE_CLIENT_SECRET=fasdfafX-fadfafPb_3mfadfdc-B-OYI5Is
GOOGLE_CALLBACK_URL=http://localhost/Bookmark/public/auth/google/callback
手順2
    'github' => [
        'client_id' => env('GITHUB_CLIENT_ID'),
        'client_secret' => env('GITHUB_CLIENT_SECRET'),
        'redirect' => env('GITHUB_CALLBACK_URL'),
    ],

// 追記する
    'google' => [
        'client_id' => env('GOOGLE_CLIENT_ID'),
        'client_secret' => env('GOOGLE_CLIENT_SECRET'),
        'redirect' => env('GOOGLE_CALLBACK_URL'),
    ],
手順3
ルートとコントローラーは既に作成済みなので、OK
手順4
リンクの作成
                    <p>SNSアカウントでログイン</p>
                    <a class="btn btn-secondary" href="{{ route('social_login','github') }}">
                        Github
                    </a>
  {{-- //+ --}}
                    <a class="btn btn-danger" href="{{ route('social_login','google') }}">
                        google
                    </a>
                            </div>
                        </div>
                    </form>
googleアカウントでログインしてみる。

usersテーブルにデータが入力されていたらOKです。

githubのメールがgoogleアカウントと同じ場合、googoleアカウントでloginしても、
githubで登録したuser情報でログインできるようにしています。
新しく登録したい場合はuserの取得方法を変更してください。
//+
            $user = User::where([
                'provider_name'=> $provider,
                'provider_id'=> $socialiteUser->getId(),
            ])->first();

        //+ 返されたuser情報でusersテーブルに照会する
            // $user = User::where(function ($query) use ($socialiteUser, $provider) {
            //     $query->where('provider_name', $provider)
            //         ->where('provider_id', $socialiteUser->id);
            // })
            //     ->orWhere('provider_email', $socialiteUser->email)
            //     ->first();
yahooアカウントで登録してみる
リファレンスサイト
↓のサイトのコードを丸々使用しました。
環境構築の手順は先ほどのgithub,googleと同じです。
コールバックURLの登録に癖があります。
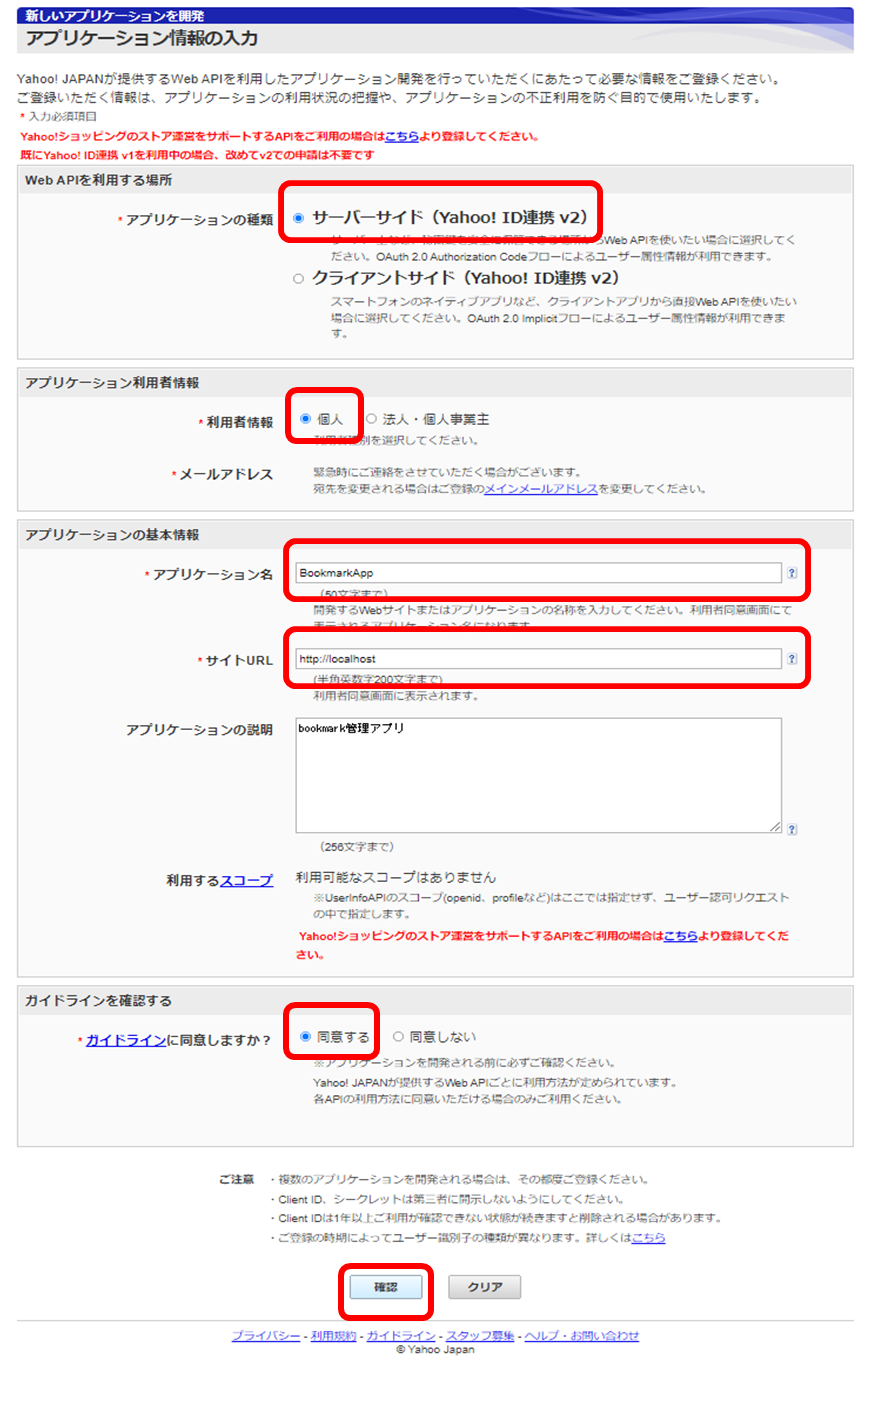

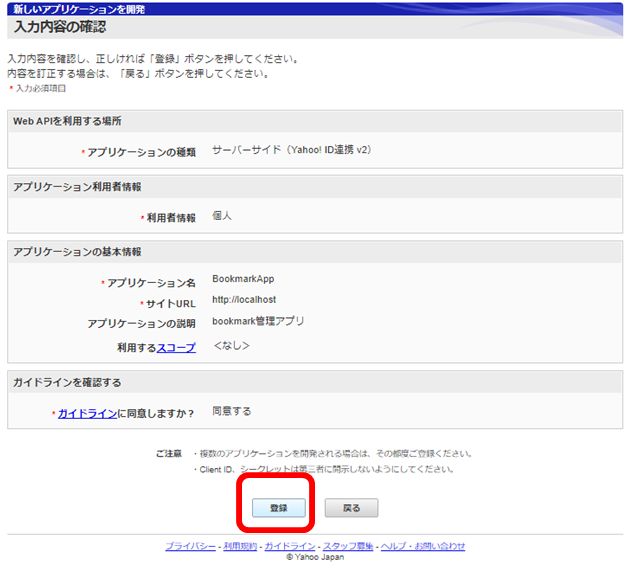
ここでクライアントIDとシークレットIDを取得
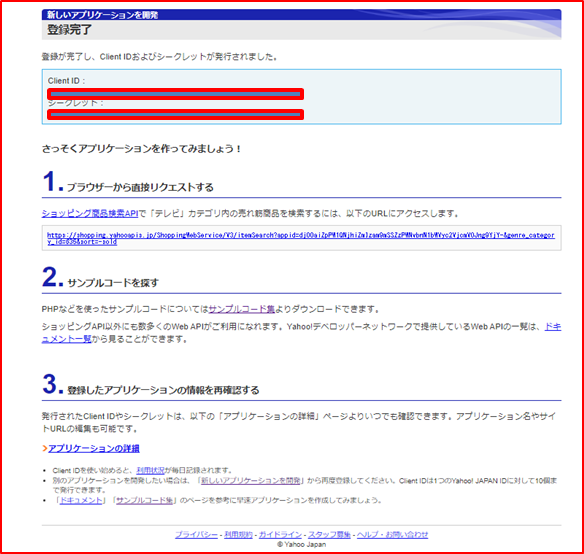
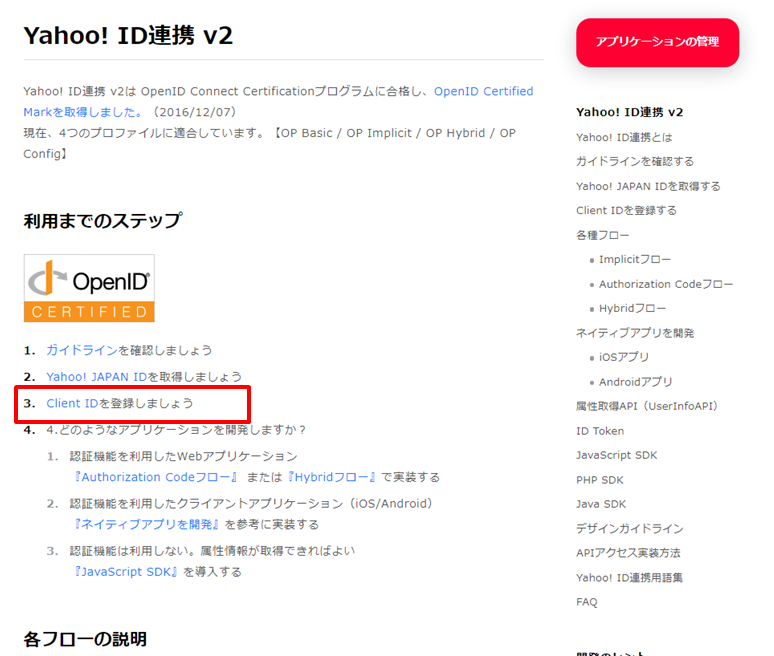
上の画像の3のアプリケーションの詳細リンクをクリックしてコールバックURLを登録
http://localhost/Bookmark/public/auth/yahoojp/callback
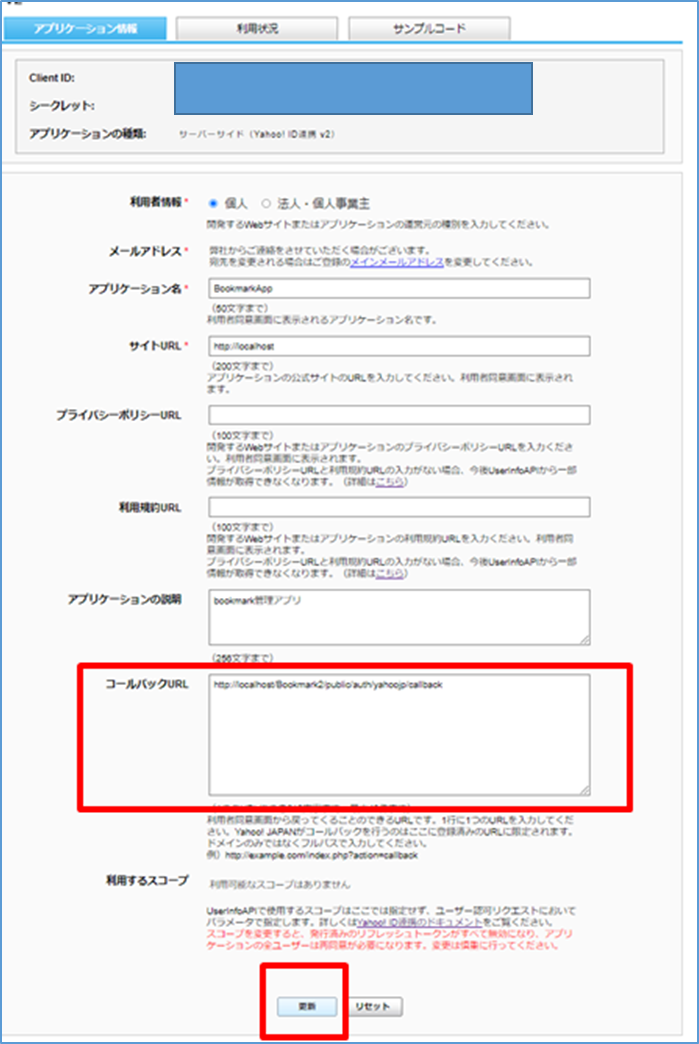
環境構築は終了です。
YahooJp_ID=fdkalfjaodfija;dlfafadfamVfadsklfjafadf-
YahooJp_SECRET=fadklsfjadlfja;ldfkjafdafiweofjaf
YahooJp_CALLBACKURL=http://localhost/Bookmark/public/auth/yahoojp/callback
    'github' => [
        'client_id' => env('GITHUB_CLIENT_ID'),
        'client_secret' => env('GITHUB_CLIENT_SECRET'),
 //githubのredirectに登録したURL
        'redirect' => env('GITHUB_CALLBACK_URL'),
    ],


    'google' => [
        'client_id' => env('GOOGLE_CLIENT_ID'),
        'client_secret' => env('GOOGLE_CLIENT_SECRET'),
        'redirect' => env('GOOGLE_CALLBACK_URL'),
    ],
// 追記する
    'yahoojp' => [
        'client_id'     => env('YahooJp_ID'),
        'client_secret' => env('YahooJp_SECRET'),
        'redirect'      => env('YahooJp_CALLBACKURL'),
    ],
リンクを作成する
                    <p>SNSアカウントでログイン</p>
                    <a class="btn btn-secondary" href="{{ route('social_login','github') }}">
                        Github
                    </a>
                    <a class="btn btn-danger" href="{{ route('social_login','google') }}">
                        google
                    </a>
  {{-- //+ --}}
                    <a class="btn btn-danger" href="{{ route('social_login','yahoojp') }}">
                        yahoo
                    </a>
                            </div>
                        </div>
                    </form>
ルートとコントローラーは既に作成済みです。
本来なら、これでOKなのですが、Laravel SocialiteはyahooJpには対応していませんので、
Laravel Socialiteを拡張する必要があります。
手順1
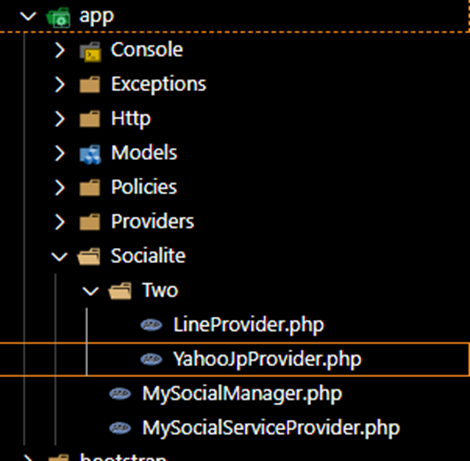
- appディレクトリの下にapp\Socialiteディレクトリを作成
- その下に、2つのファイルと1つのディレクトリを作成してください
- app\Socialite\MySocialManager.php
- app\Socialite\MySocialServiceProvider.php
- Twoディレクトリを作成その下に
1.app\Socialite\YahooJpProvider.php
<?php

namespace App\Socialite;

use Laravel\Socialite\SocialiteServiceProvider;
use Laravel\Socialite\Contracts\Factory;


class MySocialServiceProvider extends SocialiteServiceProvider
{
    public function register()
    {
        //シングルトンとしてMySocialManagerを生成
        $this->app->singleton(Factory::class, function ($app) {
            return new MySocialManager($app);
        });
    }
}
<?php

    namespace App\Socialite;

    use Laravel\Socialite\SocialiteManager;

    class MySocialManager extends SocialiteManager{

//+
        protected function createYahooJpDriver()
        {
            //services.phpの設定情報を読む
            $config = $this->config['services.yahoojp'];
            //設定情報と共にプロバイダを生成
            return $this->buildProvider(
                'App\Socialite\Two\YahooJpProvider',$config
            );
        }
<?php

namespace App\Socialite\Two;

use Laravel\Socialite\Two\AbstractProvider;
use Laravel\Socialite\Two\ProviderInterface;
use Laravel\Socialite\Two\User;

class YahooJpProvider extends AbstractProvider implements ProviderInterface
{

    //scopeの区切り文字設定
    protected $scopeSeparator = ' ';

    //スコープ設定
    protected $scopes = [
        'openid',
        'profile',
        'email',
    ];

    //認証用URL($stateはオプション)
    protected function getAuthUrl($state)
    {
        return $this->buildAuthUrlFromBase('https://auth.login.yahoo.co.jp/yconnect/v2/authorization', $state);
    }

    //token取得用URL
    protected function getTokenUrl()
    {
        return 'https://auth.login.yahoo.co.jp/yconnect/v2/token';
    }

    //Token取得の際のオプション
    //Basic認証と必要なPOSTパラメータを送付
    public function getAccessToken($code)
    {
        $basic_auth_key = base64_encode($this->clientId.":".$this->clientSecret);

        $response = $this->getHttpClient()->post($this->getTokenUrl(), [
            //認証
            'headers' => [
                'Authorization' => 'Basic '.$basic_auth_key,
            ],
            // 'form_params' => $this->getTokenFields($code),
            // 直接記述
            'form_params' => [
                'grant_type' => 'authorization_code',
                'code' => $code,
                'redirect_uri' => $this->redirectUrl
            ],
        ]);

        return $this->parseAccessToken($response->getBody());
    }

    //ユーザー情報取得
    protected function getUserByToken($token)
    {
        //url + schema=openidが必要だった
        $response = $this->getHttpClient()->get('https://userinfo.yahooapis.jp/yconnect/v2/attribute?schema=openid', [
            'headers' => [
                // 'Authorization' => 'Bearer '.$token['access_token'],
                'Authorization' => 'Bearer '.$token,
            ],
        ]);
        return json_decode($response->getBody(), true);
    }

    //Userにパラメーターをマップ(必要に応じてその他のパラメータ追加)
    protected function mapUserToObject(array $user)
    {
        return (new User())->setRaw($user)->map([
            'id' => $user['sub'],
            'name' => $user['name']??$user['nickname'],
            'email' => $user['email'],

        ]);
    }

    //token parse用の関数
    protected function parseAccessToken($body)
    {
        return json_decode($body, true);
    }
}
作成したproviderの登録
    'providers' => [

        /*
         * Laravel Framework Service Providers...
         */
        Illuminate\Auth\AuthServiceProvider::class,
        Illuminate\Broadcasting\BroadcastServiceProvider::class,
        Illuminate\Bus\BusServiceProvider::class,
        /*
         * Package Service Providers...
         */

        /*
         * Application Service Providers...
         */
        App\Providers\AppServiceProvider::class,
        App\Providers\AuthServiceProvider::class,
        // App\Providers\BroadcastServiceProvider::class,
        App\Providers\EventServiceProvider::class,
        App\Providers\RouteServiceProvider::class,
//+
        App\Socialite\MySocialServiceProvider::class,
    ],
composer update
composer updateしてもコードのエラー表記が消えない場合で、気になる場合は、
vscodeを再起動してください。
lineアカウントでログイン
リファレンスサイト
滅茶苦茶勉強になったサイト
正直laravel Socialiteを使用するとOath認証の仕組みを理解することは困難だと思います。
laravel Socialiteを使用せずにsocialite loginの解説をしてくれています。
↓こっちをメインに↑を参考にすると凄くいい。↓は↑を参考にしている。因みに私は、上下共に頻繁に見てます。
今回は、laravel Socialiteを使用して実装します。
環境構築
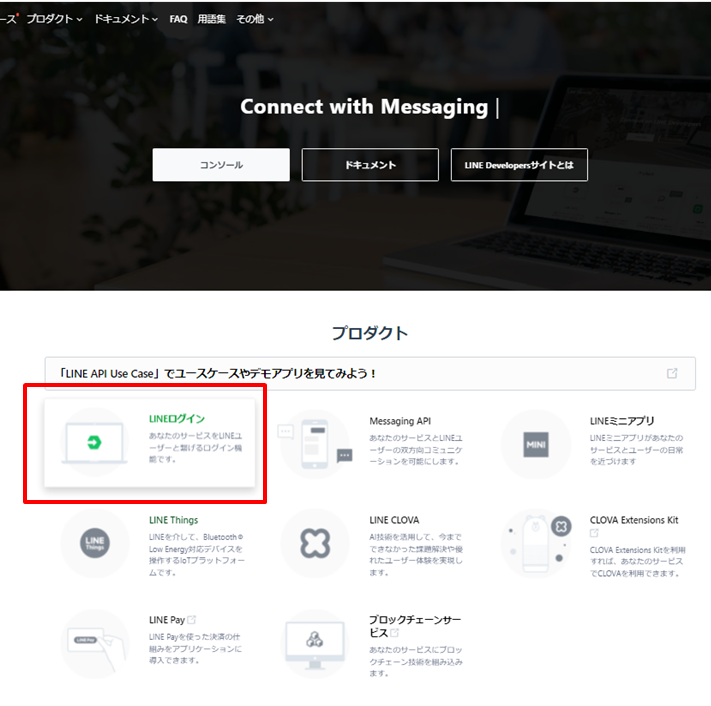
https://developers.line.biz/ja/
lineログインをクリック
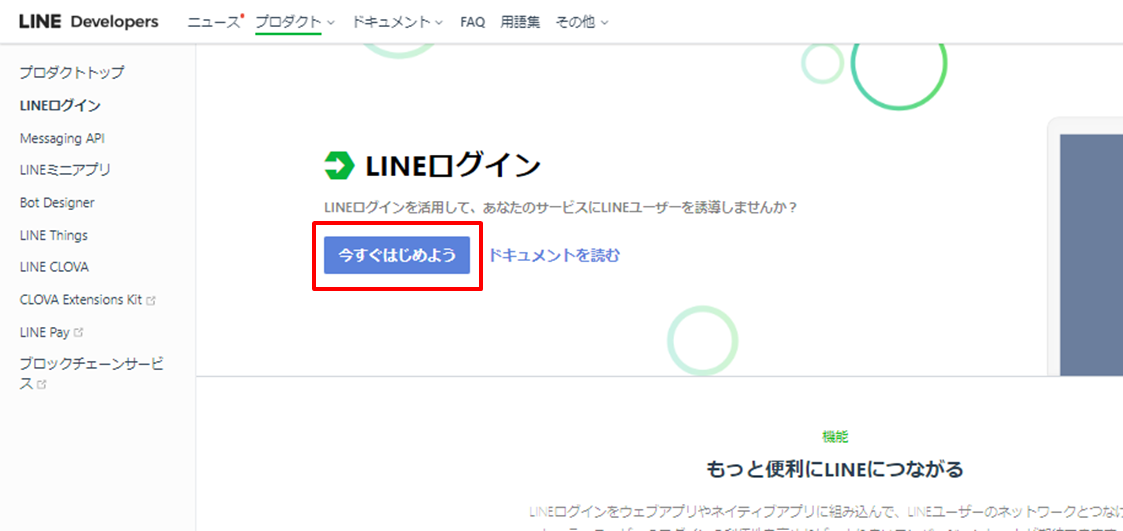
今すぐはじめようをクリック
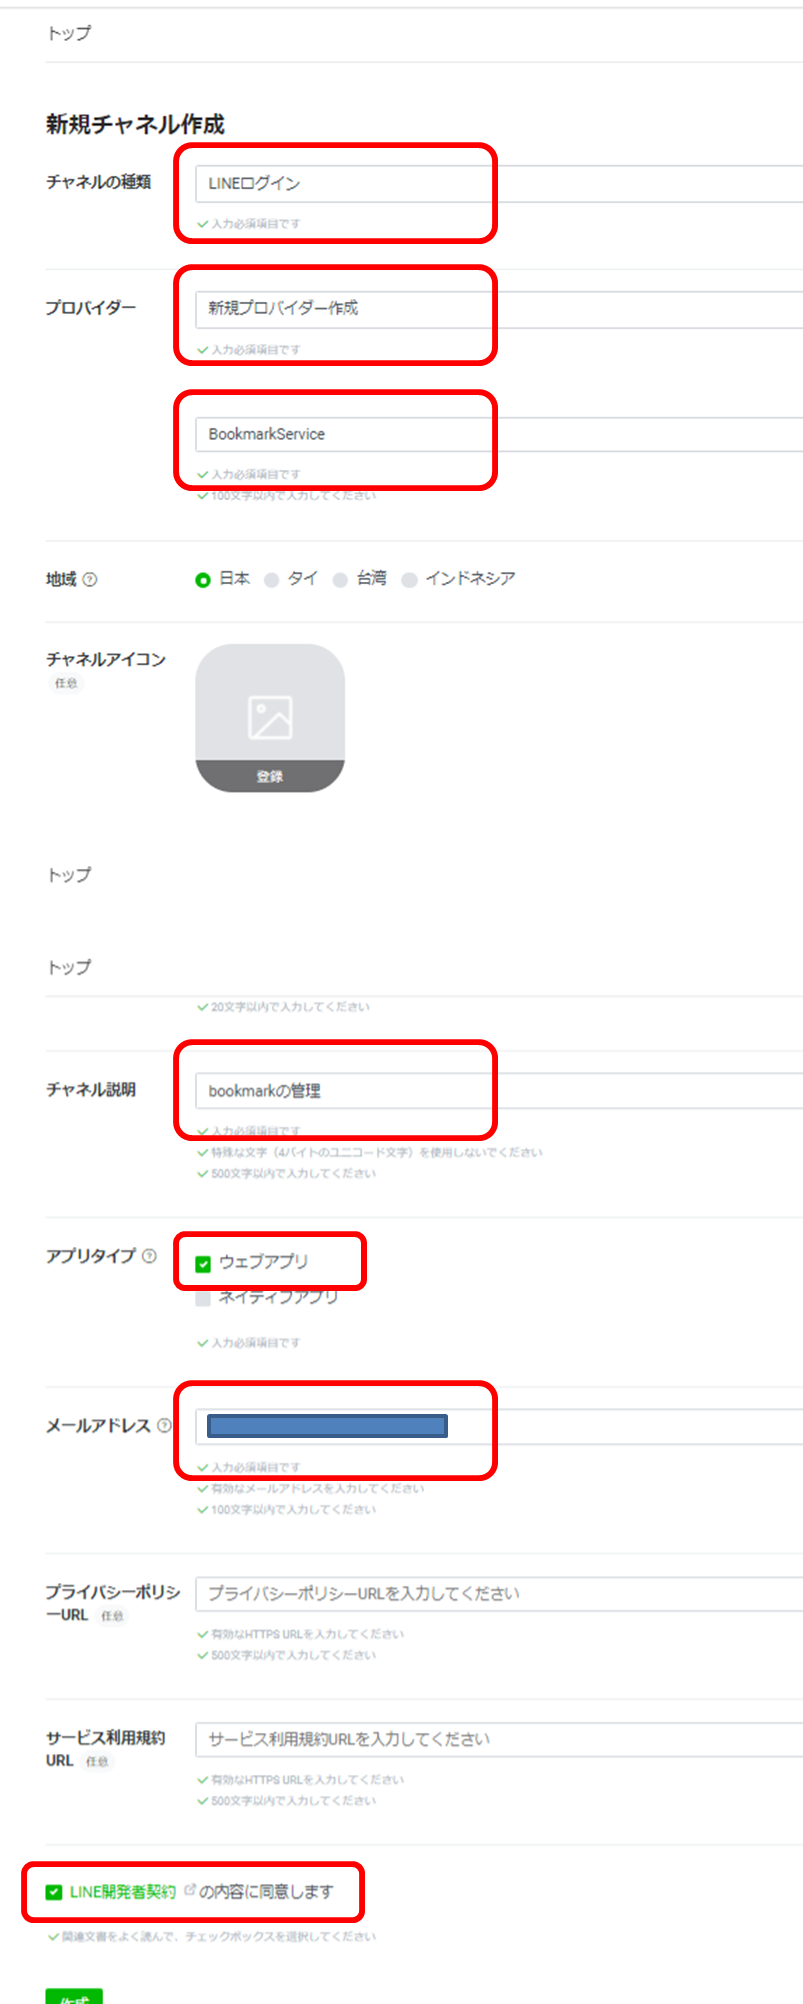
各種入力
チャンネルIDとチャンネルシークレットがクライアントIDとシークレットIDになります。
上の方の非公開タグを公開タグに忘れずに設定してください。

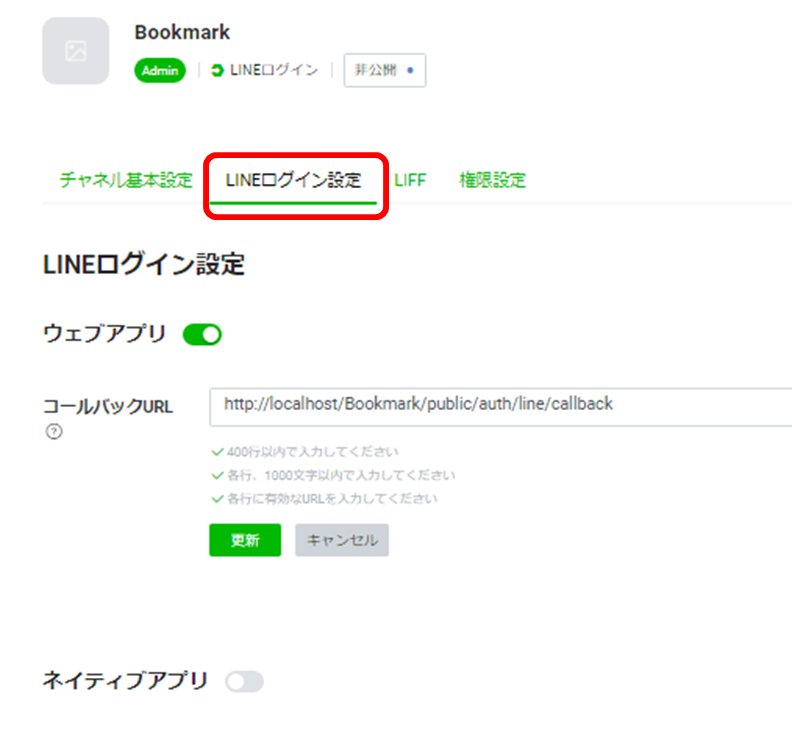
コールバックURLの登録
http://localhost/Bookmark/public/auth/line/callback
メールアドレス取得の設定です。この設定をしていないとメールアドレスは取得できません。
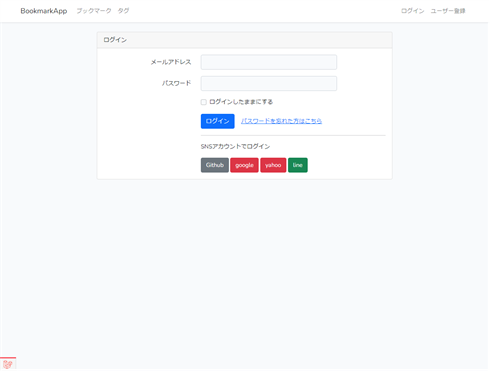
スクリーンショットはログイン画面をスクショして保存しました
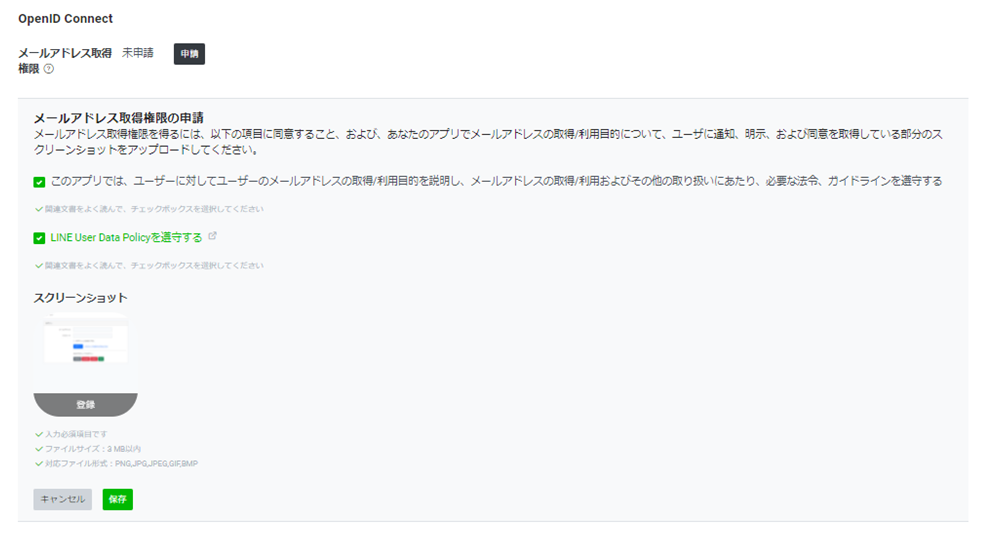
申請済みになれば、完了です。
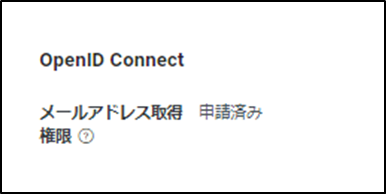
環境構築は終了です。
大まかな手順はyahooJpと同じですが、emailの取得方法が独特です。
下記のサイトでくわしく書いてくれいます。画像は下記のサイトのスクショです。
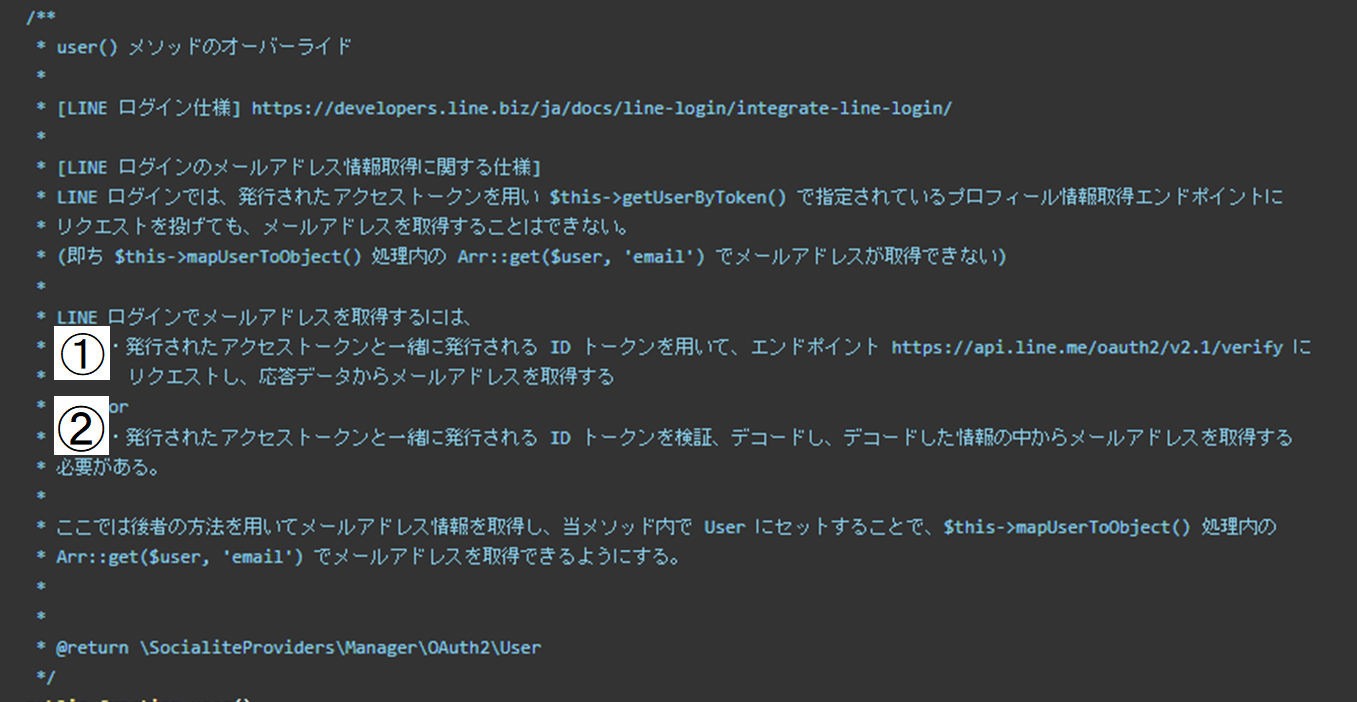
上記サイトでは2の方法をで記載してくれていますので、1の方法で記載します。
1の方法がスタンダードだと思います。
LINE_CLIENT_ID=fdafjadlsffadf
LINE_CLIENT_SECRET=dfasdfadkl;fjaoifjaafda
LINE_REDIRECT=http://localhost/Bookmark/public/auth/line/callback
    'github' => [
        'client_id' => env('GITHUB_CLIENT_ID'),
        'client_secret' => env('GITHUB_CLIENT_SECRET'),
        'redirect' => env('GITHUB_CALLBACK_URL'),
    ],


    'google' => [
        'client_id' => env('GOOGLE_CLIENT_ID'),
        'client_secret' => env('GOOGLE_CLIENT_SECRET'),
        'redirect' => env('GOOGLE_CALLBACK_URL'),
    ],

    'yahoojp' => [
        'client_id'     => env('YahooJp_ID'),
        'client_secret' => env('YahooJp_SECRET'),
        'redirect'      => env('YahooJp_CALLBACKURL'),
    ],

// 追記する
    'line'   => [
        'client_id'     => env('LINE_CLIENT_ID'),
        'client_secret' => env('LINE_CLIENT_SECRET'),
        'redirect'      => env('LINE_REDIRECT'),
    ],
ルートとコントローラーは既に作成済み。
                    <p>SNSアカウントでログイン</p>
                    <a class="btn btn-secondary" href="{{ route('social_login','github') }}">
                        Github
                    </a>
                    <a class="btn btn-danger" href="{{ route('social_login','google') }}">
                        google
                    </a>
                    <a class="btn btn-danger" href="{{ route('social_login','yahoojp') }}">
                        yahoo
                    </a>
  {{-- //+ --}}
                    <a class="btn btn-success" href="{{ route('social_login','line') }}">
                        line
                    </a>
                            </div>
                        </div>
                    </form>
<?php

    namespace App\Socialite;

    use Laravel\Socialite\SocialiteManager;

    class MySocialManager extends SocialiteManager{

        protected function createYahooJpDriver()
        {
            //services.phpの設定情報を読む
            $config = $this->config['services.yahoojp'];
            //設定情報と共にプロバイダを生成
            return $this->buildProvider(
                'App\Socialite\Two\YahooJpProvider',$config
            );
        }

//+
        protected function createLineDriver()
        {
            $config = $this->config['services.line'];

            return $this->buildProvider('App\Socialite\Two\LineProvider', $config);
        }
    }
<?php
namespace App\Socialite\Two;

use Laravel\Socialite\Two\AbstractProvider;
use Laravel\Socialite\Two\ProviderInterface;
use Laravel\Socialite\Two\User;
use Laravel\Socialite\Facades\Socialite;
use Illuminate\Support\Arr;

class LineProvider extends AbstractProvider implements ProviderInterface
{
    // protected $parameters = [
    //     'nonce' => null
    // ];
    protected $scopeSeparator = ' ';

    protected $scopes = [
        'openid',
        'profile',
        'email',
    ];

    protected function getAuthUrl($state)
    {
        // 'nonce' パラメータ値の生成//正直これの使い方が不明だった。勉強になる。
        // $this->parameters['nonce'] = (string) uniqid('PREFIX', true);

        // 'nonce' パラメータ値をセッション変数に保存
        // session()->put(['nonce' => $this->parameters['nonce']]);

        return $this->buildAuthUrlFromBase('https://access.line.me/oauth2/v2.1/authorize', $state);
    }
    protected function getTokenUrl()
    {
        return 'https://api.line.me/oauth2/v2.1/token';
    }

    public function getAccessTokenResponse($code)
    {
        $response = $this->getHttpClient()->post($this->getTokenUrl(), [
            'headers' => [
                'Content-Type' => 'application/x-www-form-urlencoded',
            ],
            'form_params' => [
                'grant_type' => 'authorization_code',
                'code' => $code,
                'redirect_uri' => $this->redirectUrl,
                'client_id' => $this->clientId,
                'client_secret' => $this->clientSecret,
            ],
        ]);
        return json_decode($response->getBody(),true);
    }

    protected function getUserByToken($token)
    {
        $response = $this->getHttpClient()->get('https://api.line.me/v2/profile', [
            'headers' => [
                'Accept' => 'application/json',
                'Authorization' => 'Bearer '.$token,
            ],
        ]);

        return json_decode($response->getBody(), true);
    }

    public function user()
    {
        if ($this->user) {
            return $this->user;
        }

        if ($this->hasInvalidState()) {
            throw new InvalidStateException;
        }

        $response = $this->getAccessTokenResponse($this->getCode());

        $id_token = Arr::get($response, 'id_token');

        $json = $this->curl_line($id_token);

        $this->user = $this->mapUserToObject($this->getUserByToken(
            $token = Arr::get($response, 'access_token')
        ));

// 戻り値: User にセット (map() でメールアドレスをセット)
        return $this->user->setToken($token)
                    ->setRefreshToken(Arr::get($response, 'refresh_token'))
                    ->setExpiresIn(Arr::get($response, 'expires_in'))
                    ->map(['email' => $json->email]);
    }

    protected function mapUserToObject(array $user)
    {
        return (new User())->setRaw($user)->map([
            'id' => $user['userId'],
            'name' => $user['displayName'],
            // 'avatar_original' => $user['pictureUrl'],
        ]);
    }

    public function curl_line($id_token){
        $headers = [ 'Content-Type: application/x-www-form-urlencoded' ];
        $post_data = array(
       //シークレットキー
       'id_token' => $id_token,
       //POST されたトークンの値
       'client_id' => $this->clientId,
        );
        $url = 'https://api.line.me/oauth2/v2.1/verify';

        $curl = curl_init();
        curl_setopt($curl, CURLOPT_URL, $url);
        curl_setopt($curl, CURLOPT_CUSTOMREQUEST, 'POST');
        curl_setopt($curl, CURLOPT_SSL_VERIFYPEER, false);
        curl_setopt($curl, CURLOPT_RETURNTRANSFER, true);
        curl_setopt($curl, CURLOPT_HTTPHEADER, $headers);
        curl_setopt($curl, CURLOPT_POSTFIELDS, http_build_query($post_data));
        $res = curl_exec($curl);
        curl_close($curl);

        $json = json_decode($res);
        // dd($json);
        return $json;
    }
}
以上、終了です。
