はじめに
Raspberry Pi 4B+に64-bit Raspberry Pi OSをインストールしてみました。
気づいた点があればコメントをお願いします。
環境
- Raspberry Pi 4B+ 4GB
- SD Card 32GB
1.64-bit Raspberry Pi OSのイメージファイルをダウンロードする。
以下のサイトから64-bit Raspberry Pi OSのイメージファイルをダウンロードする。
-
https://downloads.raspberrypi.org/raspios_arm64/images
私の場合は、 -
https://downloads.raspberrypi.org/raspios_arm64/images/raspios_arm64-2021-05-28/2021-05-07-raspios-buster-arm64.zip
をダウンロードしました。
2.64-bit Raspberry Pi OSをRaspberry Pi Imagerを使ってSDカードに書き込む
まず、https://www.raspberrypi.org/software/ にアクセスしてRaspberry Pi Imagerをダウンロードして起動します。すると次の画面が表示されるので、"CHOOSE OS"をクリックします。

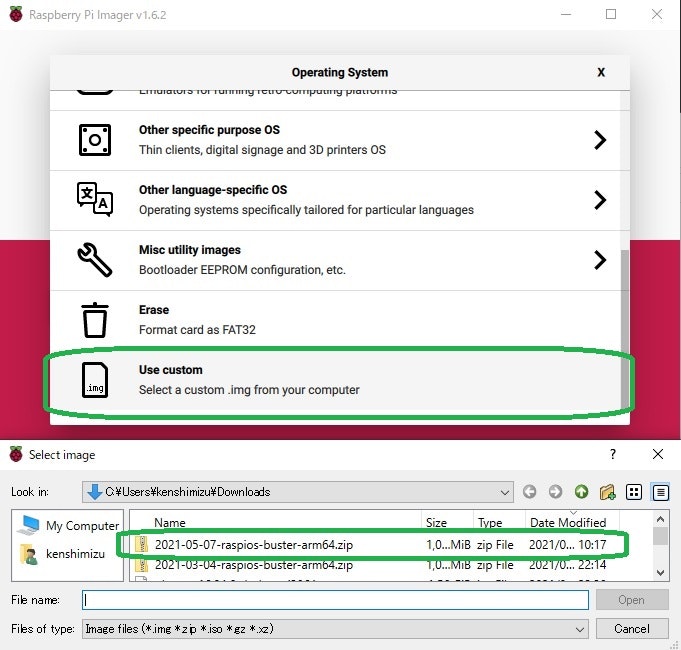
3.イメージファイルの選択
"CHOOSE OS"をクリックするとドロップダウンメニューが表示されるので、一番下の"Use custom"を選択ます。すると、ファイルエクスプローラーが起動されるので、そこから先ほどダウンロードした64-bit Raspberry Pi OSのイメージファイルを選択します。
4.書き込み先SDカードを指定する。
"Storage"ドロップダウンメニューから64-bit Raspberry Pi OSをインストールするSDカードを選択します。

5.64-bit OSのイメージファイルの書き込み
64-bit Raspberry Pi OSのイメージファイルをSDカードに書き込む準備ができたので"WRITE"ボタンをクリックします。

6.起動
64-bit Raspberry Pi OSのイメージファイルの書き込みが終了したら、書き込みが終了したSDカードをRaspberry Pi 4B+ に差し込んで電源を入れます。すると64-bit Raspberry Pi OSで起動されました。初期設定のためのウインドウが表示されるので、初期設定を終わらせたら簡単に確認作業をしてみましょう。

7.確認
確認作業は、"uname -a"コマンドを使ってカーネルのバージョンを確認して、"gcc -v"でコンパイラーも確認しておきましょう。

参考文献