本記事はPart1の続きになります。
環境情報
- 作業環境はAWS Cloud9を利用
- cdk versionは2.63.2
はじめに 作成イメージ
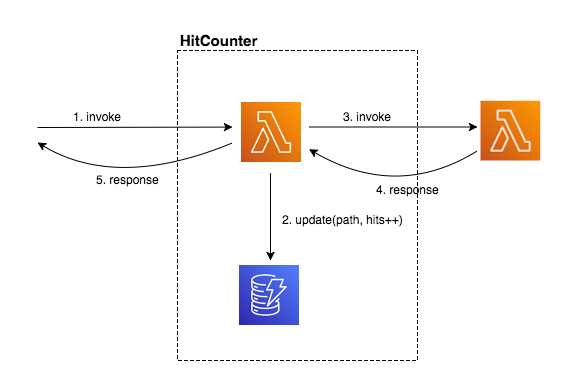
Part1で作成したLambda(Hello Lambda)の前段にHitCounter Lambdaを作成します。Hit Counter LambdaはAPI Gatewayからリクエストを受け取り、Hello Lambdaをinvokeします。Hello Lambdaからレスポンスを受け取り、DynamoDBにアクセスしてHit回数をカウントアップします。

では早速手を動かしていきましょう。
HitCounterの作成
HitCounter コンストラクタの定義
libフォルダ配下にhitcounter.tsファイルを作成し、以下のコードを記述します。Save時にエラーが表示されるかもしれませんが、そのまま進めていきます。
import * as cdk from 'aws-cdk-lib';
import * as lambda from 'aws-cdk-lib/aws-lambda';
import { Construct } from 'constructs';

export interface HitCounterProps {
  /** the function for which we want to count url hits **/
  downstream: lambda.IFunction;
}

export class HitCounter extends Construct {
  constructor(scope: Construct, id: string, props: HitCounterProps) {
    super(scope, id);

    // TODO
  }
}
補足しておきますと
- 新規のコンストラクトクラス
HitCounterを定義しました。 - コンストラクタの引数は普段通り
scope、id、propsで、cdk.Constructベースクラスに展開していきます。 -
props引数はHitCounterPropsと同じ型で、lambda.IFunctionのdownstreamというプロパティを1つ含んでいます。Part1で作成したHello Lambda関数をこのpropsに"プラグイン"してHit回数をカウントします。
Hit Counter Lambda関数を作成
次にhitカウンター用のLambda関数を作成していきます。lambda/hitcounter.jsを作成します。
const aws = require('aws-sdk')

exports.handler = async function(event) {
  console.log("request:", JSON.stringify(event, undefined, 2));

  // create AWS SDK clients
  const dynamo = new aws.DynamoDB();
  const lambda = new aws.Lambda();

  // update dynamo entry for "path" with hits++
  await dynamo.updateItem({
    TableName: process.env.HITS_TABLE_NAME,
    Key: { path: { S: event.path } },
    UpdateExpression: 'ADD hits :incr',
    ExpressionAttributeValues: { ':incr': { N: '1' } }
  }).promise();

  // call downstream function and capture response
  const resp = await lambda.invoke({
    FunctionName: process.env.DOWNSTREAM_FUNCTION_NAME,
    Payload: JSON.stringify(event)
  }).promise();

  console.log('downstream response:', JSON.stringify(resp, undefined, 2));

  // return response back to upstream caller
  return JSON.parse(resp.Payload);
};
-
HITS_TABLE_NAMEはDynamoDBのテーブル名になります。 -
DOWNSTREAM_FUNCTION_NAMEはダウンストリームのAWS Lambda関数名です。
テーブル名とダウンストリーム関数名はアプリがデプロイされる際に決定されるため、これらの値は先ほどのコンストラクタのコードに紐づける必要があります。以降のセクションで実施していきます。
Hit Counterコンストラクタにリソースを追加
ではHit Counterコンストラクタに作成したAWS Lambda関数とDynamoDBを追加定義していきます。lib/hitcounter.tsの内容は以下のようになります。
import * as cdk from 'aws-cdk-lib';
import * as lambda from 'aws-cdk-lib/aws-lambda';
import * as dynamodb from 'aws-cdk-lib/aws-dynamodb';
import { Construct } from 'constructs';

export interface HitCounterProps {
  /** the function for which we want to count url hits **/
  downstream: lambda.IFunction;
}

export class HitCounter extends Construct {

  /** allows accessing the counter function */
  public readonly handler: lambda.Function;

  constructor(scope: Construct, id: string, props: HitCounterProps) {
    super(scope, id);

    const table = new dynamodb.Table(this, 'Hits', {
        partitionKey: { name: 'path', type: dynamodb.AttributeType.STRING }
    });

    this.handler = new lambda.Function(this, 'HitCounterHandler', {
        runtime: lambda.Runtime.NODEJS_14_X,
        handler: 'hitcounter.handler',
        code: lambda.Code.fromAsset('lambda'),
        environment: {
            DOWNSTREAM_FUNCTION_NAME: props.downstream.functionName,
            HITS_TABLE_NAME: table.tableName
        }
    });
  }
}
- DynamoDBのテーブルのパーティションキーを
pathで定義しています。 -
lambda/hitcounter.handlerに紐づくLambda関数を定義しています。 - Lambdaの環境変数
functionNameとtableNameを本リソースに紐付けています。
Hit Counterコンストラクタをスタックに追加
Hit Counterコンストラクタの準備が整ったので、次はスタックにコンストラクタを追加していきます。
import * as cdk from 'aws-cdk-lib';
import * as lambda from 'aws-cdk-lib/aws-lambda';
import * as apigw from 'aws-cdk-lib/aws-apigateway';
import { HitCounter } from './hitcounter';

export class CdkWorkshopStack extends cdk.Stack {
  constructor(scope: cdk.App, id: string, props?: cdk.StackProps) {
    super(scope, id, props);

    const hello = new lambda.Function(this, 'HelloHandler', {
      runtime: lambda.Runtime.NODEJS_14_X,
      code: lambda.Code.fromAsset('lambda'),
      handler: 'hello.handler'
    });

    const helloWithCounter = new HitCounter(this, 'HelloHitCounter', {
      downstream: hello
    });

    // defines an API Gateway REST API resource backed by our "hello" function.
    new apigw.LambdaRestApi(this, 'Endpoint', {
      handler: helloWithCounter.handler
    });
  }
}
API GatewayのハンドラーをhelloWithCounter.handlerに変更してあります。これでURLがHitされた時にはまずHit Counter Lambdaが呼び出されるようになりました。Hit Counter LambdaはdownstreamにhelloLambda関数を指定しています。
デプロイ
cdk deploy
少し時間がかかります。アウプットとして以下のような内容が表示されるはずです。
Outputs:
CdkWorkshopStack.Endpoint8024A810 = https://xxxxxxxxxx.execute-api.ap-northeast-1.amazonaws.com/prod/
テスト
上記のアウトプットを使ってテストしてみましょう。
curl -i https://xxxxxxxxxx.execute-api.ap-northeast-1.amazonaws.com/prod/
502 Bad Gatewayエラーが返ってきました。。。いけなかった部分を直していきます。
HTTP/2 502
...

{"message": "Internal server error"}
CloudWatchからエラーログを参照してみると、LambdaからDynamoDBに対するAccessDeniedExceptionが吐かれています。確かにLambdaにDynamoDBに対するアクセス許可をしていませんでした(汗)。以下をhitcounter.tsに追加してあげます。
    // grant the lambda role read/write permissions to our table
    table.grantReadWriteData(this.handler);
さぁ再テスト!
。。。また502エラーです。。。今度は呼び出し(invoke)する権限が足りないよ!とAccessDeniedExceptionとエラーが出ています。これも必要でした(汗)。以下をhitcounter.tsに追加してあげます。
    // grant the lambda role invoke permissions to the downstream function
    props.downstream.grantInvoke(this.handler);
さぁ三度目の正直!!やっと成功しました!
(API Gatewayがエンドポイントを書き換えるのに少し時間がかかる場合があるので、再度502エラーが出た場合は少し待ってから再度試してみてください。)
HTTP/2 200 OK
...

Hello, CDK! You've hit /
何回か実行
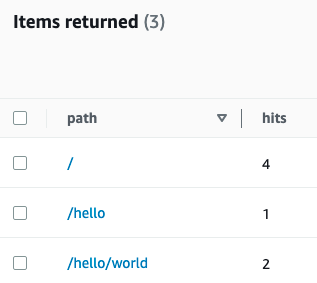
それではいくつかのパターンで実行して、DynamoDBのテーブルデータを確認してみましょう。
curl https://xxxxxxxxxx.execute-api.ap-northeast-1.amazonaws.com/prod/
curl https://xxxxxxxxxx.execute-api.ap-northeast-1.amazonaws.com/prod/
curl https://xxxxxxxxxx.execute-api.ap-northeast-1.amazonaws.com/prod/hello
curl https://xxxxxxxxxx.execute-api.ap-northeast-1.amazonaws.com/prod/hello/world
curl https://xxxxxxxxxx.execute-api.ap-northeast-1.amazonaws.com/prod/hello/world
DynamoDBのテーブルを参照してみます。

いい感じにテーブルにHitカウントが記録されていますね!
まとめ
今回作成したHit Counterは色々なLambdaにアタッチすることで、各URLに対してどれくらいURLがHitされたかカウントできる便利なサービスだと思います。実運用でも利用できそうですね!
以上です。
参考サイト