チュートリアルサイト
- htmlとcssとjavascriptを学習するのには本当に最高のサンプルだと思う。
- 他にも沢山の動画を公開してくれている。
まずはvideo を再生する
    <style>
/*imgと同じ*/
        video{
            max-width: 100%;
        }
        .vid-container{
            width: 300px;
        }
    </style>
       <div class="vid-container">
<!-- コントロールパネルの表示 controls -->
<!-- 繰り返し loop -->
        <video loop controls>
          <source src="./video/rain.mp4"  type="video/mp4">
        </video>
        </div>
        <button id="playbtn">PLAY</button>
        <button id="pause">POUSE</button>
      <script>

//sourceタグではなくvideoタグを取得
          const video = document.querySelector('video');
          playbtn.onclick = ()=>{
//再生
            video.play();
          }
          pause.onclick = ()=>{
//STOP
              video.pause();
          }
      </script>
See the Pen Untitled by y0sh1m0t0 (@y0sh1m0t0) on CodePen.
次は音楽と一緒に再生する
    <div class="vid-container">
        <video loop controls>
            <source src="./video/rain.mp4" type="video/mp4">
        </video>
    </div>
    <button id="playbtn">PLAY</button>
    <button id="pause">POUSE</button>

<!-- + -->
    <audio class="song">
        <source src="./sounds/rain.mp3" />
    </audio>
    <script>

        const video = document.querySelector('video');
//audio タグを取得
        const audio = document.querySelector('audio');

        playbtn.onclick = () => {

            video.play();
//+
            audio.play();
        }
        pause.onclick = () => {
            //STOP
            video.pause();
//+
            audio.pause();
        }
    </script>
- 音楽の再生時間を設定する audioのプロパティとメソッド
-
ontimeupdateイベント- audioが再生される間イベントが発火し続ける
-
currentTimeプロパティ- 再生した時間を取得設定できる。
-
( 再生した時間(経過時間) >= 設定時間 ) なら 再生停止させる
//+
//設定時間
    let fakeDuration = 3; //3秒

//再生した時間
    let currentTime = 0;

    audio.ontimeupdate = function () {
//再生中発火しつづける。
//その度に経過時間を更新する
        currentTime = audio.currentTime;

//経過時間が設定時間を超えたら
        if (currentTime >= fakeDuration) {

//ストップする
            audio.pause();
            video.pause();

//初期化処理
            audio.currentTime = 0;
        }
    };
-
See the Pen Untitled by y0sh1m0t0 (@y0sh1m0t0) on CodePen.
SVG と ラインエフェクト
上のサイトでSVG と ラインエフェクトのサンプルが沢山のっています。
アニメーションに関しての動作は複雑にみえますが、実はものすごく単純です。
全て、線を点線に変えてずらしているだけです。
作りたいもの
See the Pen Untitled by y0sh1m0t0 (@y0sh1m0t0) on CodePen.
- 操作するCSSプロパティ
-
stroke-dasharrayとstroke-dashoffsetプロパティ -
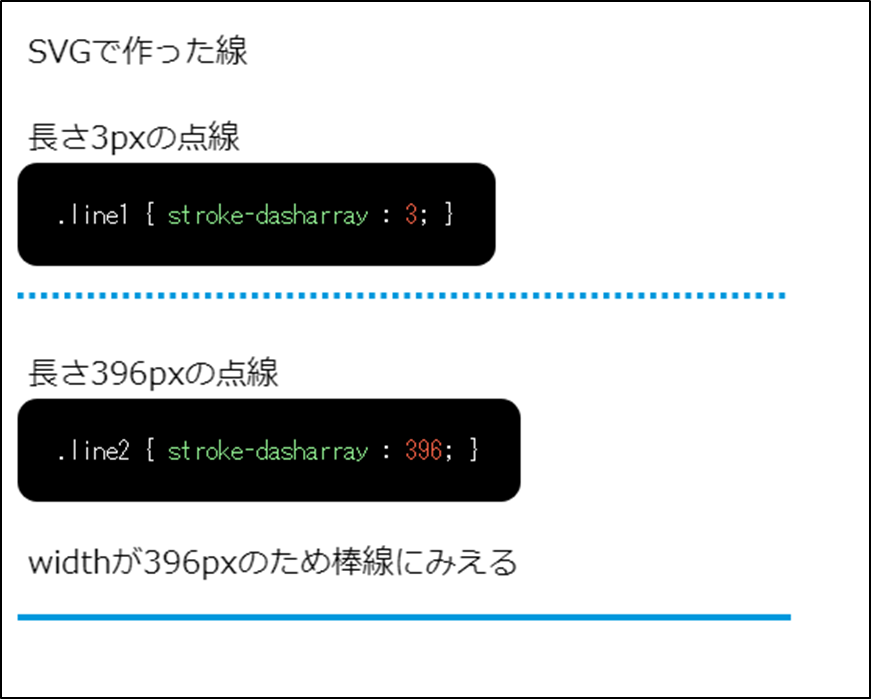
stroke-dasharray- 点線の長さを設定できる。
- 下画像はsvgで作った横線を
stroke-dasharrayで点線に変更している。 -
width="395.9pxのline
   <svg x="0px" y="0px" width="395.9px" height="3" viewBox="0 0 395.9 1">
        <line class="line" x1="0" y1="0.5" x2="395.9" y2="0.5" />
   </svg>
    {{-- 下プロパティを変更することで点線にしている --}}
-
-
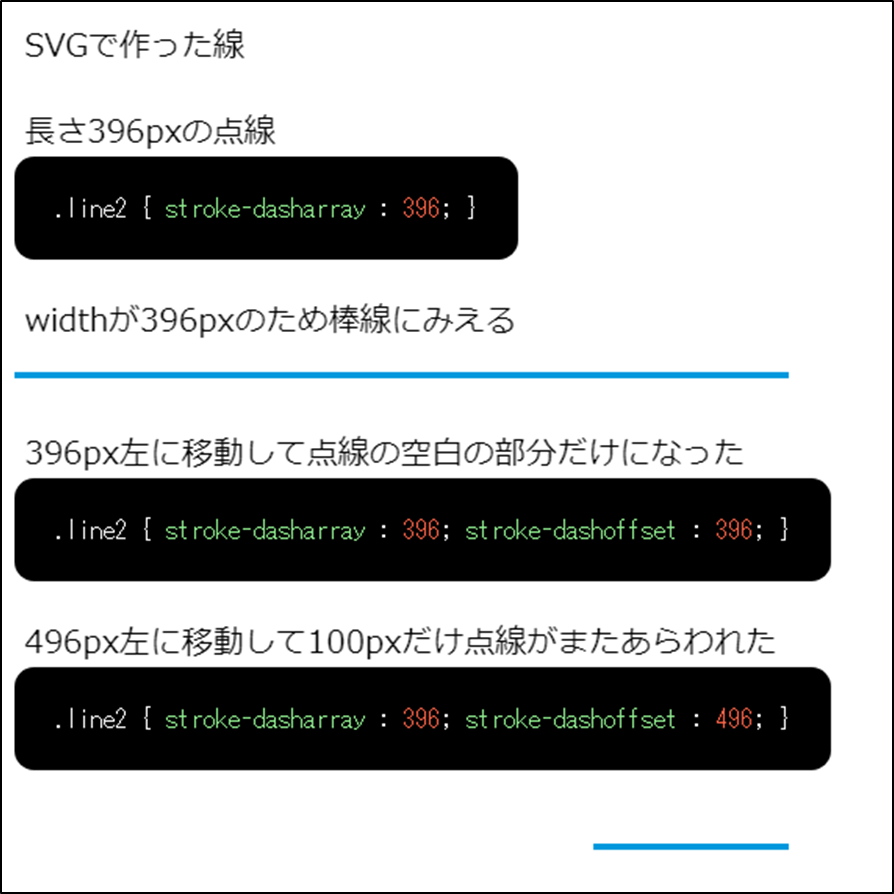
stroke-dashoffset- 点線の開始位置を変更できるプロパティ
- 上記の例では、右にずらしたり、左にずらしたりできる。
- このプロパティの値を変更することでラインが動いているように見える。
- 点線の開始位置を変更できるプロパティ
-
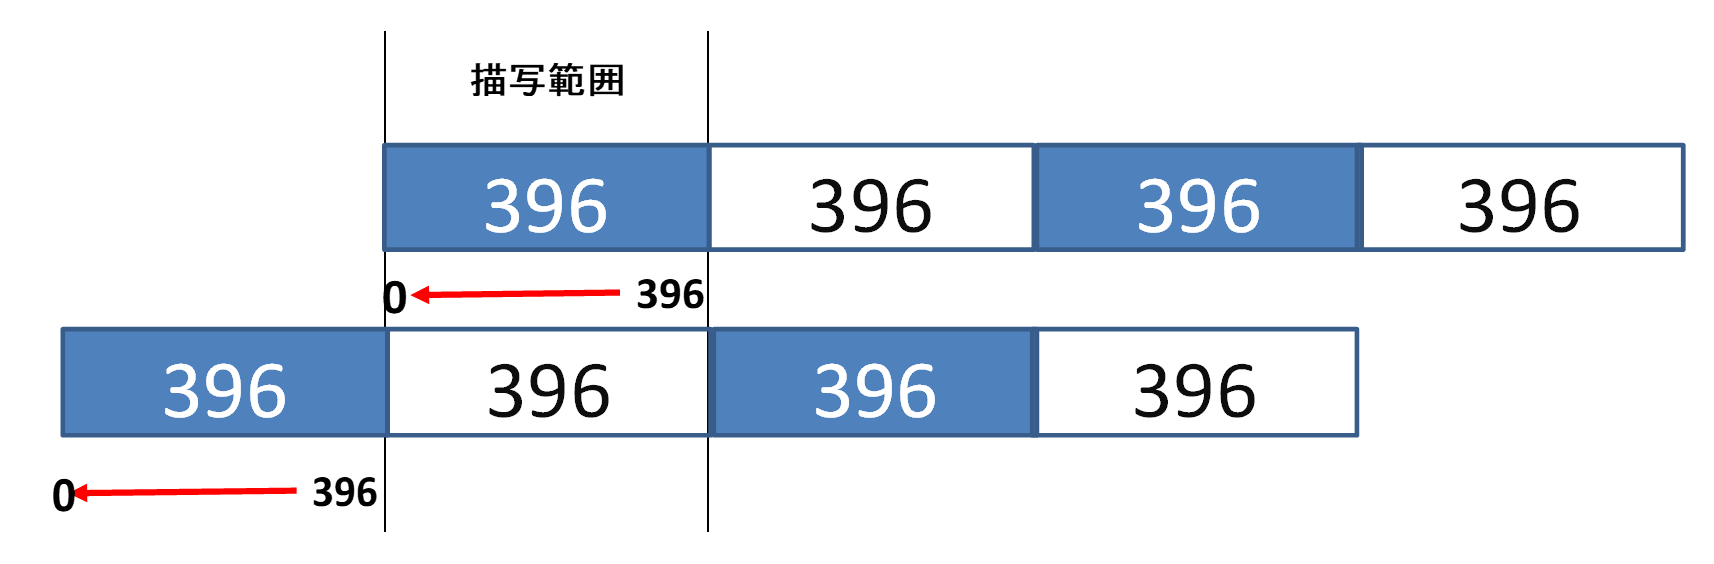
396px の 縞々模様になっているが、全周の長さ = 点線の長さになっているため横線にみえる。
-
396px左に移動させると隙間の部分だけになるため空白になる。領域はキチンとある。
-
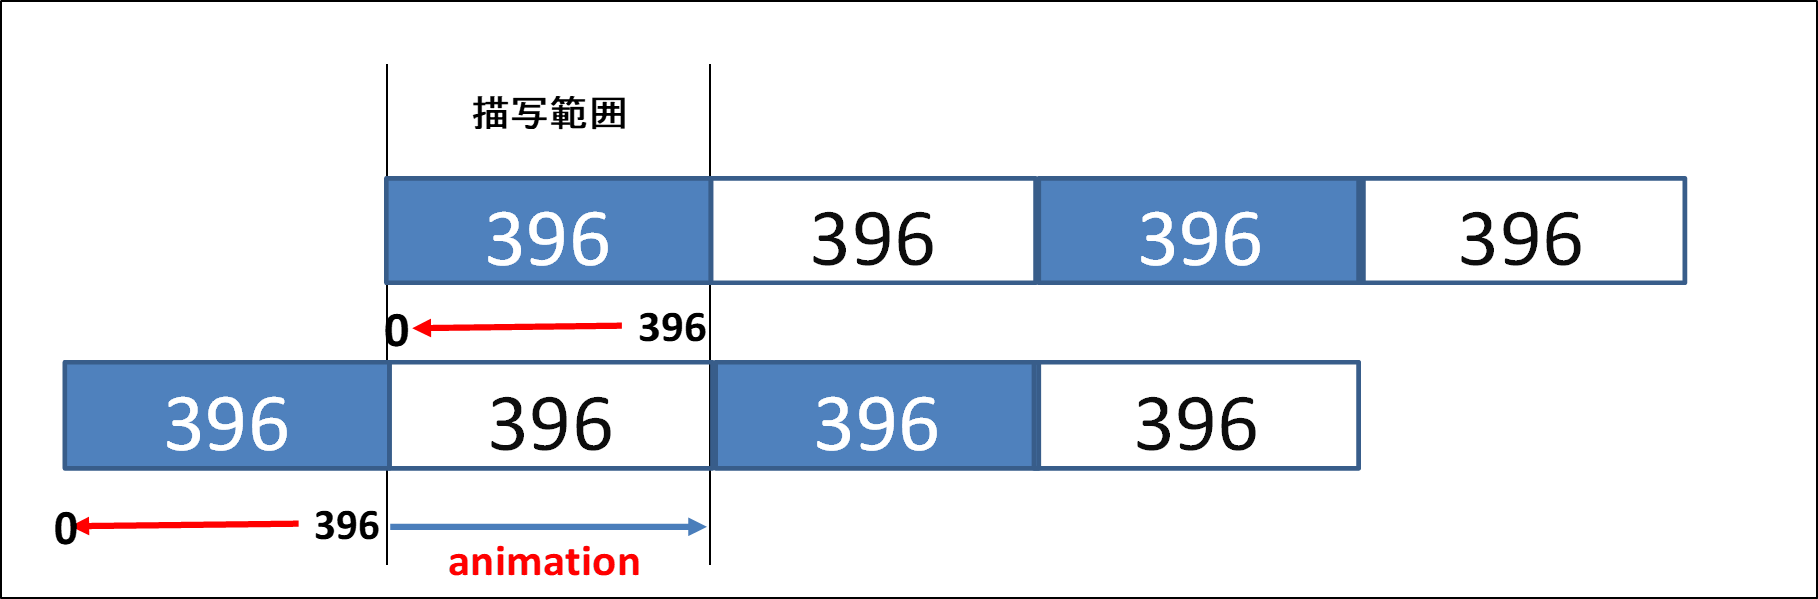
stroke-dashoffsetの数値を変化させることでアニメーションになる -
アニメーションで396を0に変化させている。
         .line {
 /*点線の長さを全周の長さにする。*/
          stroke-dasharray: 396;
 /*+*/
          animation: circle 10s linear;
      }
 /*+*/
      @keyframes circle {
          from {
 /*左に全周の長さの分だけ移動させておく(別に右でもいい 考え方として)*/
              stroke-dashoffset: 396;
          }
          to {
 /*0に近づけることでラインが右に動いているようにみえる。*/
              stroke-dashoffset: 0;
          }
      }
rerunするとアニメーションが見れる。
See the Pen Untitled by y0sh1m0t0 (@y0sh1m0t0) on CodePen.
- 最初に396px左に移動させておいて
- 0に近づけることで逆向きに移動するアニメーションになる。
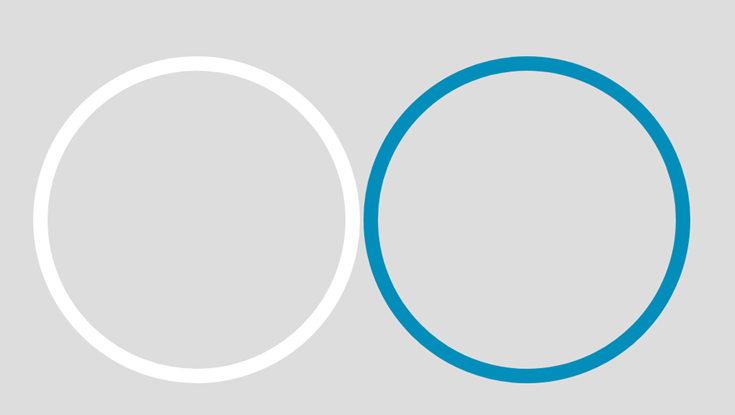
再生中にローディングするアニメーション
- やり方は上と全く同じ
- 円形になっているけど、横線にして考えると簡単。
//ホワイト
<svg class="track-outline" width="453" height="453" viewBox="0 0 453 453" fill="none"
xmlns="http://www.w3.org/2000/svg">
<circle cx="226.5" cy="226.5" r="216.5" stroke="white" stroke-width="20" />
</svg>
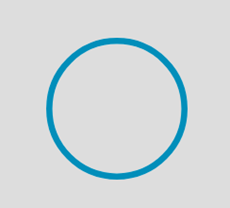
//青
<svg class="moving-outline" width="453" height="453" viewBox="0 0 453 453" fill="none"
xmlns="http://www.w3.org/2000/svg">
<circle cx="226.5" cy="226.5" r="216.5" stroke="#018EBA" stroke-width="20" />
</svg>
    <style>
        .circle {
            height: 150px;
            width: 150px;
            position: relative;
        }
        .circle svg {
            position: absolute;

/*親要素から普通にはみ出すため*/
            width: 100%;
            height: 100%;
        }
    </style>
    <div class="circle">
      <svg stroke="白">
      <svg stroke="青">
    </div>
-
jsで簡易的にアニメーションを作る
-
getTotalLength()メソッドで長さを取得できる- 上記横線の396pxの値を取得できる。
-
     <script>
      const outline = document.querySelector('.moving-outline circle');

  //全周の長さを取得する
      const outlineLength = outline.getTotalLength();
      console.log(outlineLength) //1360

  //点線の長さを全周の長さと一緒にした
      outline.style.strokeDasharray = outlineLength; //1360

  //全周の長さ分左に移動させた
      outline.style.strokeDashoffset = outlineLength;

      let progress = 0;
      let timeoutId =undefined;

 //strokeDashoffset の値を時間で変化させる関数。
      const start = ()=>{
        timeoutId =  setTimeout(() => {
          if(outlineLength > progress){

  //1360px左に移動させたのを0pxにすることで右に移動させている
              outline.style.strokeDashoffset = outlineLength - progress;
                      progress++;
                      start();
          }else{

  //progressが1360を超えたら
  //つまりoutline.style.strokeDashoffsetの値が0になったら
  //ストップする
              clearTimeout(timeoutId);
          }
          }, 1);
      }

      start();
  </script>
See the Pen Untitled by y0sh1m0t0 (@y0sh1m0t0) on CodePen.
- 再生時間に合わせてローリングさせる
-
progressを 経過時間に応じて 変化させる -
 //経過時間
    let currentTime = song.currentTime;
 //全周の長さを 経過時間と設定時間の比率で乗算する
 //経過時間  = 設定時間に なった時 比率は1になる。
 //その時 strokeDashoffset の値も0になる
    let progress = outlineLength - outlineLength * (currentTime / fakeDuration)  ;
    outline.style.strokeDashoffset = progress;
-
    <style>
        /*imgと同じ*/
        video {
            max-width: 100%;
        }

        .vid-container {
            width: 300px;
        }

        body {
            background: #ddd;
            margin: 100px;
        }

        .circle {
            height: 150px;
            width: 150px;
            position: relative;
            margin-bottom: 50px;
        }

        .circle svg {
            width: 100%;
            height: 100%;
            position: absolute;
            transform: rotate(-90deg);
        }
    </style>

    <div class="circle">

        <svg class="track-outline" width="453" height="453" viewBox="0 0 453 453" fill="none"
            xmlns="http://www.w3.org/2000/svg">
            <circle cx="226.5" cy="226.5" r="216.5" stroke="white" stroke-width="20" />
        </svg>

        <svg class="moving-outline" width="453" height="453" viewBox="0 0 453 453" fill="none"
            xmlns="http://www.w3.org/2000/svg">
            <circle cx="226.5" cy="226.5" r="216.5" stroke="#018EBA" stroke-width="20" />
        </svg>

    </div>
    <p>コントロールパネルの再生ボタンではontimeupdateイベントは発火しない</p>
    <p>ontimeupdateイベントは音楽を再生している間発火する</p>
    <p></p>
    <div class="vid-container">
        <!-- コントロールパネルの表示 controls -->
        <!-- 繰り返し loop -->
        <video loop controls>
            <source src="./video/rain.mp4" type="video/mp4">
        </video>
    </div>
    <p>音楽とビデオを再生する</p>
    <button id="play">PLAY</button>
    <button id="pause">POUSE</button>

    <!-- + -->
    <audio class="song">
        <source src="./sounds/rain.mp3" />
    </audio>
    <script>
        const video = document.querySelector('video');
        const audio = document.querySelector('audio');
        const outline = document.querySelector('.moving-outline circle');

        //円周を取得する
        const outlineLength = outline.getTotalLength();
        console.log(outlineLength) //1360

        //点線の長さを円周と一緒にした
        outline.style.strokeDasharray = outlineLength; //1360
        //円周分左に移動させた
        outline.style.strokeDashoffset = outlineLength;

        play.onclick = () => {
            audio.currentTime = 0;
            //再生
            video.play();
            audio.play();
        }
        pause.onclick = () => {
            //ストップ
            video.pause();
            audio.pause();
        }

        //設定時間
        let fakeDuration = 5;

        audio.ontimeupdate = function () {
            let currentTime = audio.currentTime;
            let progress = outlineLength - (currentTime / fakeDuration) * outlineLength;
            outline.style.strokeDashoffset = progress;

            if (currentTime >= fakeDuration) {
                audio.pause();
                video.pause();

        //微妙に端数分が空白になったのでめんどくさかったので無理やり0にした
                outline.style.strokeDashoffset = 0;
            }
        };
    </script>
See the Pen Untitled by y0sh1m0t0 (@y0sh1m0t0) on CodePen.
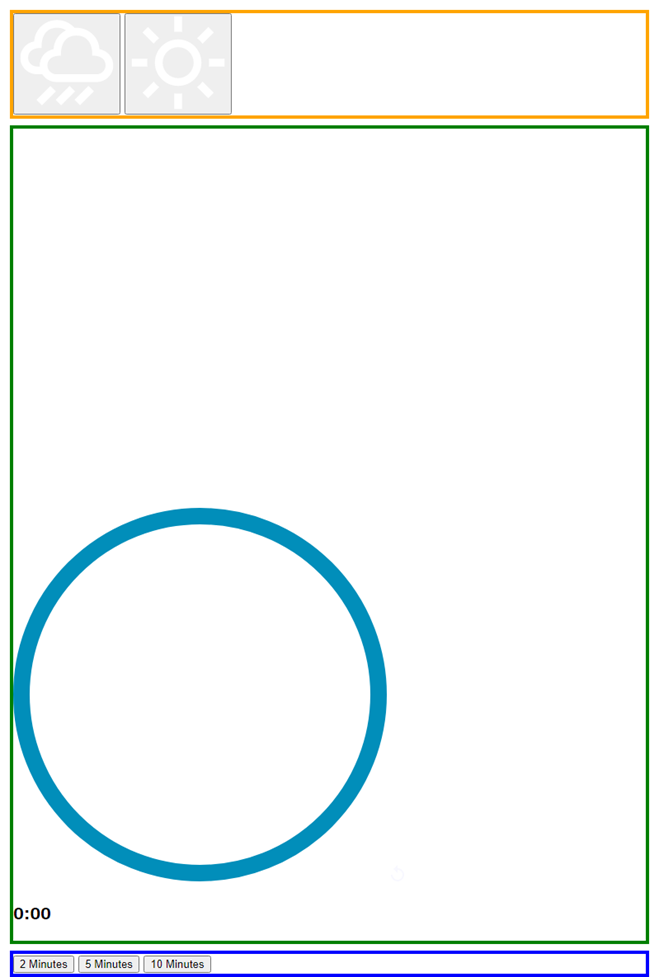
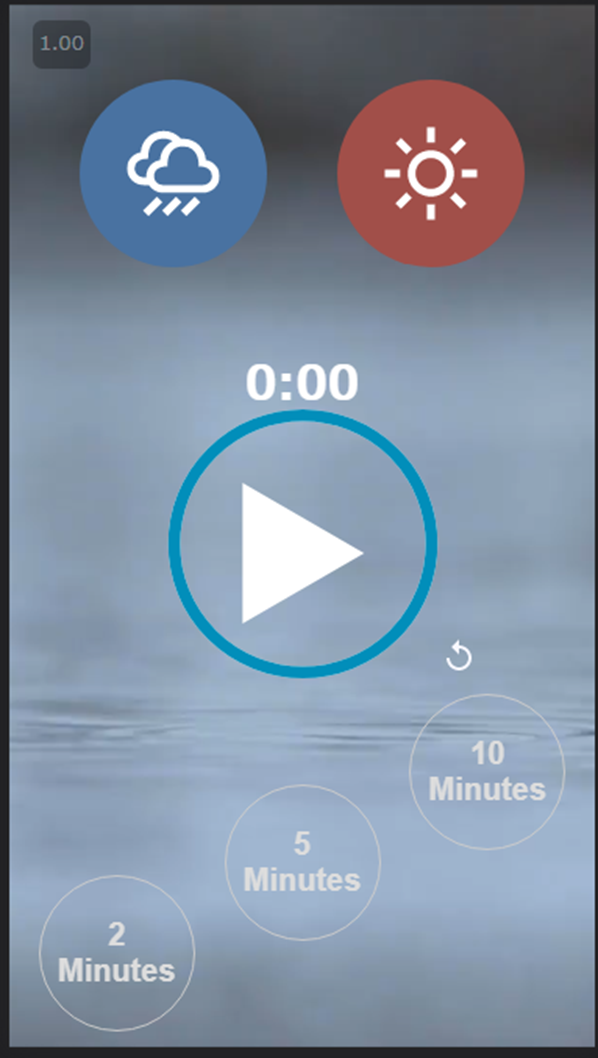
作成するアプリの完成イメージ図
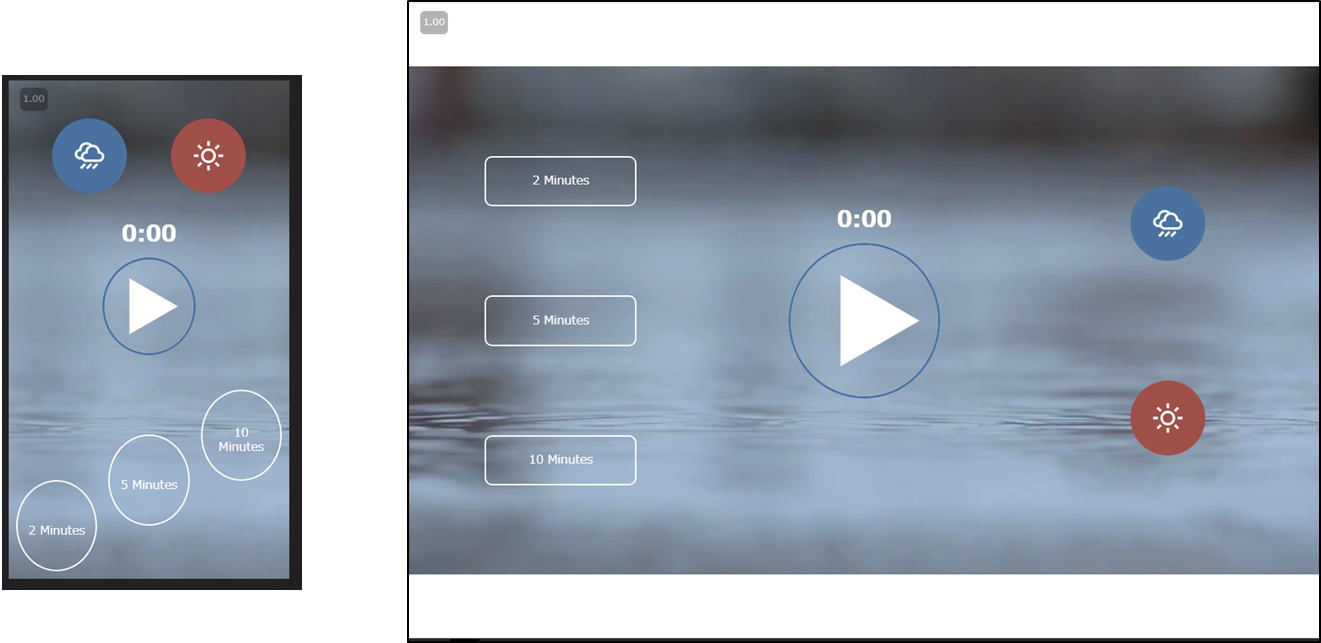
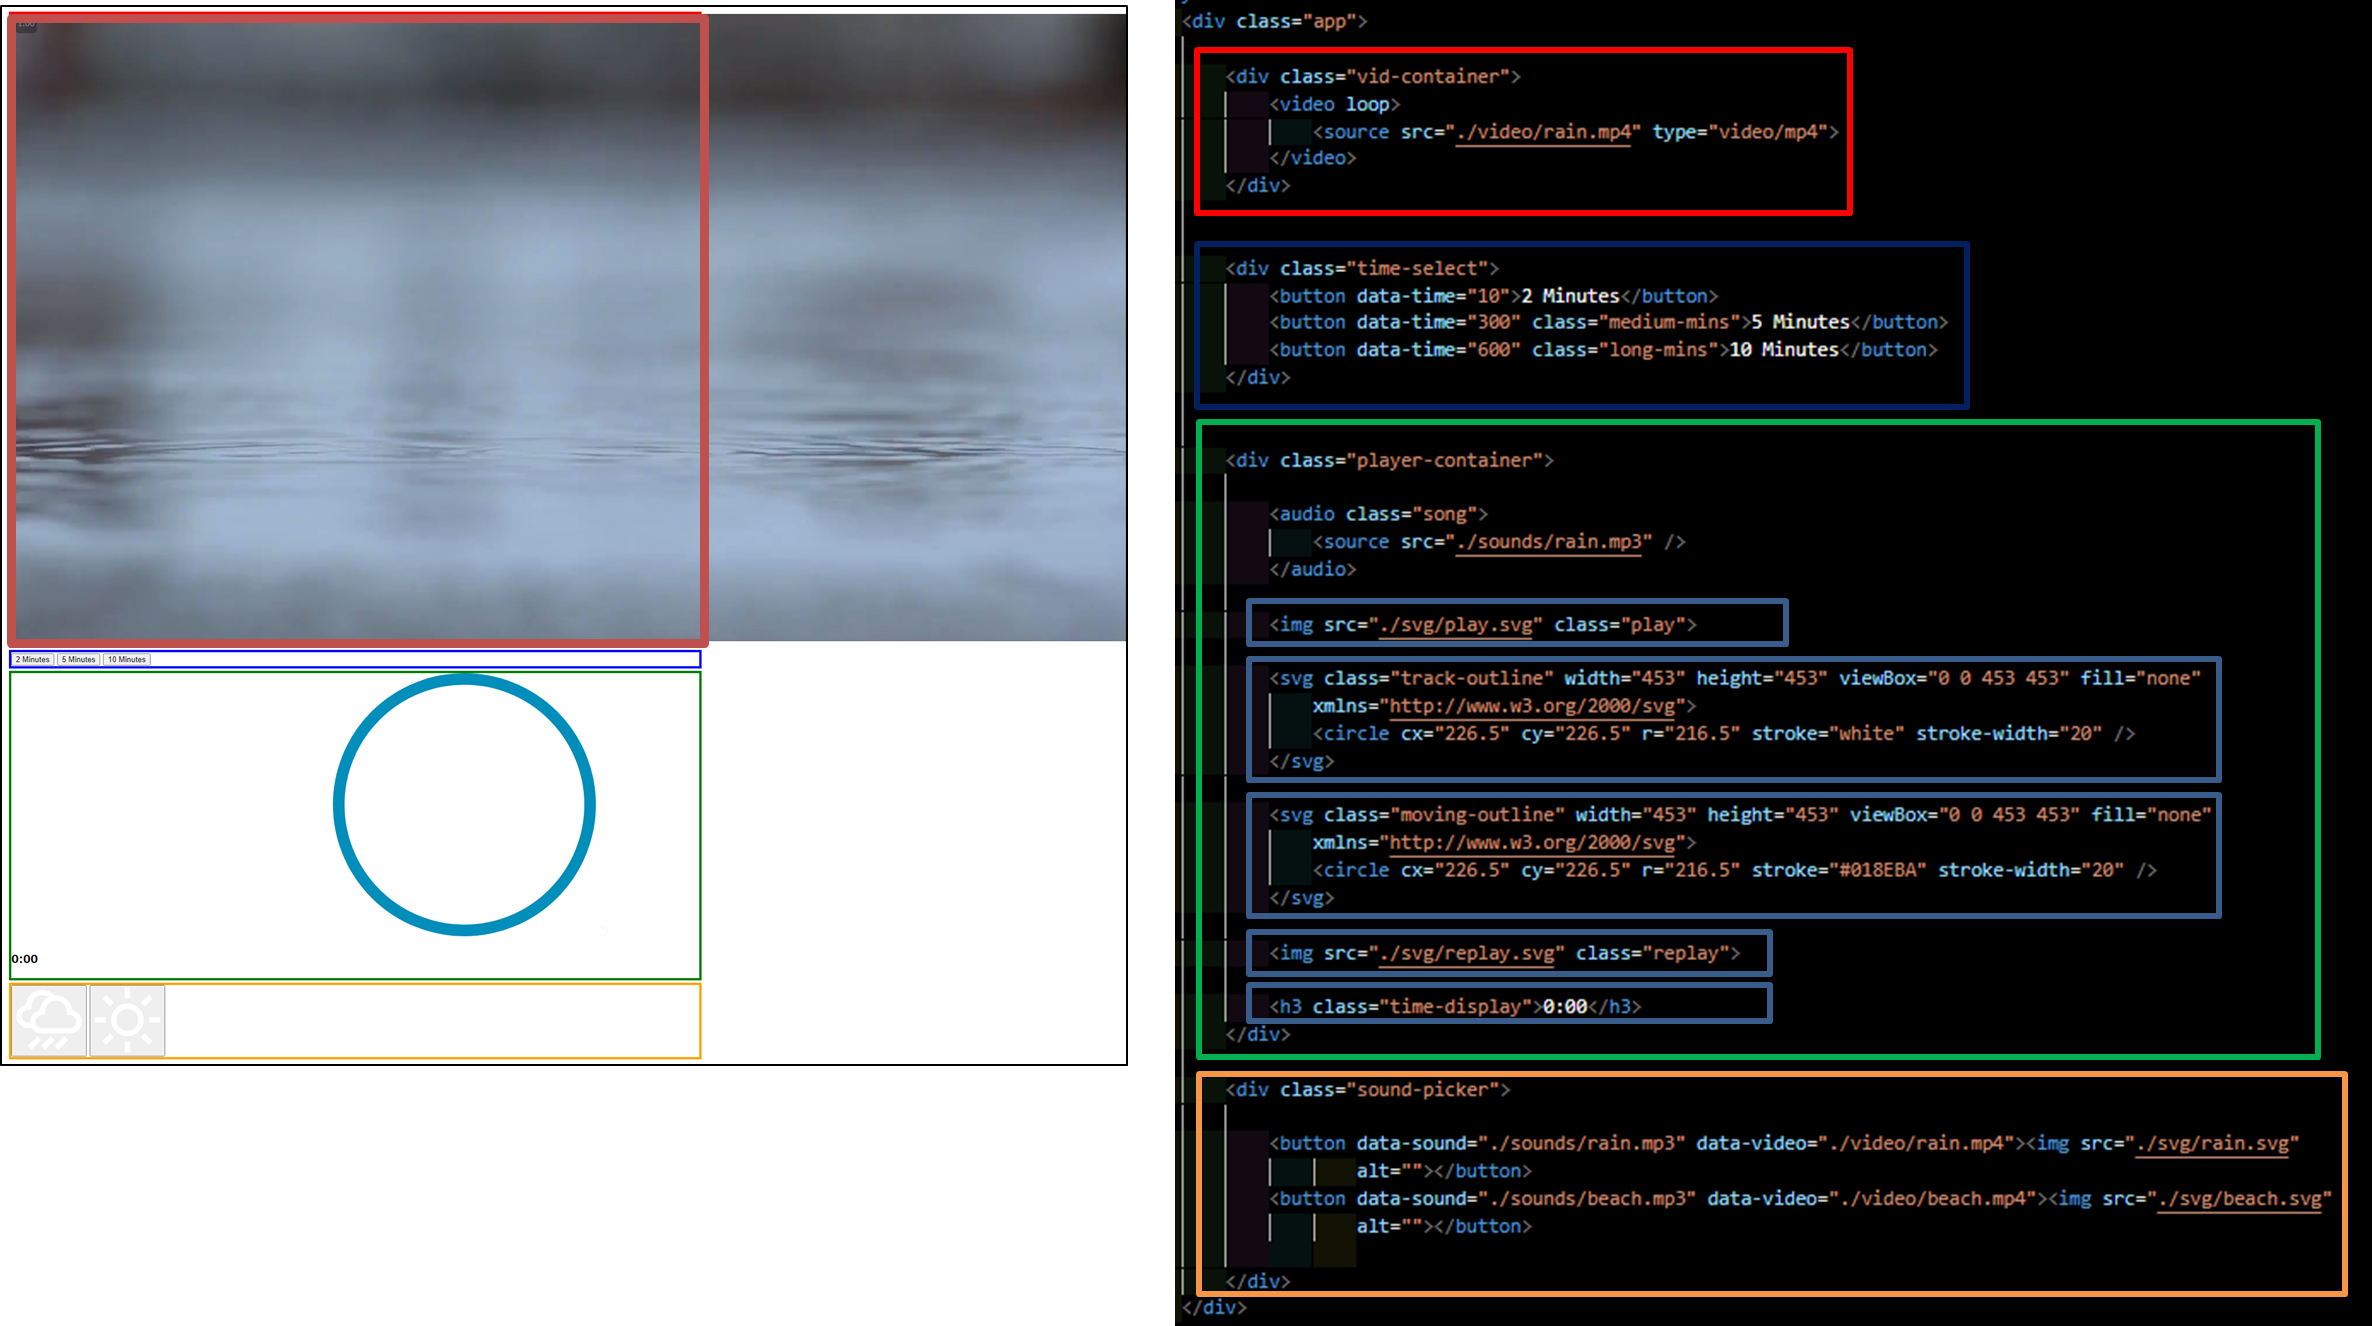
マークアップを作成する
<!DOCTYPE html>
<html lang="en">

<head>
    <meta charset="UTF-8">
    <meta http-equiv="X-UA-Compatible" content="IE=edge">
    <meta name="viewport" content="width=device-width, initial-scale=1.0">
    <title>Document</title>
</head>

<body>
    <div class="app">
<!-- section 1 -->
        <div class="vid-container">
            <video loop>
                <source src="./video/rain.mp4" type="video/mp4">
            </video>
        </div>

<!-- section 2 -->
        <div class="time-select">
            <button data-time="10"><span>2 Minutes</span></button>
            <button data-time="300" class="medium-mins"><span>5 Minutes</span></button>
            <button data-time="600" class="long-mins"><span>10 Minutes</span></button>
        </div>

<!-- section 3 -->
        <div class="player-container">

            <audio class="song">
                <source src="./sounds/rain.mp3" />
            </audio>

            <img src="./svg/play.svg" class="play">

            <svg class="track-outline" width="453" height="453" viewBox="0 0 453 453" fill="none"
                xmlns="http://www.w3.org/2000/svg">
                <circle cx="226.5" cy="226.5" r="216.5" stroke="white" stroke-width="20" />
            </svg>

            <svg class="moving-outline" width="453" height="453" viewBox="0 0 453 453" fill="none"
                xmlns="http://www.w3.org/2000/svg">
                <circle cx="226.5" cy="226.5" r="216.5" stroke="#018EBA" stroke-width="20" />
            </svg>

            <img src="./svg/replay.svg" class="replay">

            <h3 class="time-display">0:00</h3>
        </div>


<!-- section 4 -->
        <div class="sound-picker">

            <button data-sound="./sounds/rain.mp3" data-video="./video/rain.mp4"><img src="./svg/rain.svg"
                    alt=""></button>
            <button data-sound="./sounds/beach.mp3" data-video="./video/beach.mp4"><img src="./svg/beach.svg"
                    alt=""></button>

        </div>
    </div>
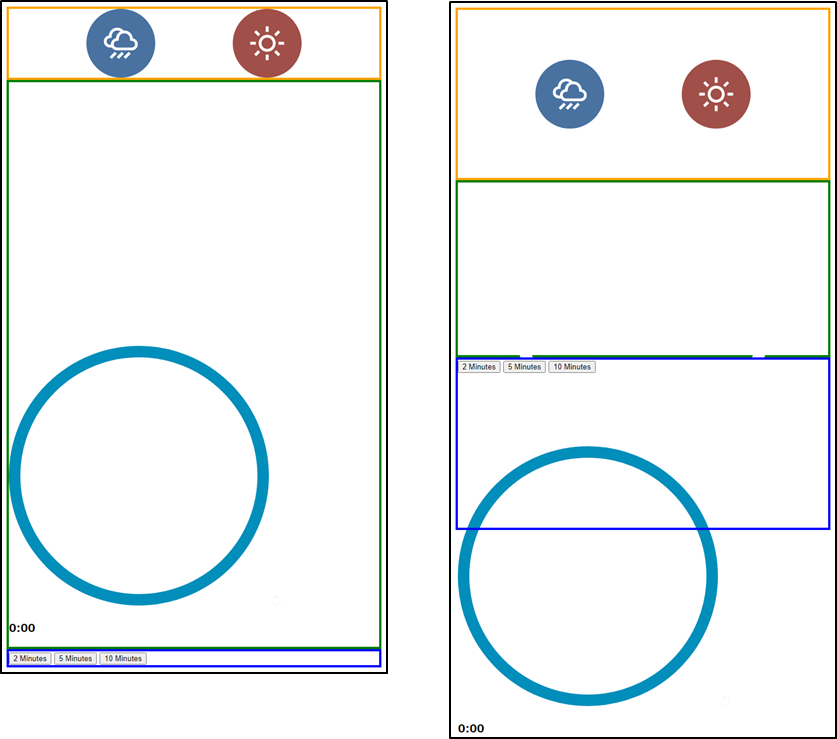
スタイルを作成する
        .app {
/* 子要素の順番を変更するための d-flex + column */
            display: flex;
            flex-direction: column;
        }

/* sectionごとに補助線をいれることで記述場所を区切る */

        .vid-container {
/* 後で全体の背景色にするため一旦d-noneで削除しておく */
            display: none;

            border: 4px solid red;/* 補助線 */
        }

/* 順番を入れ替える */

        .time-select {
            order: 3;

            border: 4px solid blue;/* 補助線 */
        }

        .player-container {
            order: 2;

            border: 4px solid green;/* 補助線 */
        }

        .sound-picker {
            order: 1;

            border: 4px solid orange;/* 補助線 */
        }
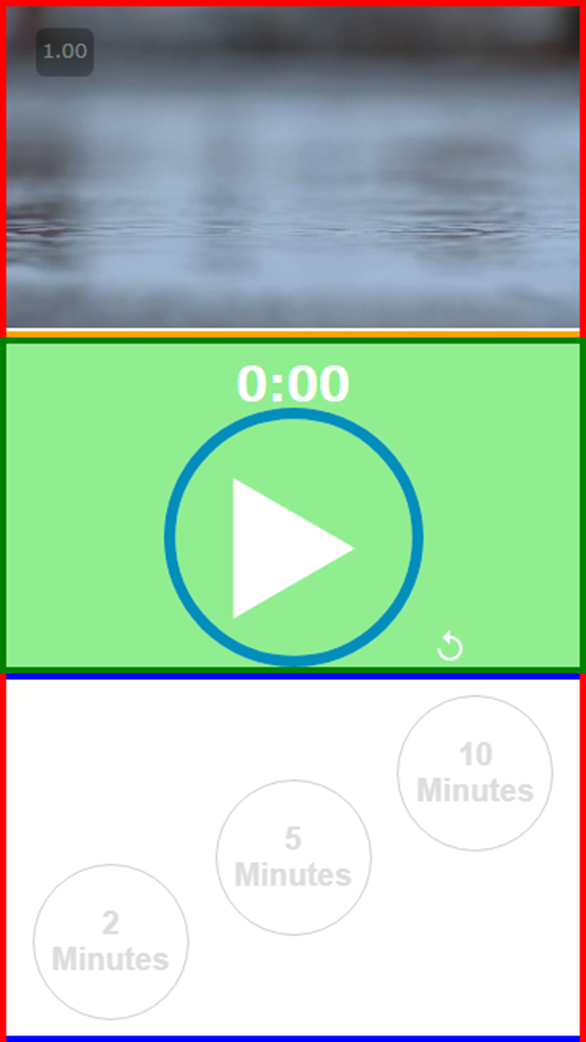
videoと順番を入れ替えた後の画像
/*親要素からはみ出るため*/

        img,video,svg{
            max-width: 100%;
        }

/*120pxの円*/

        .sound-picker button {
            border: none;
            height: 120px;
            width: 120px;
            padding: 30px;
            border-radius: 50%;
            cursor: pointer;
        }

/*ボタンの背景色を赤色*/

        .sound-picker button:nth-child(1) {
            background: #4972a1;
        }
/*ボタンの背景色を青色*/

        .sound-picker button:nth-child(2) {
            background: #a14f49;
        }
<!-- section 4 -->
        <div class="sound-picker">
            <button data-sound="./sounds/rain.mp3" data-video="./video/rain.mp4">
                    <img src="./svg/rain.svg" alt="">
            </button>
            <button data-sound="./sounds/beach.mp3" data-video="./video/beach.mp4">
                    <img src="./svg/beach.svg" alt="">
            </button>
        </div>

        .sound-picker {
            order: 1;
/*+*/
            display: flex;

/*垂直方向 真ん中*/

            align-items: center;

/*水平方向均等配置*/

            justify-content: space-evenly;

            border: 4px solid orange;/* 補助線 */
        }

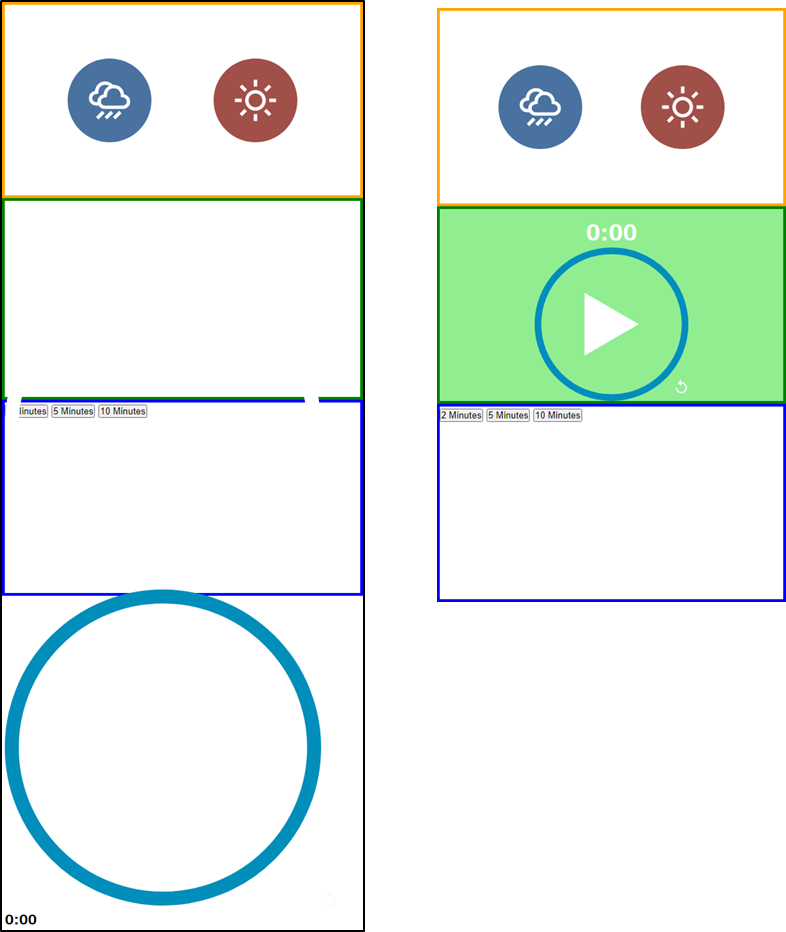
アプリの全体の高さを100vhに設定してセクションを縦方向で均等配置する
        .app {
            display: flex;
            flex-direction: column;

/*+ 高さを100vhの縦型のflexコンテナー子要素は33%ずつ均等に分配する */
            height: 100vh;
        }
        .time-select {
            order: 3;

/*+*/
            height: 33%;

            border: 4px solid blue;/* 補助線 */
        }
        .player-container {
            order: 2;

/*+*/
            height: 33%;

            border: 4px solid green;/* 補助線 */
        }
        .sound-picker {
            order: 1;
            display: flex;
            align-items: center;
            justify-content: space-evenly;

/*+*/
            height: 33%;

            border: 4px solid orange;/* 補助線 */
        }
/*+*/
        img,video,svg{
            max-width: 100%;

/*普通は横100%だけでいい*/
/*今回は縦方向にも幅を設定したため */

            max-height: 100%;
        }

        .player-container {
            order: 2;
            height: 33%;

/*親要素に relative */
            position: relative;

            border: 4px solid green;/* 補助線 */

/*+*/
            background: lightgreen;/* 補助背景色 */
        }

/* 子要素に absolute して定番の中央配置からの調整 */

/* 2つのsvgを重ねる */
        .player-container svg {
            position: absolute;
            top: 20%;
/* 下に20%下げた分高さを減少させる。 */
            height: 80%;
            left: 50%;
            transform: translate(-50%, 0);
        }
/* 再生画像やリプレイ画像 */
        .player-container img {
            position: absolute;
            top: 50%;
            left: 50%;
    /*svgの中心に来るよう調整している*/
            transform: translate(-50%, -20%);
        }
/* リプレイ画像だけ */
        .player-container img.replay {
            top: 90%;
            left:50%;
            margin-left: 100px;
        }

/* 表示時間 */
        .player-container .time-display {
            position: absolute;
            top: 5%;
            left: 50%;
            transform: translateX(-50%);
            font-size: 30px;
            color: #fff;
        }
<!-- section 3 -->
        <div class="player-container">
            <audio class="song">
                <source src="./sounds/rain.mp3" />
            </audio>
<!--再生画像--><img src="./svg/play.svg" class="play">
<!--円-->   <svg class="track-outline" width="453" height="453" viewBox="0 0 453 453" fill="none"
                xmlns="http://www.w3.org/2000/svg">
                <circle cx="226.5" cy="226.5" r="216.5" stroke="white" stroke-width="20" />
            </svg>
<!--円-->   <svg class="moving-outline" width="453" height="453" viewBox="0 0 453 453" fill="none"
                xmlns="http://www.w3.org/2000/svg">
                <circle cx="226.5" cy="226.5" r="216.5" stroke="#018EBA" stroke-width="20" />
            </svg>
<!--リプレイ画像--><img src="./svg/replay.svg" class="replay">
<!--表示時間--><h3 class="time-display">0:00</h3>
        </div>
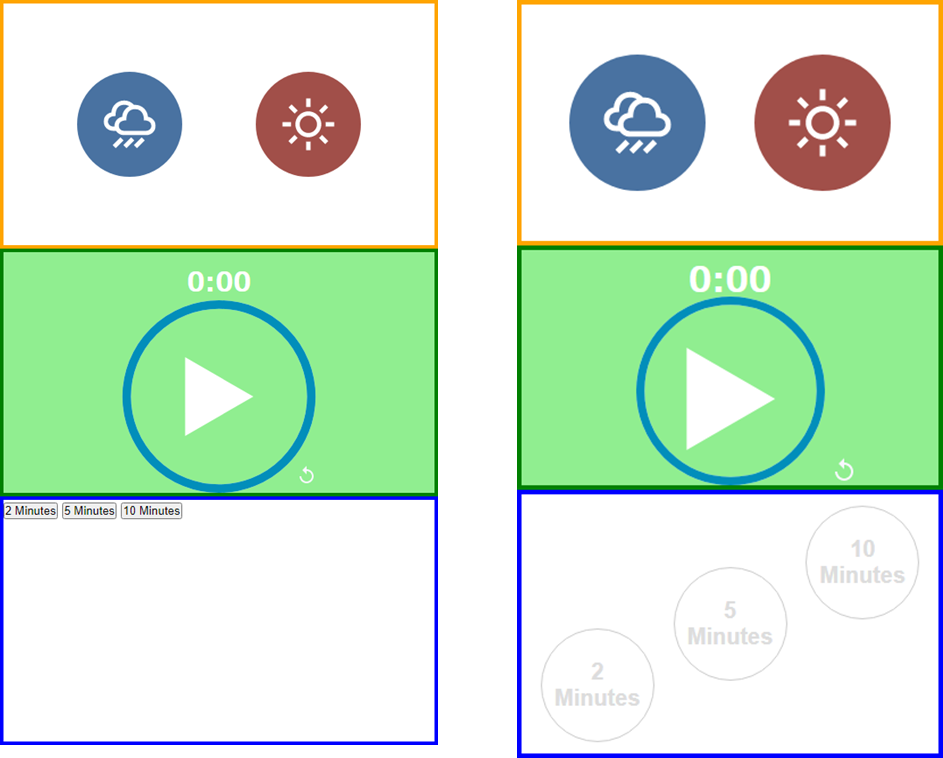
        .time-select {
            order: 3;
            height: 33%;

/*+子要素を横並びにする*/
            display: flex;
            justify-content: space-evenly;
            align-items: center;
            padding: 10px 0;


            border: 4px solid blue;/* 補助線 */
        }

        .time-select button {
            border-radius: 50%;
            border: 1px solid #ccc;
            height: 100px;
            width: 100px;
            cursor: pointer;
            background: none;
            font-size: 20px;
            font-weight: bold;
            padding: 5px;
            color: #ddd;
        }

        .time-select button:hover {
            color: #000;
            background: #fff;
        }

        .time-select button:nth-child(1) {
            align-self: end;
        }

        .time-select button:nth-child(2) {
            align-self: center;
        }

        .time-select button:nth-child(3) {
            align-self: start;
        }
        .vid-container {
            /* display: none; */

/*画面全体*/
            position: fixed;
            top: 0;
            left: 0;
            height: 100%;

            border: 4px solid red;/* 補助線 */
        }
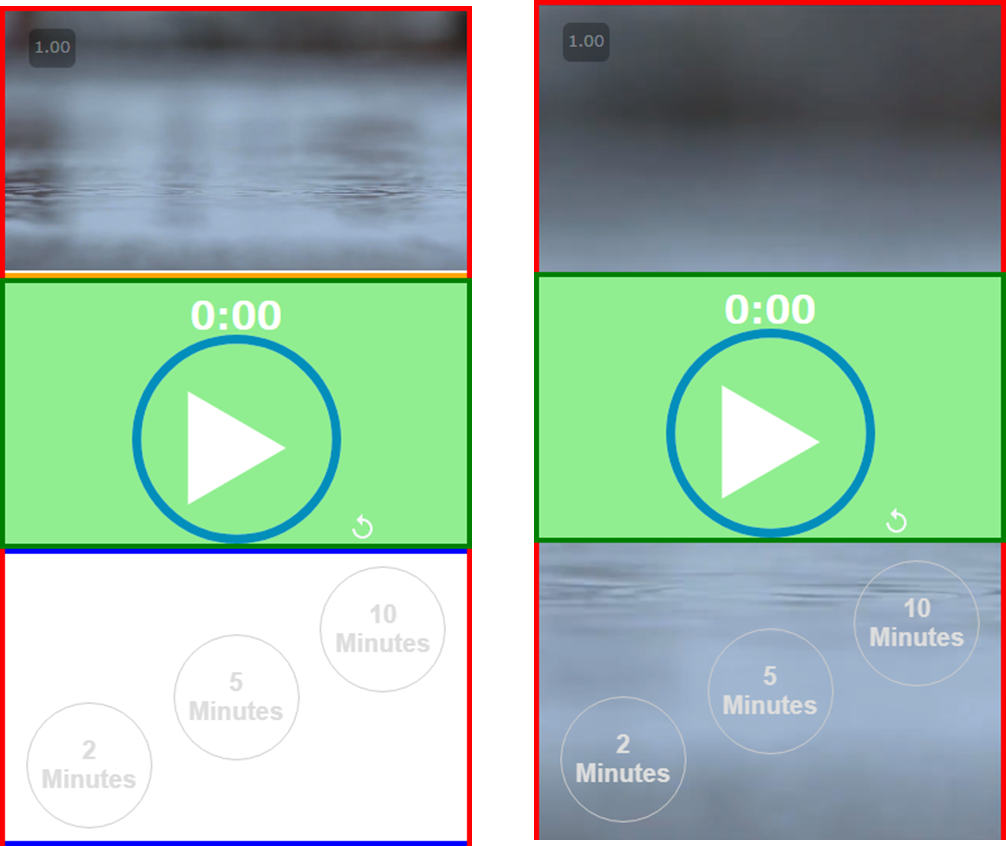
赤枠は画面全体にあるがビデオが横100%の比率で縦サイズが維持されている
/*+*/
        video{
            width: 100%;

/*縦方向を親要素の高さに設定 defaultはautoになっている*/
            height: 100%;

/*比率に合わせて画像をトリミングしてくれる。*/
            object-fit: cover;
        }
ビデオが画面全体に広がった。
補助線を解除
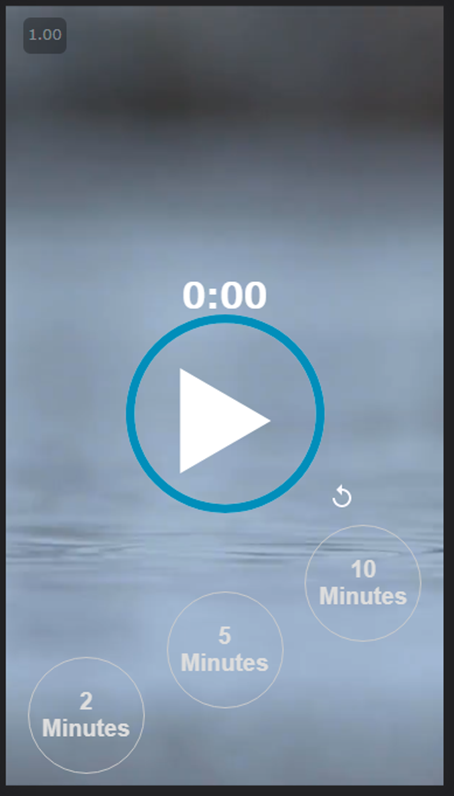
        .vid-container {
            position: fixed;
            top: 0;
            left: 0;
            height: 100%;
/*+*/
            z-index: -10;
        }
画面は完成
javascriptを作成する
関数を使ってカプセル化している
const app = ()=>{
  //処理
};
app();
//普通は即時関数化する

const app = (()=>{
  //処理
})();
要素を取得
        const app = (() => {
//音楽
            // <audio class="song">
            //     <source src="./sounds/rain.mp3" />
            // </audio>
            const song = document.querySelector('.song');
//再生ボタン
            //<img src="./svg/play.svg" class="play">
            const play = document.querySelector('.play');

//svgの青い円
            const outline = document.querySelector('.moving-outline circle');

//video
            // <div class="vid-container">
            // <video loop>
            //     <source src="./video/rain.mp4" type="video/mp4">
            // </video>
            // </div>
            const video = document.querySelector('.vid-container video');

//赤と青のボタン
            const sounds = document.querySelectorAll('.sound-picker button');

//表示時間
            const timeDisplay = document.querySelector('.time-display');

//下の再生時間を設定するボタン全部
            const timeSelects = document.querySelectorAll(".time-select button");

        })();
音楽を再生する
        .player-container img {
            position: absolute;
            top: 50%;
            left: 50%;
            transform: translate(-50%, -20%);

/*再生画像が下に埋もれているため上にあげる*/

            z-index: 10;
        }
//再生画像をクリックしたら
            play.addEventListener('click', (e) => {
                e.stopPropagation();
                checkPlaying(song);
            });

//再生しているかどうか判定して
//再生中ならストップ
//ストップ中なら再生する関数
//songはグローバル変数として宣言しているため、引数として渡す必要性はないという自分用のメモ
            const checkPlaying = (song) => {
                if (song.paused) { //停止していたらtrueを返すプロパティ
                    song.currentTime = 0; //再生時間を0にする。
                    song.play();
                    video.play();
                    play.src = './svg/pause.svg';
                } else {
                    song.pause();
                    video.pause();
                    play.src = './svg/play.svg';
                }
            }
アニメーションを作成する
//ベースの再生時間
            let fakeDuration = 5; //グローバル変数

//全周を取得する
            const outlineLength = outline.getTotalLength();

//点線の長さを全周と同じにする
            outline.style.strokeDasharray = outlineLength;

//点線を左に全周分 移動させる
            outline.style.strokeDashoffset = outlineLength;

//音楽が再生中イベントが発火してくれる。タイミングは結構いい加減。
            song.ontimeupdate = () => {
//経過時間の取得
                let currentTime = song.currentTime; //letやconstをつけてローカル変数宣言を必ずする
                let progress = outlineLength - outlineLength * (currentTime / fakeDuration);
                outline.style.strokeDashoffset = progress; //右へ引っ張りだしている感じ。

                let elapsed = fakeDuration - currentTime; //設定時間 - 経過時間 = 残りの時間(秒)
                let seconds = Math.round(elapsed % 60); //分の端数 秒を取得
                let minutes = Math.floor(elapsed / 60); //秒⇒分に変換

                if (seconds == 60) {
                    seconds = 59; //端数があって60秒が表示されてしまうため。帳尻を合わせている。60.4 > x > 58.5の範囲で59になるので間違ってはいない。
                }
                timeDisplay.textContent = `${minutes} : ${('0' + seconds).slice(-2)}` //残りの再生時間 0:00;
//経過時間が設定時間を超えたら終了
                if (currentTime >= fakeDuration) {
                    song.pause();
                    video.pause();
                    outline.style.strokeDashoffset = 0;
                    play.src = './svg/play.svg';
                    timeDisplay.textContent = `0:00` //残りの再生時間 0:00;
                }
            }
再生時間を変更する
//再生時間の再設定
//下のボタン要素のonclickプロパティに関数を登録する。
           timeSelects.forEach(timeSelect => {

//それぞれの要素のonclickプロパティに関数を設定する。
                timeSelect.onclick = function (e) {
                    song.currentTime = 0;
//ここの値を変更する
                    fakeDuration = this.dataset.time;
                    let seconds = Math.round(fakeDuration % 60); //分の端数 秒を取得
                    let minutes = Math.floor(fakeDuration / 60); //秒⇒分に変換
                    timeDisplay.textContent = `${minutes}:${('0' + secondes).slice(-2)}`;
                    checkPlaying(song);
                }
            });
ビデオと音楽を変更する。
            sounds.forEach(sound=>{
                sound.onclick = function(){
                    song.src = this.dataset.sound;
                    video.src = this.dataset.video;
                    checkPlaying(song);
                };
            });
模写したデモサイト
svg画像の注意点
ルートの一番上の.htaccessファイルを修正する必要がある
   AddType image/svg+xml .svg .svgz
   AddEncoding gzip .svgz
全体のコード
<!DOCTYPE html>
<html lang="en">

<head>
    <meta charset="UTF-8">
    <meta http-equiv="X-UA-Compatible" content="IE=edge">
    <meta name="viewport" content="width=device-width, initial-scale=1.0">
    <title>Document</title>
    <style>
        * {
            margin: 0;
            padding: 0;
        }

        .app {
            display: flex;
            flex-direction: column;

            height: 100vh;
            min-height: 600px;
        }

        img,
        video,
        svg {
            max-width: 100%;

            max-height: 100%;
        }

        video {
            width: 100%;
            height: 100%;
            object-fit: cover;
        }

        .vid-container {
            position: fixed;
            top: 0;
            left: 0;
            height: 100%;

            z-index: -10;
        }

        .time-select {
            order: 3;
            height: 33%;

            display: flex;
            justify-content: space-evenly;
            align-items: center;
            padding: 10px 0;


        }

        .time-select button {
            transition: all 0.5s ease;
            border-radius: 50%;
            border: 1px solid #ccc;
            height: 100px;
            width: 100px;
            cursor: pointer;
            background: none;
            font-size: 20px;
            font-weight: bold;
            position: relative;
            padding: 5px;
            color: #ddd;
        }

        .time-select button:hover {
            color: #000;
            background: #fff;
        }

        .time-select button:nth-child(1) {
            align-self: end;
        }

        .time-select button:nth-child(2) {
            align-self: center;
        }

        .time-select button:nth-child(3) {
            align-self: start;
        }

        .player-container {
            order: 2;
            height: 33%;

            position: relative;

        }

        .player-container svg {
            position: absolute;
            top: 20%;
            height: 80%;
            left: 50%;
            transform: translate(-50%, 0);
        }

        .player-container img {
            position: absolute;
            top: 50%;
            left: 50%;
            transform: translate(-50%, -20%);

            z-index: 10;
        }

        .player-container img.replay {
            top: 90%;
            left: 50%;
            margin-left: 100px;
        }

        .player-container .time-display {
            position: absolute;
            top: 5%;
            left: 50%;
            transform: translate(-50%);
            font-size: 30px;
            color: #fff;
            margin-top: -5px;
        }

        .player-container svg circle {
            transition: all 0.2s ease-in-out;
        }

        .sound-picker {
            order: 1;
            height: 33%;

            display: flex;
            align-items: center;
            justify-content: space-evenly;
        }

        .sound-picker button {
            border: none;
            height: 120px;
            width: 120px;
            padding: 30px;
            border-radius: 50%;
            cursor: pointer;
            transition: all 0.5s ease;
        }

        .sound-picker button:nth-child(1) {
            background: #4972a1;
        }

        .sound-picker button:nth-child(2) {
            background: #a14f49;
        }

    </style>
</head>

<body>
    <div class="app">

        <div class="vid-container">
            <video loop>
                <source src="./video/rain.mp4" type="video/mp4">
            </video>
        </div>

        <div class="time-select">
            <button data-time="10">2 Minutes</button>
            <button data-time="300" class="medium-mins">5 Minutes</button>
            <button data-time="600" class="long-mins">10 Minutes</button>
        </div>

        <div class="player-container">

            <audio class="song">
                <source src="./sounds/rain.mp3" />
            </audio>

            <img src="./svg/play.svg" class="play">

            <svg class="track-outline" width="453" height="453" viewBox="0 0 453 453" fill="none"
                xmlns="http://www.w3.org/2000/svg">
                <circle cx="226.5" cy="226.5" r="216.5" stroke="white" stroke-width="20" />
            </svg>

            <svg class="moving-outline" width="453" height="453" viewBox="0 0 453 453" fill="none"
                xmlns="http://www.w3.org/2000/svg">
                <circle cx="226.5" cy="226.5" r="216.5" stroke="#018EBA" stroke-width="20" />
            </svg>

            <img src="./svg/replay.svg" class="replay">

            <h3 class="time-display">0:00</h3>
        </div>

        <div class="sound-picker">

            <button data-sound="./sounds/rain.mp3" data-video="./video/rain.mp4"><img src="./svg/rain.svg"
                    alt=""></button>
            <button data-sound="./sounds/beach.mp3" data-video="./video/beach.mp4"><img src="./svg/beach.svg"
                    alt=""></button>

        </div>
    </div>
    <script>
        const app = (() => {

            const song = document.querySelector('.song');
            const play = document.querySelector('.play');
            const outline = document.querySelector('.moving-outline circle');
            const video = document.querySelector('.vid-container video');
            const sounds = document.querySelectorAll('.sound-picker button');
            const timeDisplay = document.querySelector('.time-display');
            const timeSelects = document.querySelectorAll(".time-select button");

            play.addEventListener('click', (e) => {
                e.stopPropagation();
                checkPlaying(song);
            }, {
                capture: false,
                once: false
            });

            //再生しているかどうか判定して
            //再生中ならストップ
            //ストップ中なら再生する関数
            const checkPlaying = (song) => {
                if (song.paused) { //停止していたらtrueを返すプロパティ
                    song.currentTime = 0;
                    song.play();
                    video.play();
                    play.src = './svg/pause.svg';
                } else {
                    song.pause();
                    video.pause();
                    play.src = './svg/play.svg';
                }
            }

            //ベースの再生時間
            let fakeDuration = 65;
            //全周を取得する
            const outlineLength = outline.getTotalLength();

            //点線の長さを全周と同じにする
            outline.style.strokeDasharray = outlineLength;
            //点線を左に全周分 移動させる
            outline.style.strokeDashoffset = outlineLength;
            song.ontimeupdate = () => {
                let currentTime = song.currentTime;
                let progress = outlineLength - outlineLength * (currentTime / fakeDuration);
                outline.style.strokeDashoffset = progress; //右へ引っ張りだしている感じ。

                let elapsed = fakeDuration - currentTime; //設定時間 - 経過時間 = 残りの時間(秒)
                let seconds = Math.round(elapsed % 60); //分の端数 秒を取得
                let minutes = Math.floor(elapsed / 60); //秒⇒分に変換

                if (seconds == 60) {
                    seconds = 59; //0.5秒以上の端数が切りあがって60秒が表示されてしまうため。帳尻を合わせている。60 > x > 58の範囲で59になるので間違ってはいない。
                }
                timeDisplay.textContent = `${minutes} : ${('0' + seconds).slice(-2)}` //残りの再生時間 0:00;

                if (currentTime >= fakeDuration) {
                    song.pause();
                    video.pause();
                    outline.style.strokeDashoffset = 0;
                    play.src = './svg/play.svg';
                    timeDisplay.textContent = `0:00` //残りの再生時間 0:00;
                }
            }

            //再生時間の再設定
            timeSelects.forEach(timeSelect => {
                timeSelect.onclick = function(e) {
                    song.currentTime = 0;
                    fakeDuration = this.dataset.time;
                    let seconds = Math.round(fakeDuration % 60); //分の端数 秒を取得
                    let minutes = Math.floor(fakeDuration / 60); //秒⇒分に変換
                    timeDisplay = `${minutes}:${('0' + secondes).slice(-2)}`;
                    checkPlaying(song);
                }
            });

            sounds.forEach(sound => {
                sound.onclick = function() {
                    song.src = this.dataset.sound;
                    video.src = this.dataset.video;
                    checkPlaying(song);
                };
            });

        })();
    </script>
</body>
</html>