はじめに
javaでApache POIを使用して結合せるに罫線とセットする。
例
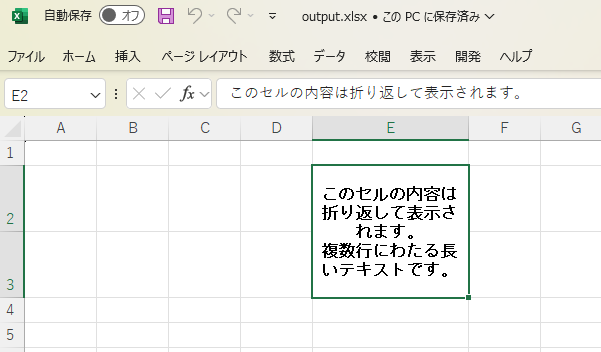
空のテンプレートからE2とE3を結合して、文字セット、罫線セットをする
(結果イメージ)

処理流れ
・セルを結合
・各セルセット
まず行を取得、または作成
次に行より列をセットしセルの場所を特定
・そこに文字を設定、今回だとE2に文字をセット
・スタイルはworkbookのcreateCellStyleメソッドよりセット
・フォントはworkbookのcreateFontメソッドよりセットし、styleにセットする
・それぞれのセルにスタイル適用
結合セルを扱う場合でも、結合がない通常のセルと同様に、範囲内のすべてのセルに対してスタイルを適用する(今回だとE2とE3にそれぞれ)
import org.apache.poi.ss.usermodel.*;
import org.apache.poi.xssf.usermodel.XSSFCellStyle;
import org.apache.poi.xssf.usermodel.XSSFWorkbook;
import org.apache.poi.ss.util.CellRangeAddress;

import java.io.FileInputStream;
import java.io.FileOutputStream;
import java.io.IOException;

public class ExcelMergeAndBorder {
    public static void main(String[] args) {
        String templatePath = "template.xlsx"; // テンプレートファイルのパス
        String outputPath = "output.xlsx";     // 出力ファイルのパス

        try (FileInputStream fis = new FileInputStream(templatePath);
             Workbook workbook = new XSSFWorkbook(fis)) {

            Sheet sheet = workbook.getSheetAt(0);

            // 既存の結合範囲を確認し、解除
            for (int i = 0; i < sheet.getNumMergedRegions(); i++) {
                CellRangeAddress mergedRegion = sheet.getMergedRegion(i);
                if (mergedRegion.isInRange(1, 4) || mergedRegion.isInRange(2, 4)) { // E2, E3を含むか
                    sheet.removeMergedRegion(i);
                    i--; // 削除後はインデックスを調整
                }
            }

            // E2とE3を縦に結合
            CellRangeAddress cellRangeAddress = new CellRangeAddress(1, 2, 4, 4); // 行と列は0ベース
            sheet.addMergedRegion(cellRangeAddress);

            // 必要な行を取得または作成
            Row row2 = sheet.getRow(1);
            if (row2 == null) {
                row2 = sheet.createRow(1);
            }
            Row row3 = sheet.getRow(2);
            if (row3 == null) {
                row3 = sheet.createRow(2);
            }

            // E2セルを取得または作成
            Cell cell = row2.getCell(4); // E2セル
            if (cell == null) {
                cell = row2.createCell(4);
            }

            // 値をセット
            String cellValue = "このセルの内容は折り返して表示されます。\n複数行にわたる長いテキストです。";
            cell.setCellValue(cellValue);

            // 罫線とスタイルの設定
            XSSFCellStyle style = (XSSFCellStyle) workbook.createCellStyle();
            style.setBorderTop(BorderStyle.THIN);
            style.setBorderBottom(BorderStyle.THIN);
            style.setBorderLeft(BorderStyle.THIN);
            style.setBorderRight(BorderStyle.THIN);
            style.setAlignment(HorizontalAlignment.CENTER);
            style.setVerticalAlignment(VerticalAlignment.CENTER);
            style.setWrapText(true); // 折り返して表示を設定

            // フォント設定
            Font font = workbook.createFont();
            font.setFontName("MS Gothic");
            font.setFontHeightInPoints((short) 12);
            font.setBold(true);
            style.setFont(font);

            // スタイルを結合されたセル全体に適用
            for (int row = 1; row <= 2; row++) { // E2, E3
                Row currentRow = sheet.getRow(row);
                if (currentRow == null) {
                    currentRow = sheet.createRow(row);
                }
                Cell currentCell = currentRow.getCell(4); // E列
                if (currentCell == null) {
                    currentCell = currentRow.createCell(4);
                }
                currentCell.setCellStyle(style); // スタイルを適用
            }

            // 列幅の設定(E列 = 4番目の列)
            sheet.setColumnWidth(4, 5000); // 列幅を調整

            // 行の高さを設定
            row2.setHeightInPoints(50); // E2の行の高さを調整
            row3.setHeightInPoints(50); // E3の行の高さを調整

            // ファイルを書き出し
            try (FileOutputStream fos = new FileOutputStream(outputPath)) {
                workbook.write(fos);
            }

            System.out.println("Excelファイルが正常に出力されました: " + outputPath);
        } catch (IOException e) {
            e.printStackTrace();
        }
    }
}
わかりやすく
Apache POIを使用したコードはクラスやメソッドの階層が深く、直感的に理解しにくい場合があります。特に、セル結合、スタイル設定、値の設定がそれぞれ異なるメソッドや処理フローを必要とするため、コードが複雑になりがちです。
以下に、コードを整理して可読性を向上させる方法を示します。
1. メソッドに分割して処理を整理
コードを単一のメインメソッドに詰め込むのではなく、以下のように処理を分割して再利用可能にすると、理解しやすくなります。
修正版コード(メソッド分割)
import org.apache.poi.ss.usermodel.*;
import org.apache.poi.xssf.usermodel.XSSFCellStyle;
import org.apache.poi.xssf.usermodel.XSSFWorkbook;
import org.apache.poi.ss.util.CellRangeAddress;

import java.io.FileInputStream;
import java.io.FileOutputStream;
import java.io.IOException;

public class ExcelMergeAndBorder {

    public static void main(String[] args) {
        String templatePath = "template.xlsx"; // テンプレートファイルのパス
        String outputPath = "output.xlsx";     // 出力ファイルのパス

        try (FileInputStream fis = new FileInputStream(templatePath);
             Workbook workbook = new XSSFWorkbook(fis)) {

            Sheet sheet = workbook.getSheetAt(0);

            // セル結合処理
            mergeCells(sheet, 1, 2, 4);

            // スタイル作成
            CellStyle style = createCellStyle(workbook);

            // 結合範囲にスタイルと値を適用
            applyStyleAndValue(sheet, 1, 2, 4, style, "このセルの内容は折り返して表示されます。\n複数行にわたる長いテキストです。");

            // ファイル出力
            try (FileOutputStream fos = new FileOutputStream(outputPath)) {
                workbook.write(fos);
            }

            System.out.println("Excelファイルが正常に出力されました: " + outputPath);
        } catch (IOException e) {
            e.printStackTrace();
        }
    }

    // セル結合処理
    private static void mergeCells(Sheet sheet, int startRow, int endRow, int colIndex) {
        // 既存の結合範囲を解除(重複回避)
        for (int i = 0; i < sheet.getNumMergedRegions(); i++) {
            CellRangeAddress mergedRegion = sheet.getMergedRegion(i);
            if (mergedRegion.isInRange(startRow, colIndex) || mergedRegion.isInRange(endRow, colIndex)) {
                sheet.removeMergedRegion(i);
                i--; // 削除後インデックスを調整
            }
        }

        // セルを結合
        CellRangeAddress cellRangeAddress = new CellRangeAddress(startRow, endRow, colIndex, colIndex);
        sheet.addMergedRegion(cellRangeAddress);
    }

    // スタイル作成
    private static CellStyle createCellStyle(Workbook workbook) {
        XSSFCellStyle style = (XSSFCellStyle) workbook.createCellStyle();
        style.setBorderTop(BorderStyle.THIN);
        style.setBorderBottom(BorderStyle.THIN);
        style.setBorderLeft(BorderStyle.THIN);
        style.setBorderRight(BorderStyle.THIN);
        style.setAlignment(HorizontalAlignment.CENTER);
        style.setVerticalAlignment(VerticalAlignment.CENTER);
        style.setWrapText(true); // 折り返して表示を設定

        // フォント設定
        Font font = workbook.createFont();
        font.setFontName("MS Gothic");
        font.setFontHeightInPoints((short) 12);
        font.setBold(true);
        style.setFont(font);

        return style;
    }

    // 結合範囲にスタイルと値を適用
    private static void applyStyleAndValue(Sheet sheet, int startRow, int endRow, int colIndex, CellStyle style, String value) {
        // 結合範囲内のセルにスタイル適用
        for (int rowIndex = startRow; rowIndex <= endRow; rowIndex++) {
            Row row = sheet.getRow(rowIndex);
            if (row == null) {
                row = sheet.createRow(rowIndex);
            }
            Cell cell = row.getCell(colIndex);
            if (cell == null) {
                cell = row.createCell(colIndex);
            }
            cell.setCellStyle(style); // スタイルを適用
        }

        // 先頭セルに値を設定
        Row mainRow = sheet.getRow(startRow);
        if (mainRow != null) {
            Cell mainCell = mainRow.getCell(colIndex);
            if (mainCell != null) {
                mainCell.setCellValue(value);
            }
        }
    }
}
コードの改善点
-
役割ごとにメソッド分割
-
mergeCells: セル結合の処理を1つのメソッドにまとめました。 -
createCellStyle: スタイル設定の処理を切り出しました。 -
applyStyleAndValue: 結合範囲にスタイルを適用し、値を設定する処理を分けました。
-
-
冗長な処理を簡略化
- メイン処理が短くなり、全体の流れが明確になりました。
-
再利用性の向上
- 結合範囲やスタイルの設定が変更になっても、特定のメソッドのみ修正すれば済むようになりました。
期待される効果
- メインの処理が短くなり、全体の流れが見やすくなります。
- 各メソッドが独立しているため、個別にテストしやすくなります。
- メソッドの役割が明確になり、コードの再利用が容易になります。
実行結果
コードを実行すると、E2:E3が正しく結合され、罫線と折り返し表示が適用され、値が設定されます。
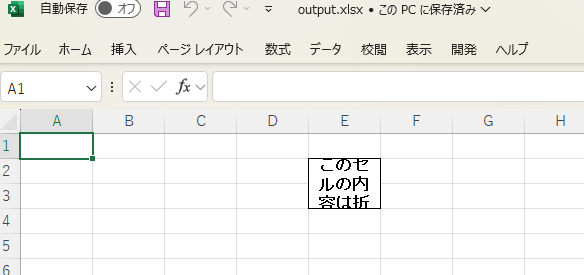
(全体表示等まで考慮に入れていません)

追記
Apache POIを使用してテンプレートからExcelファイルを読み込み、ページ設定やフォント、配置などの設定を確認する方法を記載します。特に、ページ向きや余白設定、印刷の方向などはSheetオブジェクトのPrintSetupを通じて確認できます。
以下に、ページ向きやその他の設定を確認する例を示します。
ページ設定を確認する例
import org.apache.poi.ss.usermodel.*;
import org.apache.poi.xssf.usermodel.XSSFWorkbook;
import java.io.FileInputStream;
import java.io.IOException;

public class ExcelTemplateReader {
    public static void main(String[] args) {
        String templatePath = "template.xlsx"; // テンプレートのパスを指定してください

        try (FileInputStream fis = new FileInputStream(templatePath);
             Workbook workbook = new XSSFWorkbook(fis)) {

            // シートを取得
            Sheet sheet = workbook.getSheetAt(0); // 0番目のシートを取得

            // ページ設定の確認
            System.out.println("ページ向き: " + (printSetup.getLandscape() ? "横" : "縦"));

            // 余白設定の確認
            System.out.println("左余白: " + sheet.getMargin(Sheet.LeftMargin));
            System.out.println("右余白: " + sheet.getMargin(Sheet.RightMargin));
            System.out.println("上余白: " + sheet.getMargin(Sheet.TopMargin));
            System.out.println("下余白: " + sheet.getMargin(Sheet.BottomMargin));

            // スケーリング設定の確認
            System.out.println("スケーリング (%): " + printSetup.getScale());

            // 用紙サイズの確認
            System.out.println("用紙サイズ: " + printSetup.getPaperSize());

            // フォントや配置の確認 (1つのセルを例に)
            Row row = sheet.getRow(0); // 1行目を取得
            if (row != null) {
                Cell cell = row.getCell(0); // 1列目を取得
                if (cell != null) {
                    CellStyle cellStyle = cell.getCellStyle();
                    Font font = workbook.getFontAt(cellStyle.getFontIndex());
                    System.out.println("フォント名: " + font.getFontName());
                    System.out.println("フォントサイズ: " + font.getFontHeightInPoints());

                    System.out.println("横位置: " + cellStyle.getAlignment());
                    System.out.println("縦位置: " + cellStyle.getVerticalAlignment());
                }
            }

        } catch (IOException e) {
            e.printStackTrace();
        }
    }
}
主なポイント
-
ページ向き:
PrintSetupオブジェクトのgetLandscape()メソッドでページ向き(横または縦)を確認できます。 -
余白設定:
Sheet.getMargin()メソッドで余白を確認できます。 -
フォントと配置: セルのスタイル (
CellStyle) からフォントや配置を取得できます。
ページ向きの設定を修正する例
ページ向きが意図した設定と異なる場合、以下のように修正可能です。
// ページ向きを横に設定
printSetup.setLandscape(true);
これをテンプレートの読み込み後に設定することで、正しいページ向きで出力できます。
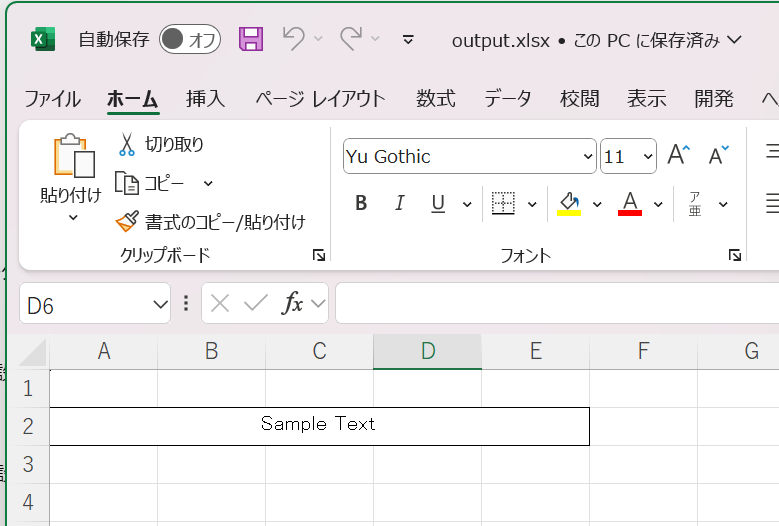
セルの書式保持
package com.example.POIExample2;

import java.io.FileInputStream;
import java.io.FileOutputStream;
import java.io.IOException;

import org.apache.poi.ss.usermodel.Cell;
import org.apache.poi.ss.usermodel.CellStyle;
import org.apache.poi.ss.usermodel.Row;
import org.apache.poi.ss.util.CellRangeAddress;
import org.apache.poi.xssf.usermodel.XSSFSheet;
import org.apache.poi.xssf.usermodel.XSSFWorkbook;

public class App {
    public static void main(String[] args) {
        try (FileInputStream templateFile = new FileInputStream("template.xlsx");
             XSSFWorkbook workbook = new XSSFWorkbook(templateFile)) {

            XSSFSheet sheet = workbook.getSheetAt(0);

            // 2行目AからE列の結合セル設定
            int sourceRowIndex = 1; // 2行目 (インデックスは0から始まる)
            int sourceStartCol = 0; // A列 (インデックスは0から始まる)
            int sourceEndCol = 4;   // E列 (インデックスは0から始まる)

            Row sourceRow = sheet.getRow(sourceRowIndex);
            if (sourceRow != null) {
                // 結合セル範囲を作成
                CellRangeAddress range = new CellRangeAddress(sourceRowIndex, sourceRowIndex, sourceStartCol, sourceEndCol);

                // 既存の結合セル範囲をチェック
                boolean isAlreadyMerged = false;
                for (int i = 0; i < sheet.getNumMergedRegions(); i++) {
                    CellRangeAddress existingRange = sheet.getMergedRegion(i);
                    if (existingRange.equals(range)) {
                        isAlreadyMerged = true;
                        break;
                    }
                }

                if (!isAlreadyMerged) {
                    sheet.addMergedRegion(range);
                }

                // 左上セルの値を設定
                Cell sourceCell = sourceRow.getCell(sourceStartCol);
                if (sourceCell == null) {
                    sourceCell = sourceRow.createCell(sourceStartCol);
                }
                sourceCell.setCellValue("Sample Text");

                // 左上セルのスタイルをコピーして適用
                CellStyle sourceStyle = sourceCell.getCellStyle();
                for (int col = sourceStartCol; col <= sourceEndCol; col++) {
                    Cell targetCell = sourceRow.getCell(col);
                    if (targetCell == null) {
                        targetCell = sourceRow.createCell(col);
                    }
                    targetCell.setCellStyle(sourceStyle);
                }
            }

            // ファイル出力
            try (FileOutputStream outputStream = new FileOutputStream("output.xlsx")) {
                workbook.write(outputStream);
            }

            System.out.println("結合セルに値をセットし、書式設定を引き継ぎました。");
        } catch (IOException e) {
            e.printStackTrace();
        }
    }
}
セルスタイルやフォントのコピー
private static CellStyle copyCellStyle(CellStyle originalStyle, XSSFWorkbook templateWorkbook, XSSFWorkbook newWorkbook) {
    CellStyle newStyle = newWorkbook.createCellStyle();

    // 各種プロパティのコピー
    newStyle.setAlignment(originalStyle.getAlignment());
    newStyle.setVerticalAlignment(originalStyle.getVerticalAlignment());
    newStyle.setBorderTop(originalStyle.getBorderTop());
    newStyle.setBorderBottom(originalStyle.getBorderBottom());
    newStyle.setBorderLeft(originalStyle.getBorderLeft());
    newStyle.setBorderRight(originalStyle.getBorderRight());
    newStyle.setTopBorderColor(originalStyle.getTopBorderColor());
    newStyle.setBottomBorderColor(originalStyle.getBottomBorderColor());
    newStyle.setLeftBorderColor(originalStyle.getLeftBorderColor());
    newStyle.setRightBorderColor(originalStyle.getRightBorderColor());
    newStyle.setWrapText(originalStyle.getWrapText());
    newStyle.setFillForegroundColor(originalStyle.getFillForegroundColor());
    newStyle.setFillBackgroundColor(originalStyle.getFillBackgroundColor());
    newStyle.setFillPattern(originalStyle.getFillPattern());
    newStyle.setRotation(originalStyle.getRotation());
    newStyle.setIndention(originalStyle.getIndention());
    newStyle.setDataFormat(originalStyle.getDataFormat());
    newStyle.setShrinkToFit(originalStyle.getShrinkToFit());

    // フォントのコピー
    Font originalFont = templateWorkbook.getFontAt(originalStyle.getFontIndexAsInt());
    Font newFont = newWorkbook.createFont();
    newFont.setFontName(originalFont.getFontName());
    newFont.setFontHeight(originalFont.getFontHeight());
    newFont.setBold(originalFont.getBold());
    newFont.setItalic(originalFont.getItalic());
    newFont.setColor(originalFont.getColor());
    newFont.setUnderline(originalFont.getUnderline());
    newFont.setStrikeout(originalFont.getStrikeout());
    newStyle.setFont(newFont);

    return newStyle;
}
