IntelliJでプラグインを作るにはどうするのか知りたくて、簡単なプラグインを作ってみました。
記録のために残しておきます。
作るもの
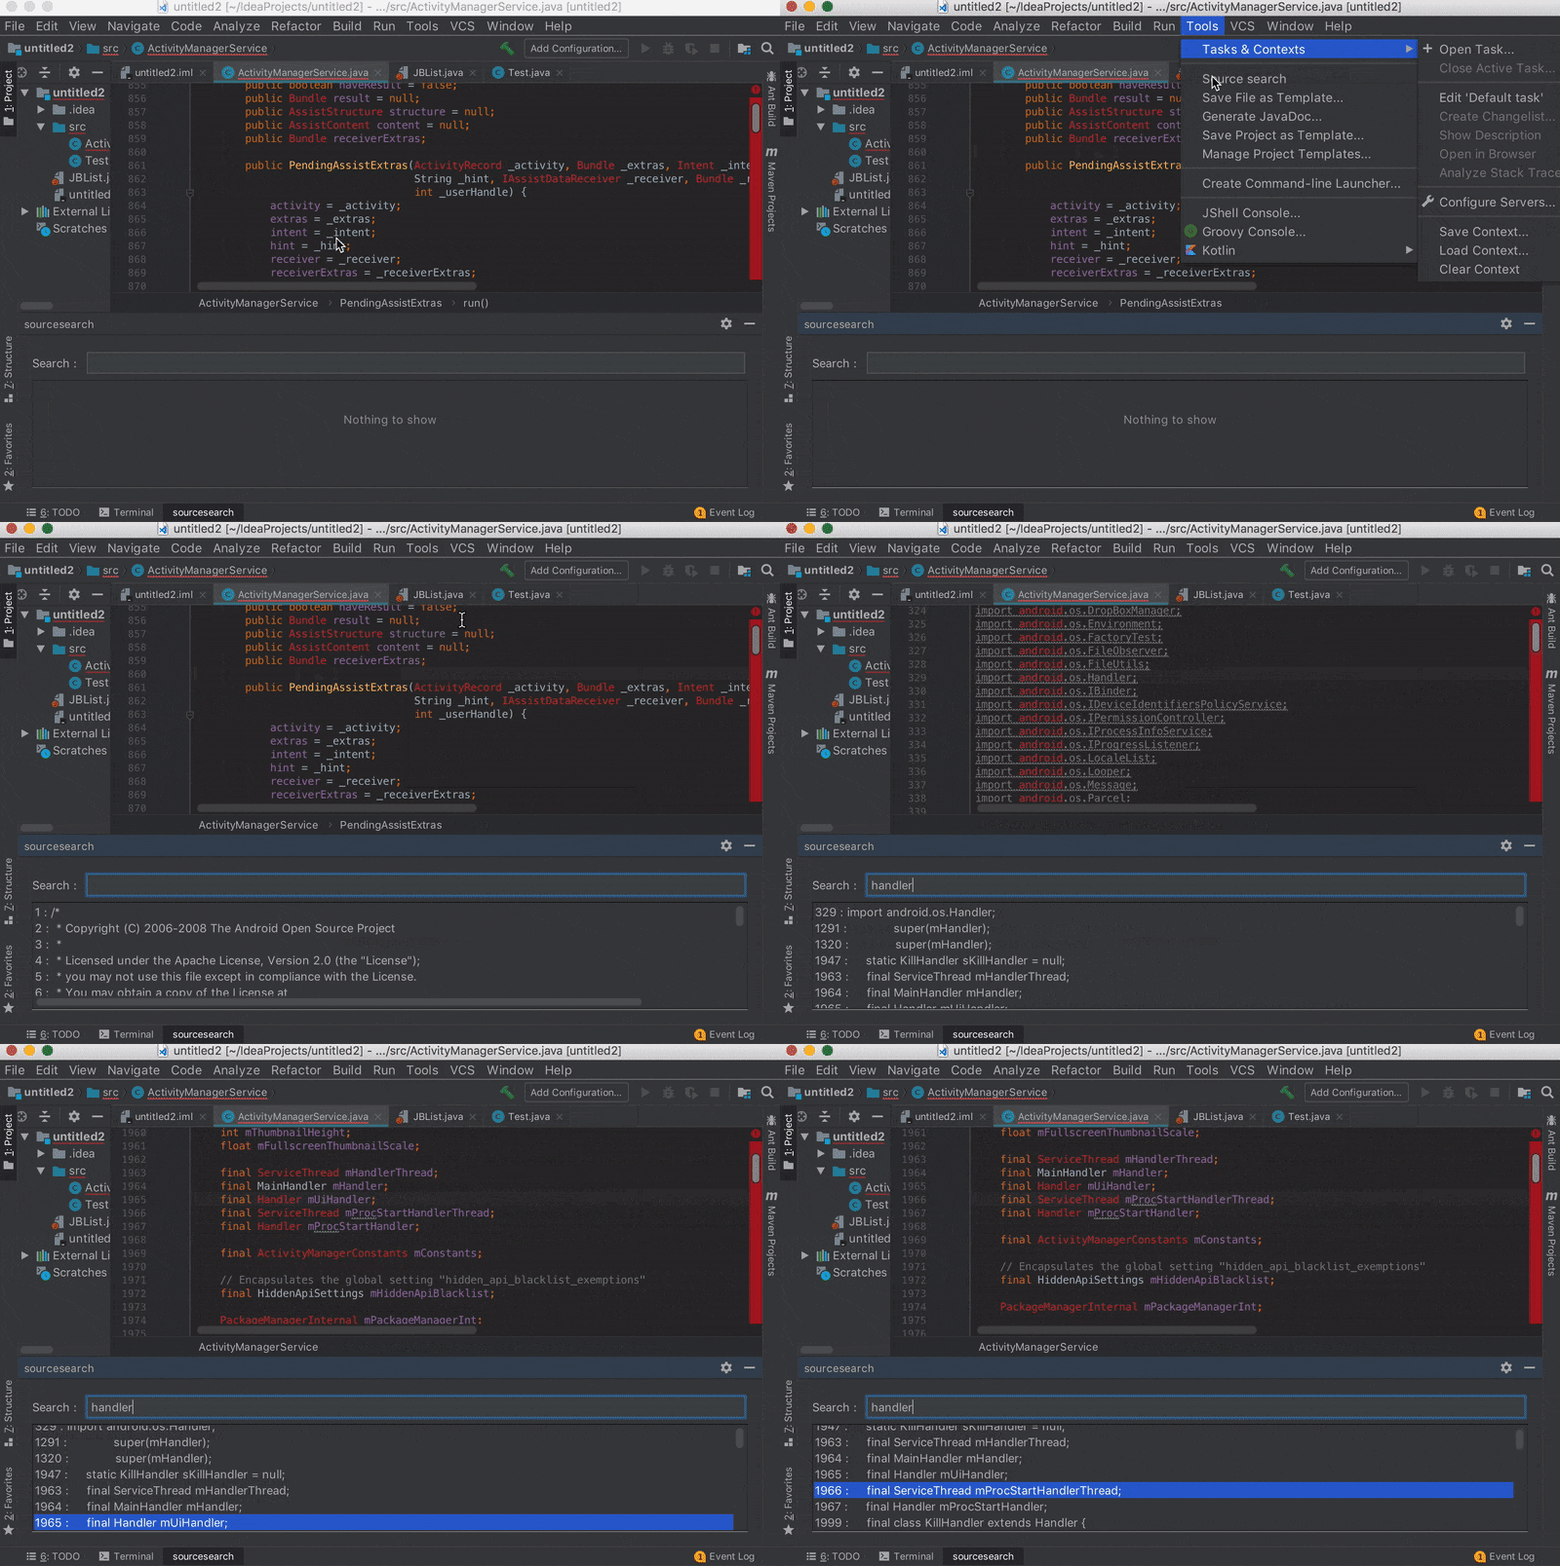
ソースコードの中から条件に一致する行だけを抽出し一覧表示し、選択するとその行を表示するプラグインです。Emacsのhelm-swoopみたいな感じです。
環境
- macOS High Sierra (10.13.6)
- IntelliJ IDEA 2018.2.3 CommunityEdition
IntelliJのプラグイン概要
IntelliJはプラグインによる拡張を前提としているため、追加の機能拡張が容易になっています。
メニューに機能を追加することや、任意の情報を表示するウインドウの追加はもちろん、新しい言語に対応するプラグインも作成することができます。
それらはJavaまたはKotlinで記述し、UIはSwingで作成します。
そしてJarファイルに固め、IntelliJのプラグイン設定画面からJarファイルを選択することでプラグインを読み込むことができます。
もちろんIntelliJの公式サイトで公開することでIntelliJのプラグイン設定画面からボタン一つでインストールすることもできるようになります。
プロジェクト作成
IntelliJのメニュー [File]-[New]-[Project...]を選択します。
New Projectウインドウが開いたら、IntelliJ Platfom Pluginを選択します。
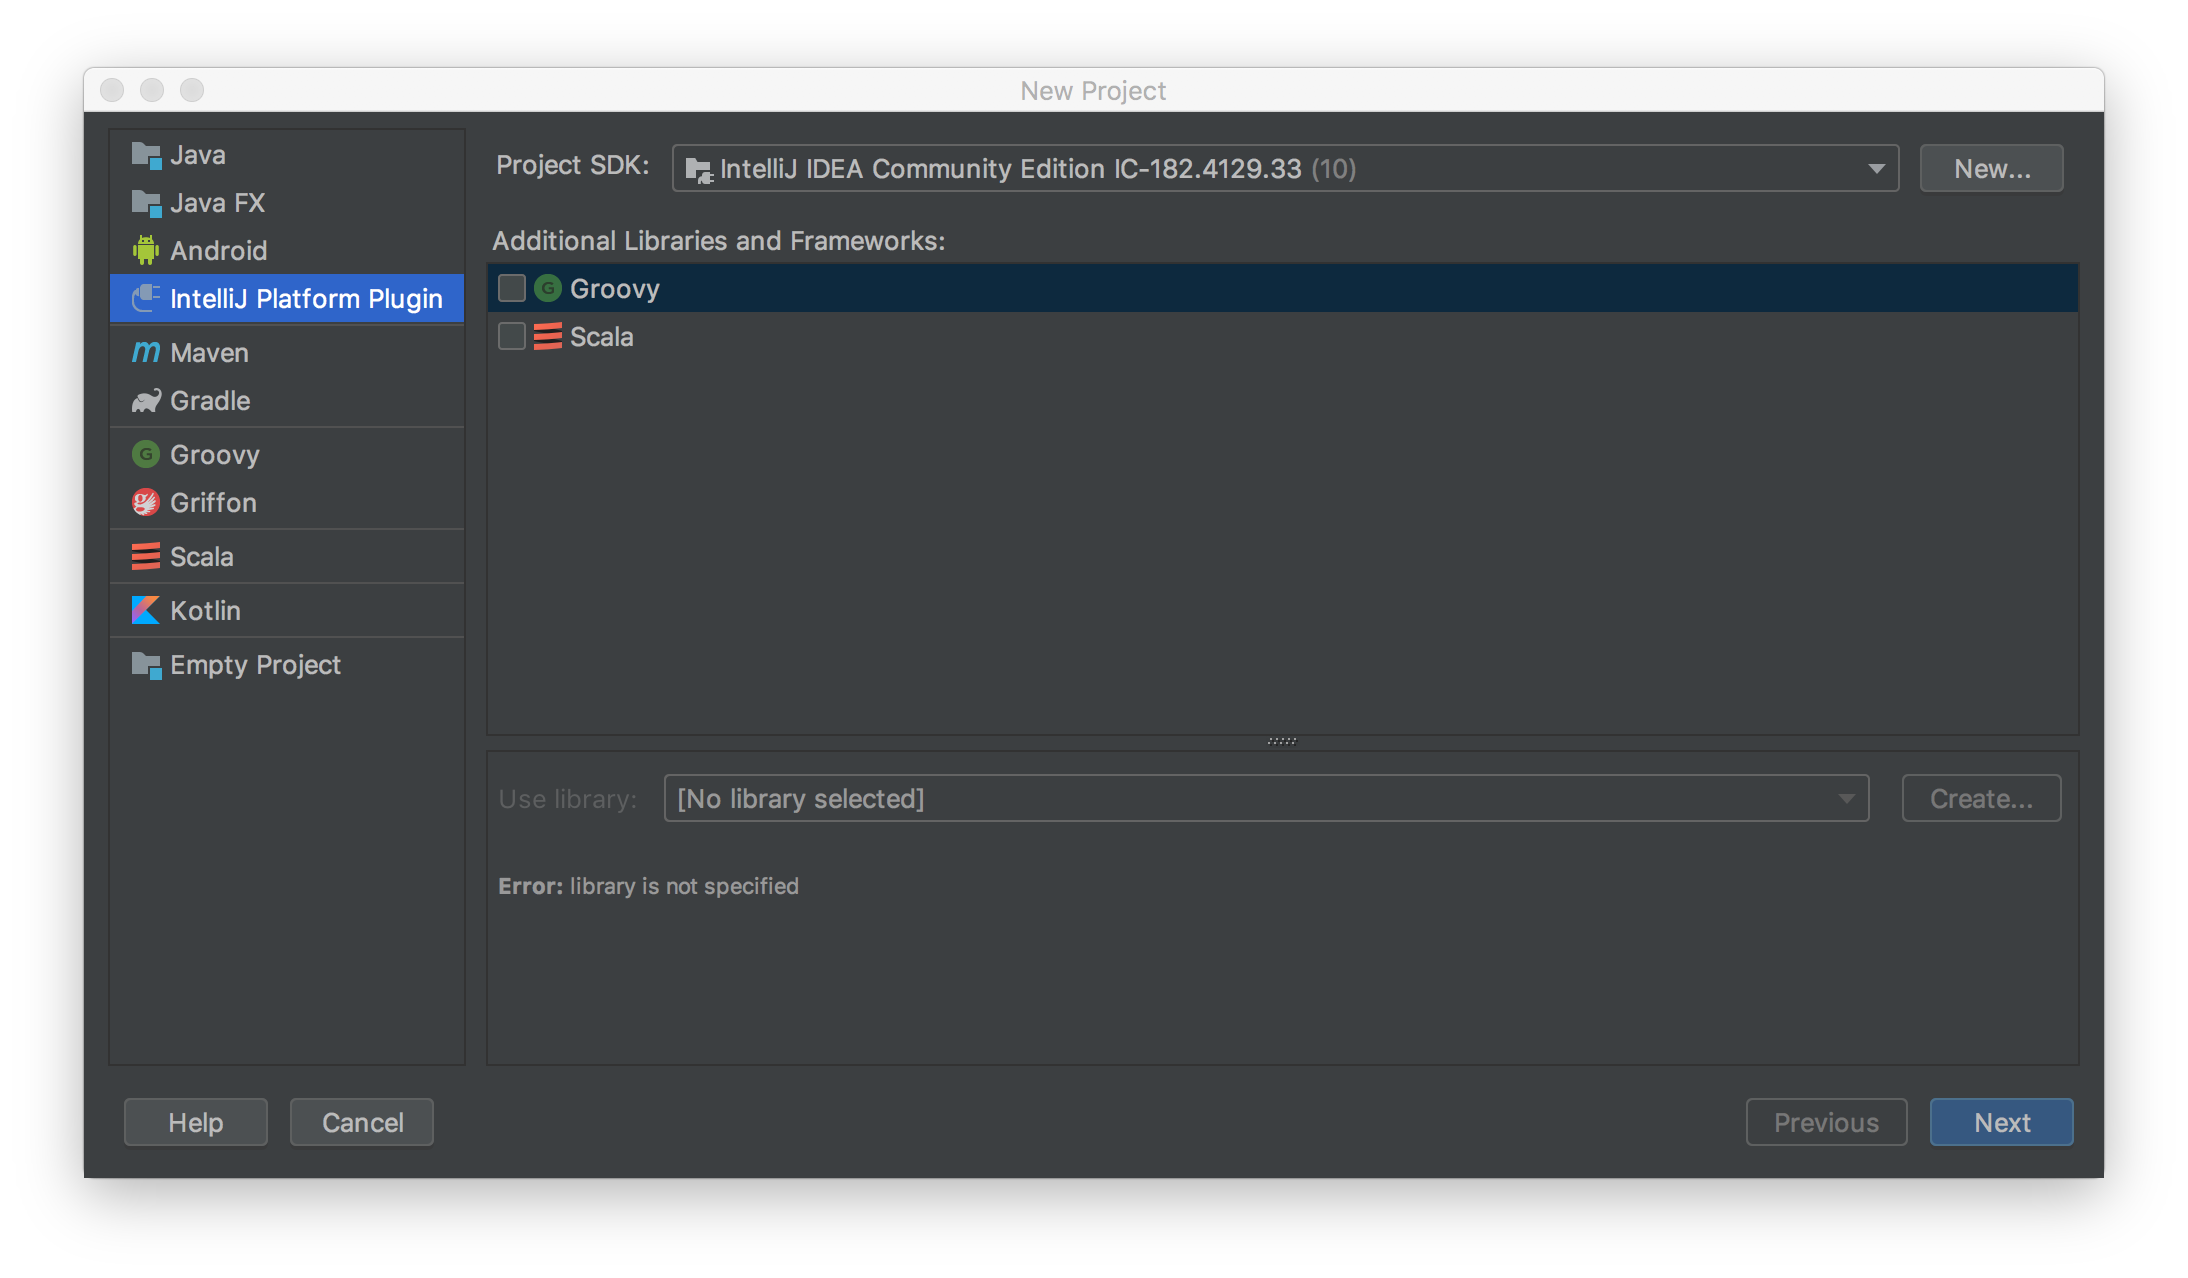
Project SDKが設定されていない場合は、設定を追加します。IntelliJのアプリ自体がPluginのSDKとなっているので、IntelliJをインストールしているフォルダを指定します。詳細は公式ページが参考になります。
IntelliJ プラットフォーム・プラグイン SDKの設定
Project SDKが設定できればNextを選択します。
Project名を入力する画面が表示されるので、適切な名前を入力してFinishを選択します。
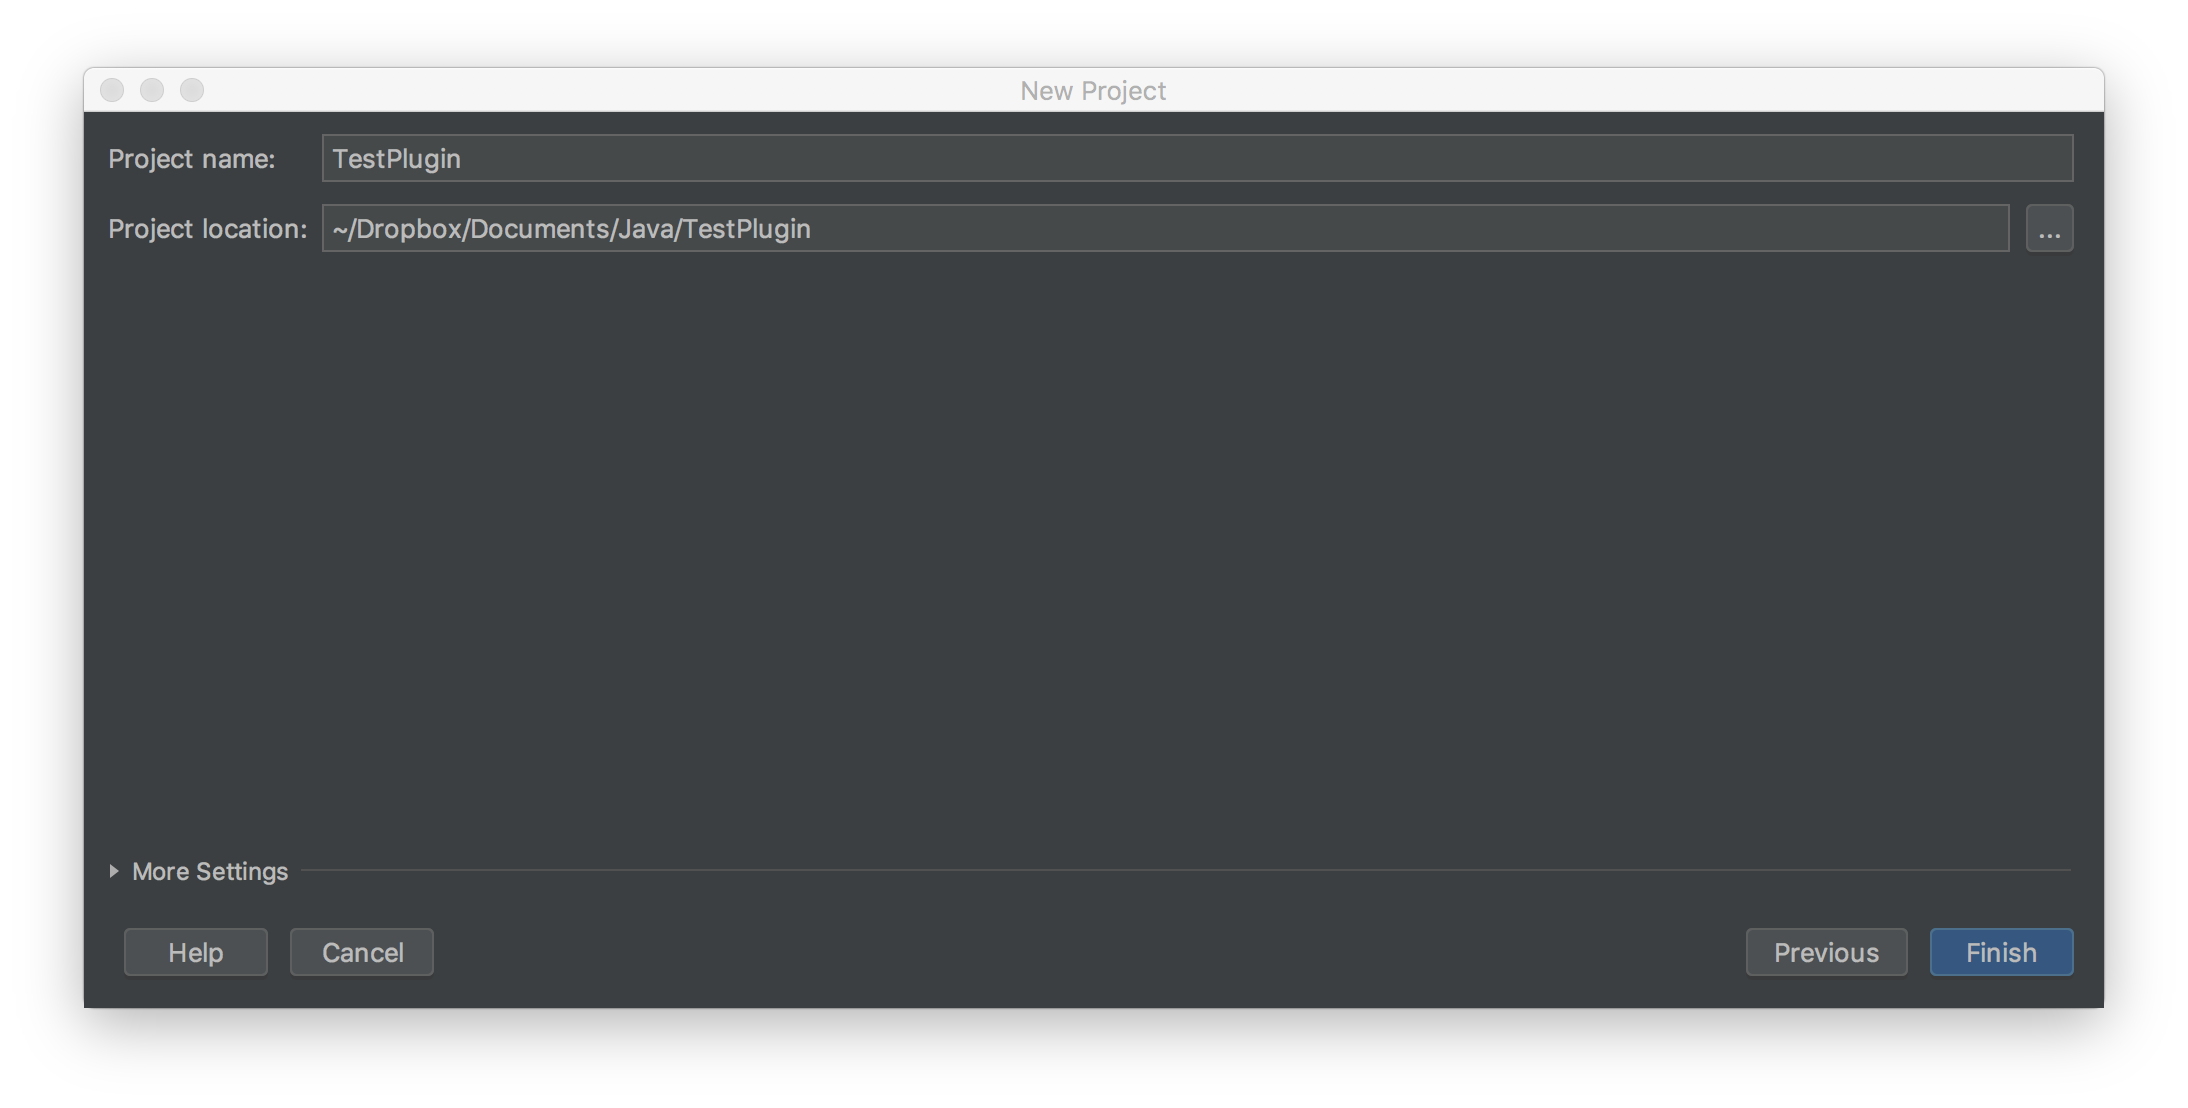
以上で初期設定は完了です。
最初に、検索結果を表示するWindowを実装します。IntelliJではSwingでUIを実装します。(Swing書くの何年ぶりだろう・・・)
Swingの説明は省きますが、次のようにResultWindowクラスを作成します。検索結果を表すResultItemも同時に定義しておきます。
data class ResultItem(
        val file: VirtualFile,
        val lineNumber: Int,
        val offset: Int,
        val text: String)

class ResultWindow: JPanel() {
    var input: JTextField
    var allResultItem: List<ResultItem> = mutableListOf()
    lateinit var resultList: JBList<ResultItem>
    var resultDataMode: DefaultListModel<ResultItem>
    var toolWindow: ToolWindow? = null
    var currentProject: Project? = null
    var selectionIndex = -1

    init {
        // Window作成
        layout = GridBagLayout()
        input = JTextField(400)

        // 検索エリアの上下キー入力で、検索結果を移動
        input.addKeyListener(object: KeyListener {
            override fun keyTyped(e: KeyEvent?) {}
            override fun keyPressed(e: KeyEvent?) {
                when (e?.keyCode) {
                    KeyEvent.VK_UP -> {
                        if (selectionIndex > 0) {
                            selectionIndex--
                        }
                    }
                    KeyEvent.VK_DOWN -> {
                        if (resultList != null && selectionIndex < resultList.itemsCount) {
                            selectionIndex++
                        }
                        if (selectionIndex > resultList.itemsCount) {
                            selectionIndex = resultList.itemsCount - 1
                        }
                    }
                    else -> {}
                }
                resultList.selectedIndex = selectionIndex
                resultList.ensureIndexIsVisible(selectionIndex)
            }
            override fun keyReleased(e: KeyEvent?) = search(input.text)
        })
        add(JLabel("Search : "), createLayoutParam(0,0,1,1,0.0,0.0,GridBagConstraints.NONE))
        add(input, createLayoutParam(1,0,1,1,1.0,0.0,GridBagConstraints.HORIZONTAL))
        resultDataMode = DefaultListModel()
        resultList = JBList(resultDataMode).apply {
            addListSelectionListener(MyListSelectionListener())
            cellRenderer = MyCellRenderer()
        }
        add(JScrollPane().apply {
            viewport.view = resultList}, createLayoutParam(0,1,2,1,0.0,1.0,GridBagConstraints.BOTH))
    }

    private fun createLayoutParam(x: Int, y: Int, sx: Int, sy:Int, wx: Double, wy: Double, fill: Int): GridBagConstraints {
        return GridBagConstraints(x,y,sx,sy,wx,wy,GridBagConstraints.CENTER,fill, Insets(0,0,0,0),0,0)
    }

    /**
     * 検索対象の設定
     */
    fun setData(list: List<ResultItem>) {
        allResultItem = list
        list.forEach {
            resultDataMode.addElement(it)
        }
    }

    /**
     * 検索実行
     */
    fun search(str: String) {
        val lowerCase = str.toLowerCase()
        resultDataMode.clear()
        allResultItem.forEach {
            if (it.text.toLowerCase().indexOf(lowerCase) != -1) {
                resultDataMode.addElement(it)
            }
        }
    }

    /**
     * 検索テキストボックス設定
     */
    fun setKeyword(title: String) {
        input.text = title
        input.requestFocusInWindow()
    }

    /**
     * 検索結果選択時にエディタ側を移動させるリスナ
     */
    inner class MyListSelectionListener: ListSelectionListener {
        override fun valueChanged(e: ListSelectionEvent?) {
            if (e == null) return
            val item = resultList.selectedValue ?: return
            currentProject?.apply {
                getCurrentEditor(this)?.apply {
                    caretModel.moveToOffset(item.offset)
                    scrollingModel.scrollToCaret(ScrollType.CENTER)
                }
            }
        }
        private fun getCurrentEditor(project: Project): Editor? =
                FileEditorManager.getInstance(project).selectedTextEditor
    }

    /**
     * JBListのCellRenderer
     */
    class MyCellRenderer: DefaultListCellRenderer() {
        override fun getListCellRendererComponent(list: JList<*>?, value: Any?, index: Int, isSelected: Boolean, cellHasFocus: Boolean): Component {
            val label = super.getListCellRendererComponent(list, value, index, isSelected, cellHasFocus) as JLabel
            val item = value as ResultItem
            label.text = "${item.lineNumber} : ${item.text}"
            return label
        }
    }
}
ほとんどSwingのコードなのでIntelliJ要素はないですが、関連する部分としては検索結果を選択したときに、対応する行へジャンプする部分です。
FileEditorManagerからEditorのインスタンスを取得し、対応する行を表示しています。
これらのAPIのドキュメントはなさそうなので、IntelliJのソースコードを読むか、ソースコードが公開されているプラグインのソースコードを読むしかなさそうです。
あとはデバッガで、各インスタンスの中に目当ての情報が無いかたどっていくと良いかもしれません。
val item = resultList.selectedValue ?: return
currentProject?.apply {
    getCurrentEditor(this)?.apply {
        caretModel.moveToOffset(item.offset) // 対応する行に移動
        scrollingModel.scrollToCaret(ScrollType.CENTER) // エディタをスクロール
    }
}

private fun getCurrentEditor(project: Project) : Editor? =
                FileEditorManager.getInstance(project).selectedTextEditor
では次にこのResultWindowをIntelliJの中から使えるようにしましょう。
このResultWindowは単なるSwingのWindowですので、ToolWindowとして呼び出せるようにします。
そのためにToolWindowFactoryを作成します。
ToolWindowFactoryを継承し、createToolWindowContentメソッドをオーバーライドします。
ResultWindowインスタンスを生成し、addしているだけです。
class SwoopPlugin : ToolWindowFactory {
    override fun createToolWindowContent(project: Project, parentToolWindow: ToolWindow) {
        ResultWindow().apply {
            toolWindow = parentToolWindow
            currentProject = project
            parentToolWindow.component.add(this)
        }
    }
}
そして、このSwoopPluginをプラグインとして使えるよう設定しましょう。
resources/META-INF/plugin.xmlを開き、先ほどのWindowをToolWindowとして追加します。
  <extensions defaultExtensionNs="com.intellij">
    <toolWindow id="sourcesearch" anchor="bottom" factoryClass="SwoopPlugin"/>
  </extensions>
この部分については公式ドキュメントTool Windowsが詳しいです。
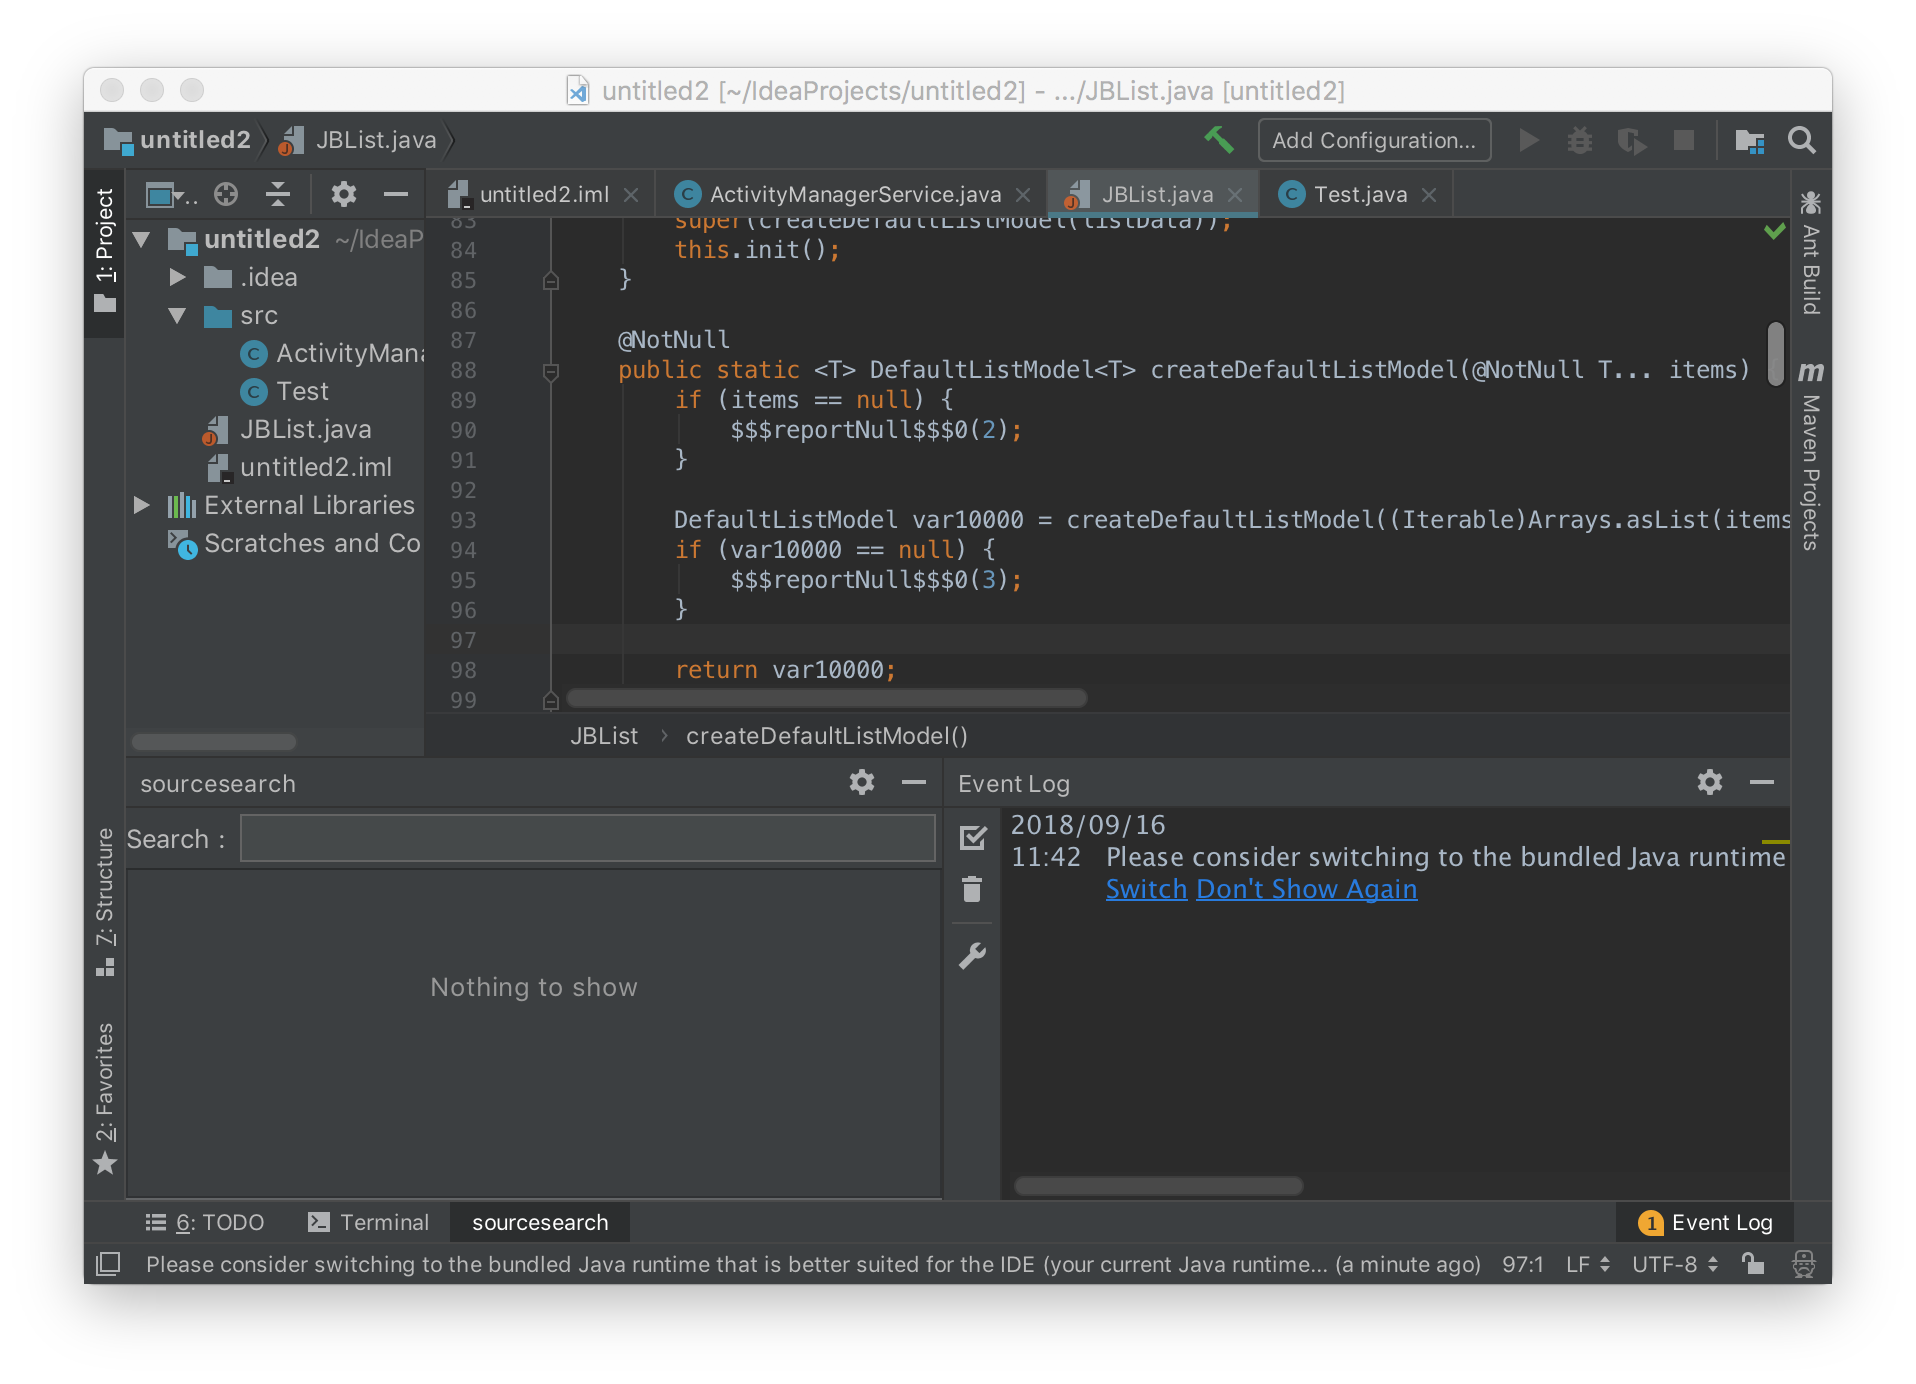
さぁ、まだ完成はしていませんが、一度実行してResultWindowが表示されるか見てみましょう。
RunでPluginを実行します。すると開発中のプラグインを有効にした状態で、もう一つのIntelliJが起動します。
左下にWindowが表示されていますね!
では次にActionを追加し、検索機能を完成させましょう。
IntelliJのメインメニューにActionを追加します。Actionとは、メニューやショートカットから起動することができる機能です。
srcディレクトリを右クリックし、コンテキストメニューを表示します。
[New]-[Plugin DevKit]-[Action]を選択します。
するとNew Actionダイアログが表示されるので、各項目を設定します。
Plugin DevKitがメニューにない場合はDevKitのプラグインが有効になっていないと思われるので、プラグイン設定画面からDevKitをenableにしてください。詳細はプラグインの管理を参照します。
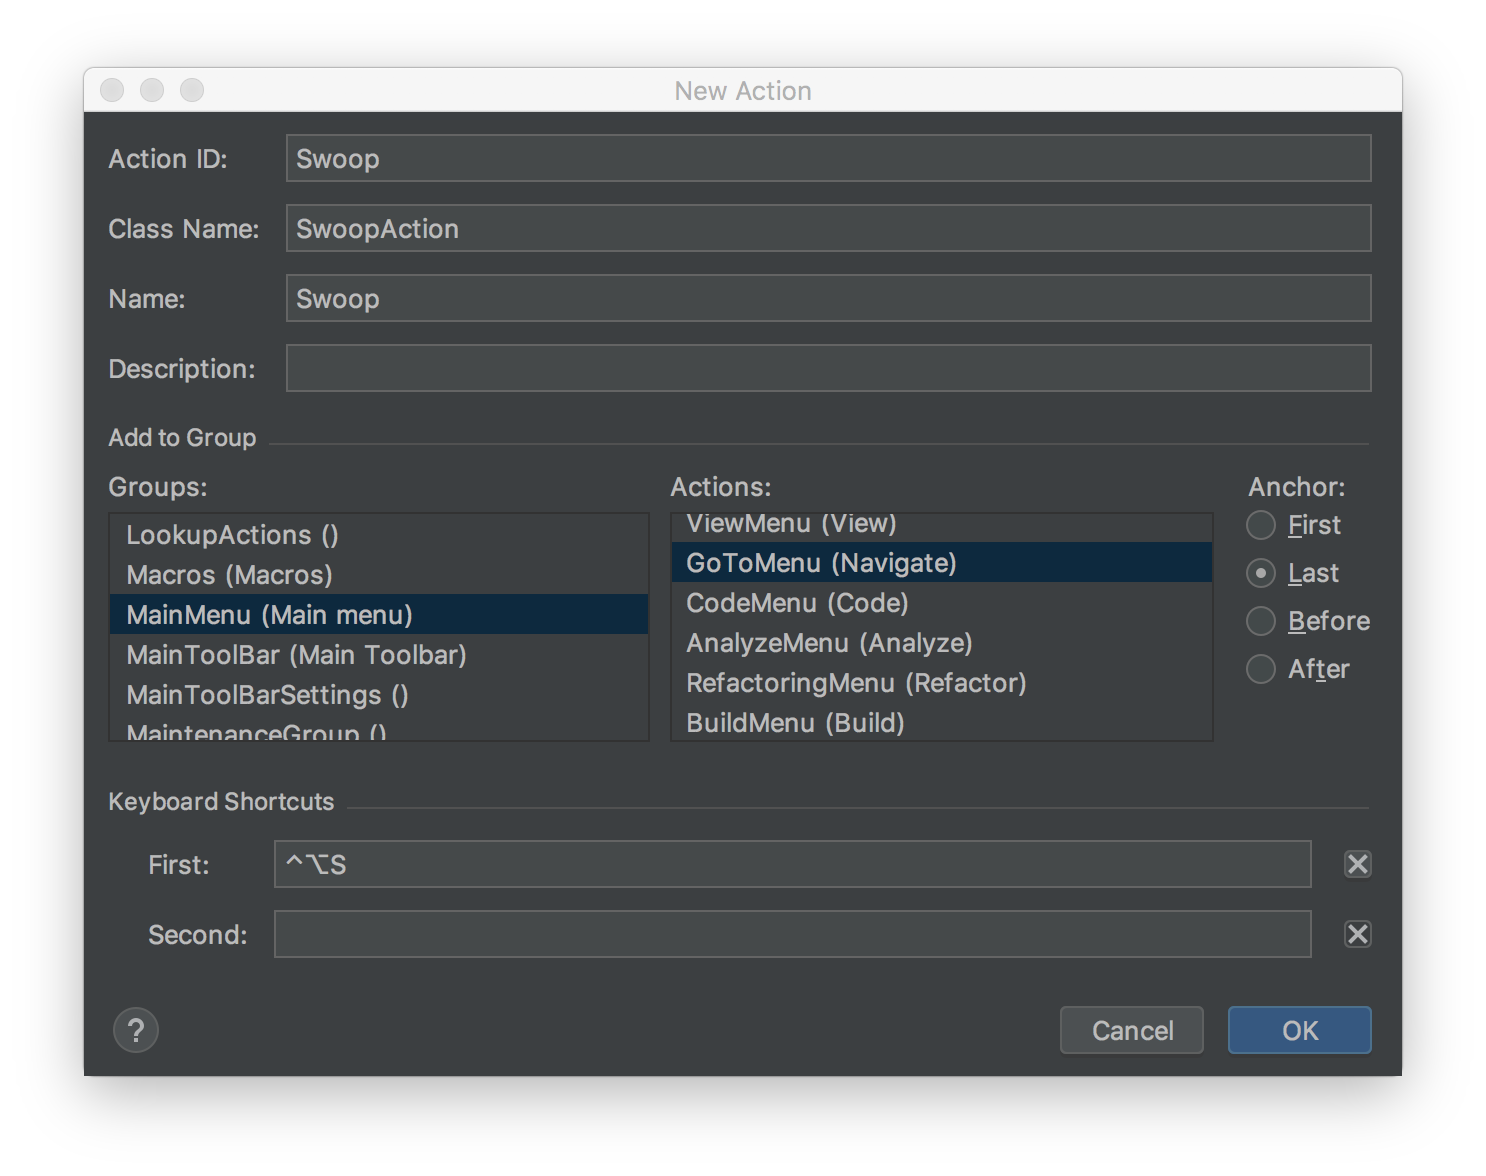
- Action ID
IntelliJの中でActionを識別するユニークなIDです。
どんなフォーマットで指定するかは標準のAction IDがまとまっているページがあるので参考にしてください。Action ID一覧 - Class Name
Actionクラスのクラス名を入力します。今回は手抜きでDefault packageに置いています。 - Name
メニューに表示される名前です。 - Description
アクションの説明になります。 - Add to Group
作成するActionをどのAction Groupに追加するかを設定します。Action Groupとは文字通りActionをまとめたものです。MainMenuはIntelliJのメニューにActionを追加します。Actionsではさらにその中のどこに追加するかを設定します。たとえばFileのAction GroupにActionを追加すると、FileのメニューにActionを追加することができます。
今回はNavigateに追加するので、GoToMenuを設定します。 - Keyboard Shortcuts
キーボードショートカットも設定することができますので必要があれば設定しておきます。
OKボタンを選択すると、プラグインの設定ファイルであるplugin.xmlにActionが追加され、ソースファイルとして入力したSwoopActionクラスが生成されます。
import com.intellij.openapi.actionSystem.AnAction;
import com.intellij.openapi.actionSystem.AnActionEvent;

public class SwoopAction extends AnAction {
    @Override
    public void actionPerformed(AnActionEvent e) {
        // TODO: insert action logic here
    }
}
ActionはAnActionクラスを継承します。そしてメニューから選択されるか、ショートカットキーが入力されるとactionPerformedメソッドが呼びだされます。
今回はKotlinでプラグインを記述したいので、JavaからKotlinに変換しておきます。
SwoopActionクラスを右クリックし、[Convert Java File to Kotlin File]を選択します。
無事にKotlinソースコードに変換されました。
import com.intellij.openapi.actionSystem.AnAction
import com.intellij.openapi.actionSystem.AnActionEvent

class SwoopAction : AnAction() {
    override fun actionPerformed(e: AnActionEvent) {
        // TODO: insert action logic here
    }
}
ではこのActionに対して実装を進めていきましょう。必要な処理は次の通りです。
- 選択中のエディタ情報を取得する。
- エディタから、ソースコードを取得する。
- ResultWindowをToolWindowManagerから取得する。
- ResultWindowに対してソースコードを渡す。
ということで実装すると次のようになります。ポイントは、AnActionEventのgetDataで各種情報を取得できるというところです。何が取れるかはデバッガで中身を見るのが早いかと思います。
そして、ToolWindowManagerからToolWindowのContentManagerを取得します。その際に指定するIDはplugin.xmlのtoolWindowのIDを指定します。
取得したContentManagerからResultWindowを取得します。
class SwoopAction : AnAction() {
    override fun actionPerformed(e: AnActionEvent) {
        // 各種インスタンス取得
        e?.getData(DataKeys.EDITOR) ?: return
        val editor = e.getData(DataKeys.EDITOR) as EditorImpl
        val currentProject = e.project ?: return
        val contentManager = ToolWindowManager.getInstance(currentProject)
                .getToolWindow("sourcesearch").contentManager
        val componentCount = contentManager.component.componentCount

        // 検索結果Window取得
        var resultWindow : ResultWindow? = null
        for (i in 0 until componentCount) {
            val component = contentManager.component.getComponent(i)
            if (component is ResultWindow) {
                resultWindow = component
                resultWindow.currentProject = currentProject
            }
        }

        // 検索実行
        editor?.document?.let {
            val split = it.text.split("\n")
            val list = mutableListOf<ResultItem>()
            var index = 1
            var offset = 1
            split.forEach {
                list.add(ResultItem(editor.virtualFile, index++, offset, it))
                offset += it.length
            }
            resultWindow?.apply {
                setData(list)
                setKeyword("")
            }
        }
    }
}
では実行し、確認しましょう。Runで起動するIntelliJのメニューに次のようにActionが追加されていれば成功です!
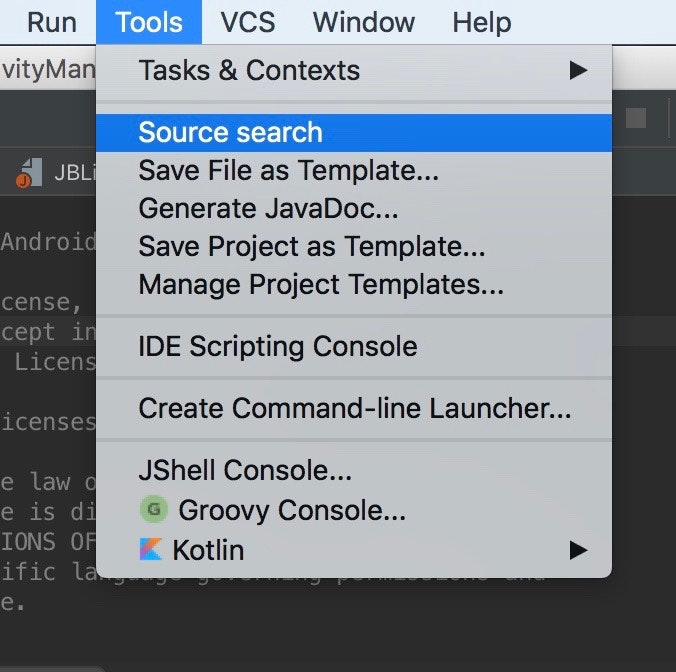
が、MacのHigh Sierraでは、Runから起動したIntelliJのインスタンスではこのActionを選択しても期待通りにactionPerformedメソッドが呼ばれません。そのため、その他のメニューもすべて動作しないはずです。
どうやらバグのようですので、次のVM引数をつけることでMacネイティブのメニューを使わなくして回避します。
-Dapple.laf.useScreenMenuBar=false

まとめ
- IntelliJのプラグインは簡単に作ることができます。
- ドキュメントは英語ですが公式ドキュメントIntelliJ Platform SDKがおすすめ。
- またはソースコードが公開されているプラグインを参考にします。。
- あとはデバッガで中身を見ればなんとかなります。
- Macではプラグインのデバッグでメニューが効かないという罠があるのでVM引数を設定して回避します。
- Kotlinおすすめ。