React Redux
前提ライブラリ
本記事は、「NativeBase」、「React Navigation」の導入を前提としています。一からプロジェクトを作成する場合には、以下の記事を参考に環境作成してください。
【React Native】NativeBase導入
【React Native】React Navigation を使ってみる(画面遷移編)
インストール
$ npm install redux --save
$ npm install react-redux --save
その意義 (私的な印象)
Redux は Facebookが提唱しているアーキテクチャである「Flux」の実装であり、Reactと相性が良いことから、Reactのアーキテクチャーとして語られることが多いです。
ただ、出来ることはネイティブアプリの感覚で言うとグローバル変数をちょっと綺麗に書けるライブラリ(Reactではグローバルに情報を持つのがとても難しいのです。)と言う印象で、出来ることが少ない割に言葉が難しくてハードルちょっと高めです。また、アーキテクチャーと言っても決められていることが少なく、縛りがほとんどないので、どう書いていいのかさっぱりわからなかったりします(ググってもなかなか何が正解なものやら)。そうは言ってもグローバルにステートを保持するのは、ある程度のプログラムではどうしても必要になることですので、他に選択肢も少ないこともあり、頑張って使っていきたいと思います。
出来ること
グローバルな(バケツリレーなしで)ステートを保持できる。
素のReactではコンポーネントに情報を渡す時に下記のような書式でpropsを引き渡して使うことがよくあります。階層が少なければこれでも不便でもないのですが、階層が多くなるとかちょっと面倒です(途中管理したい項目が増えたりするし)。
<Child {...props} />
それを統一的に同じ場所で管理したいと思った時に、Redux を使うと、
export const setProfile = profile => ({
    type: 'SET_PROFILE',
    profile: profile
});
import {combineReducers} from 'redux';

export const reducer = (state = {profile: ""}, action) => {
    switch (action.type) {
      case 'SET_PROFILE':
        return {...state, profile: action.profile}
      default:
        return {...state}
    }
};

export const reducers = combineReducers({
    user: reducer,
});
こんな感じで管理するステートを外だしに出来るので、随分とスッキリします。
上記はユーザのプロフィールをいろんな画面で表示したいというユースケースを例に、プロフィール情報をグローバルステートとして使用できるようにするものです。
冷静に「actions.js」「reducer.js」を見ると、難しいことが書いてあるような錯覚を覚えますが、実際にはactions.jsはオブジェクトを定義している純粋なJavascriptの文ですし、reducer.jsはそのオブジェクト定義を変換する純粋なアロー関数が書いてあり、それをreact-reduxに宣言(combineReducers)しているだけです。
あとは、各コンポーネントと、繋げる(connect)記述をしてあげます。(ReactのstateはJavascriptの変数ではないので、こんな感じで繋げてあげないと、コンポーネント内で使用できないのです)
const mapStateToProps = state => ({
  profile: state.user.profile,
});

const mapDispatchToProps = {
  setProfile
};

export default connect(mapStateToProps, mapDispatchToProps)(Main);
こうすることで、コンポーネント内で、
<Text>{this.props.profile}</Text>
こんな感じで表示できるようになったり、
<Button small block transparent primary onPress={() => this.props.setProfile("Taro")}>
  <Text>プロファイル設定(Taro)</Text>
</Button>
こんな感じでsetter関数を呼び出したりできます。
もちろんバケツリレーはしていません。この仕組みがよく見かける(けど全然頭に入ってこない)Reduxの動作概念の実態です。
では、そのほかのソースもちゃんと見てみましょう。
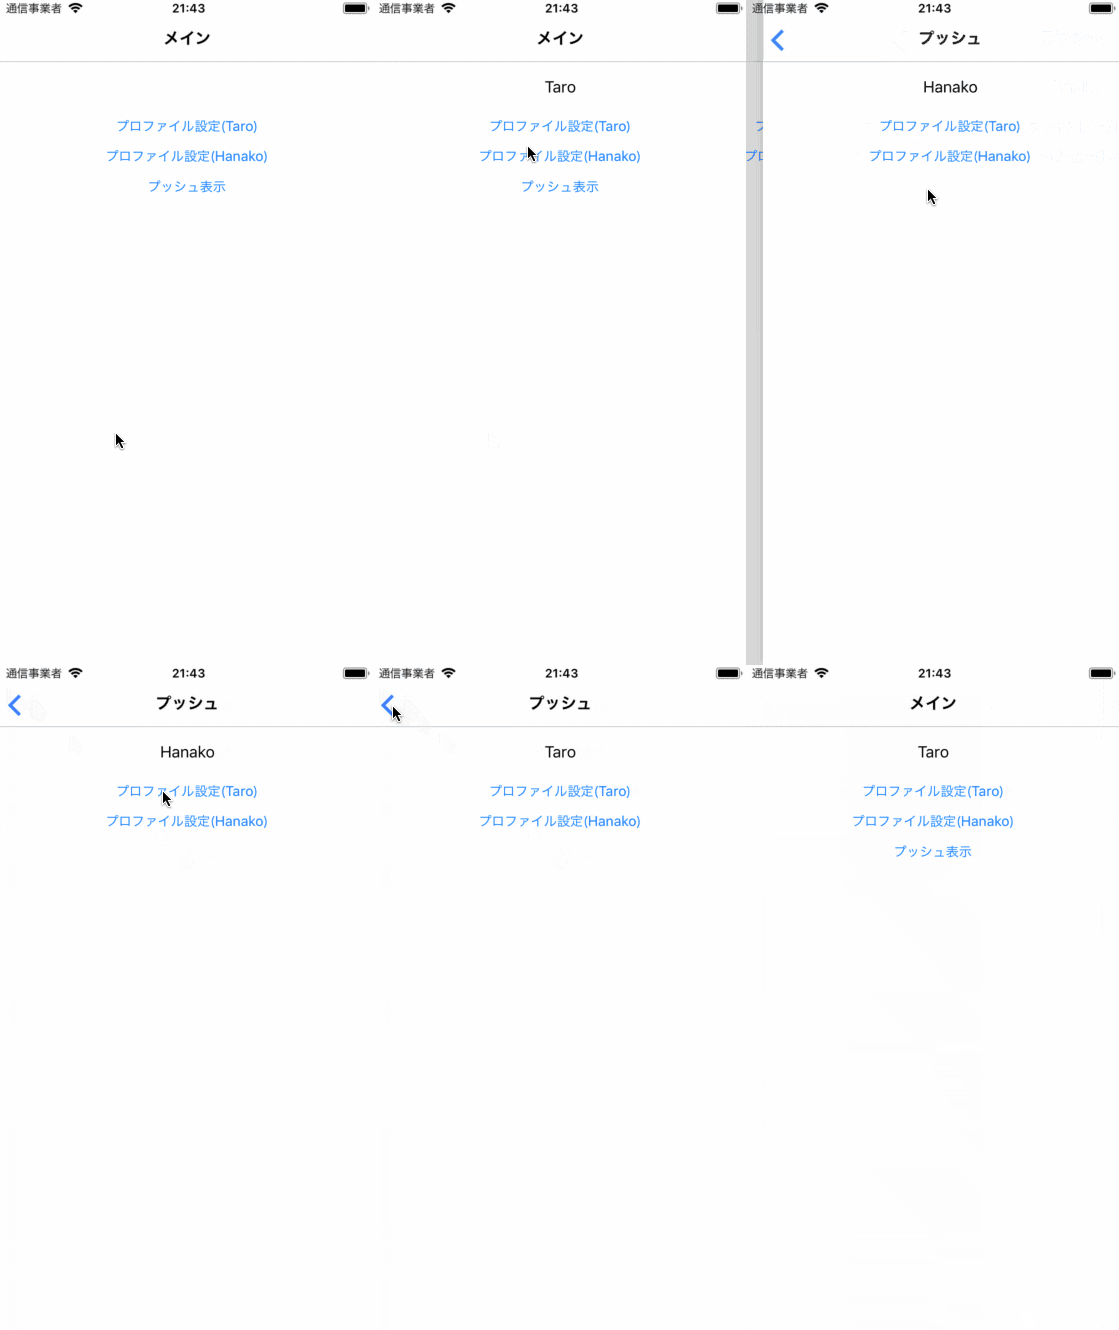
ここではReact Navigationw使用して画面遷移を行なって、グローバルに管理している「profile」を各画面で使用、操作できる様子をみてみましょう。
import React, {Component} from 'react';
import { Provider } from 'react-redux';
import { store } from './redux/store';
import HomeContainer from './Home';

export default class reduxApp extends Component {
  render() {
    return (
      <Provider store={store}>
        <HomeContainer />
      </Provider>
    );
  }
}
import React, {Component} from 'react';
import { createStackNavigator } from 'react-navigation'
import { connect } from 'react-redux';
import { setProfile } from './redux/actions';

import { Container, View, Header, Left, Body, Right, Button, Title, Text } from 'native-base';

import Main from './screens/Main'
import Push from './screens/Push'

const MainNavigation = createStackNavigator(
  {
    Main: { screen: Main },
    Push: { screen: Push },
  },
  {initialRouteName: 'Main', mode: 'card', headerMode: 'none'}
)
const NestNavigation = createStackNavigator(
  {
    MainNavigation: { screen: MainNavigation },
  },
  {initialRouteName: 'MainNavigation', mode: 'modal', headerMode: 'none'},
)

export default class HomeContainer extends Component {
    constructor(props) {
        super(props);
        console.log(props);
    }

    setProfile = profile => {
        this.props.setProfile(profile)
        const { navigation } = this.props
        navigation.navigate('Push')
    }

    render() {
    const props = this.props;
        return (
          <NestNavigation />
        );
    }
}
import React, {Component} from 'react';
import { Container, View, Header, Left, Body, Right, Button, Content, Title, Text } from 'native-base';
import { connect } from 'react-redux';
import { setProfile } from '../redux/actions';

export class Main extends Component {
  push = () => {
    const { navigation } = this.props
    navigation.navigate('Push')
  }

  render() {
    return (
      <Container>
        <Header>
          <Left />
          <Body>
            <Title>メイン</Title>
          </Body>
          <Right />
        </Header>
        <Content>
          <View style={{display: 'flex', alignItems: 'center'}}>
            <View style={{height: 50, justifyContent: 'center'}}><Text>{this.props.profile}</Text></View>
            <Button small block transparent primary onPress={() => this.props.setProfile("Taro")}>
              <Text>プロファイル設定(Taro)</Text>
            </Button>
            <Button small block transparent primary onPress={() => this.props.setProfile("Hanako")}>
              <Text>プロファイル設定(Hanako)</Text>
            </Button>
            <Button small block transparent primary onPress={this.push}>
              <Text>プッシュ表示</Text>
            </Button>
          </View>
        </Content>
      </Container>
    );
  }
}

const mapStateToProps = state => ({
  profile: state.user.profile,
});

const mapDispatchToProps = {
  setProfile
};

export default connect(mapStateToProps, mapDispatchToProps)(Main);
import React, {Component} from 'react';
import { Container, Header, Left, Body, Right, View, Button, Icon, Content, Title, Text } from 'native-base';
import { connect } from 'react-redux';
import { setProfile } from '../redux/actions';

export class Push extends Component {
  render() {
    return (
      <Container>
        <Header>
          <Left>
            <Button transparent onPress={() => this.props.navigation.goBack()}>
              <Icon name='arrow-back' />
            </Button>
          </Left>
          <Body>
            <Title>プッシュ</Title>
          </Body>
          <Right />
        </Header>
        <Content>
          <View style={{display: 'flex', alignItems: 'center'}}>
            <View style={{height: 50, justifyContent: 'center'}}><Text>{this.props.profile}</Text></View>
            <Button small block transparent primary onPress={() => this.props.setProfile("Taro")}>
              <Text>プロファイル設定(Taro)</Text>
            </Button>
            <Button small block transparent primary onPress={() => this.props.setProfile("Hanako")}>
              <Text>プロファイル設定(Hanako)</Text>
            </Button>
          </View>
        </Content>
      </Container>
    );
  }
}

const mapStateToProps = state => ({
  profile: state.user.profile,
});

const mapDispatchToProps = {
  setProfile
};

export default connect(mapStateToProps, mapDispatchToProps)(Push);
これらを使うことで、
動作の様子
このような画面動作がスッキリと実現できます。
リポジトリ
本記事で作成したものは以下で公開していますので、参考にしてください。
https://github.com/k-neo/ReactNativeCourseRedux
