はじめに
-
Cloud Functions上でheadless-chromeをPythonで動かす方法を紹介します。 - Cloud Functionを導入してあるものとします。
- 今回書いたコードは、Gitにアップしてあります
-
Cloud Functionsへのデプロイは、Mac OSで実行しています。 - crawler ディレクトリを作って、その中で作業しています。
スクレイピングする際は、サーバーに対して過剰な負荷がかからないようにしましょう。
背景
GCPのserverless環境で、クローラー(Python)を動かしたいという要件があった。
データクレンジング処理に使うライブラリは、Pythonが充実しているので、Pythonを使いたい。
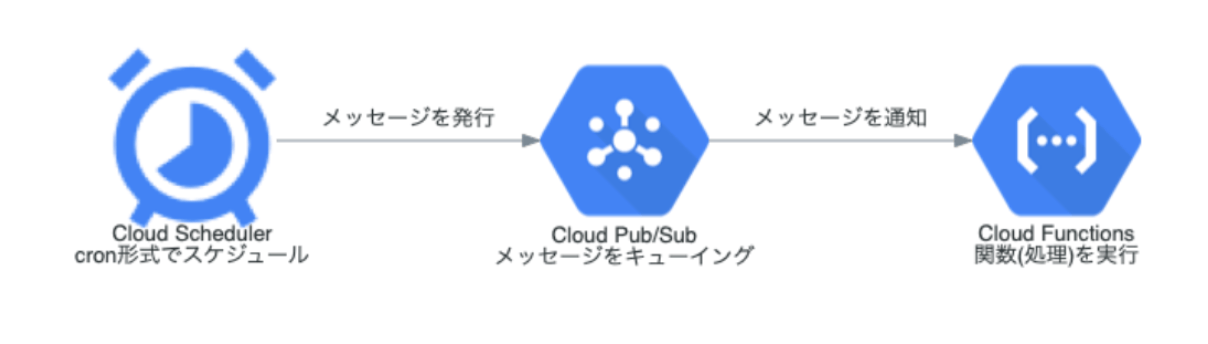
インフラ構成
CloudSchedulerで Pub/Sub を使用して Cloud Functionsをトリガーし、クローラーを実行します。インフラ構築手順は、公式ドキュメントにまとまっているので、この記事では触れません。
手順(headress-chrome on Cloud Functions)
headress-chromeのインストール
Cloud Functions は、Puppeteerはサポートしてるみたいだが、headress-chromeはサポートし
ていないみたい。
なので今回は、有志の方が lamda用に headless-chrome の build image を公開してくれているものを使います。
mkdir -p bin/
curl -SL https://github.com/adieuadieu/serverless-chrome/releases/download/v1.0.0-37/stable-headless-chromium-amazonlinux-2017-03.zip > headless-chromium.zip
unzip headless-chromium.zip -d bin/
rm headless-chromium.zip
最新のbuild imageはpythonが動かないので、v1.0.0-37 を使います。
https://github.com/adieuadieu/serverless-chrome/issues/133
Cloud Functionsが対応しているライブラリは公式で公開されております。
https://cloud.google.com/functions/docs/reference/system-packages
chromedriverのインストール
serverless-chrome に対応している chromedriver 2.37 を使用します。
curl -SL https://chromedriver.storage.googleapis.com/2.37/chromedriver_linux64.zip > chromedriver.zip
unzip chromedriver.zip -d bin/
rm chromedriver.zip
chromedriver のversionは、serverless-chrome versionに依存しており、
間違えると動かないです。
.gcloudignoreの設定
- GCP Functionsのアップロード上限が500MBなので、
.gcloudignoreで不要なファイルはアップロードしないようにしています。

.git
.gitignore

README.md
__pycache__/
venv
lsd コマンドでファイルサイズを見てみます。headless-chromiumが97MBありますが、500MB以下なので許容範囲内。
$ l bin
.rwxr-xr-x hayashikengo staff 7.5 MB Tue Mar 20 08:22:36 2018 chromedriver
.rwxr-xr-x hayashikengo staff 97 MB Thu Feb 15 19:07:40 2018 headless-chromium
functionの実装
GCF functionsでは、python3.9のイメージを使うので、python 3.9の環境をローカルで作ります。環境がない場合は、こちらからインストールしてください。
必要なライブラリをインストールして、requirements.txtに書き出します。requirements.txtに書き出されたライブラリはFunctionデプロイ時にインストールされます。
fake-useragent==0.1.11
selenium==3.13.0
seleniumはheadress-chromeに依存しており、4系だと動かないです。
main.pyにデプロイする関数を実装します。
import os

from fake_useragent import UserAgent
from selenium import webdriver


def crawler(request):
    chrome_options = webdriver.ChromeOptions()
    chrome_options.add_argument('--headless')
    chrome_options.add_argument('--disable-gpu')
    chrome_options.add_argument('--window-size=1280x1696')
    chrome_options.add_argument('--no-sandbox')
    chrome_options.add_argument('--hide-scrollbars')
    chrome_options.add_argument('--enable-logging')
    chrome_options.add_argument('--log-level=0')
    chrome_options.add_argument('--v=99')
    chrome_options.add_argument('--single-process')
    chrome_options.add_argument('--ignore-certificate-errors')
    chrome_options.add_argument('user-agent='+UserAgent().random)
    chrome_options.binary_location = os.getcwd() + "/bin/headless-chromium"
    driver = webdriver.Chrome(
        os.getcwd() + "/bin/chromedriver", chrome_options=chrome_options)

    driver.get('https://en.wikipedia.org/wiki/Special:Random')
    line = driver.find_element_by_class_name('firstHeading').text
    print(line)
    driver.quit()
    return line
GCP Functionsにデプロイ
gcloudコマンドが入っていない方は、公式よりインストール知てください。
gcloudコマンドでデプロイ。python 3.9で動くのでpython39イメージを指定。
gcloud functions deploy crawler \
    --region asia-northeast1 \
    --runtime python39 \
    --allow-unauthenticated \
    --trigger-http
urlを開いてみる。
# urlを調べる
gcloud functions describe crawler --region asia-northeast1 | grep url

# アクセスしてみる
curl https://asia-northeast1-xxxx.cloudfunctions.net/crawler
Neftenbach <- ランダムな値が帰ってくる
ランダムなカラムが帰ってくればOKでです!
さいごに
最後まで読んでいただいて、ありがとうございますmm
Cloud Functions上でheadless-chromeをPythonで動かす方法を書きました。
後は、main.pyの中身を書いて、requirements.txtに必要なライブラリを追加すれば動きます!
様々なライブラリの提供者に感謝しつつ、自分も貢献できるように精進します!
twitterでもBE・アプリ開発など情報発信していますので、よかったらフォローしてくださいmm
番外編
GitHubに今回のコードテンプレートを公開してます
使用方法は、README.mdに書いてあります。
番外編 bin/*の実行ファイルもGitHubで管理したい
Gitで管理するにはGit LFSを使えば、Gitで管理できます。
参考