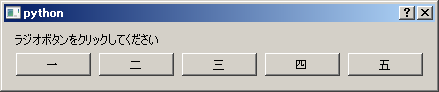
Buttonについて
横一列にレイアウトしたボタンのサンプルです。
グループ化しています。
setFocusPolicy(Qt.NoFocus)でどれにもフォーカスをあてずにフラットにしています。
button1.setCheckable(True)としているものは、トグルボタンとして振舞います。
button1.setCheckable(True)がコメントになっているものは普通のボタンです。
ButtonTest01.py
import sys

from PyQt5.QtCore import *
from PyQt5.QtWidgets import *

class FormTest(QDialog):
    def __init__(self, parent=None):
        super(FormTest, self).__init__(parent)

        button1 = QPushButton("一")
        #button1.setCheckable(True)
        button1.setFocusPolicy(Qt.NoFocus)

        button2 = QPushButton("二")
        #button2.setCheckable(True)
        button2.setFocusPolicy(Qt.NoFocus)

        button3 = QPushButton("三")
        #button3.setCheckable(True)
        button3.setFocusPolicy(Qt.NoFocus)

        button4 = QPushButton("四")
        button4.setCheckable(True)
        button4.setFocusPolicy(Qt.NoFocus)

        button5 = QPushButton("五")
        button5.setCheckable(True)
        button5.setFocusPolicy(Qt.NoFocus)

        self.group = QButtonGroup()
        self.group.addButton(button1,1)
        self.group.addButton(button2,2)
        self.group.addButton(button3,3)
        self.group.addButton(button4,4)
        self.group.addButton(button5,5)

        self.label = QLabel("ラジオボタンをクリックしてください")

        #QHboxLayout()は、Horizonal(水平方向に)レイアウトします
        layout = QHBoxLayout()

        layout.addWidget(button1)
        layout.addWidget(button2)
        layout.addWidget(button3)
        layout.addWidget(button4)
        layout.addWidget(button5)


        #QVBoxLayout()は、vertical(垂直方向)にレイアウトします
        Vlayout = QVBoxLayout()

        Vlayout.addWidget(self.label)
        Vlayout.addLayout(layout)

        self.setLayout(Vlayout)

        button1.clicked.connect(self.clicked)
        button2.clicked.connect(self.clicked)
        button3.clicked.connect(self.clicked)
        button4.clicked.connect(self.clicked)
        button5.clicked.connect(self.clicked)

    def clicked(self):
        button = self.sender()
        if button is None or not isinstance(button,QPushButton):
            return
        self.label.setText("あなたは '%s' のラジオボタンをクリックしました" % button.text())

app = QApplication(sys.argv)
formtest = FormTest()
formtest.show()
app.exec_()
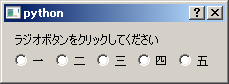
RadioButtonの場合
RadioButtonになっていること以外は、上のButtonの場合と同じです。
rdiobutton01.py
import sys

from PyQt5.QtCore import *
from PyQt5.QtWidgets import *

class FormTest(QDialog):
    def __init__(self, parent=None):
        super(FormTest, self).__init__(parent)

        radiobutton1 = QRadioButton("一")
        radiobutton1.setCheckable(True)
        radiobutton1.setFocusPolicy(Qt.NoFocus)

        radiobutton2 = QRadioButton("二")
        radiobutton2.setCheckable(True)
        radiobutton2.setFocusPolicy(Qt.NoFocus)

        radiobutton3 = QRadioButton("三")
        radiobutton3.setCheckable(True)
        radiobutton3.setFocusPolicy(Qt.NoFocus)

        radiobutton4 = QRadioButton("四")
        radiobutton4.setCheckable(True)
        radiobutton4.setFocusPolicy(Qt.NoFocus)

        radiobutton5 = QRadioButton("五")
        radiobutton5.setCheckable(True)
        radiobutton5.setFocusPolicy(Qt.NoFocus)

        self.group = QButtonGroup()
        self.group.addButton(radiobutton1,1)
        self.group.addButton(radiobutton2,2)
        self.group.addButton(radiobutton3,3)
        self.group.addButton(radiobutton4,4)
        self.group.addButton(radiobutton5,5)

        self.label = QLabel("ラジオボタンをクリックしてください")

        layout = QHBoxLayout()

        layout.addWidget(radiobutton1)
        layout.addWidget(radiobutton2)
        layout.addWidget(radiobutton3)
        layout.addWidget(radiobutton4)
        layout.addWidget(radiobutton5)

        Vlayout = QVBoxLayout()

        Vlayout.addWidget(self.label)
        Vlayout.addLayout(layout)

        self.setLayout(Vlayout)

        radiobutton1.clicked.connect(self.clicked)
        radiobutton2.clicked.connect(self.clicked)
        radiobutton3.clicked.connect(self.clicked)
        radiobutton4.clicked.connect(self.clicked)
        radiobutton5.clicked.connect(self.clicked)

    def clicked(self):
        radiobutton = self.sender()
        if radiobutton is None or not isinstance(radiobutton,QRadioButton):
            return
        self.label.setText("あなたは '%s' のラジオボタンをチェックしました" % radiobutton.text())

app = QApplication(sys.argv)
formtest = FormTest()
formtest.show()
app.exec_()
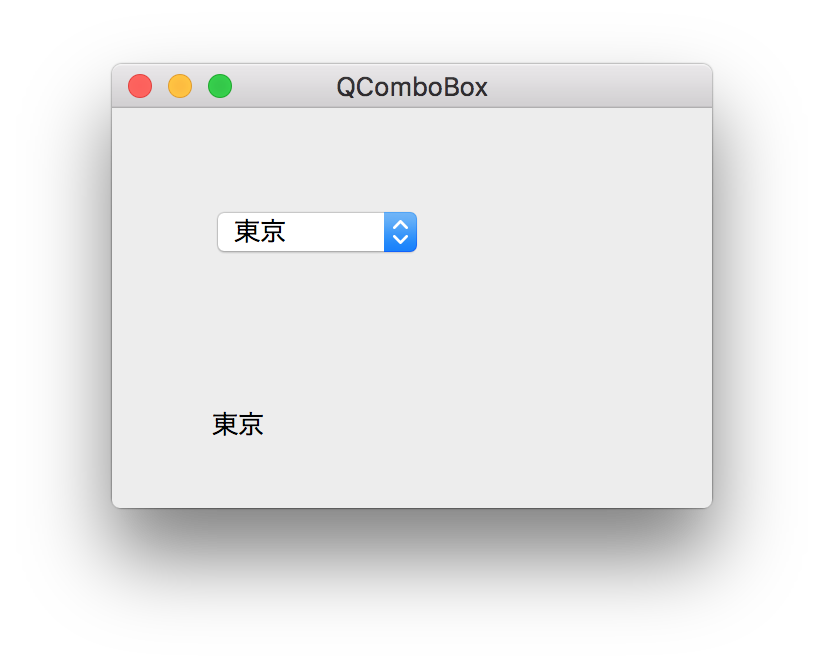
ComboBoxの場合
ここで注目は、activated[str]の部分です、スロットが文字列を受け取るということです。
ComboTest01.py
import sys
from PyQt5.QtWidgets import *

class ComboTest01(QWidget):
    def __init__(self, parent=None):
        super(ComboTest01, self).__init__(parent)
        self.initUI()

    def initUI(self):
        self.label = QLabel("東京",self)
        combo = QComboBox(self)
        combo.addItem("東京")
        combo.addItem("足立区")
        combo.addItem("台東区")
        combo.addItem("千代田区")
        combo.addItem("品川区")
        combo.addItem("隅田区")
        combo.move(50,50)
        self.label.move(50,150)
        combo.activated[str].connect(self.onActivated)
        self.setGeometry(300,300,300,200)
        self.setWindowTitle("QComboBox")

    def onActivated(self,text):
        self.label.setText(text)
        self.label.adjustSize()

if __name__ == '__main__':
    app = QApplication(sys.argv)
    win = ComboTest01()
    win.show()
    sys.exit(app.exec_())
ファイルオープンダイアログのサンプル
Dialogsこちらを参考に、プレーンテキスト等の拡張子限定でファイルを選択するようにしています。
実際のオープンとリードはpython3のコンポーネントを使用しているので日本語も文字化けしません。
File_Open_Test01.py
import sys
from PyQt5.QtWidgets import *
from PyQt5.QtGui import QIcon


class FileOpenTest(QMainWindow):

    def __init__(self):
        super().__init__()

        self.initUI()


    def initUI(self):

        self.textEdit = QTextEdit()
        self.setCentralWidget(self.textEdit)
        self.statusBar()

        openFile = QAction(QIcon('open.png'), '開く', self)
        openFile.setShortcut('Ctrl+O')
        openFile.setStatusTip('新しいファイルを開く')
        openFile.triggered.connect(self.showDialog)

        menubar = self.menuBar()
        fileMenu = menubar.addMenu('&ファイル')
        fileMenu.addAction(openFile)

        self.setGeometry(300, 300, 350, 300)
        self.setWindowTitle('ファイルダイアログ')


    def showDialog(self):
        fname = QFileDialog.getOpenFileName(self,'Open file', '/', filter="Image Files (*.csv *.txt *.html *.xml *.py *.pyw)")

        if fname[0]:
            f = open(fname[0], 'r')

            with f:
                data = f.read()
                self.textEdit.setText(data)

if __name__ == '__main__':

    app = QApplication(sys.argv)
    win = FileOpenTest()
    win.show()
    sys.exit(app.exec_())

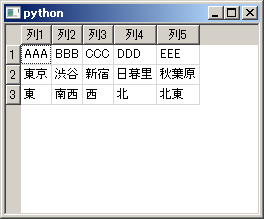
QTableWidgetでテーブルを作ってみる
table = tableTest01(data, 3, 5)の部分書き換えて、data項目をセットすれば拡張できます。
tableTest01.py
import sys
from PyQt5.QtCore import *
from PyQt5.QtGui import *
from PyQt5.QtWidgets import *

data = [['AAA', '東京', '東'],['BBB', '渋谷', '南西'],['CCC', '新宿', '西'],['DDD', '日暮里', '北'],['EEE', '秋葉原', '北東']]
class tableTest01(QTableWidget):
    def __init__(self, data, *args):
        QTableWidget.__init__(self, *args)
        self.data = data
        self.setdata()
        self.resizeColumnsToContents()
        self.resizeRowsToContents()

    def setdata(self):
        #ヘッダーを作成
        horHeaders = ['列1','列2','列3','列4','列5']
        self.setHorizontalHeaderLabels(horHeaders)
        #テーブルにデータをセット
        for n in range(len(self.data)):
            print("n=%d" % n)
            for m in range(len(self.data[n])):
                print("m=%d" % m)
                newitem = QTableWidgetItem(data[n][m])
                self.setItem(m, n, newitem)

def main():
    app = QApplication(sys.argv)
    table = tableTest01(data, 3, 5)
    table.show()
    sys.exit(app.exec_())


if __name__ == "__main__":
    main()
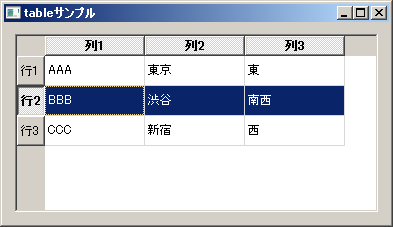
tableTest01.pyの列と行の並びがあまりよくないので、tableTest02.pyで横一のならびに変えてみます。classのコードも少し変えました。
tableTest02.py
import sys
from PyQt5.QtWidgets import *

data = [['AAA', '東京', '東'],['BBB', '渋谷', '南西'],['CCC', '新宿', '西']]

class TableWindow(QWidget):

    def __init__(self, parent=None):
        super(TableWindow, self).__init__(parent)
        colcnt = len(data[0])
        rowcnt = len(data)
        self.tablewidget = QTableWidget(rowcnt, colcnt)

        #ヘッダー設定
        horHeaders = ['列1','列2','列3']
        self.tablewidget.setHorizontalHeaderLabels(horHeaders)
        verHeaders = ['行1','行2','行3']
        self.tablewidget.setVerticalHeaderLabels(verHeaders)

        #テーブルの中身作成
        for n in range(rowcnt):
            for m in range(colcnt):
                item = QTableWidgetItem(str(data[n][m]))
                self.tablewidget.setItem(n, m, item)

        #レイアウト
        layout = QHBoxLayout()
        layout.addWidget(self.tablewidget)
        self.setLayout(layout)
        self.setWindowTitle('tableサンプル')

def main():
    app = QApplication(sys.argv)
    widget = TableWindow()
    widget.show()
    widget.raise_()
    sys.exit(app.exec_())

if __name__ == "__main__":
    main()
tablewidgetのセルの色を変えてみる
TableBackColor.py
import sys
from PyQt5.QtCore import *
from PyQt5.QtGui import *
from PyQt5.QtWidgets import *
from PyQt5.Qt import *

class MainWindow(QMainWindow):
    def __init__(self, parent=None):
        QMainWindow.__init__(self,parent)
        self.table = QTableWidget()
        self.table.setColumnCount(2)
        self.setCentralWidget(self.table)
        data1 = [['行A','行B','行C','行D'],['行A','行B','行C','行D']]
        colcnt = len(data1[0])
        rowcnt = len(data1)


        self.table.setRowCount(4)

        for n in range(rowcnt):
            for m in range(colcnt):
                item1 = QTableWidgetItem(str(data1[n][m]))
                if n == 1:
                    item1.setBackground(QColor(Qt.yellow))
                self.table.setItem(n, m, item1)
        self.table.item(1, 0).setBackground(QColor(100, 10, 125))


if __name__ == '__main__':
    app = QApplication(sys.argv)
    window = MainWindow()
    window.show()
    sys.exit(app.exec_())

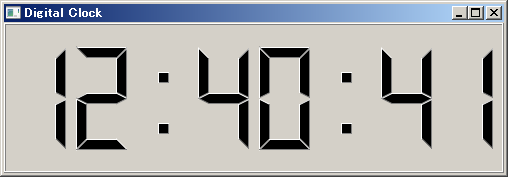
デジタル時計を表示
TestTimer.py
import sys
from PyQt5.QtWidgets import *
from PyQt5.QtCore import *

class TestTimer(QWidget):

    def __init__(self, parent=None):

        super(TestTimer, self).__init__(parent)
        self.setWindowTitle('Digital Clock')
        timer = QTimer(self)

        timer.timeout.connect(self.updtTime)
        self.testTimeDisplay = QLCDNumber(self)
        self.testTimeDisplay.setSegmentStyle(QLCDNumber.Filled)
        self.testTimeDisplay.setDigitCount(8)
        self.testTimeDisplay.resize(500, 150)
        self.updtTime()
        timer.start(1000)

    def updtTime(self):

        currentTime = QDateTime.currentDateTime().toString('hh:mm:ss')
        self.testTimeDisplay.display(currentTime)

if __name__ == '__main__':

    myApp = QApplication(sys.argv)
    myWindow = TestTimer()
    myWindow.show()
    myApp.exec_()
    sys.exit()
Windowのstyleを変えてみる
styleFactory.py
from PyQt5.QtCore import *
from PyQt5.QtGui import *
from PyQt5.QtWidgets import *
import sys

class winStyle_test(QWidget):
    def __init__(self, parent=None):
        super(winStyle_test, self).__init__(parent)

        self.originalPalette = QApplication.palette()

        horizontalLayout = QHBoxLayout()

        self.styleLabel = QLabel("Window Style:")
        self.styleComboBox = QComboBox()

        # QStyleFactoryからリストセット
        self.styleComboBox.addItems(QStyleFactory.keys())
        print(QStyleFactory.keys())

        # カレントのstyleを検索
        index = self.styleComboBox.findText(qApp.style().objectName(), Qt.MatchFixedString)

        # styleをセット
        self.styleComboBox.setCurrentIndex(index)

        # styleがchangeしたら
        self.styleComboBox.activated[str].connect(self.windStyleChanged)

        # windowのpalette
        self.useStylePaletteCheckBox = QCheckBox("&style standard palette")
        self.useStylePaletteCheckBox.setChecked(True)
        self.useStylePaletteCheckBox.toggled.connect(self.changePalette)

        horizontalLayout.addWidget(self.styleLabel)
        horizontalLayout.addWidget(self.styleComboBox)
        horizontalLayout.addWidget(self.useStylePaletteCheckBox)
        self.setLayout(horizontalLayout)

    def changePalette(self):
        if (self.useStylePaletteCheckBox.isChecked()):
            QApplication.setPalette(QApplication.style().standardPalette())
        else:
            QApplication.setPalette(self.originalPalette)


    def windStyleChanged(self, style):
        qApp.setStyle(style)

if __name__ == "__main__":

    app = QApplication(sys.argv)
    w = winStyle_test()
    QApplication.setPalette(QApplication.style().standardPalette())
    w.show()
    sys.exit(app.exec_())

standardIconについて
Qtでデフォルトで使用可能な組み込みアイコンを表示するためにこんなのを作ったみたいです。
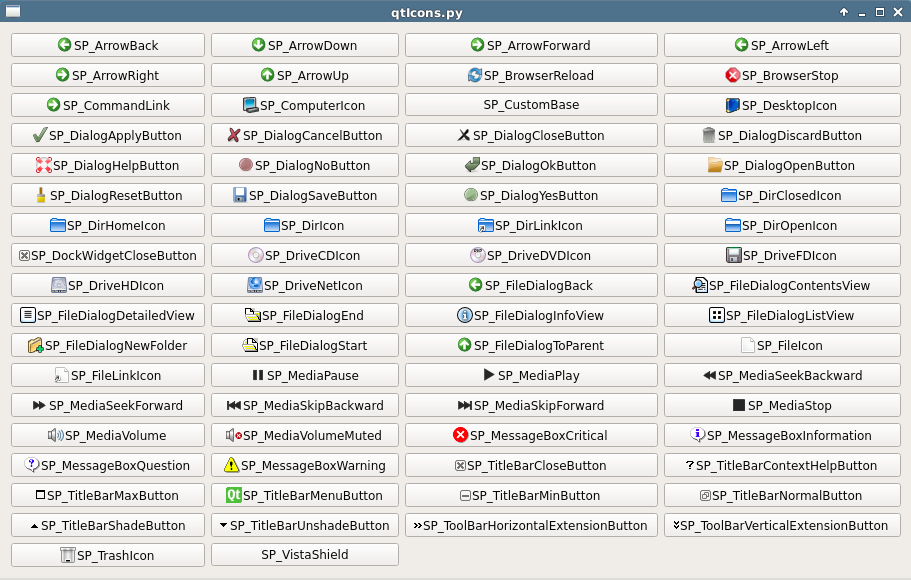
でもIconが小さいのとテキストを拾うのがめんどいので、こんな感じにしてみました。
iconList.py
import sys
from PyQt5.QtCore import *
from PyQt5.QtGui import *
from PyQt5.QtWidgets import *


class Window(QWidget):
    def __init__(self, parent=None):
        super(Window, self).__init__()

        icons = [
            'SP_ArrowBack',
            'SP_ArrowDown',
            'SP_ArrowForward',
            'SP_ArrowLeft',
            'SP_ArrowRight',
            'SP_ArrowUp',
            'SP_BrowserReload',
            'SP_BrowserStop',
            'SP_CommandLink',
            'SP_ComputerIcon',
            'SP_CustomBase',
            'SP_DesktopIcon',
            'SP_DialogApplyButton',
            'SP_DialogCancelButton',
            'SP_DialogCloseButton',
            'SP_DialogDiscardButton',
            'SP_DialogHelpButton',
            'SP_DialogNoButton',
            'SP_DialogOkButton',
            'SP_DialogOpenButton',
            'SP_DialogResetButton',
            'SP_DialogSaveButton',
            'SP_DialogYesButton',
            'SP_DirClosedIcon',
            'SP_DirHomeIcon',
            'SP_DirIcon',
            'SP_DirLinkIcon',
            'SP_DirOpenIcon',
            'SP_DockWidgetCloseButton',
            'SP_DriveCDIcon',
            'SP_DriveDVDIcon',
            'SP_DriveFDIcon',
            'SP_DriveHDIcon',
            'SP_DriveNetIcon',
            'SP_FileDialogBack',
            'SP_FileDialogContentsView',
            'SP_FileDialogDetailedView',
            'SP_FileDialogEnd',
            'SP_FileDialogInfoView',
            'SP_FileDialogListView',
            'SP_FileDialogNewFolder',
            'SP_FileDialogStart',
            'SP_FileDialogToParent',
            'SP_FileIcon',
            'SP_FileLinkIcon',
            'SP_MediaPause',
            'SP_MediaPlay',
            'SP_MediaSeekBackward',
            'SP_MediaSeekForward',
            'SP_MediaSkipBackward',
            'SP_MediaSkipForward',
            'SP_MediaStop',
            'SP_MediaVolume',
            'SP_MediaVolumeMuted',
            'SP_MessageBoxCritical',
            'SP_MessageBoxInformation',
            'SP_MessageBoxQuestion',
            'SP_MessageBoxWarning',
            'SP_TitleBarCloseButton',
            'SP_TitleBarContextHelpButton',
            'SP_TitleBarMaxButton',
            'SP_TitleBarMenuButton',
            'SP_TitleBarMinButton',
            'SP_TitleBarNormalButton',
            'SP_TitleBarShadeButton',
            'SP_TitleBarUnshadeButton',
            'SP_ToolBarHorizontalExtensionButton',
            'SP_ToolBarVerticalExtensionButton',
            'SP_TrashIcon',
            'SP_VistaShield'
        ]

        self.le = QLineEdit('')
        self.le.setText('')

        self.lab = QPushButton()


        layout = QVBoxLayout()

        self.comb = QComboBox(self)
        self.comb.addItem('')

        count = 0
        for i in icons:
            print(i)
            self.comb.insertItem(count, i)

            self.comb.setItemIcon(count, self.style().standardIcon(getattr(QStyle, i)))

            count += 1

        layout.addWidget(self.comb)
        layout.addWidget(self.le)
        layout.addWidget(self.lab)
        self.lab.setSizePolicy(QSizePolicy.Minimum, QSizePolicy.Expanding)

        self.comb.activated[str].connect(self.onActivated)

        self.setLayout(layout)


    def onActivated(self, text):

        self.le.setText(text)
        print(text)

        self.lab.setIcon(self.style().standardIcon(getattr(QStyle,text)))
        self.lab.setIconSize(QSize(200, 200))


if __name__ == '__main__':
    app = QApplication(sys.argv)

    dialog = Window()
    dialog.resize(300, 350)
    dialog.setWindowTitle("standardIcon List")
    dialog.show()

    sys.exit(app.exec_())
 ただ、拡大できないアイコンもあるらしい。

QGraphicsSceneに楕円と矩形を置いてマウスで移動可能にする
MyFrame.py
from PyQt5.QtCore import *
from PyQt5.QtGui import *
from PyQt5.QtWidgets import *

class MyFrame(QGraphicsView):
    def __init__( self, parent = None ):
        super(MyFrame, self).__init__(parent)

        #シーン作成
        self.scene = QGraphicsScene(self)

        #シーンをセット
        self.scene.setSceneRect(0, 0, 500, 500)
        self.setScene(self.scene)

        #pen = QPen(QColor(Qt.green))

        #ブラシ(Brush)をセット
        brush = QBrush(Qt.red, Qt.CrossPattern)

        #楕円作成
        item = self.scene.addEllipse(30, 30, 50, 50, Qt.red, brush)
        #矩形作成
        item2 = self.scene.addRect(70, 70, 50, 50, Qt.green, QBrush(Qt.green, Qt.CrossPattern))

        #選択と移動を可能にする
        item.setFlag(QGraphicsItem.ItemIsSelectable)
        item.setFlag(QGraphicsItem.ItemIsMovable)

        #移動を可能にする
        item2.setFlag(QGraphicsItem.ItemIsMovable)

if ( __name__ == '__main__' ):
    app = QApplication([])
    f = MyFrame()
    f.show()
    app.exec_()

ブラシに色と塗りを設定する以下の部分が肝です。
QBrush(Qt.green, Qt.CrossPattern)