先日 LINE Bot 用のリッチメニューマネージャーなるツールを作りましたが、その際に利用した Ignite UI についてまとめます。リッチメニューで LINE ボットの UX を向上
今回はユーザー管理を行うようなアプリケーションを作ってみます。
Ignite UI for Angular
Infragistics 社が提供するコンポーネントで、コミュニティ向けなら無償ということだったので採用。
Ignite UI for Angular
基本デスクトップ向けのサイズ感で作っていきます。
プロジェクト作成
以下の手順でプロジェクトを作成します。
1. まず Angular CLI をインストールします。
npm install -g @angular/cli
2. インストールした Angular CLI を使ってプロジェクトの作成します。ここではルーティング機能を付けるのに --routing を指定しています。
ng new ignite-ui-app --routing
cd ignite-ui-app
3. 次に Ignite UI など必要なパッケージを追加します。 igniteui-angular が Ignite UI for Angular のメインパッケージです。hammer.js はタッチジェスチャー用のライブラリです。
npm install igniteui-angular hammerjs @types/hammerjs
npm install
4. Visual Studio Code で起動します。
code .
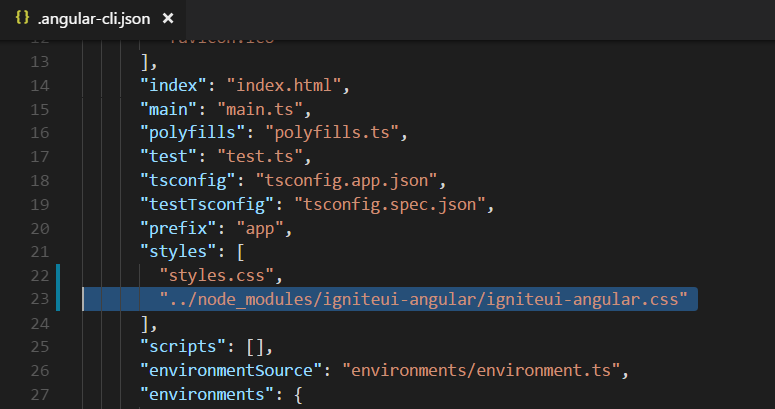
5. Ignite UI に必要な CSS を設定します。.angular-cli.json の styles に "../node_modules/igniteui-angular/igniteui-angular.css" を追加します
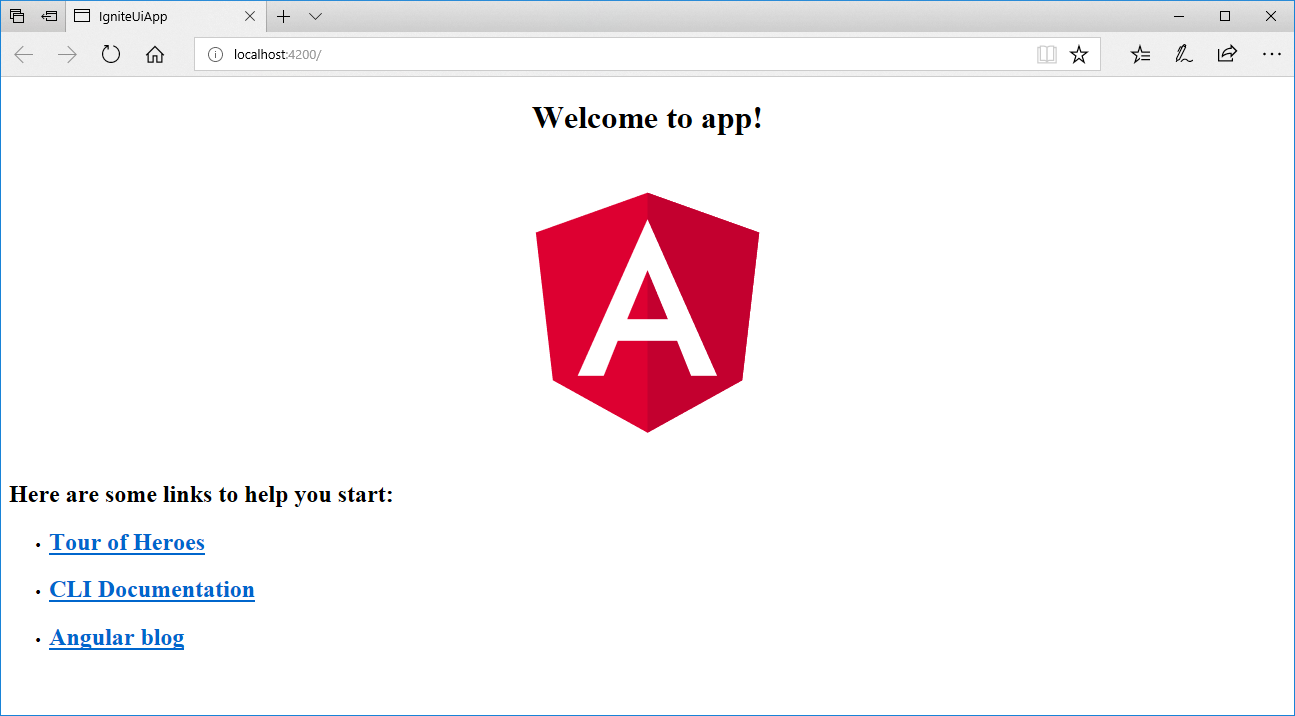
6. 一旦実行してみます。
ng server --open
ブラウザでアプリが開けばまずは準備完了です。
では Ignite UI を使ってアプリを開発していきます。
アプリケーションシェルの作成
まずアプリケーションの外枠を作ります。
ナビゲーションバーの利用
1. 上部にナビゲーションバーを追加します。Ignite UI は各コントロールをモジュールをして提供しているので、まず src/app/app.module.ts にモジュールを登録します。また依存関係のある hammer.js も追加します。
import { BrowserModule } from '@angular/platform-browser';
import { NgModule } from '@angular/core';
import { AppRoutingModule } from './app-routing.module';
import { AppComponent } from './app.component';
// Ignite UI モジュールの参照
import { IgxNavbarModule } from 'igniteui-angular/main';
// Hammer
import "hammerjs";

@NgModule({
  declarations: [
    AppComponent
  ],
  imports: [
    BrowserModule,
    AppRoutingModule,
    IgxNavbarModule // Ignite UI Navbar モジュールの追加
  ],
  providers: [],
  bootstrap: [AppComponent]
})
export class AppModule { }
2. 次に画面を設定します。html に を使った画面、またその中で指定した関数を app.component.ts 内で指定しています。尚、actionButtonIcon には menu のほか https://material.io/icons/ にあるアイコンを指定できます。
<!--The content below is only a placeholder and can be replaced.-->
<igx-navbar [title]="title"
   actionButtonIcon="menu"
   (onAction)="onClickMenu()">
</igx-navbar>

<router-outlet></router-outlet>
import { Component } from '@angular/core';

@Component({
  selector: 'app-root',
  templateUrl: './app.component.html',
  styles: []
})
export class AppComponent {
  title = 'Ignite Ui App';

  onClickMenu(){
    window.alert("menu clicked");
  }
}
3. 保存すると自動的にブラウザが更新されます。
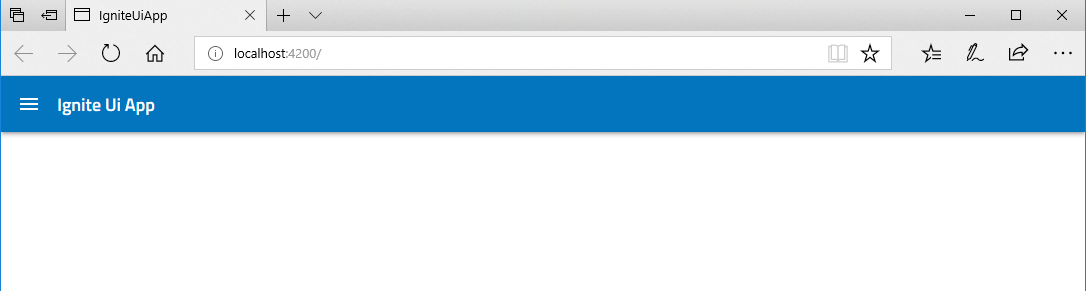
4. 左上のメニューアイコンをクリックして、アラートが出ることを確認します。
アイコンの利用
アイコンはいくつか使い道がありますが、ここではナビゲーションバー右側に出す、メニューのアイコンとして使います。
1. まずモジュールの追加から。
import { BrowserModule } from '@angular/platform-browser';
import { NgModule } from '@angular/core';
import { AppRoutingModule } from './app-routing.module';
import { AppComponent } from './app.component';
// Ignite UI モジュールの参照
import { IgxNavbarModule, IgxIconModule } from 'igniteui-angular/main';
// Hammer
import "hammerjs";

@NgModule({
  declarations: [
    AppComponent
  ],
  imports: [
    BrowserModule,
    AppRoutingModule,
    IgxNavbarModule, // Ignite UI Navbar モジュールの追加
    IgxIconModule // Ignite UI Icon モジュールの追加
  ],
  providers: [],
  bootstrap: [AppComponent]
})
export class AppModule { }
2. 次に対して Add アイコンを igx-icon エレメントとして追加します。使えるアイコンは先ほど同様 https://material.io/icons/ です。
<!--The content below is only a placeholder and can be replaced.-->
<igx-navbar [title]="title"
   actionButtonIcon="menu"
   (onAction)="onClickMenu()">
   <igx-icon name="add" (click)="onClickAdd()"></igx-icon>
   <igx-icon name="refresh" (click)="onClickRefresh()"></igx-icon>
</igx-navbar>

<router-outlet></router-outlet>
import { Component } from '@angular/core';

@Component({
  selector: 'app-root',
  templateUrl: './app.component.html',
  styleUrls: ['./app.component.css']
})

export class AppComponent {
  title = 'Ignite Ui App';

  onClickMenu(){
    window.alert("menu clicked");
  }

  onClickAdd(){
    window.alert("add clicked");
  }

  onClickRefresh(){
    window.alert("refresh clicked");
  }
}
3. それぞれのボタンをクリックして動作を確認します。

左側にリストの追加
メニューを上部に追加したので、次は左側のレコードの一覧を表示するリストを追加します。
リスト (スクロール) の利用
では次に画面の左にメニューの一覧を出す用のリストを作ります。Ignite UI ではリストとスクロールの 2 種類のコンポーネントをサポートしています。リストは検索機能や複雑なアイテムのサポートなど高機能である一方、スクロールは多くのアイテムを簡単に読み込めます。今回はスクロールを使います。
1. まずはコンポーネントの追加から。
import { BrowserModule } from '@angular/platform-browser';
import { NgModule } from '@angular/core';
import { AppRoutingModule } from './app-routing.module';
import { AppComponent } from './app.component';

// Ignite UI モジュールの参照
import { IgxNavbarModule, IgxIconModule, IgxScrollModule } from 'igniteui-angular/main';
// Hammer
import "hammerjs";

@NgModule({
  declarations: [
    AppComponent
  ],
  imports: [
    BrowserModule,
    AppRoutingModule,
    IgxNavbarModule, // Ignite UI Navbar モジュールの追加
    IgxIconModule, // Ignite UI Icon モジュールの追加
    IgxScrollModule, // Ignite UI Scroll モジュールの追加
  ],
  providers: [],
  bootstrap: [AppComponent]
})
export class AppModule { }
2. 次にリスト用のコンポーネントを追加します。ng コマンドで list コンポーネントを追加します。
ng generate component list
3. 追加したコンポーネントを読みこむ様に app.component.html とスタイルのため app.component.css を変更します。一覧から選択したユーザーを受け渡しできるように selectedUser を app.component.ts に設定して、双方向バインドしています。
<!--The content below is only a placeholder and can be replaced.-->
<igx-navbar [title]="title" actionButtonIcon="menu" (onAction)="onClickMenu()">
  <igx-icon name="add" (click)="onClickAdd()"></igx-icon>
  <igx-icon name="refresh" (click)="onClickRefresh()"></igx-icon>
</igx-navbar>

<app-list [(selectedUser)]="selectedUser"></app-list>
<router-outlet></router-outlet>
<div>{{selectedUser.name}}</div>
app-list, div {
    float: left;
}
import { Component } from '@angular/core';
import { User } from './models/user';

@Component({
  selector: 'app-root',
  templateUrl: './app.component.html',
  styleUrls: ['./app.component.css']
})

export class AppComponent {
  title = 'Ignite Ui App';
  public selectedUser: User = new User("", "", 0);

  onClickMenu() {
    window.alert("menu clicked");
  }

  onClickAdd() {
    window.alert("add clicked");
  }

  onClickRefresh() {
    window.alert("refresh clicked");
  }
}
3. 一覧にはユーザーというクラスを使うので、以下のコマンドで Models フォルダに User クラスを追加します。中身も追加してください。
ng generate class models/user
export class User {
    public image: string
    public name: string
    public id: number

    constructor(image: string, name: string, id: number) {
        this.image = image;
        this.name = name;
        this.id = id;
    }
}
4. 次に追加された list のコンポーネントを変更します。ここでは IxgScroll と IgxScrollEvent をインポートしているほか、User クラスもインポートしています。また app.component と双方向でバインドしている selectedUser をそれぞれ Input と Output で設定し、onItemSelect 関数で結果を返しています。
import { Component, OnInit, Input, Output, EventEmitter } from '@angular/core';
import { IgxScroll, IgxScrollEvent } from "igniteui-angular/main";
import { User } from '../models/user';

@Component({
  selector: 'app-list',
  templateUrl: './list.component.html',
  styleUrls: ['./list.component.css']
})
export class ListComponent implements OnInit {
  @Input() selectedUser: User;
  @Output() selectedUserChange: EventEmitter<User> = new EventEmitter();

  constructor() {
    for (let i = 1; i <= 22; i++) {
      this.users.push(new User(
        `http://www.infragistics.com/angular-demos/assets/images/avatar/${i}.jpg`,
        "User: " + i,
        i
      ));
    }

    this.visibleUsers = this.users.slice(0, this.visibleUsersCount);
  }

  public users: User[] = new Array<User>();
  public visibleUsers: User[];
  public visibleUsersCount: number = 8;

  ngOnInit() {
  }

  private onItemSelect(user: User): void {
    this.selectedUserChange.emit(user);
  }

  private updateList($event: IgxScrollEvent): void {
    this.visibleUsers = this.users.slice($event.currentTop, $event.currentTop + this.visibleUsersCount);
  }
}
5. 画面とスタイルも以下のように変更します。
<igx-scroll #scroll (onScroll)="updateList($event)"
    [visibleItemsCount]="visibleUsersCount"
    [itemHeight]="70"
    [totalItemsCount]="users.length">
    <ul class="list">
        <li class="list-item" *ngFor="let user of visibleUsers" (click)="onItemSelect(user)">
            <h5 class="list-item-value">{{user.name}}</h5>
        </li>
    </ul>
</igx-scroll>
.list {
    width: 250px;
}
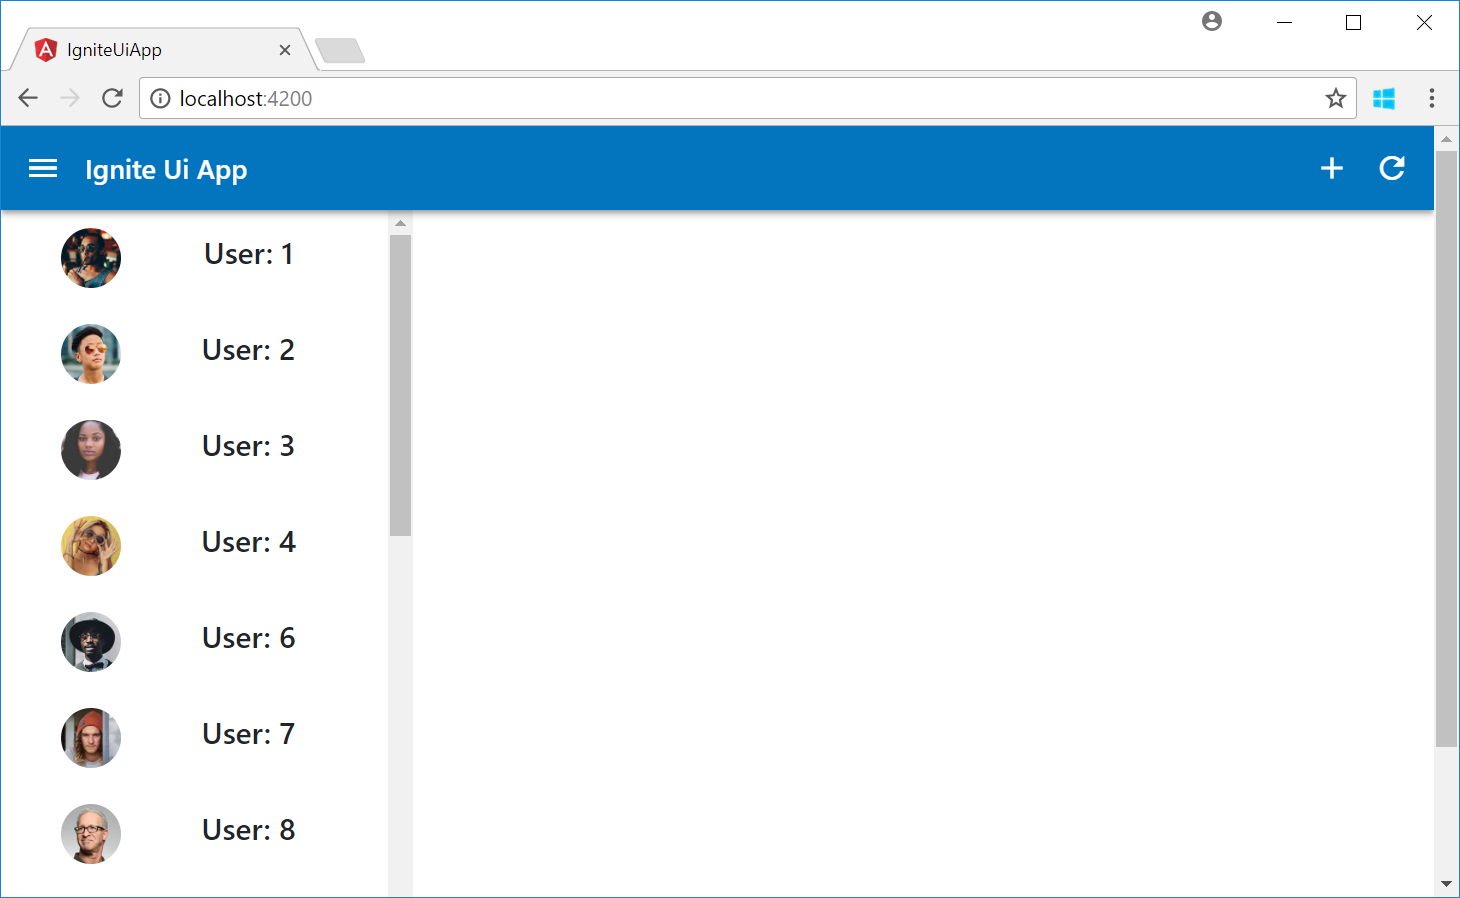
6. 保存すると画面が自動更新され、以下のようにスクロールリストが出ます。アイテムをクリックすると名前が表示されることを確認してください。

アバターの利用
リストのアイテムはこのままで不細工です。また写真も使いたいので、Ignite UI のアバターを利用します。アバターは写真とテキストを奇麗に表示することが出来ます。
1. いつも通りコンポーネントの追加から。
import { BrowserModule } from '@angular/platform-browser';
import { NgModule } from '@angular/core';
import { AppRoutingModule } from './app-routing.module';
import { AppComponent } from './app.component';

// Ignite UI モジュールの参照
import { IgxNavbarModule, IgxIconModule, IgxScrollModule, IgxAvatarModule } from 'igniteui-angular/main';

// Hammer
import "hammerjs";
import { ListComponent } from './list/list.component';

@NgModule({
  declarations: [
    AppComponent,
    ListComponent
  ],
  imports: [
    BrowserModule,
    AppRoutingModule,
    IgxNavbarModule, // Ignite UI Navbar モジュールの追加
    IgxIconModule, // Ignite UI Icon モジュールの追加
    IgxScrollModule, // Ignite UI Scroll モジュールの追加
    IgxAvatarModule, // Ignite UI Avatar モジュールの追加
  ],
  providers: [],
  bootstrap: [AppComponent]
})
export class AppModule { }
2. 続いてアバターが使えるよう、list.component.ts でもインポートを追記します。
import { Component, OnInit, Input, Output, EventEmitter } from '@angular/core';
import { IgxScroll, IgxScrollEvent, IgxAvatar } from "igniteui-angular/main";
import { User } from '../models/user';

@Component({
  selector: 'app-list',
  templateUrl: './list.component.html',
  styleUrls: ['./list.component.css']
})
export class ListComponent implements OnInit {
  @Input() selectedUser: User;
  @Output() selectedUserChange: EventEmitter<User> = new EventEmitter();

  constructor() {
    for (let i = 1; i <= 22; i++) {
      this.users.push(new User(
        `http://www.infragistics.com/angular-demos/assets/images/avatar/${i}.jpg`,
        "User: " + i,
        i
      ));
    }

    this.visibleUsers = this.users.slice(0, this.visibleUsersCount);
  }

  public users: User[] = new Array<User>();
  public visibleUsers: User[];
  public visibleUsersCount: number = 8;

  ngOnInit() {
  }

  private onItemSelect(user: User): void {
    this.selectedUserChange.emit(user);
  }

  private updateList($event: IgxScrollEvent): void {
    this.visibleUsers = this.users.slice($event.currentTop, $event.currentTop + this.visibleUsersCount);
  }
}
3. 最後に html と css を変更します。igx-avatar の追加と CSS 用にクラスをいくつか指定しています。
<igx-scroll #scroll (onScroll)="updateList($event)"
    [visibleItemsCount]="visibleUsersCount"
    [itemHeight]="70"
    [totalItemsCount]="users.length">
    <ul class="list">
        <li class="list-item" *ngFor="let user of visibleUsers" (click)="onItemSelect(user)">
            <igx-avatar class="list-item-image" roundShape="true" src="{{user.image}}"></igx-avatar>
            <h5 class="list-item-value">{{user.name}}</h5>
        </li>
    </ul>
</igx-scroll>
.list {
    width: 250px;
}

.list-item {
    list-style: none;
    height: 64px;
    display: flex;
    flex-direction: row;
    justify-content: flex-start;
    align-items: center;
}

.list-item-image, .list-item-value {
    flex-grow: 1;
    flex-shrink: 1;
    flex-basis: auto;
}
4. 保存すると画面が更新されます。
リストと詳細画面の連携
リストを作成したので、次に各ユーザーの情報を出す詳細画面を作ります。まず画面をどのように出すかとユーザーの情報を提供するサービスを作ります。
Angular ルーティングと詳細画面
Ignite UI から話はそれますが、ユーザーの詳細画面の表示に Angular のルーティングを使いたいので、まずそちらをセットアップします。
1. 以下のコマンドで新しく detail コンポーネントを追加します。
ng generate component detail
2. 次に追加したコンポーネントをルーティングの対象にするため、app-routing.module.ts を変更します。
import { NgModule } from '@angular/core';
import { Routes, RouterModule } from '@angular/router';
// Detail コンポーネントの追加
import { DetailComponent } from './detail/detail.component';

const routes: Routes = [
  // detail をパスとして指定したら Detail コンポーネントを表示。idがパラメーター
  { path: 'detail/:id', component: DetailComponent }
];

@NgModule({
  imports: [RouterModule.forRoot(routes)],
  exports: [RouterModule]
})
export class AppRoutingModule { }
3. app コンポーネントを変更してテストのデータを出さないようにするとともに、ルーティングで不要となる
SelectedUser の受け取りを削除します。
import { Component } from '@angular/core';
import { User } from './models/user';

@Component({
  selector: 'app-root',
  templateUrl: './app.component.html',
  styleUrls: ['./app.component.css']
})

export class AppComponent {
  title = 'Ignite Ui App';

  onClickMenu() {
    window.alert("menu clicked");
  }

  onClickAdd() {
    window.alert("add clicked");
  }

  onClickRefresh() {
    window.alert("refresh clicked");
  }
}
<!--The content below is only a placeholder and can be replaced.-->
<igx-navbar [title]="title" actionButtonIcon="menu" (onAction)="onClickMenu()">
  <igx-icon name="add" (click)="onClickAdd()"></igx-icon>
  <igx-icon name="refresh" (click)="onClickRefresh()"></igx-icon>
</igx-navbar>

<app-list></app-list>
<router-outlet></router-outlet>
app-list, router-outlet {
    float: left;
}
4. detail.component.ts と html を変更して変数を受け取れるようにします。
import { Component, OnInit } from '@angular/core';
import { ActivatedRoute } from '@angular/router';
@Component({
  selector: 'app-detail',
  templateUrl: './detail.component.html',
  styleUrls: ['./detail.component.css']
})
export class DetailComponent implements OnInit {

  public id: string;
  constructor( private route: ActivatedRoute ) {
  }

  ngOnInit() {
    // パラメーターの変更をモニタ
    this.route.params.subscribe(params => {
      this.id = params.id;
    });
  }
}
<p>
  {{id}}
</p>
5. リストでアイテムを選択した際に、ルーティングするように変更します。コンストラクタに router 変数を指定していますが、これは Angular の機能でサービスを差し込むことが出来るようになってます。また不要となった SelectedUser のインプット、アウトプットを削除します。
import { Component, OnInit, EventEmitter } from '@angular/core';
import { IgxScroll, IgxScrollEvent, IgxAvatar } from "igniteui-angular/main";
import { User } from '../models/user';
import { Router } from '@angular/router';

@Component({
  selector: 'app-list',
  templateUrl: './list.component.html',
  styleUrls: ['./list.component.css']
})
export class ListComponent implements OnInit {

  constructor(private router: Router) {
    for (let i = 1; i <= 22; i++) {
      this.users.push(new User(
        `http://www.infragistics.com/angular-demos/assets/images/avatar/${i}.jpg`,
        "User: " + i,
        i
      ));
    }

    this.visibleUsers = this.users.slice(0, this.visibleUsersCount);
  }

  public users: User[] = new Array<User>();
  public visibleUsers: User[];
  public visibleUsersCount: number = 8;

  ngOnInit() {
  }

  private onItemSelect(user: User): void {
    this.router.navigate([`/detail/${user.id}`]);
  }

  private updateList($event: IgxScrollEvent): void {
    this.visibleUsers = this.users.slice($event.currentTop, $event.currentTop + this.visibleUsersCount);
  }
}
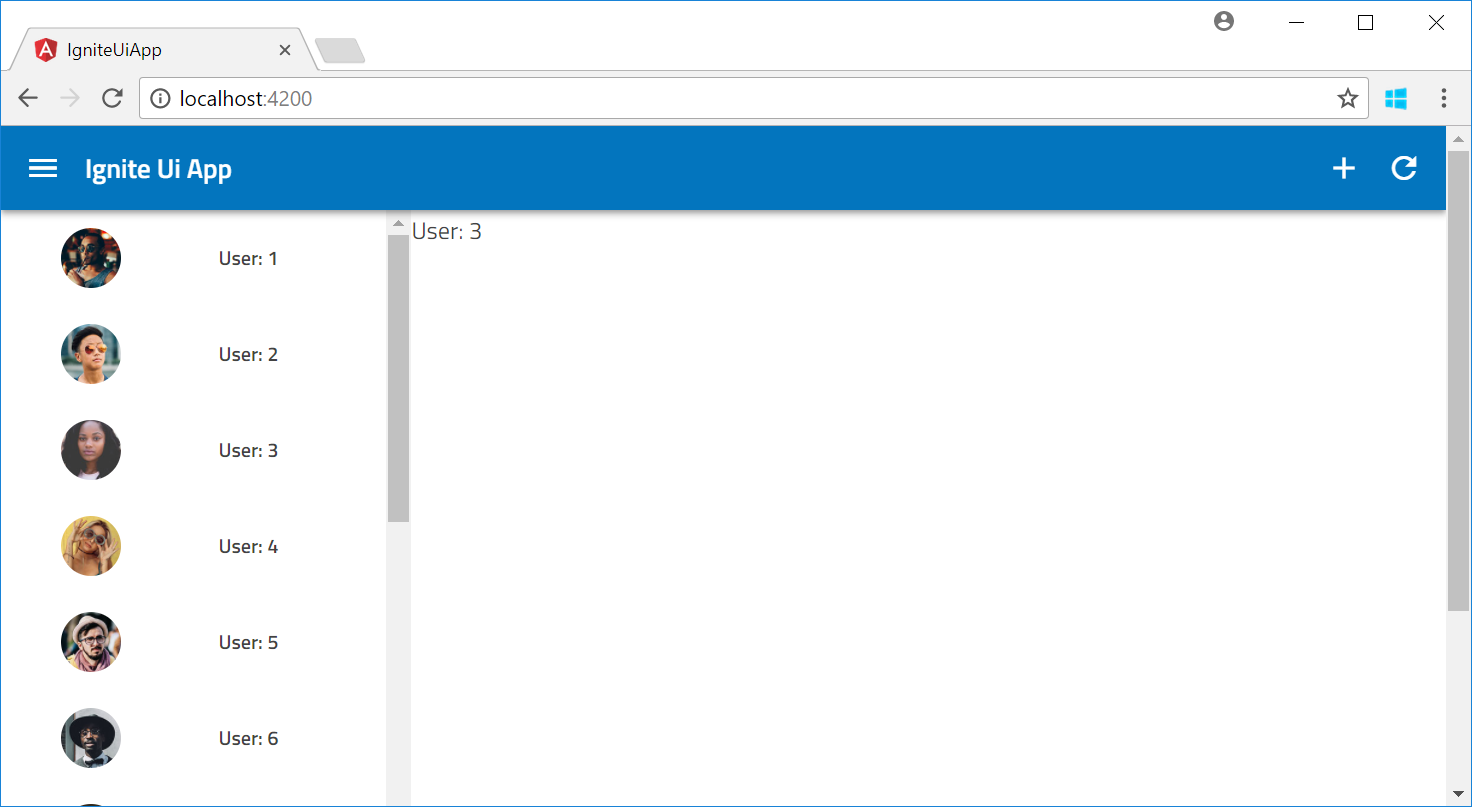
6. 保存すると画面が更新されます。リストのアイテムをクリックすると右の画面の値が変わることを確認します。

Angular サービスの利用
このタイミングでユーザーの情報を返す所もサービスとして実装します。
1. 以下のコマンドでサービスを作ります。サービスを使うモジュールを指定し、また専用のフォルダに入れるように --flat に false を渡しています。
ng generate service user --module=app --flat false
2. app.module.ts で追加したサービスをプロバイダーとして指定します。
import { BrowserModule } from '@angular/platform-browser';
import { NgModule } from '@angular/core';
import { AppRoutingModule } from './app-routing.module';
import { AppComponent } from './app.component';

// Ignite UI モジュールの参照
import { IgxNavbarModule, IgxIconModule, IgxScrollModule, IgxAvatarModule } from 'igniteui-angular/main';

// Hammer
import "hammerjs";
import { ListComponent } from './list/list.component';
import { DetailComponent } from './detail/detail.component';
import { UserService } from './user/user.service';

@NgModule({
  declarations: [
    AppComponent,
    ListComponent,
    DetailComponent
  ],
  imports: [
    BrowserModule,
    AppRoutingModule,
    IgxNavbarModule, // Ignite UI Navbar モジュールの追加
    IgxIconModule, // Ignite UI Icon モジュールの追加
    IgxScrollModule, // Ignite UI Scroll モジュールの追加
    IgxAvatarModule, // Ignite UI Avatar モジュールの追加
  ],
  providers: [UserService], // サービスをプロバイダに追加
  bootstrap: [AppComponent]
})
export class AppModule { }
3. 追加したサービスでユーザーを返すようにします。ここでは将来的に Web API 等を呼ぶことを考えて Observe と of を使っています。
import { Injectable } from '@angular/core';
import { Observable } from 'rxjs/Observable';
import { of } from 'rxjs/observable/of';
import { User } from '../models/user'
@Injectable()
export class UserService {

  private users: Array<User>;

  constructor() {
    this.users = new Array<User>();
    for (let i = 1; i <= 22; i++) {

      this.users.push(new User(
        `http://www.infragistics.com/angular-demos/assets/images/avatar/${i}.jpg`,
        "User: " + i,
        i
      ));
    }
   }

  getUsers(): Observable<User[]>{
      return of(this.users)
  }

  getUser(id: number): Observable<User>{
      return of(this.users.find(x=>x.id === +id));
  }
}
4. サービスを list.component.ts で使うように変更します。ここでも先ほどの router 同様サービスの差し込みを使って、コンストラクタに直接サービスを渡しています。
import { Component, OnInit, EventEmitter } from '@angular/core';
import { IgxScroll, IgxScrollEvent, IgxAvatar } from "igniteui-angular/main";
import { User } from '../models/user';
import { UserService } from '../user/user.service';
import { Router } from '@angular/router';

@Component({
  selector: 'app-list',
  templateUrl: './list.component.html',
  styleUrls: ['./list.component.css']
})
export class ListComponent implements OnInit {

  constructor(private userService: UserService, private router: Router) {
    // ユーザーをサービスから取得。非同期のため subscribe でデータ受け取り。
    this.userService.getUsers().subscribe(
      (users) => {
        this.users = users;
        this.visibleUsers = this.users.slice(0, this.visibleUsersCount);
      }
    );
  }

  public users: User[] = new Array<User>();
  public visibleUsers: User[];
  public visibleUsersCount: number = 8;

  ngOnInit() {
  }

  private onItemSelect(user: User): void {
    // detail にナビゲート
    this.router.navigate([`/detail/${user.id}`]);
  }

  private updateList($event: IgxScrollEvent): void {
    this.visibleUsers = this.users.slice($event.currentTop, $event.currentTop + this.visibleUsersCount);
  }
}
5. 同様に detail.component.ts と html も変更します。
import { Component, OnInit } from '@angular/core';
import { ActivatedRoute } from '@angular/router';
import { UserService } from '../user/user.service';
import { User } from '../models/user';

@Component({
  selector: 'app-detail',
  templateUrl: './detail.component.html',
  styleUrls: ['./detail.component.css']
})

export class DetailComponent implements OnInit {

  public user: User;
  constructor( private route: ActivatedRoute, private userService: UserService ) {
  }

  ngOnInit() {
    // パラメーターの変更をモニタ
    this.route.params.subscribe(params => {
      this.userService.getUser(params.id).subscribe(
        (user) => {this.user = user;}
      );
    });
  }
}
<p>
  {{user.name}}
</p>
6. 全てを保存して動作が期待どおりか確認します。
レコードの表示
大体の構成が終わったので、次に詳細画面の機能を追加していきます。まずリストで選択したレコードの表示からです。
インプットとラベルの利用
まず Ignite UI のインプットとラベルを使って項目を表示します。
1. コンポーネントの追加から。インプットのモジュールは IgxInput と Module がついていないので気を付けてください。また Angular フォーム機能を併用するので、FormsModule も追加しています。
import { BrowserModule } from '@angular/platform-browser';
import { NgModule } from '@angular/core';
import { FormsModule } from '@angular/forms';
import { AppRoutingModule } from './app-routing.module';
import { AppComponent } from './app.component';

// Ignite UI モジュールの参照
import { IgxNavbarModule, IgxIconModule, IgxScrollModule, IgxAvatarModule,
IgxLabelModule,
IgxLabel, IgxInput} from 'igniteui-angular/main';

// Hammer
import "hammerjs";
import { ListComponent } from './list/list.component';
import { DetailComponent } from './detail/detail.component';
import { UserService } from './user/user.service';

@NgModule({
  declarations: [
    AppComponent,
    ListComponent,
    DetailComponent
  ],
  imports: [
    BrowserModule,
    AppRoutingModule,
    FormsModule,
    IgxNavbarModule, // Ignite UI Navbar モジュールの追加
    IgxIconModule, // Ignite UI Icon モジュールの追加
    IgxScrollModule, // Ignite UI Scroll モジュールの追加
    IgxAvatarModule, // Ignite UI Avatar モジュールの追加
    IgxLabelModule, // Ignite UI Label モジュールの追加
    IgxInput, // Ignite UI Input の追加
  ],
  providers: [UserService], // サービスをプロバイダに追加
  bootstrap: [AppComponent]
})
export class AppModule { }
2. 次に detail.component の変更をします。html で要素を使えるように ts では import を追加しただけです。
import { Component, OnInit } from '@angular/core';
import { ActivatedRoute } from '@angular/router';
import { IgxLabel, IgxInput, IgxAvatar } from 'igniteui-angular/main';
import { UserService } from '../user/user.service';
import { User } from '../models/user';

@Component({
  selector: 'app-detail',
  templateUrl: './detail.component.html',
  styleUrls: ['./detail.component.css']
})

export class DetailComponent implements OnInit {

  public user: User;
  constructor( private route: ActivatedRoute, private userService: UserService ) {
  }

  ngOnInit() {
    // パラメーターの変更をモニタ
    this.route.params.subscribe(params => {
      this.userService.getUser(params.id).subscribe(
        (user) => {this.user = user;}
      );
    });
  }
}
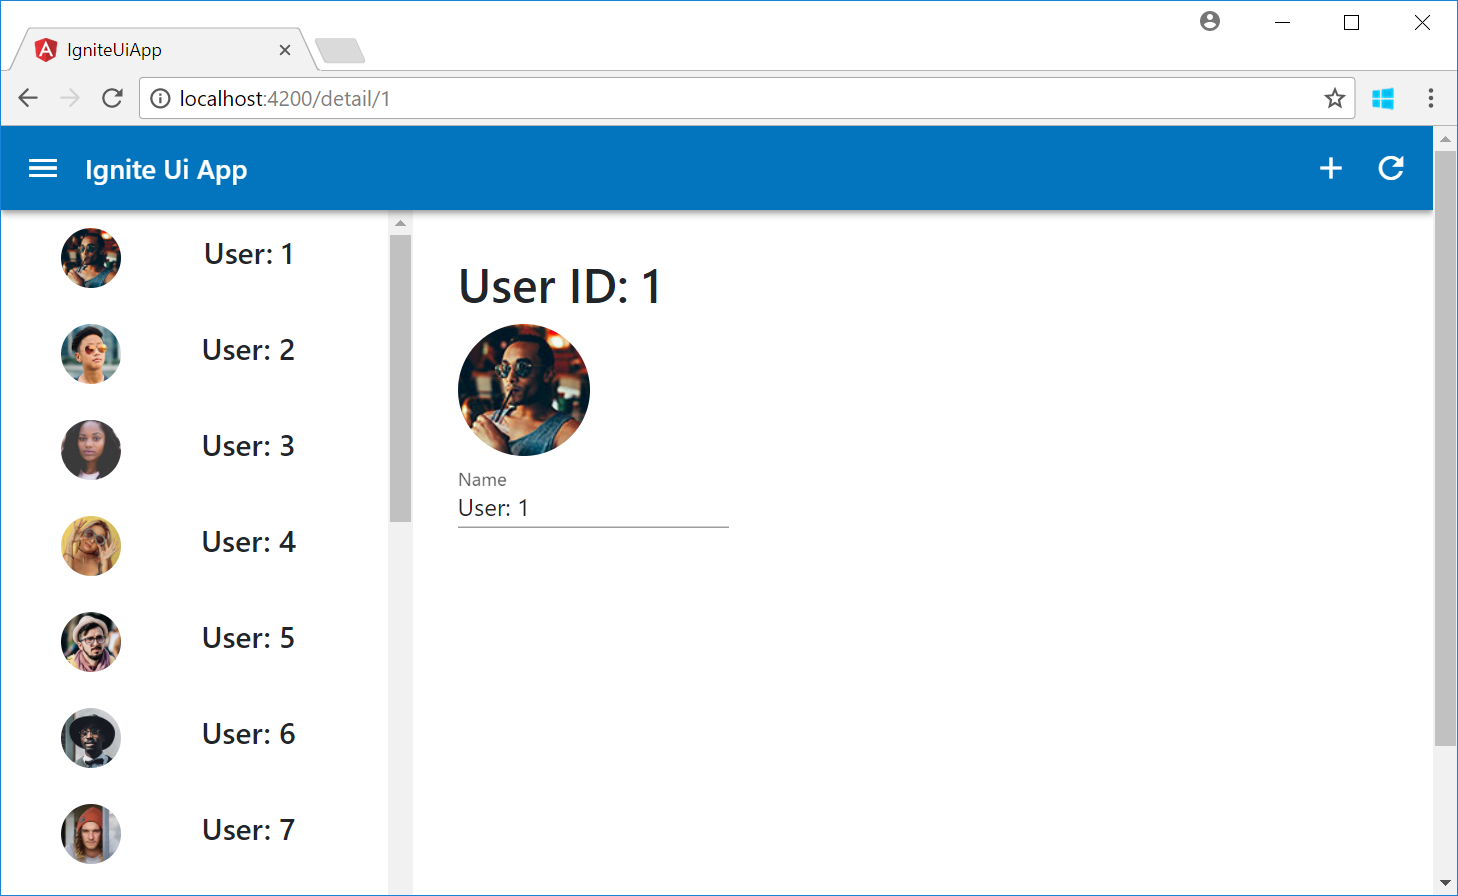
<div class="detail">
  <div>
      <h2 igxLabel>User ID: {{user.id}}</h2>
      <igx-avatar size="large" roundShape="true" src="{{user.image}}"></igx-avatar>
  </div>
  <div class="igx-form-group">
    <input [(ngModel)]="user.name" igxInput type="text" />
    <label igxLabel>Name</label>
  </div>
</div>
.detail {
    float: left;
    margin: 30px;
}
3. すべてを保存して動作を確認します。
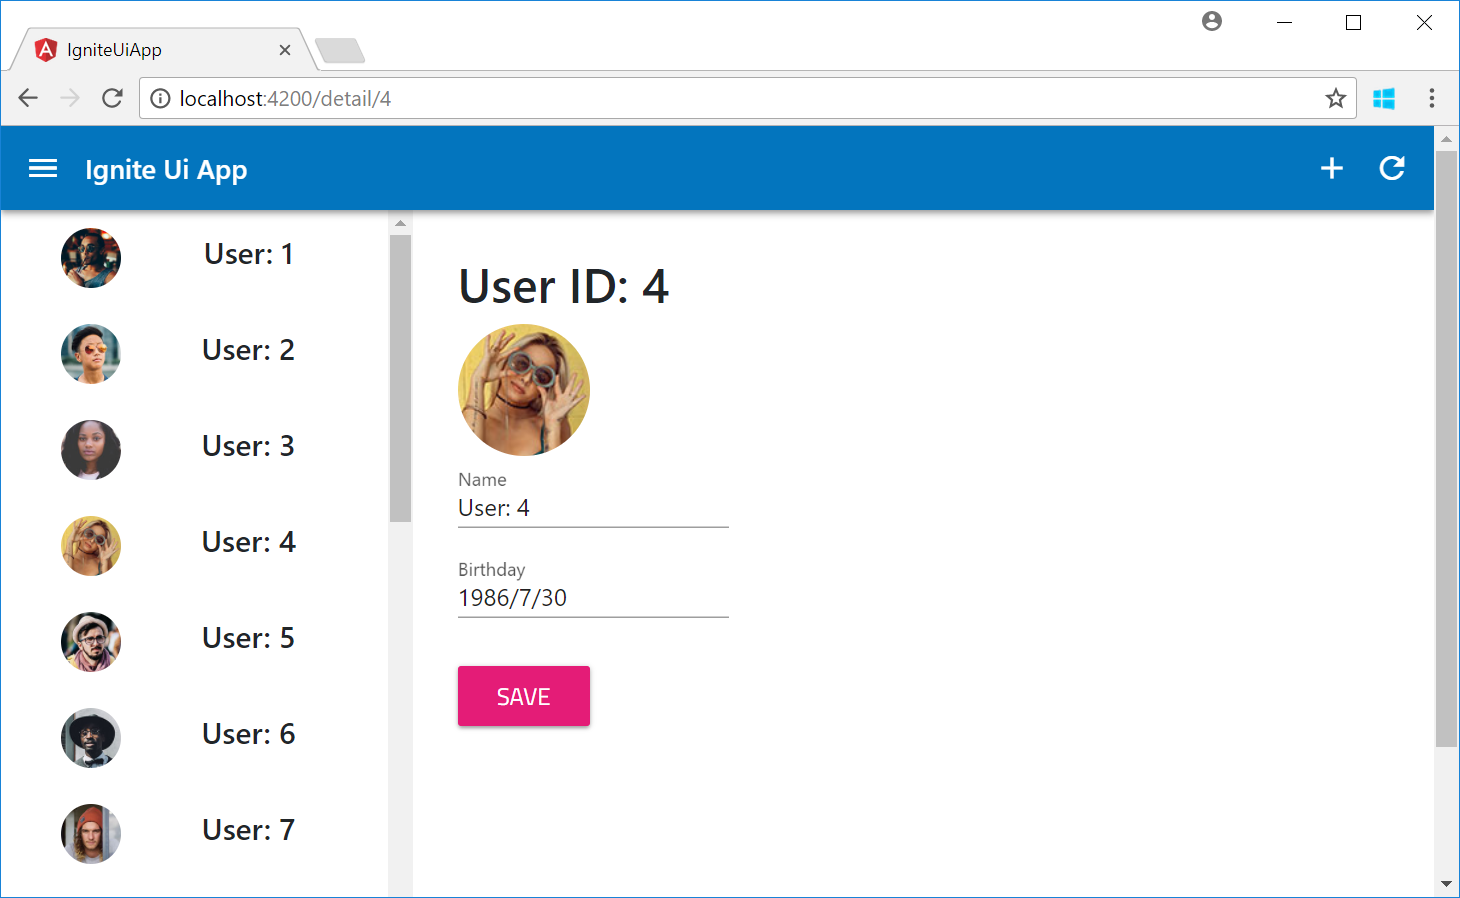
日付ピッカーの利用
日付は開発者からするとフォーマットを適当に入れられると困るため、ピッカーがあると便利です。ユーザーの誕生日を日付ピッカーで設定できるようにします。
1. まずモデルに誕生日を追加します。
export class User {
    public image: string
    public name: string
    public id: number
    public birthdate: Date

    constructor(image: string, name: string, id: number, birthdate: Date) {
        this.image = image;
        this.name = name;
        this.id = id;
        this.birthdate = birthdate;
    }
}
2. ユーザーサービスを更新します。ついでに今後使うであろう保存機能も付けておきます。
import { Injectable } from '@angular/core';
import { Observable } from 'rxjs/Observable';
import { of } from 'rxjs/observable/of';
import { User } from '../models/user'
@Injectable()
export class UserService {

  private users: Array<User>;

  constructor() {
    this.users = new Array<User>();
    for (let i = 1; i <= 22; i++) {
      let birthdate = new Date(2018, 0, i);
      this.users.push(new User(
        `http://www.infragistics.com/angular-demos/assets/images/avatar/${i}.jpg`,
        "User: " + i,
        i,
        birthdate
      ));
    }
   }

  getUsers(): Observable<User[]>{
      return of(this.users)
  }

  getUser(id: number): Observable<User>{
      return of(this.users.find(x=>x.id === +id));
  }

  save(user: User): Observable<boolean> {
    let index = this.users.indexOf(user);
    if (index !== -1) {
      this.users[index] = user;
      return of(true);
    }
    else {
      return of(false);
    }
  }
}
3. 日付ピッカーモジュールを追加します。IgxDatePickerComponent もありますが、モジュール追加のみで大丈夫です。また日付ピッカーは BrowserAnimation も使う出の、そちらも追加します。
import { BrowserModule } from '@angular/platform-browser';
import { BrowserAnimationsModule } from '@angular/platform-browser/animations';
import { NgModule } from '@angular/core';
import { FormsModule } from '@angular/forms';
import { AppRoutingModule } from './app-routing.module';
import { AppComponent } from './app.component';

// Ignite UI モジュールの参照
import { IgxNavbarModule, IgxIconModule, IgxScrollModule, IgxAvatarModule,
IgxLabelModule, IgxLabel, IgxInput, IgxDatePickerModule } from 'igniteui-angular/main';

// Hammer
import "hammerjs";
import { ListComponent } from './list/list.component';
import { DetailComponent } from './detail/detail.component';
import { UserService } from './user/user.service';

@NgModule({
  declarations: [
    AppComponent,
    ListComponent,
    DetailComponent
  ],
  imports: [
    BrowserModule,
    BrowserAnimationsModule,
    AppRoutingModule,
    FormsModule,
    IgxNavbarModule, // Ignite UI Navbar モジュールの追加
    IgxIconModule, // Ignite UI Icon モジュールの追加
    IgxScrollModule, // Ignite UI Scroll モジュールの追加
    IgxAvatarModule, // Ignite UI Avatar モジュールの追加
    IgxLabelModule, // Ignite UI Label モジュールの追加
    IgxInput, // Ignite UI Input の追加
    IgxDatePickerModule // Ignite UI DatePicker モジュールの追加
  ],
  providers: [UserService], // サービスをプロバイダに追加
  bootstrap: [AppComponent]
})
export class AppModule { }
4. detail.component.html に日付ピッカーを追加します。ピッカーには色々な機能がありますが、ここでは閉じる、今日を選ぶ、データバインド、ロケールの指定を使っています。
<div class="detail">
  <div>
      <h2 igxLabel>User ID: {{user.id}}</h2>
    <igx-avatar size="large" roundShape="true" src="{{user.image}}"></igx-avatar>
  </div>
  <div class="igx-form-group">
    <input [(ngModel)]="user.name" igxInput type="text" />
    <label igxLabel>Name</label>
  </div>
  <div class="igx-form-group">
    <input style="display: none" [(ngModel)]="user.birthdate" igxInput type="text" />
    <igx-datePicker [cancelButtonLabel]="'Close'" [todayButtonLabel]="'Today'" [locale]="'ja-JP'" [(ngModel)]="user.birthdate"></igx-datePicker>
      <label igxLabel>Birthday</label>
    </div>
</div>
5. すべてを保存して、日付ピッカーが動作することを確認します。

レコードの保存
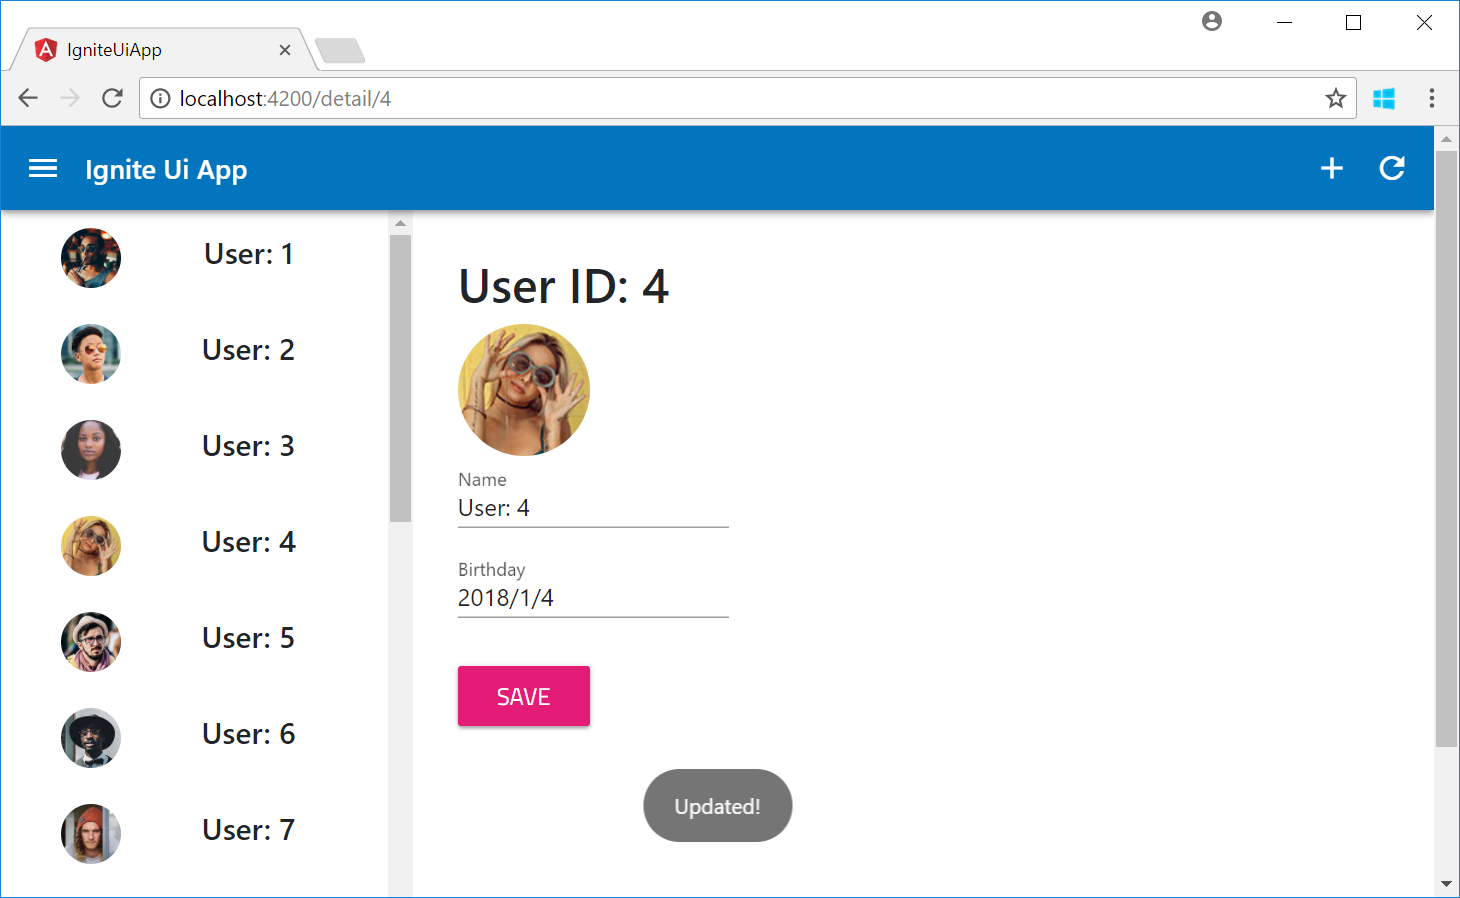
次に変更した内容を保存するようにします。
ボタンの利用
変更した値を保存するため、保存ボタンをつけますが、Ignite UI にはボタンコントロールも存在します。
1. まずモジュール追加から行います。ここではボタンモジュールだけでなく、クリックしたときの効果を付与できるリップルモジュールも追加しています。
import { BrowserModule } from '@angular/platform-browser';
import { BrowserAnimationsModule } from '@angular/platform-browser/animations';
import { NgModule } from '@angular/core';
import { FormsModule } from '@angular/forms';
import { AppRoutingModule } from './app-routing.module';
import { AppComponent } from './app.component';

// Ignite UI モジュールの参照
import { IgxNavbarModule, IgxIconModule, IgxScrollModule, IgxAvatarModule,
IgxLabelModule, IgxLabel, IgxInput, IgxDatePickerModule, IgxButtonModule, IgxRippleModule } from 'igniteui-angular/main';

// Hammer
import "hammerjs";
import { ListComponent } from './list/list.component';
import { DetailComponent } from './detail/detail.component';
import { UserService } from './user/user.service';

@NgModule({
  declarations: [
    AppComponent,
    ListComponent,
    DetailComponent
  ],
  imports: [
    BrowserModule,
    BrowserAnimationsModule,
    AppRoutingModule,
    FormsModule,
    IgxNavbarModule, // Ignite UI Navbar モジュールの追加
    IgxIconModule, // Ignite UI Icon モジュールの追加
    IgxScrollModule, // Ignite UI Scroll モジュールの追加
    IgxAvatarModule, // Ignite UI Avatar モジュールの追加
    IgxLabelModule, // Ignite UI Label モジュールの追加
    IgxInput, // Ignite UI Input の追加
    IgxDatePickerModule, // Ignite UI DatePicker モジュールの追加
    IgxButtonModule, // Ignite UI Button モジュールの追加
    IgxRippleModule, // Ignite UI Ripple モジュールの追加
  ],
  providers: [UserService], // サービスをプロバイダに追加
  bootstrap: [AppComponent]
})
export class AppModule { }
2. detail コンポーネントを更新します。ボタンもリップルもそれぞれエレメントではないため、import の処理は不要です。
import { Component, OnInit } from '@angular/core';
import { FormsModule } from '@angular/forms';
import { ActivatedRoute } from '@angular/router';
import { IgxLabel, IgxInput, IgxAvatar } from 'igniteui-angular/main';
import { UserService } from '../user/user.service';
import { User } from '../models/user';

@Component({
  selector: 'app-detail',
  templateUrl: './detail.component.html',
  styleUrls: ['./detail.component.css']
})

export class DetailComponent implements OnInit {

  public user: User;
  constructor( private route: ActivatedRoute, private userService: UserService ) {
  }

  ngOnInit() {
    // パラメーターの変更をモニタ
    this.route.params.subscribe(params => {
      this.userService.getUser(params.id).subscribe(
        (user) => {this.user = user;}
      );
    });
  }

  public save(){
    this.userService.save(this.user);
  }
}
<div class="detail">
  <div>
    <h2 igxLabel>User ID: {{user.id}}</h2>
    <igx-avatar size="large" roundShape="true" src="{{user.image}}"></igx-avatar>
  </div>
  <div class="igx-form-group">
    <input [(ngModel)]="user.name" igxInput type="text" />
    <label igxLabel>Name</label>
  </div>
  <div class="igx-form-group">
    <input style="display: none" [(ngModel)]="user.birthdate" igxInput type="text" />
    <igx-datePicker [cancelButtonLabel]="'Close'" [todayButtonLabel]="'Today'" [locale]="'ja-JP'" [(ngModel)]="user.birthdate"></igx-datePicker>
    <label igxLabel>Birthday</label>
  </div>
  <div>
    <span igxButton="raised" igxRipple (click)="save()">Save</span>
  </div>
</div>
3. 全てを保存してブラウザで期待した動作をするか確認します。ユーザーの誕生日を更新して、他のユーザーに遷移した後、また元のユーザーに戻って日付が変わっていれば成功です。
トースト通知の利用
今のままでは変更した際にあまり変更できた気がしないので、通知を出します。window.alert でもいいですが、Ignite UI のトースト機能を利用します。
1. まずモジュールの追加から。
import { BrowserModule } from '@angular/platform-browser';
import { BrowserAnimationsModule } from '@angular/platform-browser/animations';
import { NgModule } from '@angular/core';
import { FormsModule } from '@angular/forms';
import { AppRoutingModule } from './app-routing.module';
import { AppComponent } from './app.component';

// Ignite UI モジュールの参照
import { IgxNavbarModule, IgxIconModule, IgxScrollModule, IgxAvatarModule,
IgxLabelModule, IgxLabel, IgxInput, IgxDatePickerModule, IgxButtonModule, IgxRippleModule,
IgxToastModule } from 'igniteui-angular/main';

// Hammer
import "hammerjs";
import { ListComponent } from './list/list.component';
import { DetailComponent } from './detail/detail.component';
import { UserService } from './user/user.service';

@NgModule({
  declarations: [
    AppComponent,
    ListComponent,
    DetailComponent
  ],
  imports: [
    BrowserModule,
    BrowserAnimationsModule,
    AppRoutingModule,
    FormsModule,
    IgxNavbarModule, // Ignite UI Navbar モジュールの追加
    IgxIconModule, // Ignite UI Icon モジュールの追加
    IgxScrollModule, // Ignite UI Scroll モジュールの追加
    IgxAvatarModule, // Ignite UI Avatar モジュールの追加
    IgxLabelModule, // Ignite UI Label モジュールの追加
    IgxInput, // Ignite UI Input の追加
    IgxDatePickerModule, // Ignite UI DatePicker モジュールの追加
    IgxButtonModule, // Ignite UI Button モジュールの追加
    IgxRippleModule, // Ignite UI Ripple モジュールの追加
    IgxToastModule, // Ignite UI Toast モジュールの追加
  ],
  providers: [UserService], // サービスをプロバイダに追加
  bootstrap: [AppComponent]
})
export class AppModule { }
2. detail コンポーネントを更新します。ts 内で html の要素を読みために ViewChild を利用しています。また #toast と igx-toast に名前を付けて参照しています。show() メソッドを実行したら、自動的に数秒でトーストは消えます。
import { Component, OnInit, ViewChild } from '@angular/core';
import { FormsModule } from '@angular/forms';
import { ActivatedRoute } from '@angular/router';
import { IgxLabel, IgxInput, IgxAvatar, IgxToastModule, IgxToast } from 'igniteui-angular/main';
import { UserService } from '../user/user.service';
import { User } from '../models/user';

@Component({
  selector: 'app-detail',
  templateUrl: './detail.component.html',
  styleUrls: ['./detail.component.css']
})

export class DetailComponent implements OnInit {

  @ViewChild('toast') toast: IgxToast;

  public user: User;
  constructor( private route: ActivatedRoute, private userService: UserService ) {
  }

  ngOnInit() {
    // パラメーターの変更をモニタ
    this.route.params.subscribe(params => {
      this.userService.getUser(params.id).subscribe(
        (user) => {this.user = user;}
      );
    });
  }

  public save(){
    this.userService.save(this.user).subscribe(()=>{
      this.toast.show();
    });
  }
}
<div class="detail">
  <div>
    <h2 igxLabel>User ID: {{user.id}}</h2>
    <igx-avatar size="large" roundShape="true" src="{{user.image}}"></igx-avatar>
  </div>
  <div class="igx-form-group">
    <input [(ngModel)]="user.name" igxInput type="text" />
    <label igxLabel>Name</label>
  </div>
  <div class="igx-form-group">
    <input style="display: none" [(ngModel)]="user.birthdate" igxInput type="text" />
    <igx-datePicker [cancelButtonLabel]="'Close'" [todayButtonLabel]="'Today'" [locale]="'ja-JP'" [(ngModel)]="user.birthdate"></igx-datePicker>
    <label igxLabel>Birthday</label>
  </div>
  <div>
    <span igxButton="raised" igxRipple (click)="save()">Save</span>
  </div>
  <igx-toast #toast message="Updated!">
  </igx-toast>
</div>
3. すべて保存をしてから、画面でトーストが出るか確認します。
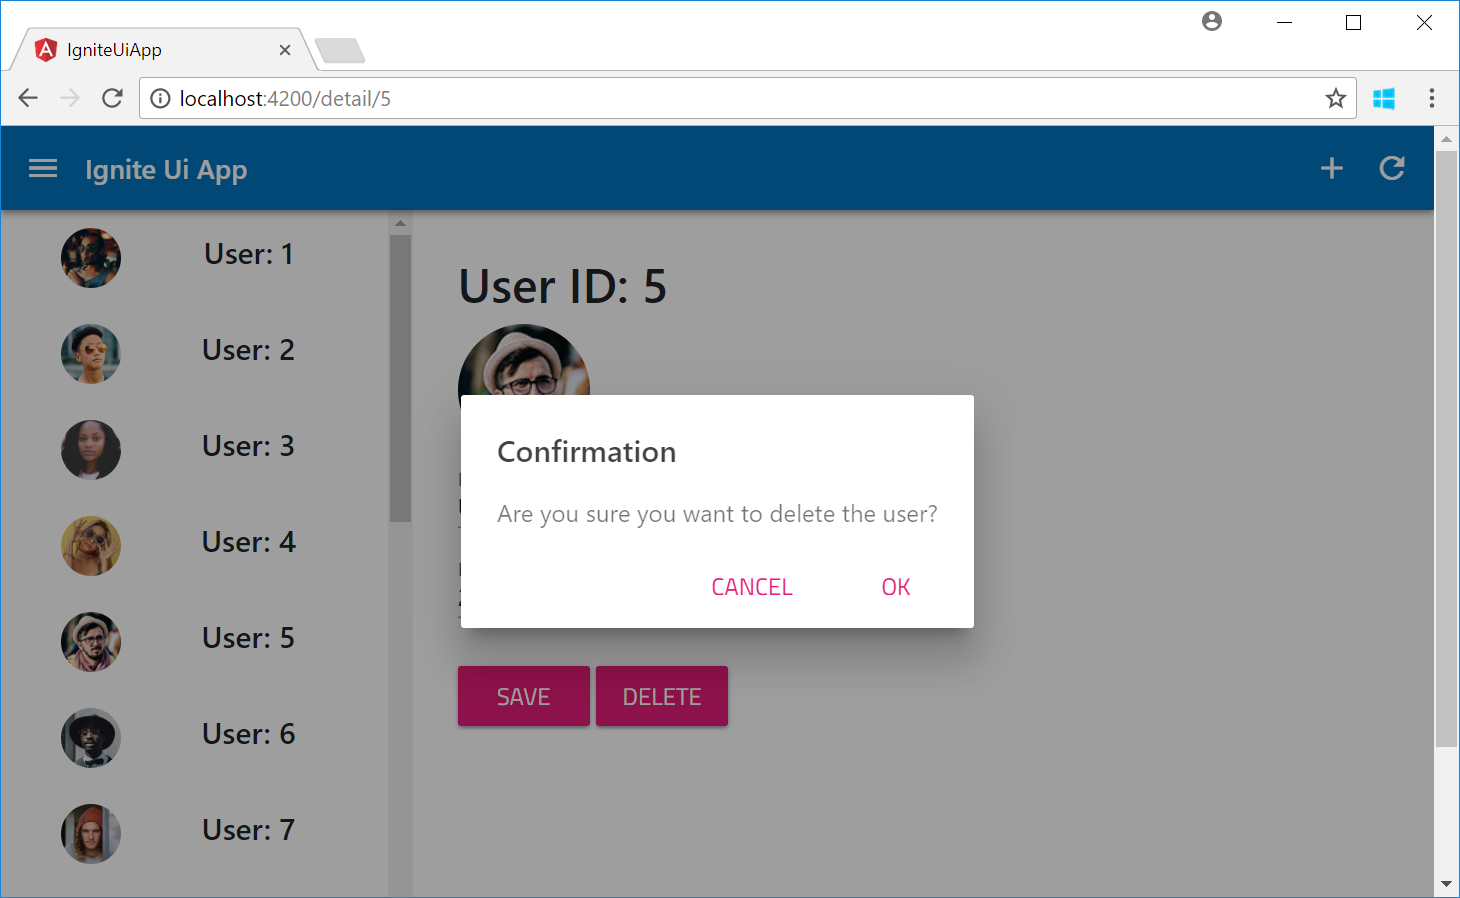
レコードの削除
次にレコードを削除するために削除機能を付けます。
ダイアログの利用
削除時に確認を出すようにします。Ignite UI ではダイアログ機能も提供しているのでこちらを使います。
1. まずモジュールの追加から。
import { BrowserModule } from '@angular/platform-browser';
import { BrowserAnimationsModule } from '@angular/platform-browser/animations';
import { NgModule } from '@angular/core';
import { FormsModule } from '@angular/forms';
import { AppRoutingModule } from './app-routing.module';
import { AppComponent } from './app.component';

// Ignite UI モジュールの参照
import { IgxNavbarModule, IgxIconModule, IgxScrollModule, IgxAvatarModule,
IgxLabelModule, IgxLabel, IgxInput, IgxDatePickerModule, IgxButtonModule, IgxRippleModule,
IgxToastModule, IgxDialogModule } from 'igniteui-angular/main';

// Hammer
import "hammerjs";
import { ListComponent } from './list/list.component';
import { DetailComponent } from './detail/detail.component';
import { UserService } from './user/user.service';

@NgModule({
  declarations: [
    AppComponent,
    ListComponent,
    DetailComponent
  ],
  imports: [
    BrowserModule,
    BrowserAnimationsModule,
    AppRoutingModule,
    FormsModule,
    IgxNavbarModule, // Ignite UI Navbar モジュールの追加
    IgxIconModule, // Ignite UI Icon モジュールの追加
    IgxScrollModule, // Ignite UI Scroll モジュールの追加
    IgxAvatarModule, // Ignite UI Avatar モジュールの追加
    IgxLabelModule, // Ignite UI Label モジュールの追加
    IgxInput, // Ignite UI Input の追加
    IgxDatePickerModule, // Ignite UI DatePicker モジュールの追加
    IgxButtonModule, // Ignite UI Button モジュールの追加
    IgxRippleModule, // Ignite UI Ripple モジュールの追加
    IgxToastModule, // Ignite UI Toast モジュールの追加
    IgxDialogModule // Ignite UI Dialog モジュールの追加
  ],
  providers: [UserService], // サービスをプロバイダに追加
  bootstrap: [AppComponent]
})
export class AppModule { }
2. detail コンポーネントの更新をします。ts ファイルでは IgxDialog をインポートしているほか、Router サービスを受け取り、レコード削除時に、トップ画面に遷移するようにしています。また、ダイアログの呼び出しは、#dialog で名前を付けて、それをボタンのクリックイベントから dialog.open() で表示しています。
import { Component, OnInit, ViewChild } from '@angular/core';
import { FormsModule } from '@angular/forms';
import { ActivatedRoute } from '@angular/router';
import { IgxLabel, IgxInput, IgxAvatar, IgxToastModule, IgxToast, IgxDialogModule } from 'igniteui-angular/main';
import { UserService } from '../user/user.service';
import { User } from '../models/user';
import { Router } from '@angular/router';

@Component({
  selector: 'app-detail',
  templateUrl: './detail.component.html',
  styleUrls: ['./detail.component.css']
})

export class DetailComponent implements OnInit {

  @ViewChild('toast') toast: IgxToast;
  public user: User;
  constructor( private route: ActivatedRoute, private router: Router,private userService: UserService ) {
  }

  ngOnInit() {
    // パラメーターの変更をモニタ
    this.route.params.subscribe(params => {
      this.userService.getUser(params.id).subscribe(
        (user) => {this.user = user;}
      );
    });
  }

  public save(){
    this.userService.save(this.user).subscribe(()=>{
      this.toast.show();
    });
  }

  public delete(){
    this.userService.delete(this.user).subscribe(()=>{
      this.toast.message = "deleted";
      this.toast.show();
      this.router.navigate([`/`]);
    })
  }
}
<div class="detail">
  <div>
    <h2 igxLabel>User ID: {{user.id}}</h2>
    <igx-avatar size="large" roundShape="true" src="{{user.image}}"></igx-avatar>
  </div>
  <div class="igx-form-group">
    <input [(ngModel)]="user.name" igxInput type="text" />
    <label igxLabel>Name</label>
  </div>
  <div class="igx-form-group">
    <input style="display: none" [(ngModel)]="user.birthdate" igxInput type="text" />
    <igx-datePicker [cancelButtonLabel]="'Close'" [todayButtonLabel]="'Today'" [locale]="'ja-JP'" [(ngModel)]="user.birthdate"></igx-datePicker>
    <label igxLabel>Birthday</label>
  </div>
  <div>
    <span igxButton="raised" igxRipple (click)="save()">Save</span>
    <span igxButton="raised" igxRipple (click)="dialog.open()">Delete</span>
  </div>
  <igx-toast #toast message="Updated!">
  </igx-toast>

  <igx-dialog #dialog
    title="Confirmation"
    message="Are you sure you want to delete the user?"
    leftButtonLabel="Cancel"
    (onLeftButtonSelect)="dialog.close()"
    rightButtonLabel="OK"
    (onRightButtonSelect)="delete()">
</igx-dialog>
</div>
3. 画面がこれでいいので、次にユーザーサービスを更新して削除できるようにします。またユーザーの削除をリストコンポーネントに通知するために、Subject の仕組みを入れています。
import { Injectable } from '@angular/core';
import { Observable } from 'rxjs/Observable';
import { of } from 'rxjs/observable/of';
import { User } from '../models/user'
import { Subject }    from 'rxjs/Subject';
@Injectable()
export class UserService {

  private users: Array<User>;
  // 通知用に一つ Subject を用意
  private userUpdate = new Subject<string>()
  public userUpdateSource$ = this.userUpdate.asObservable();

  constructor() {
    this.users = new Array<User>();
    for (let i = 1; i <= 22; i++) {
      let birthdate = new Date(2018, 0, i);
      this.users.push(new User(
        `http://www.infragistics.com/angular-demos/assets/images/avatar/${i}.jpg`,
        "User: " + i,
        i,
        birthdate
      ));
    }
  }

  getUsers(): Observable<User[]> {
    return of(this.users)
  }

  getUser(id: number): Observable<User> {
    return of(this.users.find(x => x.id === +id));
  }

  save(user: User): Observable<boolean> {
    let index = this.users.indexOf(user);
    if (index !== -1) {
      this.users[index] = user;
      return of(true);
    }
    else {
      return of(false);
    }
  }

  delete(user: User): Observable<boolean> {
    let index = this.users.indexOf(user);
    if (index !== -1) {
      this.users.splice(index, 1);
      // 削除したことを通知
      this.userUpdate.next("updated");
      return of(true);
    }
    else {
      return of(false);
    }
  }
}
4. 通知をリストコンポーネントで受け取る様にします。
import { Component, OnInit, EventEmitter } from '@angular/core';
import { IgxScroll, IgxScrollEvent, IgxAvatar } from "igniteui-angular/main";
import { User } from '../models/user';
import { UserService } from '../user/user.service';
import { Router } from '@angular/router';

@Component({
  selector: 'app-list',
  templateUrl: './list.component.html',
  styleUrls: ['./list.component.css']
})
export class ListComponent implements OnInit {
  constructor(private userService: UserService, private router: Router) {
    this.load();
  }

  public users: User[] = new Array<User>();
  public visibleUsers: User[];
  public visibleUsersCount: number = 8;

  ngOnInit() {
    // 変更通知を受け取ったら再度データをロード
    this.userService.userUpdateSource$.subscribe(
      (user)=>{this.load();}
    )
  }

  public load():void{
     // ユーザーをサービスから取得。非同期のため subscribe でデータ受け取り。
    this.userService.getUsers().subscribe(
      (users) => {
        this.users = users;
        this.visibleUsers = this.users.slice(0, this.visibleUsersCount);
      }
    );
  }

  private onItemSelect(user: User): void {
    // detail にナビゲート
    this.router.navigate([`/detail/${user.id}`]);
  }

  private updateList($event: IgxScrollEvent): void {
    this.visibleUsers = this.users.slice($event.currentTop, $event.currentTop + this.visibleUsersCount);
  }
}
5. すべてを保存して、期待通り動くか確認します。以下では User:5 を削除してみました。
レコードの作成
もちろん新しいレコードも必要なので、レコードの作成機能を付けます。既存の詳細画面を使いまわすことが出来ますが、制御が面倒なので新規の画面を作ります。
チェックボックス/スイッチ、スライダー、ラジオボタンの利用
ユーザーの情報を入力するために、Ignite UI が提供するさまざまなインプットコントロールを使っていきます。
1. まずはユーザークラスの拡張から行います。
export class User {
    public image: string
    public name: string
    public id: number
    public birthdate: Date
    public gender: Gender
    public userRank: number
    public isAdmin: boolean

    constructor(image: string, name: string, id: number, birthdate: Date,
    gender: Gender, userRank: number, isAdmin: boolean ) {
        this.image = image;
        this.name = name;
        this.id = id;
        this.birthdate = birthdate;
        this.gender = gender;
        this.userRank = userRank;
        this.isAdmin = isAdmin;
    }
}

export enum Gender {
    Male = 1,
    Female,
    Other,
}
2. ユーザーサービスで新しいレコードを追加できるようにします。また新しいフィールドに対してもデータソースとして値を追加します。
import { Injectable } from '@angular/core';
import { Observable } from 'rxjs/Observable';
import { of } from 'rxjs/observable/of';
import { User, Gender } from '../models/user'
import { Subject } from 'rxjs/Subject';

@Injectable()
export class UserService {

  private users: Array<User>;
  // 通知用に一つ Subject を用意
  private userUpdate = new Subject<string>()
  public userUpdateSource$ = this.userUpdate.asObservable();

  constructor() {
    this.users = new Array<User>();
    for (let i = 1; i <= 22; i++) {
      let birthdate = new Date(2018, 0, i);
      this.users.push(new User(
        `http://www.infragistics.com/angular-demos/assets/images/avatar/${i}.jpg`,
        "User: " + i,
        i,
        birthdate,
        Gender.Other,
        i,
        false
      ));
    }
  }

  getUsers(): Observable<User[]> {
    return of(this.users)
  }

  getUser(id: number): Observable<User> {
    return of(this.users.find(x => x.id === +id));
  }

  add(user: User): Observable<boolean> {
    this.users.push(user);
    // 追加したことを通知
    this.userUpdate.next("updated");
    return of(true);
  }

  save(user: User): Observable<boolean> {
    let index = this.users.indexOf(user);
    if (index !== -1) {
      this.users[index] = user;
      return of(true);
    }
    else {
      return of(false);
    }
  }

  delete(user: User): Observable<boolean> {
    let index = this.users.indexOf(user);
    if (index !== -1) {
      this.users.splice(index, 1);
      // 削除したことを通知
      this.userUpdate.next("updated");
      return of(true);
    }
    else {
      return of(false);
    }
  }
}
3. 次に以下のコマンドで新規レコード作成画面用のコンポーネントを追加します。
ng generate component new
4. ルーティングに新しいモジュールを追加します。
import { NgModule } from '@angular/core';
import { Routes, RouterModule } from '@angular/router';
// Detail コンポーネントの追加
import { DetailComponent } from './detail/detail.component';
import { NewComponent } from './new/new.component';

const routes: Routes = [
  // detail をパスとして指定したら Detail コンポーネントを表示。idがパラメーター
  { path: 'detail/:id', component: DetailComponent },
  // new をパスとして指定したら New コンポーネントを表示
  { path: 'new', component: NewComponent }
];

@NgModule({
  imports: [RouterModule.forRoot(routes)],
  exports: [RouterModule]
})
export class AppRoutingModule { }
5. 必要なモジュールを追加していきます。
import { BrowserModule } from '@angular/platform-browser';
import { BrowserAnimationsModule } from '@angular/platform-browser/animations';
import { NgModule } from '@angular/core';
import { FormsModule } from '@angular/forms';
import { AppRoutingModule } from './app-routing.module';
import { AppComponent } from './app.component';

// Ignite UI モジュールの参照
import {
  IgxNavbarModule, IgxIconModule, IgxScrollModule, IgxAvatarModule,
  IgxLabelModule, IgxLabel, IgxInput, IgxDatePickerModule, IgxButtonModule, IgxRippleModule,
  IgxToastModule, IgxDialogModule, IgxCheckboxModule, IgxSwitchModule, IgxSliderModule, IgxRadioModule
 } from 'igniteui-angular/main';

// Hammer
import "hammerjs";
import { ListComponent } from './list/list.component';
import { DetailComponent } from './detail/detail.component';
import { UserService } from './user/user.service';
import { NewComponent } from './new/new.component';

@NgModule({
  declarations: [
    AppComponent,
    ListComponent,
    DetailComponent,
    NewComponent
  ],
  imports: [
    BrowserModule,
    BrowserAnimationsModule,
    AppRoutingModule,
    FormsModule,
    IgxNavbarModule, // Ignite UI Navbar モジュールの追加
    IgxIconModule, // Ignite UI Icon モジュールの追加
    IgxScrollModule, // Ignite UI Scroll モジュールの追加
    IgxAvatarModule, // Ignite UI Avatar モジュールの追加
    IgxLabelModule, // Ignite UI Label モジュールの追加
    IgxInput, // Ignite UI Input の追加
    IgxDatePickerModule, // Ignite UI DatePicker モジュールの追加
    IgxButtonModule, // Ignite UI Button モジュールの追加
    IgxRippleModule, // Ignite UI Ripple モジュールの追加
    IgxToastModule, // Ignite UI Toast モジュールの追加
    IgxDialogModule, // Ignite UI Dialog モジュールの追加
    IgxCheckboxModule, // Ignite UI Checkbox モジュールの追加
    IgxSwitchModule, // Ignite UI Switch モジュールの追加
    IgxSliderModule, // Ignite UI Slider モジュールの追加
    IgxRadioModule, // Ignite UI Slider モジュールの追加
  ],
  providers: [UserService], // サービスをプロバイダに追加
  bootstrap: [AppComponent]
})
export class AppModule { }
6. new コンポーネントのロジックと画面を作ります。ここでは isAdmin にスイッチを使っていますが、チェックボックスを使ってもいいです。またスライダーの色などは CSS で変更しています。
import { Component, OnInit, ViewChild } from '@angular/core';
import { FormsModule } from '@angular/forms';
import { User, Gender } from '../models/user';
import { UserService } from '../user/user.service';
import { IgxLabel, IgxInput, IgxAvatar, IgxToast, IgxDialog, IgxCheckbox, IgxSwitch, IgxSlider, IgxRadio } from 'igniteui-angular/main';
import { Router } from '@angular/router';
import { ActivatedRoute } from '@angular/router';

@Component({
  selector: 'app-new',
  templateUrl: './new.component.html',
  styleUrls: ['./new.component.css']
})
export class NewComponent implements OnInit {

  constructor(private userService: UserService, private router: Router) {
  }

  @ViewChild('toast') toast: IgxToast;
  public user: User;
  public gender: string[];

  ngOnInit() {
    this.user = new User("", "", 0, null, Gender.Other, 0, true);
    // Gender を配列から取得
    let genderValues = Object.keys(Gender);
    this.gender = genderValues.slice(genderValues.length / 2);
  }

  public loadImage(input: HTMLInputElement): void {
    if (!input.value) {
      return;
    }

    let reader = new FileReader();
    // Callback when file read.
    reader.onload = () => {
      input.value = "";
      this.user.image = reader.result;
    }

    reader.readAsDataURL(input.files[0]);
  }

  public create() {
    this.userService.add(this.user).subscribe(() => {
      // 作成したらトーストを出してルートに遷移
      this.toast.show();
      this.router.navigate([`/`]);
    });
  }
}
<div class="new">
  <div>
    <input #imageInput [(ngModel)]="user.image" igxInput type="file" (change)="loadImage(imageInput)" />
    <igx-avatar size="large" roundShape="true" src="{{user.image}}"></igx-avatar>
  </div>
  <div class="igx-form-group">
      <input [(ngModel)]="user.id" igxInput type="number" />
      <label igxLabel>User ID</label>
    </div>
  <div class="igx-form-group">
    <input [(ngModel)]="user.name" igxInput type="text" />
    <label igxLabel>Name</label>
  </div>
  <div class="igx-form-group">
    <input style="display: none" [(ngModel)]="user.birthdate" igxInput type="text" />
    <igx-datePicker [cancelButtonLabel]="'Close'" [todayButtonLabel]="'Today'" [locale]="'ja-JP'" [(ngModel)]="user.birthdate"></igx-datePicker>
    <label igxLabel>Birthday</label>
  </div>
  <igx-radio *ngFor="let item of gender" value="{{item}}" name="group" [(ngModel)]="user.gender">{{item}}</igx-radio>

  <div class="igx-form-group slider">
    <igx-slider [minValue]="0" [maxValue]="50" [lowerBound]="0" [value]="0" [(ngModel)]="user.userRank"></igx-slider>
    <label igxLabel>User Rank</label>
  </div>
  <igx-switch [checked]="user.isAdmin" [(ngModel)]="user.isAdmin" >
      Is Admin
  </igx-switch>

  <div>
      <span igxButton="raised" igxRipple (click)="create()">Create</span>
    </div>
  <igx-toast #toast message="Created!">
  </igx-toast>
</div>
.new {
    float: left;
    margin: 30px;
}

.slider {
    padding-top: 10px;
    margin-bottom: -10px
}

igx-slider >>> .igx-slider__track-fill {
    background: #e41c77;
}
7. メニューバーの新規ボタンクリックイベントで new にルーティングします。またリフレッシュボタンクリックでリストの一覧をリロードするようにも設定しています。List コンポーネントに対する参照は ViewChild で指定しています。
import { Component, ViewChild, ElementRef } from '@angular/core';
import { User } from './models/user';
import { ListComponent } from './list/list.component';
import { Router } from '@angular/router';

@Component({
  selector: 'app-root',
  templateUrl: './app.component.html',
  styleUrls: ['./app.component.css']
})

export class AppComponent {

  @ViewChild('applist') listComponent: ListComponent;
  selectedUser: User;

  title = 'Ignite Ui App';

  constructor(private router: Router) {
  }

  onClickMenu(){
    window.alert("menu clicked");
  }

  onClickAdd(){
    this.router.navigate(['/new']);
  }

  onClickRefresh(){
    this.listComponent.load();
  }
}
<!--The content below is only a placeholder and can be replaced.-->
<igx-navbar [title]="title" actionButtonIcon="menu" (onAction)="onClickMenu()">
  <igx-icon name="add" (click)="onClickAdd()"></igx-icon>
  <igx-icon name="refresh" (click)="onClickRefresh()"></igx-icon>
</igx-navbar>

<app-list #applist></app-list>
<router-outlet></router-outlet>
8. すべてを保存して、アプリを試してみます。メニューバーのプラスボタンクリックで新規作成画面に遷移し、実際にレコードを追加できるか確認します。

まとめ
今回は Angular と Ignite UI でアプリを作ってみました。Ignite UI にはまだまだ機能があります。次回は他のコントロールやモバイルサイズのアプリについて考えてみます。