前回はボットで Azure AD v2 の認証をしました。今回は取得したトークンを利用して Microsoft Graph から予定を取得します。
Microsoft Graph については以前連載を書いたので、詳細はそちらを参照してください。
Microsoft Graph を使ってみよう : 目次
Microsoft Graph 用クラス
まずは Microsoft Graph を使えるようにします。
1. 以下コマンドで Microsoft.Graph パッケージの追加。
dotnet add package Microsoft.Graph
2. Services フォルダを追加して、MSGraphService.cs ファイルを追加。

3. 以下のコードを張り付け。
using System;
using System.Collections.Generic;
using System.IO;
using System.Linq;
using System.Net.Http;
using System.Net.Http.Headers;
using System.Threading.Tasks;
using Microsoft.Graph;

public class MSGraphService
{
    private string token;
    public MSGraphService(string token)
    {
        this.token = token;
    }

    public async Task<User> GetMeAsync()
    {
        var graphClient = GetAuthenticatedClient();
        var me = await graphClient.Me.Request().GetAsync();
        return me;
    }

    public async Task<Stream> GetPhotoAsync()
    {
        var graphClient = GetAuthenticatedClient();
        var profilePhoto = await graphClient.Me.Photo.Content.Request().GetAsync();
        return profilePhoto;
    }

    public async Task UpdatePhotoAsync(Stream image)
    {
        var graphClient = GetAuthenticatedClient();
        await graphClient.Me.Photo.Content.Request().PutAsync(image);
        return;
    }

    public async Task<List<Event>> GetScheduleAsync()
    {
        var graphClient = GetAuthenticatedClient();
        var queryOption = new List<QueryOption>(){
            new QueryOption("startDateTime", DateTime.Today.ToString()),
            new QueryOption("endDateTime", DateTime.Today.AddDays(1).ToString())
        };
        var events = await graphClient.Me.CalendarView.Request(queryOption).GetAsync();
        return events.CurrentPage.ToList();
    }

    private GraphServiceClient GetAuthenticatedClient()
    {
        var graphClient = new GraphServiceClient(
            new DelegateAuthenticationProvider(
                requestMessage =>
                {
                    // トークンを指定
                    requestMessage.Headers.Authorization = new AuthenticationHeaderValue("bearer", token);
                    // タイムゾーンを指定
                    requestMessage.Headers.Add("Prefer", "outlook.timezone=\"" + TimeZoneInfo.Local.Id + "\"");
                    return Task.CompletedTask;
                }));
        return graphClient;
    }
}
ScheduleDialog で予定の取得
追加した MSGraphService を使ってダイアログを完成させます。
1. ScheduleDialog.cs を以下のコードで差し替え。
using System.Threading;
using System.Threading.Tasks;
using Microsoft.Bot.Builder.Dialogs;
using Microsoft.Bot.Schema;

public class ScheduleDialog : ComponentDialog
{
    private const string connectionName = "AzureAdv2";
    public ScheduleDialog() : base(nameof(ScheduleDialog))
    {
        // ウォーターフォールのステップを定義。処理順にメソッドを追加。
        var waterfallSteps = new WaterfallStep[]
        {
            LoginAsync,
            GetScheduleAsync,
        };

        // ウォーターフォールダイアログと各種プロンプトを追加
        AddDialog(new WaterfallDialog("schedule", waterfallSteps));
        AddDialog(new OAuthPrompt(
                "login",
                new OAuthPromptSettings
                {
                    ConnectionName = connectionName,
                    Text = "サインインダイアログ",
                    Title = "サインイン",
                    Timeout = 300000, // 5分でタイムアウトするように設定
                }));
    }

    private static async Task<DialogTurnResult> LoginAsync(WaterfallStepContext stepContext, CancellationToken cancellationToken)
    {
        return await stepContext.BeginDialogAsync("login", cancellationToken: cancellationToken);
    }
    private static async Task<DialogTurnResult> GetScheduleAsync(WaterfallStepContext stepContext, CancellationToken cancellationToken)
    {
        // ログインの結果よりトークンを取得
        var tokenResponse = (TokenResponse)stepContext.Result;

        if (!string.IsNullOrEmpty(tokenResponse.Token))
        {
            var graphClient = new MSGraphService(tokenResponse.Token);
            var events = await graphClient.GetScheduleAsync();
            events.ForEach(async x =>
            {
                await stepContext.Context.SendActivityAsync($"{System.DateTime.Parse(x.Start.DateTime).ToString("HH:mm")}-{System.DateTime.Parse(x.End.DateTime).ToString("HH:mm")} : {x.Subject}", cancellationToken: cancellationToken);
            });
        }
        else
            await stepContext.Context.SendActivityAsync($"サインインに失敗しました。", cancellationToken: cancellationToken);

        return await stepContext.EndDialogAsync(true, cancellationToken);
    }
}
2. F5 を押下してデバッグ実行。予定を取得。

ログインダイアログの作成
現在は認証プロンプトが ScheduleDialog にあるため他のダイアログから使いずらい問題があります。よって別途ウインダイアログを作成します。
1. Dialogs フォルダに LoginDialog.cs を作成し、以下のコードを張り付け。
- EndDialogAsync で戻り値としてトークンを指定
using System.Threading;
using System.Threading.Tasks;
using Microsoft.Bot.Builder.Dialogs;
using Microsoft.Bot.Schema;

public class LoginDialog : ComponentDialog
{
    private const string connectionName = "AzureAdv2";
    public LoginDialog() : base(nameof(LoginDialog))
    {
        // ウォーターフォールのステップを定義。処理順にメソッドを追加。
        var waterfallSteps = new WaterfallStep[]
        {
            LoginAsync,
            CompleteLoginAsync,
        };

        // ウォーターフォールダイアログと各種プロンプトを追加
        AddDialog(new WaterfallDialog("logindialog", waterfallSteps));
        AddDialog(new OAuthPrompt(
                "login",
                new OAuthPromptSettings
                {
                    ConnectionName = connectionName,
                    Text = "サインインダイアログ",
                    Title = "サインイン",
                    Timeout = 300000, // 5分でタイムアウトするように設定
                }));
    }

    private static async Task<DialogTurnResult> LoginAsync(WaterfallStepContext stepContext, CancellationToken cancellationToken)
    {
        return await stepContext.BeginDialogAsync("login", cancellationToken: cancellationToken);
    }
    private static async Task<DialogTurnResult> CompleteLoginAsync(WaterfallStepContext stepContext, CancellationToken cancellationToken)
    {
        // ログインの結果よりトークンを取得
        var tokenResponse = (TokenResponse)stepContext.Result;

        if (string.IsNullOrEmpty(tokenResponse.Token))
        {
            await stepContext.Context.SendActivityAsync($"サインインに失敗しました。", cancellationToken: cancellationToken);
            return await stepContext.EndDialogAsync("", cancellationToken);
        }
        else
            // 戻り値としてトークンを返す
            return await stepContext.EndDialogAsync(tokenResponse.Token, cancellationToken);
    }
}
2. ScheduleDialog.cs で作成した LoginDialog を使うように変更。
using System.Threading;
using System.Threading.Tasks;
using Microsoft.Bot.Builder.Dialogs;
using Microsoft.Bot.Schema;

public class ScheduleDialog : ComponentDialog
{
    public ScheduleDialog() : base(nameof(ScheduleDialog))
    {
        // ウォーターフォールのステップを定義。処理順にメソッドを追加。
        var waterfallSteps = new WaterfallStep[]
        {
            LoginAsync,
            GetScheduleAsync,
        };

        // ウォーターフォールダイアログと各種プロンプトを追加
        AddDialog(new WaterfallDialog("schedule", waterfallSteps));
        AddDialog(new LoginDialog());
    }

    private static async Task<DialogTurnResult> LoginAsync(WaterfallStepContext stepContext, CancellationToken cancellationToken)
    {
        return await stepContext.BeginDialogAsync(nameof(LoginDialog), cancellationToken: cancellationToken);
    }
    private static async Task<DialogTurnResult> GetScheduleAsync(WaterfallStepContext stepContext, CancellationToken cancellationToken)
    {
        // ログインの結果よりトークンを取得
        var accessToken = (string)stepContext.Result;

        if (!string.IsNullOrEmpty(accessToken))
        {
            var graphClient = new MSGraphService(accessToken);
            var events = await graphClient.GetScheduleAsync();
            events.ForEach(async x =>
            {
                await stepContext.Context.SendActivityAsync($"{System.DateTime.Parse(x.Start.DateTime).ToString("HH:mm")}-{System.DateTime.Parse(x.End.DateTime).ToString("HH:mm")} : {x.Subject}", cancellationToken: cancellationToken);
            });
        }
        else
            await stepContext.Context.SendActivityAsync($"サインインに失敗しました。", cancellationToken: cancellationToken);

        return await stepContext.EndDialogAsync(true, cancellationToken);
    }
}
3. 動作確認をして先ほどと同じ挙動であることを確認。
写真の更新
最後に画像を送ってプロファイル画像を変えられるようにします。
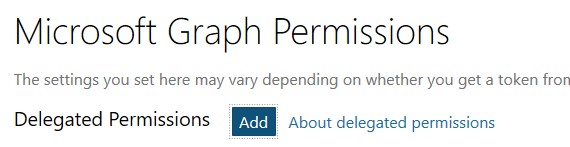
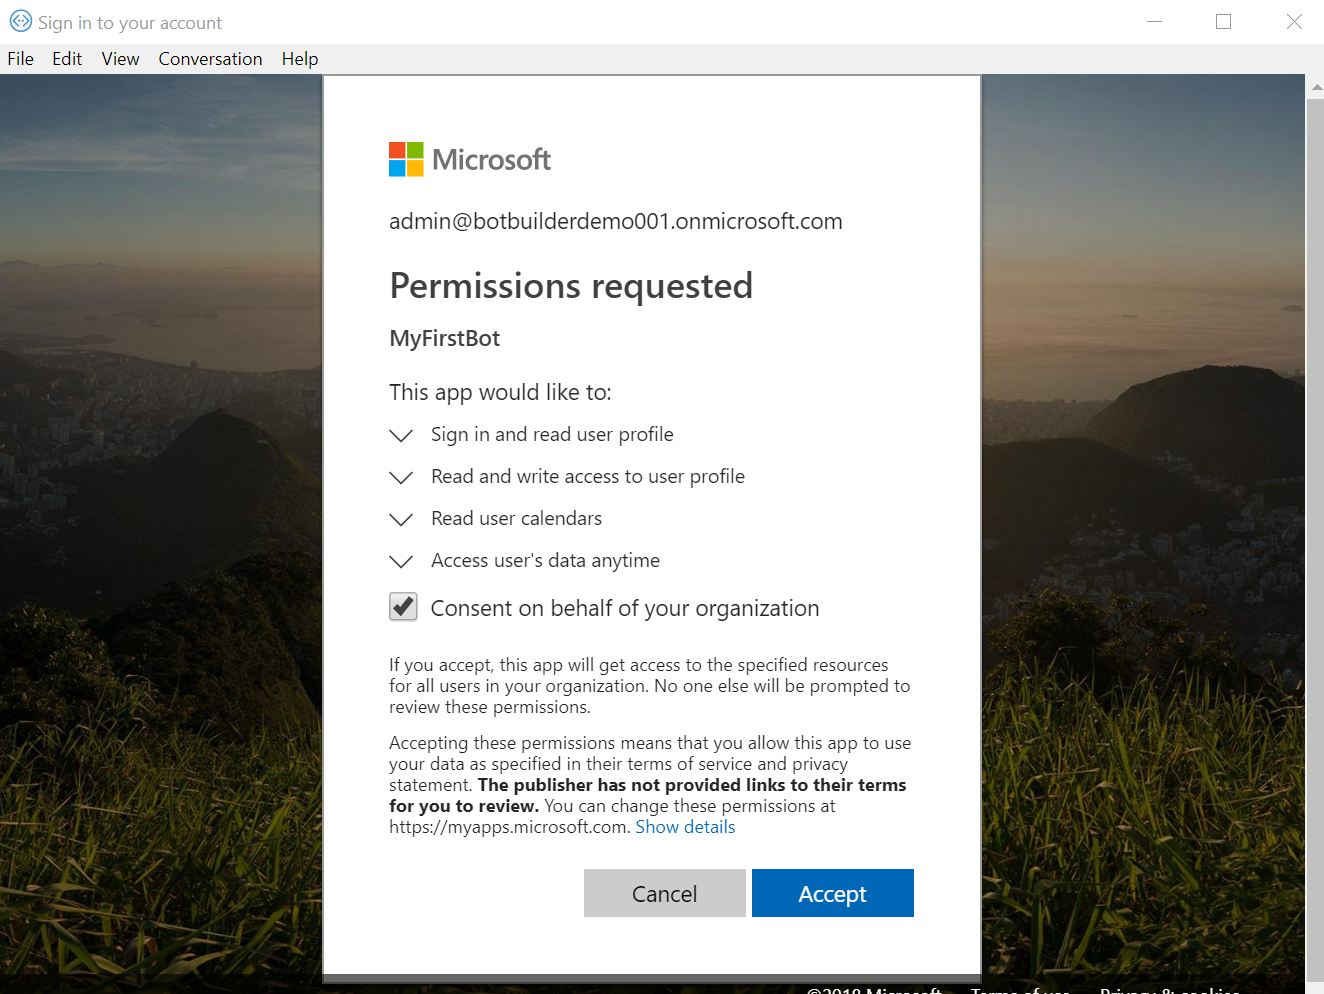
1. Application Registration Portal に Office 365 管理者のアカウントでログイン。Delegated Permissions の「Add」をクリック。
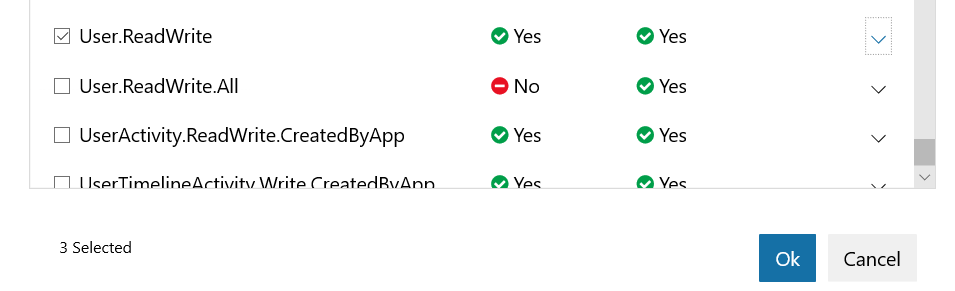
2. Users.ReadWrite にチェックをいれて「Ok」をクリック。その後「Save」をクリック。
3. Azure ポータル にログイン。Bot Channels Registration より「設定」を選択し、OAuth 認証設定より「AzureAdv2」をクリック。
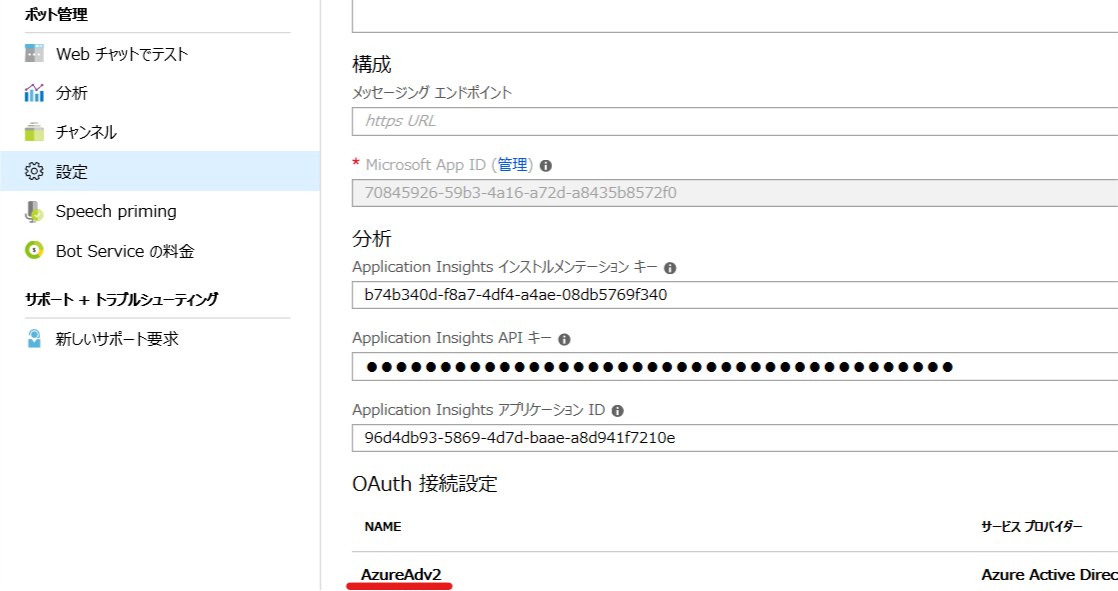
4. スコープに User.ReadWrite を追加して「保存」

5. Dialogs フォルダに PhotoUpdateDialog.cs を追加し、コードを以下と差し替え。
- stepContext.NextAsync の引数で次ステップにアクセストークンを渡す
- stepContext.Options より親ダイアログからの引数を受け取る
using System;
using System.IO;
using System.Linq;
using System.Threading;
using System.Threading.Tasks;
using Microsoft.Bot.Builder;
using Microsoft.Bot.Builder.Dialogs;
using Microsoft.Bot.Connector;
using Microsoft.Bot.Schema;

public class PhotoUpdateDialog : ComponentDialog
{
    public PhotoUpdateDialog() : base(nameof(PhotoUpdateDialog))
    {
        // ウォーターフォールのステップを定義。処理順にメソッドを追加。
        var waterfallSteps = new WaterfallStep[]
        {
            LoginAsync,
            UpdatePhotoAsync,
            GetPhotoAsync,
        };

        // ウォーターフォールダイアログと各種プロンプトを追加
        AddDialog(new WaterfallDialog("updatephoto", waterfallSteps));
        AddDialog(new LoginDialog());
    }

    private static async Task<DialogTurnResult> LoginAsync(WaterfallStepContext stepContext, CancellationToken cancellationToken)
    {
        // 認証ダイアログはテキストがないと落ちるため、ダミーを設定
        stepContext.Context.Activity.Text = "dummy";
        return await stepContext.BeginDialogAsync(nameof(LoginDialog), cancellationToken: cancellationToken);
    }
    private static async Task<DialogTurnResult> UpdatePhotoAsync(WaterfallStepContext stepContext, CancellationToken cancellationToken)
    {
        // ログインの結果よりトークンを取得
        var accessToken = (string)stepContext.Result;
        // 親ダイアログより渡されたイメージを取得

        // 添付ファイルを取得して MemoryStream に格納
        var connector = new ConnectorClient(new Uri(stepContext.Context.Activity.ServiceUrl));
        var image = await connector.HttpClient.GetStreamAsync(stepContext.Options.ToString());
        if (!string.IsNullOrEmpty(accessToken))
        {
            var graphClient = new MSGraphService(accessToken);
            await graphClient.UpdatePhotoAsync(image);
        }
        else
            await stepContext.Context.SendActivityAsync($"サインインに失敗しました。", cancellationToken: cancellationToken);

        return await stepContext.NextAsync(accessToken, cancellationToken);
    }

    private static async Task<DialogTurnResult> GetPhotoAsync(WaterfallStepContext stepContext, CancellationToken cancellationToken)
    {
        // 前の処理よりトークンを取得
        var accessToken = (string)stepContext.Result;
        if (!string.IsNullOrEmpty(accessToken))
        {
            // 返信の作成
            var reply = stepContext.Context.Activity.CreateReply();
            // 現在の写真を取得
            var graphClient = new MSGraphService(accessToken);
            var image = await graphClient.GetPhotoAsync();
            byte[] buffer = new byte[16 * 1024];
            using (MemoryStream ms = new MemoryStream())
            {
                int read;
                while ((read = image.Read(buffer, 0, buffer.Length)) > 0)
                {
                    ms.Write(buffer, 0, read);
                }

                var image64 = System.Convert.ToBase64String(ms.ToArray());
                // 返信に画像を設定
                reply.Attachments.Add(new Attachment(
                    contentType: "image/png",
                    contentUrl: $"data:image/png;base64,{image64}"
                    ));
            }
            await stepContext.Context.SendActivityAsync(reply, cancellationToken);
        }
        else
            await stepContext.Context.SendActivityAsync($"サインインに失敗しました。", cancellationToken: cancellationToken);

        return await stepContext.EndDialogAsync(true, cancellationToken);
    }
}
6. MyBot.cs でユーザーからメッセージが来た場合の処理に、添付ファイルが来た場合の処理を追加。
if (turnContext.Activity.Attachments != null)
{
    // 添付ファイルのアドレスを取得
    var attachment = turnContext.Activity.Attachments.First();
    var attachmentUrl = attachment.ContentUrl;
    // PhotoUpdateDialog に対して画像のアドレスを渡す
    await dialogContext.BeginDialogAsync(nameof(PhotoUpdateDialog), attachmentUrl, cancellationToken);
}
else
{
    // これまでのコード
}
7. MyBot.cs のコンストラクタで PhotoUpdateDialog を使うよう dialogs 追加。
public MyBot(MyStateAccessors accessors, LuisRecognizer luisRecognizer)
{
    this.accessors = accessors;
    this.luisRecognizer = luisRecognizer;
    this.dialogs = new DialogSet(accessors.ConversationDialogState);

    // コンポーネントダイアログを追加
    dialogs.Add(new ProfileDialog(accessors));
    dialogs.Add(new MenuDialog());
    dialogs.Add(new WeatherDialog());
    dialogs.Add(new ScheduleDialog());
    dialogs.Add(new PhotoUpdateDialog());
}
8. Startup.cs の ConfigureServices メソッドにある MyMiddleware を呼び出す場所をコメントアウト。
//options.Middleware.Add(new MyMiddleware());
テスト
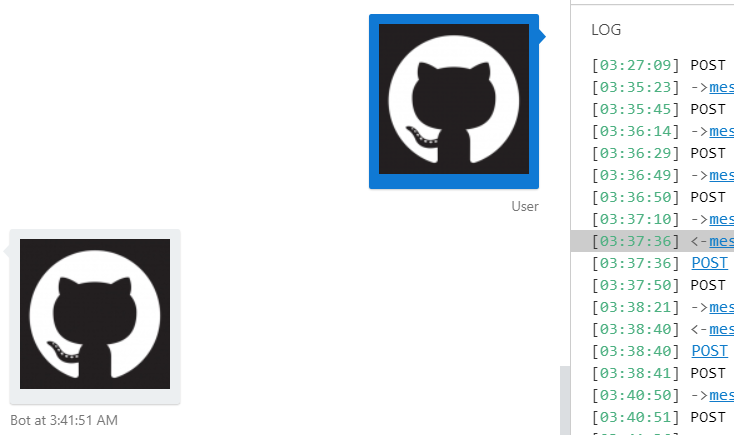
1. F5 を押下してデバッグ実行。エミュレーターより接続。既にログインしている場合は一度ログアウトしてからプロファイル用の画像を送信。サインインを求められるので、「サインイン」をクリック。
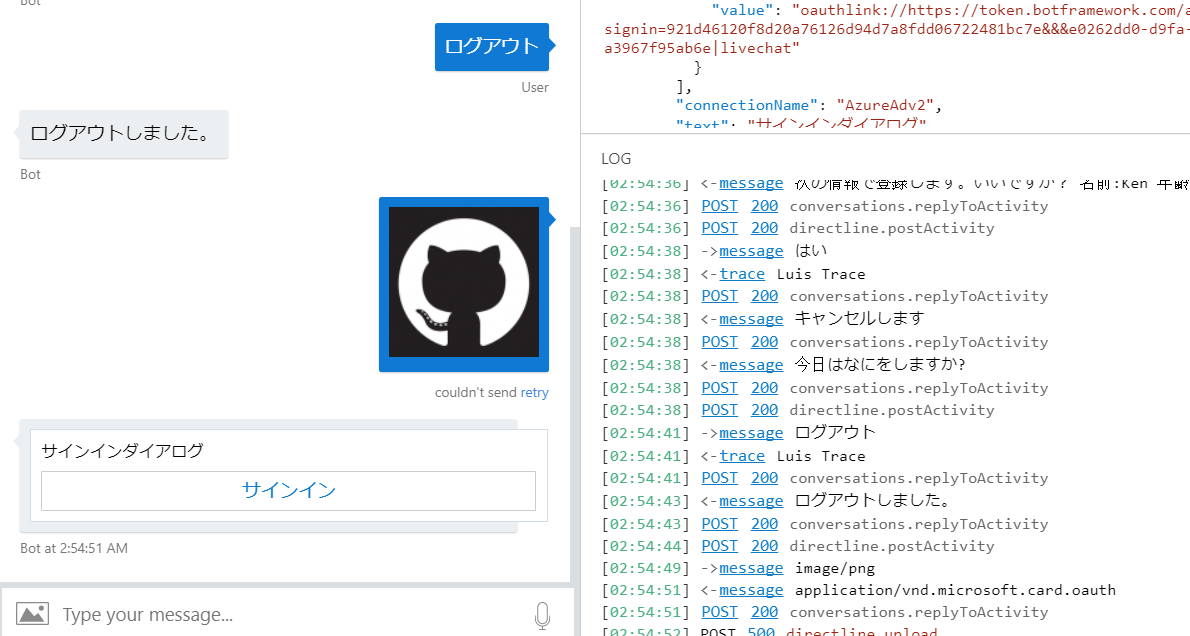
2. 新しくプロファイルの書き込み権限を要求されるので承諾。
3. プロファイルが書き換わることを確認。
4. 設定した画像が返ってくることを確認。
まとめ
今回は Microsoft Graph の連携を見ていきましたが、結果権限の追加やダイアログ間、プロンプト間のデータの受け渡しなどを見ることができました。次回はダイアログの検証とリトライについて見ていきます。