LINE の Bot 開発 C# 超入門(後編) メッセージの内容と文脈を意識した会話を実現する
前編に続いて Bot を開発していきます。今回は自然言語解析を用いたメッセージの理解と、文脈に応じて対話をおこなうところまでをカバーします。
開発の流れ
- 自然言語解析サービスの Language Understanding Intelligent Service (LUIS) を設定し、理解すべきメッセージを理解できるように学習させます。
- Bot が受け取ったメッセージを LUIS と連携してユーザーの意図を判定できるようにします。
- 文脈に応じて対話するための機能を Bot に盛り込みます。
手順
自然言語解析の設定
LUIS はマイクロソフトの自然言語処理のサービスです。ユーザーが発話した文章が何を意図しているのかを特定するために利用します。また、その文章の中からパラメーターを抽出する機能も備えています。
1 下記 LUIS のサイトにアクセスしてマイクロソフトアカウントでログインします。
LUIS https://www.luis.ai

2 ログインしたら Create new app をクリックし、設定します。Culture は後から変えられないので注意。
- Name: 任意
- Culture: Japanese
3 まず Entity を登録します。Entity は文章の中から抜き出したい項目として扱います。左サイドバーから Entities を選択し、Create new entity をクリックします。
4 名前を menu、タイプを Simple で作成します。
5 次に Intent を登録します。Intent は文章の意図です。左のサイドバーから Intents を選択し、Create new intent をクリックします。名前を order として作成します。
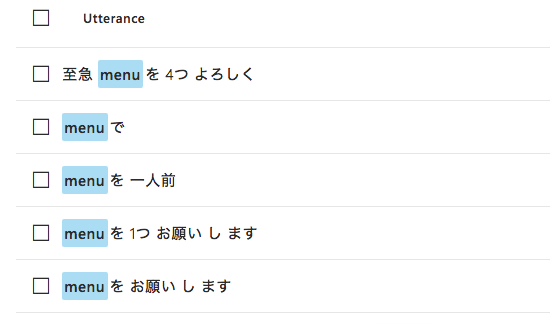
6 例文 (Utterance) として「松をお願いします。」と入力して Enter を押下します。追加された例文の「松」をクリックして「menu」を選択します。
9 次に greeting という名前で Intent を追加します。
11 最後に Train ボタンをクリックして学習させます。
これで LUIS の学習は完了です。以下の手順で呼び出すためのキーとアドレスを取得します。
LUIS の公開とキーの取得
2 Publish to production slot をクリックして公開します。
3 画面下部に出るキーをコピーしておきます。
4 上部メニューより SETTINGS を選択して、画面に表示される Application ID をコピーしておきます。
Bot に自然言語解析の追加
ユーザーがテキストを送って来た時に解析をできるようにコードを追加します。
1 Visual Studio Code でビューメニューより統合ターミナルを開きます。
2 以下コマンドで LUIS 用のパッケージをインストールします。
dotnet add package microsoft.cognitive.luis
dotnet restore
3 LineBotApp.cs コードの上部に以下 using ステートメントを追加します。
using Microsoft.Cognitive.LUIS;
4 コンストラクターより前に LuisClient プロパティを追加します。Application ID、キーを自分のものと差し替えます。
private LuisClient luisClient = new LuisClient(
            appId: "12819323-19e6-4103-aaa0-352d14fc2cfa",
            appKey: "4501df87a8944328b3bd07ed8adb6508");
5 HandleTextAsync メソッドを以下のコードに変更します。
private async Task HandleTextAsync(string replyToken, string userMessage, string userId)
{
    var replyMessage = new TextMessage($"You said: {userMessage}");
    // LUIS で文章を解析
    var luisResult = await luisClient.Predict(userMessage);
    if(luisResult.TopScoringIntent.Name == "greeting")
    {
        replyMessage.Text = "どうもどうも";
    }
    else if(luisResult.TopScoringIntent.Name == "order")
    {
        // メニューエンティティがある場合
        if(luisResult.Entities.ContainsKey("menu"))
        {
            replyMessage.Text = $"毎度!{luisResult.Entities["menu"].First().Value} ですね!";
        }
        else
        {
            replyMessage.Text = "毎度!注文ですね。何にしましょう?";
        }
    }

    await messagingClient.ReplyMessageAsync(replyToken, new List<ISendMessage> { replyMessage });
}
6 luisResult を取得した後にブレークポイントを置いて、F5 を押下してデバッグを開始します。
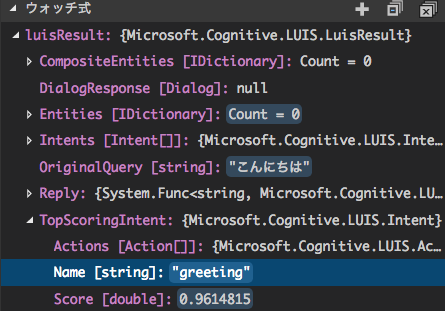
7 シミュレーターから「どうも」など、挨拶と認識されるはずのテキストを送ります。ブレークポイントがヒットしたら、ウォッチ式などで luisResult の中身を確認し、greeting が意図として認識されていることを確認します。
8 同様に「松をお願い」と送って、order と、認識されるかと、menu エンティティが取得できているか確認します。
自然言語解析とフローの改善
一見うまく行っているように見えますが、「注文をおねがい」と送るとどうなるでしょう。この場合「注文」が menu と認識されます。これは LUIS で文章の位置関係などからエンティティを推測しているためです。メニューのように決まった者の場合、LIST を使う方が良いです。
1 LUIS の画面より BUILD を選択し、Entities をクリックします。
2 既存の menu エンティティを選択し Delete Entity をクリックして削除します。
3 Create new entity をクリックして、List タイプで menu を作り直します。
4 Values に「松」「竹」「梅」をそれぞれ追加します。類義語を追加することもできます。
5 Train ボタンをクリックして学習させます。Simple Entity と異なり、List は例文に対して指定する必要はありません。学習が終わったら、PUBLISH メニューより再度パブリッシュします。
6 注文の意図はあるがメニューがない場合の対応をコードに追加します。
private async Task HandleTextAsync(string replyToken, string userMessage, string userId)
{
    ISendMessage replyMessage = new TextMessage("");
    // LUIS で文章を解析
    var luisResult = await luisClient.Predict(userMessage);
    if(luisResult.TopScoringIntent.Name == "greeting")
    {
        replyMessage = new TextMessage("どうもどうも");
    }
    else if(luisResult.TopScoringIntent.Name == "order")
    {
        // メニューエンティティがある場合
        if(luisResult.Entities.ContainsKey("menu"))
        {
            replyMessage = new TextMessage($"毎度!{luisResult.Entities["menu"].First().Value} ですね!");
        }
        else
        {
            // 注文だがメニューがわからない場合はメニューをボタンで提示
            replyMessage = new TemplateMessage("menu", new ButtonsTemplate(
                title: "注文",
                text: "毎度!注文ですね。何にしましょう?",
                actions: new List<ITemplateAction>(){
                    new MessageTemplateAction("松","松"),
                    new MessageTemplateAction("竹","竹"),
                    new MessageTemplateAction("梅","梅"),
                    }));
        }
    }

    await messagingClient.ReplyMessageAsync(replyToken, new List<ISendMessage> { replyMessage });
}
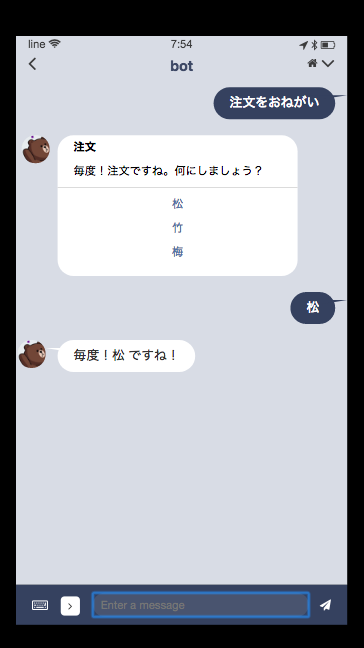
7 再度デバッグを実行して、シミュレーターから「注文をおねがい」と送ります。ボタンテンプレートが返ってくることを確認します。
8 これで注文を受ける箇所はうまくいきそうです。次に出前先の住所を確認します。ここで重要な点はすでに聞いた注文を忘れないように保存しておくことです。テンプレートは EventSourceState というデータ構造をストレージに格納できるようになっているのでこれを拡張します。まず注文と出前先を格納するクラスを追加します。Models フォルダに Order.cs を追加します。
using Microsoft.WindowsAzure.Storage.Table;

namespace sushibot.Models
{
    public class Order : EventSourceState
    {
        public string Menu { get; set; }
        public string Location_Address { get; set; }
        public string Location_Title { get; set; }

        public Order()
        {
            SourceType = "order";
        }
    }
}
9 テーブルストレージが Order を使うように Controllers¥LineBotControllers.cs の Post メソッドを変更します。
public async Task<IActionResult> Post([FromBody]JToken req)
{
    var events = WebhookEventParser.Parse(req.ToString());
    var connectionString = appsettings.LineSettings.StorageConnectionString;
    var blobStorage = await BlobStorage.CreateAsync(connectionString, "linebotcontainer");
    var orderState = await TableStorage<Order>.CreateAsync(connectionString, "eventsourcestate");
    var app = new LineBotApp(lineMessagingClient, orderState, blobStorage);
    await app.RunAsync(events);
    return new OkResult();
}
10 LineBotApp.cs を以下のコードに差し替えます。主な変更は以下の通りです。
- Order を使うようにプロパティとコンストラクターの変更
- 位置情報をハンドルするように OnMessageAsync での処理と HandleLocationAsync の追加。
- HandleTextAsync メソッド内で Order の保存や、位置情報の確認ロジックの追加。
尚、位置情報の確認は地図を利用してもらうようにURL スキームを利用しています。
- LuisClient に渡す AppId と AppKey はそれぞれ自身のものに変更してください。
using Line.Messaging;
using Line.Messaging.Webhooks;
using System;
using System.Collections.Generic;
using System.IO;
using System.Linq;
using System.Threading.Tasks;
using sushibot.CloudStorage;
using sushibot.Models;
using Microsoft.Cognitive.LUIS;

namespace sushibot
{
    internal class LineBotApp : WebhookApplication
    {
        private LineMessagingClient messagingClient { get; }
        private TableStorage<Order> orderState { get; }
        private BlobStorage blobStorage { get; }
        private LuisClient luisClient = new LuisClient(
            appId: "12819323-19e6-4103-aaa0-352d14fc2cfa",
            appKey: "4501df87a8944328b3bd07ed8adb6508");

        public LineBotApp(LineMessagingClient lineMessagingClient, TableStorage<Order> tableStorage, BlobStorage blobStorage)
        {
            this.messagingClient = lineMessagingClient;
            this.orderState = tableStorage;
            this.blobStorage = blobStorage;
        }

        protected override async Task OnMessageAsync(MessageEvent ev)
        {
            switch (ev.Message.Type)
            {
                case EventMessageType.Text:
                    await HandleTextAsync(ev.ReplyToken, ((TextEventMessage)ev.Message).Text, ev.Source.UserId);
                    break;
                case EventMessageType.Location:
                    var location = ((LocationEventMessage)ev.Message);
                    await HandleLocationAsync(ev.ReplyToken, location, ev.Source.Id);
                    break;
            }
        }

        private async Task HandleLocationAsync(string replyToken, LocationEventMessage location, string userId)
        {
            // Order ステートを取得
            var order = await orderState.FindAsync("order", userId);
            // 住所を設定後保存
            order.Location_Address = location.Address;
            order.Location_Title = location.Title;
            await orderState.UpdateAsync(order);
            await messagingClient.ReplyMessageAsync(replyToken, new[] {
                        new TextMessage($"あいよ!{order.Menu}を{order.Location_Title}にだね!")
                    });
        }

        private async Task HandleTextAsync(string replyToken, string userMessage, string userId)
        {
            ISendMessage replyMessage = new TextMessage("");

            // LUIS で文章を解析
            var luisResult = await luisClient.Predict(userMessage);
            if (luisResult.TopScoringIntent.Name == "greeting")
            {
                replyMessage = new TextMessage("どうもどうも");
            }
            else if (luisResult.TopScoringIntent.Name == "order")
            {
                // メニューエンティティがある場合
                if (luisResult.Entities.ContainsKey("menu"))
                {
                    // メニューを取得して、Order を Azure テーブルに保存
                    var menu = luisResult.Entities["menu"].First().Value;
                    var order = new Order(){ Menu = menu, SourceId = userId };
                    await orderState.UpdateAsync(order);
                    // 住所の確認に地図を起動するスキームを送信
                    replyMessage = new TemplateMessage("location", new ButtonsTemplate(
                        title: "住所の送信",
                        text: $"毎度!{menu}ですね。どちらにお送りしましょう?",
                        actions: new List<ITemplateAction>(){
                            new UriTemplateAction("住所を送る","line://nv/location")
                            }));
                }
                else
                {
                    // 注文だがメニューがわからない場合はメニューをボタンで提示
                    replyMessage = new TemplateMessage("menu", new ButtonsTemplate(
                        title: "注文",
                        text: "毎度!注文ですね。何にしましょう?",
                        actions: new List<ITemplateAction>(){
                            new MessageTemplateAction("松","松"),
                            new MessageTemplateAction("竹","竹"),
                            new MessageTemplateAction("梅","梅"),
                            }));
                }
            }

            await messagingClient.ReplyMessageAsync(replyToken, new List<ISendMessage> { replyMessage });
        }
    }
}
クラウドへのデプロイとテスト
最後に最新のコードをデプロイしてテストしてみましょう。
1 以下のコマンドで変更をコミットして、デプロイをします。
git add .
git commit -m update
git push
2 プッシュが完了したらモバイル端末で LINE を起動します。まず挨拶と出前依頼を送ってみます。
4 住所を送るボタンをクリックすると地図が開きます。任意の住所を送ります。
まとめ
今回は Bot が自然言語からユーザーが求めていることを理解し、文脈も加味しながら対話できるまでを実装しました。
この後はいろいろなメッセージに対して適切に反応できるように理解力とスキルを広げていく、精度をあげていくということが求められると思います。Bot 開発はまだまだ確立した開発手法というものは存在せず、開発者の腕にかかっている分野で、そこがまた魅力的なところですね。
付録
LINEのBot開発にあたり有用なライブラリ・ツールをご紹介しておきます。


