Web アプリケーションでの認証
ユーザーは以下の図のように、ブラウザ経由で ASP.NET MVC アプリケーションに接続します。Azure AD v2 エンドポイントを利用して自分のサイトをセキュアにできます。
以下、ASP.NET Web アプリへの "Microsoft でサインイン" の追加 より抜粋。

しかし Web アプリケーションが Microsoft Graph に接続してユーザーに関連する情報を取得する場合、ユーザーのアクセストークンが必要となる一方、アクセストークンを要求するのは ASP.NET MVC アプリケーションとなります。そこで MSAL ではそのための手段として、OpenId Connect によるユーザー認証と認可コードの取得、およびサービス側が、認可コードを利用してアクセストークンを取得する仕組みを用意しています。
今回は以下のアプリケーションを作ります。
- C# MVC Web アプリケーション
- OpenId と認可コードフローでトークン取得
- MSAL を利用
OpenId Connect と認可コードフロー
Web アプリケーションにユーザーが OpenId Connect を使用してログインした場合、認可コードが Azure AD より発行されます。Web アプリケーションはこのコードを使って、ユーザーのアクセストークンを取得できます。
アプリケーションの登録
OAuth 2.0 を使うために、まず初めにアプリケーションを登録します。
1. Microsoft アプリ登録ポータル にアクセスして、ログイン。ここでは組織アカウントを使用。

2. ユーザー委任シナリオで作成したアプリケーションを利用、または新規に登録。プラットフォームの項目で「プラットフォームの追加」をクリック。Web アプリケーションを選択。

3. アプリケーションシークレットの項目で「新しいパスワードを生成」をクリック。パスワードが表示されるのでコピーして保存。
※このパスワードは画面を消すと二度と取得できない。

4. Microsoft Graph のアクセス許可の「委任されたアクセス許可」項目で、「追加」をクリック。

5. 必要な権限を追加。ここでは Calendars.ReadWrite を選択。

6. 最後に「保存」をクリック。
アプリケーションの開発
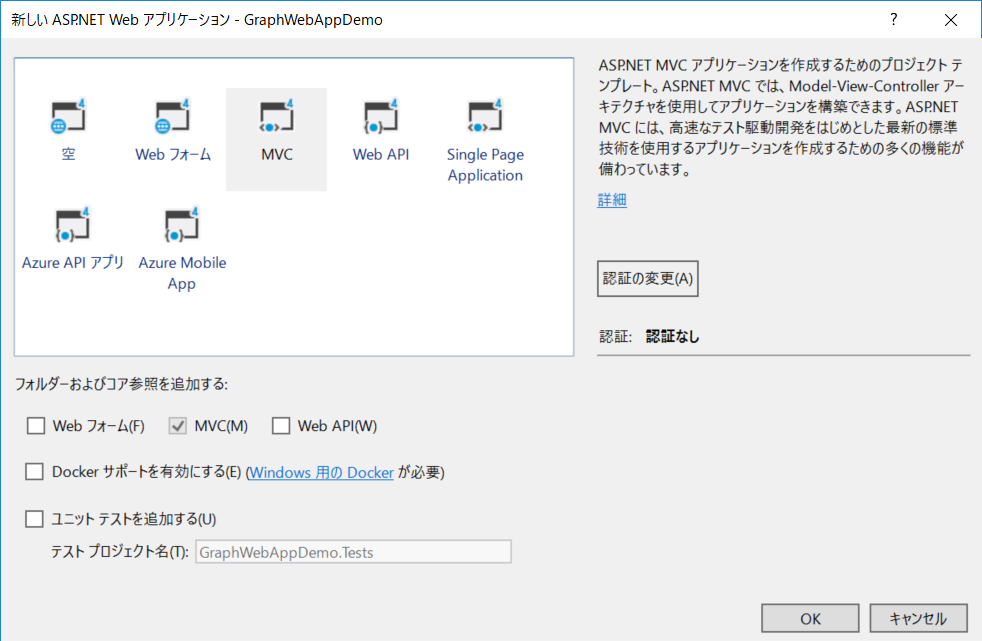
1. Visual Studio で新しい ASP.NET Web アプリケーションプロジェクトを作成。
2. MVC を選択。「認証の変更」をクリック。
3. 「個別のユーザーアカウント」を選択して、「OK」。元の画面に戻るので、再度「OK」をクリックしてプロジェクト作成完了。
4. NuGet の管理より、「Microsoft.Identity.Client」、「Microsoft.Owin.Security.OpenIdConnect」をインストール。MSAL はプレビューのため、「プレリリースを含める」にチェックを入れる。
5. 作成したプロジェクトを右クリックしてプロパティを表示。Web のセクションから「プロジェクトの URL」 を確認。
6. Web.Config の configuration/appSettings 内に必要な情報を追加。
<add key="ClientId" value="登録したアプリケーションの ID" />
<add key="ClientSecret" value="作成したパスワード" />
<add key="GraphScopes" value="User.Read" />
<add key="RedirectUri" value="プロジェクトの URL" />
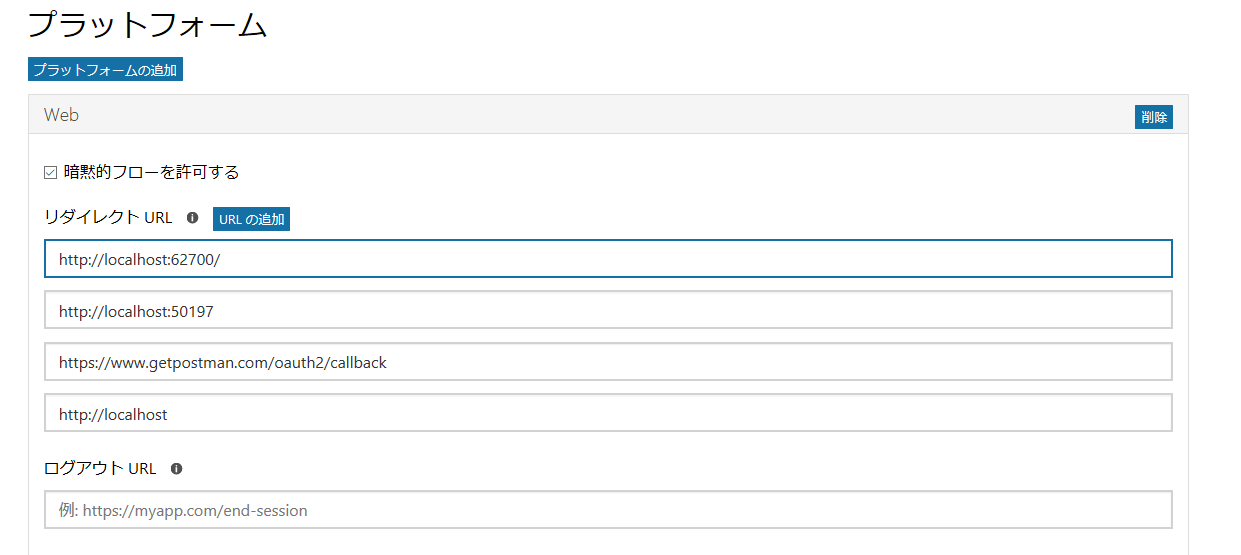
7. Microsoft アプリ登録ポータル に戻って、Web プラットフォームの「リダイレクト URL」から「URL の追加」をクリック。プロジェクトの URL を追加後、「保存」。
8. ユーザーのログインとトークン管理のヘルパークラスを作成。プロジェクトに TokenStorage フォルダを作成し、SessionTokenCache.cs ファイルを追加。
9. 中身を以下のコードと書き換え。尚コードは GitHub にある aspnet-connect-rest-sample のものを拝借。これまでの記事でも紹介した通り、MSAL が利用する UserTokenCache に利用される。
/*
*  Copyright (c) Microsoft. All rights reserved. Licensed under the MIT license.
*  See LICENSE in the source repository root for complete license information.
*/

using Microsoft.Identity.Client;
using System;
using System.Collections.Generic;
using System.Linq;
using System.Threading;
using System.Web;

namespace GraphWebAppDemo.TokenStorage
{

    // Store the user's token information.
    public class SessionTokenCache
    {
        private static ReaderWriterLockSlim SessionLock = new ReaderWriterLockSlim(LockRecursionPolicy.NoRecursion);
        string UserId = string.Empty;
        string CacheId = string.Empty;
        HttpContextBase httpContext = null;

        TokenCache cache = new TokenCache();

        public SessionTokenCache(string userId, HttpContextBase httpcontext)
        {
            // not object, we want the SUB
            UserId = userId;
            CacheId = UserId + "_TokenCache";
            httpContext = httpcontext;
            Load();
        }

        public TokenCache GetMsalCacheInstance()
        {
            cache.SetBeforeAccess(BeforeAccessNotification);
            cache.SetAfterAccess(AfterAccessNotification);
            Load();
            return cache;
        }

        public void SaveUserStateValue(string state)
        {
            SessionLock.EnterWriteLock();
            httpContext.Session[CacheId + "_state"] = state;
            SessionLock.ExitWriteLock();
        }
        public string ReadUserStateValue()
        {
            string state = string.Empty;
            SessionLock.EnterReadLock();
            state = (string)httpContext.Session[CacheId + "_state"];
            SessionLock.ExitReadLock();
            return state;
        }
        public void Load()
        {
            SessionLock.EnterReadLock();
            cache.Deserialize((byte[])httpContext.Session[CacheId]);
            SessionLock.ExitReadLock();
        }

        public void Persist()
        {
            SessionLock.EnterWriteLock();

            // Optimistically set HasStateChanged to false. We need to do it early to avoid losing changes made by a concurrent thread.
            cache.HasStateChanged = false;

            // Reflect changes in the persistent store
            httpContext.Session[CacheId] = cache.Serialize();
            SessionLock.ExitWriteLock();
        }

        // Triggered right before MSAL needs to access the cache.
        // Reload the cache from the persistent store in case it changed since the last access.
        void BeforeAccessNotification(TokenCacheNotificationArgs args)
        {
            Load();
        }

        // Triggered right after MSAL accessed the cache.
        void AfterAccessNotification(TokenCacheNotificationArgs args)
        {
            // if the access operation resulted in a cache update
            if (cache.HasStateChanged)
            {
                Persist();
            }
        }

    }
}
10. App_Start フォルダ内 Startup.Auth.cs を以下のコードに書き換えて、OpenId Connect を利用するように変更。
using System.Web;
using Owin;
using Microsoft.Owin.Security;
using Microsoft.Owin.Security.Cookies;
using Microsoft.Owin.Security.OpenIdConnect;
using System.Configuration;
using System.Threading.Tasks;
using GraphWebAppDemo.TokenStorage;
using System.IdentityModel.Tokens;
using System.IdentityModel.Claims;
using Microsoft.Identity.Client;
using Microsoft.IdentityModel.Tokens;

namespace GraphWebAppDemo
{
    public partial class Startup
    {
        private static string clientId = ConfigurationManager.AppSettings["ClientId"];
        private static string clientSecret = ConfigurationManager.AppSettings["ClientSecret"];
        private static string redirectUri = ConfigurationManager.AppSettings["RedirectUri"];
        private static string graphScopes = ConfigurationManager.AppSettings["GraphScopes"];

        public void ConfigureAuth(IAppBuilder app)
        {
            app.SetDefaultSignInAsAuthenticationType(CookieAuthenticationDefaults.AuthenticationType);

            app.UseCookieAuthentication(new CookieAuthenticationOptions());

            app.UseOpenIdConnectAuthentication(
                new OpenIdConnectAuthenticationOptions
                {
                    ClientId = clientId,
                    Authority = "https://login.microsoftonline.com/common/v2.0",
                    PostLogoutRedirectUri = redirectUri,
                    RedirectUri = redirectUri,
                    Scope = "openid email profile offline_access " + graphScopes,
                    TokenValidationParameters = new TokenValidationParameters
                    {
                        ValidateIssuer = false,
                        // 本番運用のサーバーでは Issuer を検証し、正しいアプリケーションから戻ってきたものか確認。
                        //     IssuerValidator = (issuer, token, tvp) =>
                        //     {
                        //         if (MyCustomTenantValidation(issuer))
                        //             return issuer;
                        //         else
                        //             throw new SecurityTokenInvalidIssuerException("Invalid issuer");
                        //     },
                    },
                    Notifications = new OpenIdConnectAuthenticationNotifications
                    {
                        AuthorizationCodeReceived = async (context) =>
                        {
                            var code = context.Code;
                            string signedInUserID = context.AuthenticationTicket.Identity.FindFirst(ClaimTypes.NameIdentifier).Value;

                            TokenCache userTokenCache = new SessionTokenCache(signedInUserID,
                                context.OwinContext.Environment["System.Web.HttpContextBase"] as HttpContextBase).GetMsalCacheInstance();
                            ConfidentialClientApplication cca = new ConfidentialClientApplication(
                                clientId,
                                redirectUri,
                                new ClientCredential(clientSecret),
                                userTokenCache,
                                null);
                            string[] scopes = graphScopes.Split(new char[] { ' ' });

                            AuthenticationResult result = await cca.AcquireTokenByAuthorizationCodeAsync(code, scopes);
                        },
                        AuthenticationFailed = (context) =>
                        {
                            context.HandleResponse();
                            context.Response.Redirect("/Error?message=" + context.Exception.Message);
                            return Task.FromResult(0);
                        }
                    }
                });
        }
    }
}
11. サインアウト時に OpenId Connect のキャッシュを消せるよう、AccountController.cs の LogOff メソッドを以下のコードで書き換え。using の追加を必要に応じて追加。
//
// POST: /Account/LogOff
[HttpPost]
[ValidateAntiForgeryToken]
public ActionResult LogOff()
{
    if (Request.IsAuthenticated)
    {
        HttpContext.GetOwinContext().Authentication.SignOut(OpenIdConnectAuthenticationDefaults.AuthenticationType, CookieAuthenticationDefaults.AuthenticationType);
    }

    return RedirectToAction("Index", "Home");
}
12. またログインでも OpenId Connect を利用するよう、Login メソッドを以下に書き換え
//
// GET: /Account/Login
[AllowAnonymous]
public ActionResult Login(string returnUrl)
{
    if (!Request.IsAuthenticated)
    {
        // Signal OWIN to send an authorization request to Azure.
        HttpContext.GetOwinContext().Authentication.Challenge(
            new AuthenticationProperties { RedirectUri = "/" },
            OpenIdConnectAuthenticationDefaults.AuthenticationType);
    }
    ViewBag.ReturnUrl = returnUrl;
    return View();
}
13. AntiForgery の対応として、Global.asax.cs の Application_Start メソッドを以下のコードと差し替え。
protected void Application_Start()
{
    AntiForgeryConfig.UniqueClaimTypeIdentifier = ClaimTypes.NameIdentifier;
    AreaRegistration.RegisterAllAreas();
    FilterConfig.RegisterGlobalFilters(GlobalFilters.Filters);
    RouteConfig.RegisterRoutes(RouteTable.Routes);
    BundleConfig.RegisterBundles(BundleTable.Bundles);
}
14. Graph を使うサンプルとして HomeController.cs の About メソッドを以下に書き換え。
using GraphWebAppDemo.TokenStorage;
using Newtonsoft.Json.Linq;
using System.Net.Http;
using System.Security.Claims;
using System.Configuration;
using System.Threading.Tasks;
using System.Net.Http.Headers;

[Authorize]
public async Task<ActionResult> About()
{
    string signedInUserID = ClaimsPrincipal.Current.FindFirst(ClaimTypes.NameIdentifier).Value;
    TokenCache userTokenCache = new SessionTokenCache(signedInUserID, HttpContext).GetMsalCacheInstance();
    ConfidentialClientApplication cca = new ConfidentialClientApplication(
            clientId,
            redirectUri,
            new ClientCredential(clientSecret),
            userTokenCache, null);

    // Get an access token.
    var authResult = await cca.AcquireTokenSilentAsync(graphScopes.Split(new char[] { ' ' }), cca.Users.FirstOrDefault());

    using (HttpClient client = new HttpClient())
    {
        client.DefaultRequestHeaders.Authorization = new AuthenticationHeaderValue("Bearer", authResult.AccessToken);

        var httpResponse = await client.GetAsync("https://graph.microsoft.com/v1.0/me");
        var me = JToken.Parse(await httpResponse.Content.ReadAsStringAsync());
        ViewBag.Message = me.Value<string>("displayName");
    }

    return View();
}
アプリケーションのテスト
1. F5 キーを押下してデバッグ実行。画面が起動したら「ログイン」をクリック。
2. サインインページが出るので、サインイン。
3. 「詳細」をクリック。名前が取得できることを確認。
コードの詳細確認
OpenId Connect と MSAL の連携
MVC アプリケーションには OpenId Connect を利用してサインインしていますが、Scope として Microsoft Graph の権限も指定しています。これにより必要なアクセストークンを取得するための認可コードが Azure AD より返されます。
app.UseOpenIdConnectAuthentication(
    new OpenIdConnectAuthenticationOptions
    {
        ClientId = clientId,
        Authority = "https://login.microsoftonline.com/common/v2.0",
        PostLogoutRedirectUri = redirectUri,
        RedirectUri = redirectUri,
        Scope = "openid email profile offline_access " + graphScopes,
        TokenValidationParameters = new TokenValidationParameters
        {
            ValidateIssuer = false,
            // 本番運用のサーバーでは Issuer を検証し、正しいアプリケーションから戻ってきたものか確認。
            //     IssuerValidator = (issuer, token, tvp) =>
            //     {
            //         if (MyCustomTenantValidation(issuer))
            //             return issuer;
            //         else
            //             throw new SecurityTokenInvalidIssuerException("Invalid issuer");
            //     },
        },
...
認可トークン取得成功時のコールバック関数で、MSAL の ConfidentialClientApplication を作成し、AcquireTokenByAuthorizationCodeAsync メソッドを実行して有効なアクセストークンが取得できるか検証するとともに、UserToken キャッシュにユーザー情報をキャッシュしています。尚、一度でも認可トークンが発行された場合、期限が切れるか、サインアウトするまで、コールバックは発生しません。
Notifications = new OpenIdConnectAuthenticationNotifications
{
    AuthorizationCodeReceived = async (context) =>
    {
        var code = context.Code;
        string signedInUserID = context.AuthenticationTicket.Identity.FindFirst(ClaimTypes.NameIdentifier).Value;

        TokenCache userTokenCache = new SessionTokenCache(signedInUserID,
            context.OwinContext.Environment["System.Web.HttpContextBase"] as HttpContextBase).GetMsalCacheInstance();
        ConfidentialClientApplication cca = new ConfidentialClientApplication(
            clientId,
            redirectUri,
            new ClientCredential(clientSecret),
            userTokenCache,
            null);
        string[] scopes = graphScopes.Split(new char[] { ' ' });

        AuthenticationResult result = await cca.AcquireTokenByAuthorizationCodeAsync(code, scopes);
    },
...
OpenId Connect へのログインとログアウト
Owin の Authentication.Challenge を呼び出してログインを実行しています。
HttpContext.GetOwinContext().Authentication.Challenge(
    new AuthenticationProperties { RedirectUri = "/" },
    OpenIdConnectAuthenticationDefaults.AuthenticationType)
またログアウト時も Owin の Authentication.SignOut を呼び出して OpenId Connect およびクッキー認証ともにサインアウトしています。
HttpContext.GetOwinContext().Authentication.SignOut(OpenIdConnectAuthenticationDefaults.AuthenticationType, CookieAuthenticationDefaults.AuthenticationType);
Microsoft Graph の呼び出し
既にユーザートークンのキャッシュが終わっているため、ConfidentialClientApplication の AcquireTokenSilentAsync メソッドを、ユーザーを指定して実行しています。上記の OpenId Connect と認可コードの処理が失敗している場合は、必然的にこちらのコードも失敗します。
string signedInUserID = ClaimsPrincipal.Current.FindFirst(ClaimTypes.NameIdentifier).Value;
TokenCache userTokenCache = new SessionTokenCache(signedInUserID, HttpContext).GetMsalCacheInstance();
ConfidentialClientApplication cca = new ConfidentialClientApplication(
        clientId,
        redirectUri,
        new ClientCredential(clientSecret),
        userTokenCache, null);

// Get an access token.
var authResult = await cca.AcquireTokenSilentAsync(graphScopes.Split(new char[] { ' ' }), cca.Users.FirstOrDefault());

using (HttpClient client = new HttpClient())
{
    client.DefaultRequestHeaders.Authorization = new AuthenticationHeaderValue("Bearer", authResult.AccessToken);

    var httpResponse = await client.GetAsync("https://graph.microsoft.com/v1.0/me");
    var me = JToken.Parse(await httpResponse.Content.ReadAsStringAsync());
    ViewBag.Message = me.Value<string>("displayName");
}
ログインユーザーの表示名を取得する
現在、サインインしたにも関わらず、アプリケーションではユーザーの名前が取得できていません。これはユーザーのクレーム情報に名前が含まれないからです。

Azure AD v2 の OpenId Connect 制限
プロトコルに関する制限事項 にある通り、OpenId Connect でスコープの Profile を指定しても、ユーザー情報が返りません。そこで OpenId Connect にログイン後、さらに Microsoft Graph にアクセスし、名前を補完してみます。
1. Startup.Auth.cs のAuthorizationCodeReceived コールバックを以下のコードと差し替え。
AuthorizationCodeReceived = async (context) =>
{
    var code = context.Code;
    string signedInUserID = context.AuthenticationTicket.Identity.FindFirst(ClaimTypes.NameIdentifier).Value;

    TokenCache userTokenCache = new SessionTokenCache(signedInUserID,
        context.OwinContext.Environment["System.Web.HttpContextBase"] as HttpContextBase).GetMsalCacheInstance();
    ConfidentialClientApplication cca = new ConfidentialClientApplication(
        clientId,
        redirectUri,
        new ClientCredential(clientSecret),
        userTokenCache,
        null);
    string[] scopes = graphScopes.Split(new char[] { ' ' });

    AuthenticationResult result = await cca.AcquireTokenByAuthorizationCodeAsync(code, scopes);

    using (HttpClient client = new HttpClient())
    {
        client.DefaultRequestHeaders.Authorization = new AuthenticationHeaderValue("Bearer", result.AccessToken);

        var httpResponse = await client.GetAsync("https://graph.microsoft.com/v1.0/me");
        var me = JToken.Parse(await httpResponse.Content.ReadAsStringAsync());
        System.Security.Claims.ClaimsIdentity claimsId = context.AuthenticationTicket.Identity;
        claimsId.AddClaim(new System.Security.Claims.Claim(
            System.Security.Claims.ClaimTypes.Name, me.Value<string>("displayName"), System.Security.Claims.ClaimValueTypes.String));
    }
},
2. F5 キーを押下してプログラムを実行。サインイン状態の場合は一旦ログオフして、再度サインイン。名前が出ることを確認。
コードの詳細確認
ではコードの中身を見ていきましょう。
Microsoft Graph からユーザー情報の取得
認可コードから AuthenticationResult を取得した後、そのまま /me にアクセスして名前を取得。
using (HttpClient client = new HttpClient())
{
    client.DefaultRequestHeaders.Authorization = new AuthenticationHeaderValue("Bearer", result.AccessToken);
    var httpResponse = await client.GetAsync("https://graph.microsoft.com/v1.0/me");
    var me = JToken.Parse(await httpResponse.Content.ReadAsStringAsync());
...
クレームを追加
現在のクレーム ID を取得して、名前クレームを追加。
System.Security.Claims.ClaimsIdentity claimsId = context.AuthenticationTicket.Identity;
claimsId.AddClaim(new System.Security.Claims.Claim(
        System.Security.Claims.ClaimTypes.Name, me.Value<string>("displayName"),
        System.Security.Claims.ClaimValueTypes.String));
増分同意を追加する
Azure AD v2 の機能として増分同意機能がありますが、現在は OpenId Connect でログインした際に取得した認可トークンを使っているため、増分同意に対応していません。
今回は「問い合わせ」メニューを変更して、連絡先一覧を取得できるようにし、増分同意を実装します。
1. まずアプリケーションに権限を追加。Microsoft アプリ登録ポータル にログインして、「委任されたアクセス許可」に Contacts.Read 権限を追加して保存。
2. 次に Models フォルダーに Contact.cs ファイルを追加し、以下のコードを差し替え。
using Newtonsoft.Json;
using System.Collections.Generic;

namespace GraphWebAppDemo.Models
{
    public class Contact
    {
        [JsonProperty("id")]
        public string ContactId { get; set; }
        [JsonProperty("displayName")]
        public string DisplayName { get; set; }
        [JsonProperty("jobTitle")]
        public string JobTitle { get; set; }
        [JsonProperty("emailAddresses")]
        public List<EmailAddress> EmailAddresses { get; set; }

        public class EmailAddress
        {
            [JsonProperty("name")]
            public string Name { get; set; }
            [JsonProperty("address")]
            public string Address { get; set; }
        }
    }
}
3. Shared フォルダにある _Layout.cshtml の 「問い合わせ」を「連絡先」に変更。
<li>@Html.ActionLink("ホーム", "Index", "Home")</li>
<li>@Html.ActionLink("詳細", "About", "Home")</li>
<li>@Html.ActionLink("連絡先", "Contact", "Home")</li>
4. HomeController.cs の Contact メソッドを以下のコードに差し替え。
public async Task<ActionResult> Contact()
{
    string signedInUserID = ClaimsPrincipal.Current.FindFirst(ClaimTypes.NameIdentifier).Value;
    TokenCache userTokenCache = new SessionTokenCache(signedInUserID, HttpContext).GetMsalCacheInstance();
    ConfidentialClientApplication cca = new ConfidentialClientApplication(
            clientId,
            redirectUri,
            new ClientCredential(clientSecret),
            userTokenCache, null);

    var scopes = new string[] { "Contacts.Read" };

    try
    {
        var authResult = await cca.AcquireTokenSilentAsync(scopes, cca.Users.FirstOrDefault());
        using (HttpClient client = new HttpClient())
        {
            client.DefaultRequestHeaders.Authorization = new AuthenticationHeaderValue("Bearer", authResult.AccessToken);

            var httpResponse = await client.GetAsync("https://graph.microsoft.com/v1.0/me/contacts");
            var resultJson = JToken.Parse(await httpResponse.Content.ReadAsStringAsync());
            var contacts = JsonConvert.DeserializeObject<List<Contact>>(resultJson["value"].ToString());

            return View(contacts);
        }
    }
    catch (MsalUiRequiredException)
    {
        try
        {
            string authReqUrl = (await cca.GetAuthorizationRequestUrlAsync(scopes, null, null)).ToString();
            ViewBag.AuthorizationRequest = authReqUrl;
        }
        catch (Exception ee)
        {
            Response.Write(ee.Message);
        }
    }

    return View();
}
5. 最後に画面の対応。Views/Home フォルダの Contact.cshtml を以下のコードに差し替え。
@model List<GraphWebAppDemo.Models.Contact>
@{
    ViewBag.Title = "連絡先一覧";
}

<h2>@ViewBag.Title</h2>

@if (ViewBag.AuthorizationRequest != null)
{
    <text>
        追加の同意が必要です。<a href="@ViewBag.AuthorizationRequest">こちら</a>をクリックしてください。
    </text>
}
else
{
    foreach (var contact in Model)
    {
        <text>名前: @contact.DisplayName</text><br />
        <text>タイトル: @contact.JobTitle</text><br />
        if (contact.EmailAddresses.Count > 0)
        {
            <text>メール: @contact.EmailAddresses.First().Address</text><br />
        }
    }
}
6. F5 キーを押下してデバッグ開始。ログインしている場合は一旦ログオフして、再度ログイン。その後「連絡先」メニューをクリック。追加同意を求められる。
7. リンクをクリックするとサインインが求められるので、サインイン。ここで追加の同意が求められる。
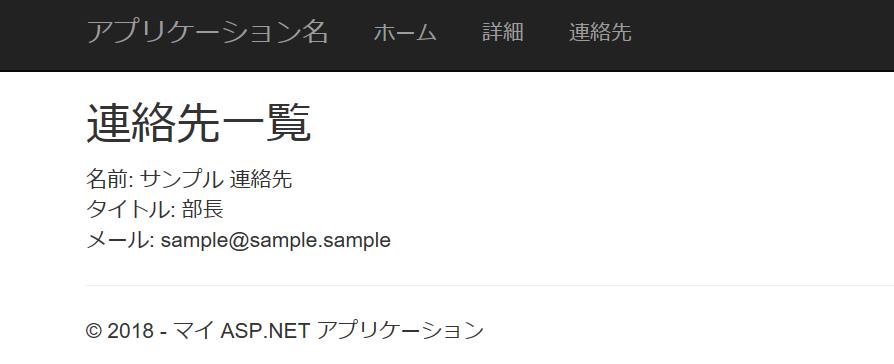
8. 同意後、再度連絡先をクリック。一覧が取得できていることを確認。
コードの詳細確認
追加した内容を確認してみましょう。
アクセストークン取得失敗の処理
スコープが変わり、まだ同意が取れていない場合は、AcquireTokenSilentAsync が失敗します。そこで増分同意のアドレスを GetAuthorizationRequestUrlAsync メソッドで取得して画面に返します。
try
{
    var authResult = await cca.AcquireTokenSilentAsync(scopes, cca.Users.FirstOrDefault());
...
}
catch (MsalUiRequiredException)
{
    try
    {
        string authReqUrl = (await cca.GetAuthorizationRequestUrlAsync(scopes, null, null)).ToString();
        ViewBag.AuthorizationRequest = authReqUrl;
    }
...
}
Microsoft Graph の呼び出し
前回同様 HttpClient を使っています。/me/contacts はコレクションを返すため、JSON のパースも value プロパティを配列としてパースしています。
client.DefaultRequestHeaders.Authorization = new AuthenticationHeaderValue("Bearer", authResult.AccessToken);

var httpResponse = await client.GetAsync("https://graph.microsoft.com/v1.0/me/contacts");
var resultJson = JToken.Parse(await httpResponse.Content.ReadAsStringAsync());
var contacts = JsonConvert.DeserializeObject<List<Contact>>(resultJson["value"].ToString());

return View(contacts);
Contact クラス
MVC でモデルを画面にバインドするには、クラスとして定義されたオブジェクトが使いやすいため、今回は Contact クラスを作成しました。
考慮事項
ユーザートークンキャッシュの場所
クライアントアプリケーションと異なり、Web アプリケーションは複数インスタンスで稼働する可能性が高い他、状況によってはサーバーが再起動されます。今回の開発でもアプリケーションを再起動するたびに、サインアウト/サインインが必要になったため、複数のインスタンスからアクセスでき、かつ永続化されるストレージにキャッシュを保存するようにしてください。
まとめ
今回は MVC を例に Web アプリケーションにおける Microsoft Graph の利用を見ていきましたが、OpenId Connect のスコープに Microsoft Graph の権限を指定し、取得した認可コードを使ってアクセストークンを取得するフローは、他の Web アプリケーションでも同様です。GitHub にある多くのサンプルも同じパターンで実装しています。
参照
Azure Active Directory v2.0 と OpenID Connect プロトコル
v2.0 プロトコル: OAuth 2.0 承認コード フロー
ASP.NET Web アプリへの "Microsoft でサインイン" の追加
aspnet-connect-rest-sample
active-directory-dotnet-webapp-openidconnect-v2


