前回の記事では、最小構成で「オウム返し」ボットを開発しました。本記事では、そのコードを使って、ボットが呼び出されるまでの仕組みを理解していきます。
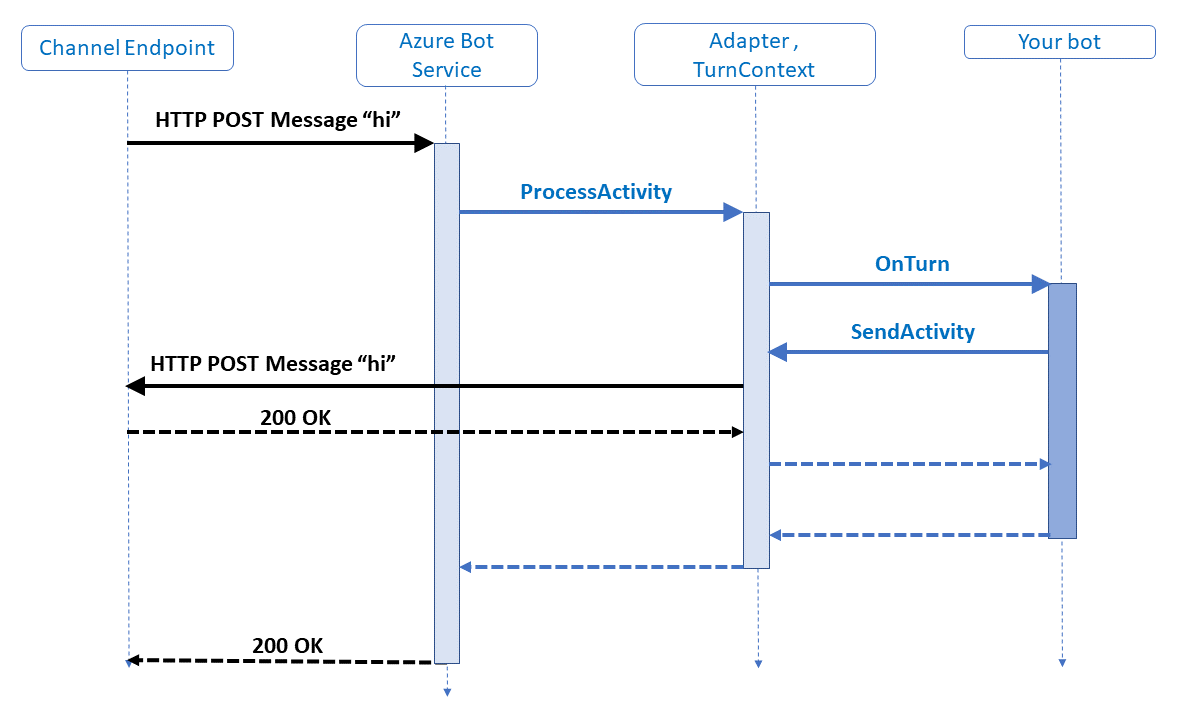
公式ページにある Bot が動作する仕組み
- Bot Framework Service なるものから HTTP POST が来る
- Web Server Integration で受けて ProcessActivity を呼ぶ
- Adapter、TurnContext と Middleware でそれらを受けて、OnTurn を呼ぶ
- 自分のボットが呼び出される
- 自分のボットから SendActivity で返信を返す (HTTP 応答ではなく、新規の POST)
- それぞれの HTTP 要求に対して 200 を返す
今回はこの動作のうち、OnTurn が呼ばれるところまでを見ていきます。
NuGet パッケージ
前回のボットでは、BotBuilder 関連の 以下 NuGet パッケージを使いました。
Microsoft.Bot.Builder.Integration.AspNet.Core
Microsoft.Bot.Builder
Microsoft.Bot.Connector
Microsoft.Bot.Schema
全てオープンソースで公開されています。[GitHub: botbuilder-dotnet]
(https://github.com/Microsoft/botbuilder-dotnet)
Microsoft.Bot.Builder.Integration.AspNet.Core
BotBuilder と ASP.NET Core を繋ぐモジュール
Microsoft.Bot.Builder
Bot Builder v4 のメインモジュール
Microsoft.Bot.Connector
ボットと Bot Framework Connector を繋ぐモジュール
Microsoft.Bot.Schema
Bot Builder のスキーマを定義したモジュール
この中で Microsoft.Bot.Builder.Integration.AspNet.Core パッケージは BotBuilder と ASP.NET Core を繋ぐ、ASP.NET Core ミドルウェアとして動作します。
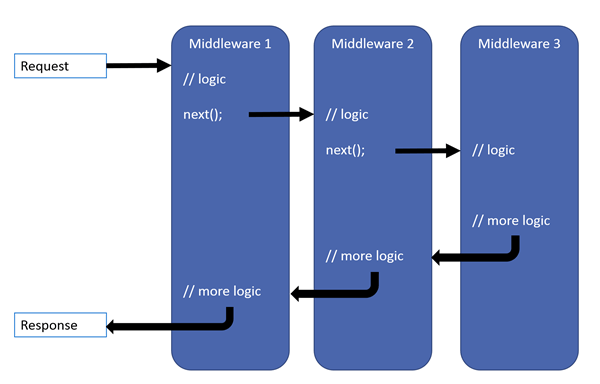
ASP.NET Core ミドルウェア
ミドルウェアは、ユーザーから送られてきた HTTP 要求を処理するコンポーネントです。既定のミドルウェアに追加して、開発者が独自に開発することが出来ます。ミドルウェアは要求と応答に対して操作を行え、next() で次のミドルウェアに処理を渡します。
- HTTP 要求に対する処理
- next(); で次のミドルウェアを呼び出す
- HTTP 応答に対する処理
開発したミドルウェアは Startup.cs の Configure メソッド内で登録します。ミドルウェは登録した順番で呼び出されます。
public void Configure(IApplicationBuilder app, IHostingEnvironment env)
{
    app.UseDefaultFiles() // 既定のファイルを使うミドルウェア
       .UseStaticFiles() // 静的ファイルを使うミドルウェア
       .UseMvc(); // MVC を使うミドルウェア
}
詳細は ASP.NET Core のミドルウェア参照。
BotBuilder を追加する際も、以下の様に Configure にミドルウェアとして追加しました。
public void Configure(IApplicationBuilder app, IHostingEnvironment env)
{
    app.UseBotFramework();
}
UseBotFramework メソッドは Microsoft.Bot.Builder.Integration.AspNet.Core が提供する機能で、中身は以下の様になっています。
GitHub より引用 : UseBotFramework メソッド ※コメント追加
public static IApplicationBuilder UseBotFramework(this IApplicationBuilder applicationBuilder)
{
    if (applicationBuilder == null)
    {
        throw new ArgumentNullException(nameof(applicationBuilder));
    }

    // IoC に登録済の構成を取得。IoC については後で説明。
    var applicationServices = applicationBuilder.ApplicationServices;
    var configuration = applicationServices.GetService<IConfiguration>();

    if (configuration != null)
    {
        // 構成情報より各種エンドポイント情報を取得
        var openIdEndpoint = configuration.GetSection(AuthenticationConstants.BotOpenIdMetadataKey)?.Value;
        if (!string.IsNullOrEmpty(openIdEndpoint))
        {
            ChannelValidation.OpenIdMetadataUrl = openIdEndpoint;
        }
        var oauthApiEndpoint = configuration.GetSection(AuthenticationConstants.OAuthUrlKey)?.Value;
        if (!string.IsNullOrEmpty(oauthApiEndpoint))
        {
            OAuthClient.OAuthEndpoint = oauthApiEndpoint;
        }
        var emulateOAuthCards = configuration.GetSection(AuthenticationConstants.EmulateOAuthCardsKey)?.Value;
        if (!string.IsNullOrEmpty(emulateOAuthCards) && bool.TryParse(emulateOAuthCards, out bool emualteOAuthCardsValue))
        {
            OAuthClient.EmulateOAuthCards = emualteOAuthCardsValue;
        }
    }

    // BotFrameworkOptions オプションを取得してパスを確認。
    var options = applicationServices.GetRequiredService<IOptions<BotFrameworkOptions>>().Value;
    var paths = options.Paths;
    // パス (/api/messages) に BotMessageHandler の HandleAsync メソッドをマップ
    applicationBuilder.Map(
        paths.BasePath + paths.MessagesPath,
        botActivitiesAppBuilder => botActivitiesAppBuilder.Run(new BotMessageHandler().HandleAsync));

    return applicationBuilder;
}
構成情報などの取り扱いはありますが、大事な点は /api/messages パスに要求が来たら、BotMessageHandler の HandleAsync が呼ばれるという点です。尚、パス情報は以下のコードにハードコードされています。
GitHub より引用 : BotFrameworkPaths
public BotFrameworkPaths()
{
    BasePath = "/api";
    MessagesPath = "/messages";
}
では BotMessageHandler の HandleAsync メソッドを見ていきましょう。
GitHub より引用 : HandleAsync ※コメント追加および一部不要コード削除
public async Task HandleAsync(HttpContext httpContext)
{
    var request = httpContext.Request;
    var response = httpContext.Response;
    // POST メソッドだけ反応。またヘッダーや中身があるかも確認。
    if (request.Method != HttpMethods.Post)
    {
        response.StatusCode = (int)HttpStatusCode.MethodNotAllowed;
        return;
    }
    if (request.ContentLength == 0)
    {
        response.StatusCode = (int)HttpStatusCode.BadRequest;
        return;
    }
    if (!MediaTypeHeaderValue.TryParse(request.ContentType, out var mediaTypeHeaderValue) || mediaTypeHeaderValue.MediaType != "application/json")
    {
        response.StatusCode = (int)HttpStatusCode.NotAcceptable;
        return;
    }

    // IoC で登録済の BotFrameworkAdapter および、 IBot を継承したボットを取得。
    // どこで登録しているかは後で説明。
    var requestServices = httpContext.RequestServices;
    var botFrameworkAdapter = requestServices.GetRequiredService<BotFrameworkAdapter>();
    var bot = requestServices.GetRequiredService<IBot>();

    try
    {
        // 実際の処理を実行。
        var invokeResponse = await ProcessMessageRequestAsync(
            request,
            botFrameworkAdapter,
            bot.OnTurnAsync, // Bot の OnTurnAsync
            default(CancellationToken));

        // 結果を確認
        if (invokeResponse == null)
        {
            response.StatusCode = (int)HttpStatusCode.OK;
        }
        else
        {
            response.ContentType = "application/json";
            response.StatusCode = invokeResponse.Status;

            using (var writer = new StreamWriter(response.Body))
            {
                using (var jsonWriter = new JsonTextWriter(writer))
                {
                    BotMessageSerializer.Serialize(jsonWriter, invokeResponse.Body);
                }
            }
        }
    }
    catch (UnauthorizedAccessException)
    {
        response.StatusCode = (int)HttpStatusCode.Forbidden;
    }
}
ここでは HTTP 要求の中身を確認後、IoC に登録済の BotFrameworkAdapter と IBot を取得して ProcessMessageRequestAsync メソッドを実行しています。また IBot については OnTurnAsync メソッドを引数として渡しています。IoC については後で説明しますので、先に ProcessMessageRequestAsync を確認します。
GitHub より引用 : ProcessMessageRequestAsync ※コメント追加
protected override async Task<InvokeResponse> ProcessMessageRequestAsync(HttpRequest request, BotFrameworkAdapter botFrameworkAdapter, BotCallbackHandler botCallbackHandler, CancellationToken cancellationToken)
{
    // Activity を作成。中身を HTTP 要求から取得。
    var activity = default(Activity);
    using (var bodyReader = new JsonTextReader(new StreamReader(request.Body, Encoding.UTF8)))
    {
        activity = BotMessageHandlerBase.BotMessageSerializer.Deserialize<Activity>(bodyReader);
    }

# pragma warning disable UseConfigureAwait // Use ConfigureAwait
    // アダプターの ProcessActivityAsync メソッドに Activity およびコールバック (OnTurnAsync) を渡す。
    var invokeResponse = await botFrameworkAdapter.ProcessActivityAsync(
            request.Headers["Authorization"],
            activity,
            botCallbackHandler,
            cancellationToken);
# pragma warning restore UseConfigureAwait // Use ConfigureAwait

    return invokeResponse;
}
ここでは HTTP 要求より Activity を作って ProcessActivityAsync を実行しています。尚、ここまでは Microsoft.Bot.Builder.Integration.AspNet.Core でしたが、BotFrameworkAdapter は Bot Builder 本体側のパッケージのコードになるため、ASP.NET Core との繋ぎはこの辺りで終わりです。
GitHub から引用 : ProcessActivityAsync ※コメント追加
public async Task<InvokeResponse> ProcessActivityAsync(string authHeader, Activity activity, BotCallbackHandler callback, CancellationToken cancellationToken)
{
    BotAssert.ActivityNotNull(activity);
    // Jwt トークンの検証および ClaimsIdentity の作成。
    var claimsIdentity = await JwtTokenValidation.AuthenticateRequest(activity, authHeader, _credentialProvider, _channelProvider, _httpClient).ConfigureAwait(false);
    return await ProcessActivityAsync(claimsIdentity, activity, callback, cancellationToken).ConfigureAwait(false);
}

public async Task<InvokeResponse> ProcessActivityAsync(ClaimsIdentity identity, Activity activity, BotCallbackHandler callback, CancellationToken cancellationToken)
{
    BotAssert.ActivityNotNull(activity);

    // TurnContext を 自分自身と Activity を引数に作成。TurnContext の詳細はまた別の記事で。
    using (var context = new TurnContext(this, activity))
    {
        // TurnContext に認証情報を設定
        context.TurnState.Add<IIdentity>(BotIdentityKey, identity);
        // Connector クライアントを追加
        var connectorClient = await CreateConnectorClientAsync(activity.ServiceUrl, identity, cancellationToken).ConfigureAwait(false);
        context.TurnState.Add(connectorClient);

        // 処理実行
        await RunPipelineAsync(context, callback, cancellationToken).ConfigureAwait(false);

        // Invoke シナリオ。詳細は別記事で。
        if (activity.Type == ActivityTypes.Invoke)
        {
            Activity invokeResponse = context.TurnState.Get<Activity>(InvokeReponseKey);
            if (invokeResponse == null)
            {
                // ToDo: Trace Here
                throw new InvalidOperationException("Bot failed to return a valid 'invokeResponse' activity.");
            }
            else
            {
                return (InvokeResponse)invokeResponse.Value;
            }
        }

        // Invoke 以外は何もしない。
        return null;
    }
}
ここでは TurnContext を作成しています。TurnContext に認証情報の設定と、Microsoft.Bot.Builder.Connector で提供される ConnectorClient の設定を行い、実際の処理に移るべく RunPipelineAsync が呼ばれています。
TurnContext は非常に重要であるため、あらためて別の記事で紹介します。
GitHub より引用 : RunPipelineAsync ※ コメント追加
protected async Task RunPipelineAsync(ITurnContext turnContext, BotCallbackHandler callback, CancellationToken cancellationToken)
{
    BotAssert.ContextNotNull(turnContext);

    // Bot Builder に登録されたミドルウェアをまず実行。これは ASP.NET Core ミドルウェアとはまた別のため、別の記事で説明。
    if (turnContext.Activity != null)
    {
        try
        {
            await MiddlewareSet.ReceiveActivityWithStatusAsync(turnContext, callback, cancellationToken).ConfigureAwait(false);
        }
        catch (Exception e)
        {
            if (OnTurnError != null)
            {
                await OnTurnError.Invoke(turnContext, e).ConfigureAwait(false);
            }
            else
            {
                throw;
            }
        }
    }
    else
    {
        // コールバック (OnTurnAsync) を実行。
        if (callback != null)
        {
            await callback(turnContext, cancellationToken).ConfigureAwait(false);
        }
    }
}
ここでようやく開発した「オウム返しボット」の OnTurnAsync が呼ばれました。
ASP.NET Core 依存関係の挿入 (Dependency Injection : DI)
DI とは、Inversion of Control (IoC) コンテナという場所に登録した情報を元に、必要なオブジェクトを動的に取り出す仕組みのことで、ASP.NET Core では標準でこの機能が提供されます。
詳細は ASP.NET Core での依存関係の挿入 参照
登録は Startup.cs の ConfigureServices メソッドで行います。前回記事の「オウム返し」ボットでも以下の様に登録をしました。
public void ConfigureServices(IServiceCollection services)
{
    services.AddBot<MyBot>();
}
こちらのコードでは、MyBot クラスを登録し、必要な時に取り出せるようにしています。では AddBot が何をしているか見ていきましょう。
GitHub より引用 : AddBot ※ コメント追加
public static IServiceCollection AddBot<TBot>(this IServiceCollection services, Action<BotFrameworkOptions> configureAction = null)
    where TBot : class, IBot
{
    // 引数のチェック
    if (services == null)
    {
        throw new ArgumentNullException(nameof(services));
    }
    if (configureAction != null)
    {
        services.Configure(configureAction);
    }

    // IBot を要求した際、TBot (今回の場合 MyBot) を返すように登録。
    services.AddTransient<IBot, TBot>();
    // BotFrameworkAdapter を要求した際、常に同じインスタンスを返すように登録。
    services.AddSingleton(sp =>
    {
        // 登録済の BotFrameworkOptions を取得
        var options = sp.GetRequiredService<IOptions<BotFrameworkOptions>>().Value;
        // BotFrameworkAdapter を新規に作成し、OnTurnError に指定されたハンドルを設定。
        var botFrameworkAdapter = new BotFrameworkAdapter(options.CredentialProvider, options.ChannelProvider, options.ConnectorClientRetryPolicy, options.HttpClient)
        {
            OnTurnError = options.OnTurnError,
        };
        // Bot Builder のミドルウェアを順次登録
        foreach (var middleware in options.Middleware)
        {
            botFrameworkAdapter.Use(middleware);
        }

        return botFrameworkAdapter;
    });

    return services;
}
ここでは IBot が要求した際に TBot (今回の場合 MyBot) を、BotFrameworkAdapter を要求した場合、同じインスタンスを返すように設定しています。この設定があるため、上記で紹介した HandleAsync メソッド内で動的に IBot と BotFrameworkAdapter を取得できています。
「オウム返し」ボットでは BotFrameworkOptions やミドルウェアは何も登録していませんが、登録した場合はこのコードで設定がされることになります。
IoC/DI は今後も利用するため重要な概念です。
まとめ
今回は Startup.cs に設定したコードが実際にどのように動作して、結果ボットが動作するかを見ていきました。次回はアダプター、TurnContext と Activity を見ていきます。

