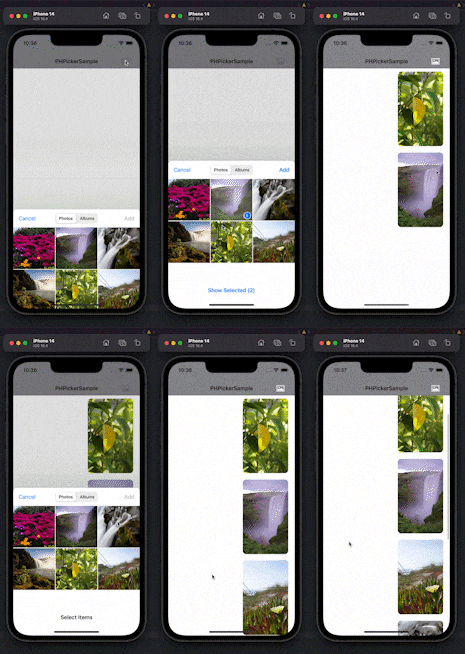
完成動画
まずは完成形を見ていただければと...
このように複数選択した画像をTableViewに表示する方法を紹介します。
環境
Swift:5.8.1
Xcode:14.3.1
実装
ライブラリをimportして必要な変数を用意します。
import UIKit
import PhotosUI

final class ViewController: UIViewController {

    private var selection = [String: PHPickerResult]()
    private var selectedAssetIdentifiers = [String]()
    private var images: [UIImage?] = []

    ///// 省略 /////
}
次にPHPickerViewControllerを使って写真選択画面を表示する関数を書きます。
private func presentPicker() {
    var configuration = PHPickerConfiguration(photoLibrary: .shared())
    configuration.filter = .any(of: [.images, .livePhotos, .videos])
    configuration.preferredAssetRepresentationMode = .current
    configuration.selection = .ordered
    configuration.selectionLimit = 0

    let picker = PHPickerViewController(configuration: configuration)
    picker.delegate = self

    if let sheet = picker.sheetPresentationController {
        sheet.detents = [.medium(), .large()]
    }
    present(picker, animated: true)
}
次にデリゲート内で画像データのキーを取得します。didFinishPickingはpickerを閉じたら呼ばれます。
func picker(_ picker: PHPickerViewController, didFinishPicking results: [PHPickerResult]) {
    dismiss(animated: true)

    let existingSelection = selection
    var newSelection = [String: PHPickerResult]()

    results.forEach { result in
        guard let identifier = result.assetIdentifier else {
            return
        }
        newSelection[identifier] = existingSelection[identifier] ?? result
    }

    // Track the selection in case the user deselects it later.
    selection = newSelection
    selectedAssetIdentifiers = results.map(\.assetIdentifier!)

    print("didFinishPicking:", selectedAssetIdentifiers)

    loadImageData()
}
選択した画像データのキーは↓このように配列に格納されます。
didFinishPicking: ["ED7AC36B-A150-4C38-BB8C-B6D696F4F2ED/L0/001", "B84E8479-475C-4727-A4A4-B77AA9980897/L0/001"]
次に取得した画像データのキーを指定して取り出し、UIImage型に変換して配列に格納する関数を書きます。(配列にするのはTableViewで表示するため)
private func loadImageData() {
    selectedAssetIdentifiers.forEach { identifier in
        guard let selection = selection[identifier] else {
            return
        }
        let itemProvider = selection.itemProvider

        if itemProvider.canLoadObject(ofClass: UIImage.self) {
            itemProvider.loadObject(ofClass: UIImage.self) { image, error in
                DispatchQueue.main.async {
                    self.images.append(image as? UIImage)
                    self.tableView.reloadData()
                }
            }
        }
    }
}
tableView.reloadData()が呼ばれたら選択した画像が表示されます。
最後に全体にコードです。
import UIKit
import PhotosUI

final class ViewController: UIViewController {

    @IBOutlet weak var tableView: UITableView!

    private var selection = [String: PHPickerResult]()
    private var selectedAssetIdentifiers = [String]()
    private var images: [UIImage?] = []

    override func viewDidLoad() {
        super.viewDidLoad()
        setUpTableView()
    }

    private func setUpTableView() {
        tableView.delegate = self
        tableView.dataSource = self
        tableView.separatorStyle = .none
        tableView.allowsMultipleSelection = false
        tableView.register(UINib(nibName: "TableViewCell", bundle: nil), forCellReuseIdentifier: "cell")
    }

    private func presentPicker() {
        var configuration = PHPickerConfiguration(photoLibrary: .shared())
        configuration.filter = .any(of: [.images, .livePhotos, .videos])
        configuration.preferredAssetRepresentationMode = .current
        configuration.selection = .ordered
        configuration.selectionLimit = 0

        let picker = PHPickerViewController(configuration: configuration)
        picker.delegate = self

        if let sheet = picker.sheetPresentationController {
            sheet.detents = [.medium(), .large()]
        }
        present(picker, animated: true)
    }

    private func loadImageData() {
        selectedAssetIdentifiers.forEach { identifier in
            guard let selection = selection[identifier] else {
                return
            }
            let itemProvider = selection.itemProvider

            if itemProvider.canLoadObject(ofClass: UIImage.self) {
                itemProvider.loadObject(ofClass: UIImage.self) { image, error in
                    DispatchQueue.main.async {
                        self.images.append(image as? UIImage)
                        self.tableView.reloadData()
                    }
                }
            }
        }
    }

    @IBAction func onOpenButtonTapped(_ sender: UIButton) {
        presentPicker()
    }
}

extension ViewController: PHPickerViewControllerDelegate {

    func picker(_ picker: PHPickerViewController, didFinishPicking results: [PHPickerResult]) {
        dismiss(animated: true)

        let existingSelection = selection
        var newSelection = [String: PHPickerResult]()

        results.forEach { result in
            guard let identifier = result.assetIdentifier else {
                return
            }
            newSelection[identifier] = existingSelection[identifier] ?? result
        }

        // Track the selection in case the user deselects it later.
        selection = newSelection
        selectedAssetIdentifiers = results.map(\.assetIdentifier!)

        print("didFinishPicking:", selectedAssetIdentifiers)

        loadImageData()
    }
}

extension ViewController: UITableViewDelegate, UITableViewDataSource {

    func tableView(_ tableView: UITableView, numberOfRowsInSection section: Int) -> Int {
        return images.count
    }

    func tableView(_ tableView: UITableView, cellForRowAt indexPath: IndexPath) -> UITableViewCell {
        let cell = tableView.dequeueReusableCell(withIdentifier: "cell", for: indexPath) as! TableViewCell
        cell.photo.image = images[indexPath.row]

        return cell
    }
}
import UIKit

final class TableViewCell: UITableViewCell {

    @IBOutlet weak var photo: UIImageView!

    override func awakeFromNib() {
        super.awakeFromNib()
        // Initialization code
    }

    override func setSelected(_ selected: Bool, animated: Bool) {
        super.setSelected(selected, animated: animated)
        // Configure the view for the selected state
    }

}
おわりに
類似するライブラリのUIImagePickerでは複数選択できませんでしたが、PHPickerを利用すれば画像の複数選択が可能です。画像を複数選択したいケースは多いと思うので、この記事を参考に実装していただければ幸いです。
最後までご覧いただきありがとうございました!
