投稿の経緯
元々MessageKitを使って開発していたメッセージ画面のカスタム性能を高めるためにフルリプレイスすることになり、メッセージ入力部分をライブラリなしで開発したので記事にします。
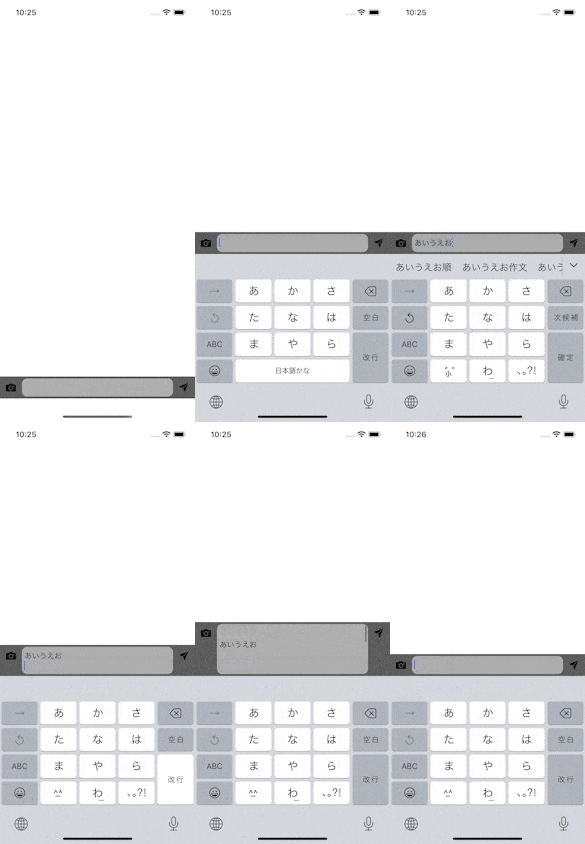
完成動画
まずは完成動画を見ていただいて全体のイメージを掴んでいただければと思います。
仕様として
- キーボードの表示/非表示に合わせて入力部分の表示位置を変える
- 入力内容に合わせてTextViewと背景Viewの高さを可変にする
この辺りを抑える必要があります。
※カメラボタンと送信ボタンの処理は今回実装していません。入力部分のUIにフォーカスしています。
実装
キーボードの表示/非表示
NotificationCenterを登録して
ViewController.swift
private func setUpNotification() {
    NotificationCenter.default.addObserver(
        self,
        selector: #selector(keyboardWillShow(_:)),
        name: UIResponder.keyboardWillShowNotification,
        object: nil
    )
    NotificationCenter.default.addObserver(
        self,
        selector: #selector(keyboardWillHide(_:)),
        name: UIResponder.keyboardWillHideNotification,
        object: nil
    )
}
キーボードを表示するタイミングでキーボードのframeを取得し、キーボードを非表示にするタイミングで入力部分のframeとtableViewのサイズを取得する。
ViewController.swift
@objc func keyboardWillShow(_ notification: Notification) {
    guard let userInfo = notification.userInfo else {
        return
    }
    guard let keyboardInfo = userInfo[UIResponder.keyboardFrameEndUserInfoKey] as? NSValue else {
        return
    }
    keyboardFrame = keyboardInfo.cgRectValue
}

@objc func keyboardWillHide(_ notification: Notification) {
    guard let messageInputViewFrame = messageInputViewFrame else {
        return
    }
    guard let tableViewSize = tableViewSize else {
        return
    }
    messageInputView.frame = messageInputViewFrame
    tableView.frame.size = tableViewSize
}
入力部分の構築
それぞれのパーツを作成する。
ViewController.swift
private func setUpLayoutContainer() {
    setUpTableView()
    setUpMessageInputView()
    setUpCameraButton()
    setUpTextView()
    setUpSendButton()
    messageInputViewFrame = messageInputView.frame
    tableViewSize = tableView.frame.size
}

private func setUpTableView() {
    let barHeight = UIApplication.shared.statusBarFrame.height
    let frame = CGRect(
        x: 0,
        y: barHeight,
        width: view.frame.width,
        height: view.frame.height - (barHeight + INPUT_VIEW_HEIGHT)
    )
    tableView.frame = frame
    tableView.separatorStyle = .none
    tableView.backgroundColor = .white

    view.addSubview(tableView)
}

private func setUpMessageInputView() {
    let barHeight = UIApplication.shared.statusBarFrame.height
    let frame = CGRect(
        x: 0,
        y: view.frame.height - (barHeight + INPUT_VIEW_HEIGHT),
        width: view.frame.width,
        height: INPUT_VIEW_HEIGHT
    )
    messageInputView.frame = frame
    messageInputView.backgroundColor = .darkGray
    view.addSubview(messageInputView)
}

private func setUpCameraButton() {
    let frame = CGRect(
        x: 0,
        y: 0,
        width: BUTTON_SIZE,
        height: BUTTON_SIZE
    )
    cameraButton.frame = frame
    cameraButton.setImage(UIImage(systemName: "camera.fill"), for: .normal)
    cameraButton.tintColor = .black
    cameraButton.backgroundColor = .clear
    cameraButton.addTarget(self, action: #selector(onCameraButtonTapped(_:)), for: .touchUpInside)
    messageInputView.addSubview(cameraButton)
}

private func setUpTextView() {
    let frame = CGRect(
        x: BUTTON_SIZE,
        y: TEXT_VIEW_MARGIN,
        width: view.frame.width - (BUTTON_SIZE * 2),
        height: TEXT_VIEW_HEIGHT
    )
    textView.frame = frame
    textView.font = UIFont.systemFont(ofSize: 16)
    textView.layer.cornerRadius = 10
    textView.delegate = self
    textView.backgroundColor = .lightGray
    messageInputView.addSubview(textView)
}

private func setUpSendButton() {
    let frame = CGRect(
        x: view.frame.width - BUTTON_SIZE,
        y: 0,
        width: BUTTON_SIZE,
        height: BUTTON_SIZE
    )
    sendButton.frame = frame
    sendButton.setImage(UIImage(systemName: "paperplane.fill"), for: .normal)
    sendButton.tintColor = .black
    sendButton.backgroundColor = .clear
    sendButton.addTarget(self, action: #selector(onSendButtonTapped(_:)), for: .touchUpInside)
    messageInputView.addSubview(sendButton)
}
入力部分を可変にする
キーボードを表示するタイミングで入力部分の位置を可変にして、入力された文字と段落に合わせてtextViewの高さと背景Viewの高さを可変にしています。
ViewController.swift
func drawMessageInputView() {
    let statusBarHeight = UIApplication.shared.statusBarFrame.height
    var height = textView.sizeThatFits(CGSize(
        width: textView.frame.size.width,
        height: CGFloat.greatestFiniteMagnitude)
    ).height

    if height < MIN_TEXT_VIEW_HEIGHT {
        height = MIN_TEXT_VIEW_HEIGHT
    } else if MAX_TEXT_VIEW_HEIGHT < height {
        height = MAX_TEXT_VIEW_HEIGHT
    }

    if let keyboardFrame = keyboardFrame {
        textView.frame = CGRect(
            x: textView.frame.origin.x,
            y: textView.frame.origin.y,
            width: textView.frame.width,
            height: height
        )
        messageInputView.frame = CGRect(
            x: messageInputView.frame.origin.x,
            y: view.frame.height - keyboardFrame.size.height - (textView.frame.height + (TEXT_VIEW_MARGIN * 2)),
            width: view.frame.width,
            height: height + (TEXT_VIEW_MARGIN * 2)
        )
        tableView.frame.size = CGSize(
            width: tableView.frame.width,
            height: view.frame.height - (statusBarHeight + keyboardFrame.height + height)
        )
   }
}

extension ViewController: UITextViewDelegate {
    func textViewDidChange(_ textView: UITextView) {
        drawMessageInputView()
    }
}
コード全体
コード全体を記載しておきます。
ViewController.swift
import UIKit

final class ViewController: UIViewController {

    private var tableView = UITableView()
    private var messageInputView = UIView()
    private var textView = UITextView()
    private var cameraButton = UIButton()
    private var sendButton = UIButton()

    private var messageInputViewFrame: CGRect?
    private var tableViewSize: CGSize?
    private var keyboardFrame: CGRect?

    private let BUTTON_SIZE: CGFloat = 44
    private let INPUT_VIEW_HEIGHT: CGFloat = 44
    private let TEXT_VIEW_HEIGHT: CGFloat = 36
    private let TEXT_VIEW_MARGIN: CGFloat = 4
    private let MIN_TEXT_VIEW_HEIGHT: CGFloat = 36
    private let MAX_TEXT_VIEW_HEIGHT: CGFloat = 100

    override func viewDidLoad() {
        super.viewDidLoad()
        setUp()
    }

    private func setUp() {
        setUpLayoutContainer()
        setUpNotification()
    }

    private func setUpLayoutContainer() {
        setUpTableView()
        setUpMessageInputView()
        setUpCameraButton()
        setUpTextView()
        setUpSendButton()
        messageInputViewFrame = messageInputView.frame
        tableViewSize = tableView.frame.size
    }

    private func setUpTableView() {
        let barHeight = UIApplication.shared.statusBarFrame.height
        let frame = CGRect(
            x: 0,
            y: barHeight,
            width: view.frame.width,
            height: view.frame.height - (barHeight + INPUT_VIEW_HEIGHT)
        )
        tableView.frame = frame
        tableView.separatorStyle = .none
        tableView.backgroundColor = .white

        view.addSubview(tableView)
    }

    private func setUpMessageInputView() {
        let barHeight = UIApplication.shared.statusBarFrame.height
        let frame = CGRect(
            x: 0,
            y: view.frame.height - (barHeight + INPUT_VIEW_HEIGHT),
            width: view.frame.width,
            height: INPUT_VIEW_HEIGHT
        )
        messageInputView.frame = frame
        messageInputView.backgroundColor = .darkGray
        view.addSubview(messageInputView)
    }

    private func setUpCameraButton() {
        let frame = CGRect(
            x: 0,
            y: 0,
            width: BUTTON_SIZE,
            height: BUTTON_SIZE
        )
        cameraButton.frame = frame
        cameraButton.setImage(UIImage(systemName: "camera.fill"), for: .normal)
        cameraButton.tintColor = .black
        cameraButton.backgroundColor = .clear
        cameraButton.addTarget(self, action: #selector(onCameraButtonTapped(_:)), for: .touchUpInside)
        messageInputView.addSubview(cameraButton)
    }

    private func setUpTextView() {
        let frame = CGRect(
            x: BUTTON_SIZE,
            y: TEXT_VIEW_MARGIN,
            width: view.frame.width - (BUTTON_SIZE * 2),
            height: TEXT_VIEW_HEIGHT
        )
        textView.frame = frame
        textView.font = UIFont.systemFont(ofSize: 16)
        textView.layer.cornerRadius = 10
        textView.delegate = self
        textView.backgroundColor = .lightGray
        messageInputView.addSubview(textView)
    }

    private func setUpSendButton() {
        let frame = CGRect(
            x: view.frame.width - BUTTON_SIZE,
            y: 0,
            width: BUTTON_SIZE,
            height: BUTTON_SIZE
        )
        sendButton.frame = frame
        sendButton.setImage(UIImage(systemName: "paperplane.fill"), for: .normal)
        sendButton.tintColor = .black
        sendButton.backgroundColor = .clear
        sendButton.addTarget(self, action: #selector(onSendButtonTapped(_:)), for: .touchUpInside)
        messageInputView.addSubview(sendButton)
    }

    private func setUpNotification() {
        NotificationCenter.default.addObserver(
            self,
            selector: #selector(keyboardWillShow(_:)),
            name: UIResponder.keyboardWillShowNotification,
            object: nil
        )
        NotificationCenter.default.addObserver(
            self,
            selector: #selector(keyboardWillHide(_:)),
            name: UIResponder.keyboardWillHideNotification,
            object: nil
        )
    }

    @objc func keyboardWillShow(_ notification: Notification) {
        guard let userInfo = notification.userInfo else {
            return
        }
        guard let keyboardInfo = userInfo[UIResponder.keyboardFrameEndUserInfoKey] as? NSValue else {
            return
        }
        keyboardFrame = keyboardInfo.cgRectValue
        drawMessageInputView()
    }

    @objc func keyboardWillHide(_ notification: Notification) {
        guard let messageInputViewFrame = messageInputViewFrame else {
            return
        }
        guard let tableViewSize = tableViewSize else {
            return
        }
        messageInputView.frame = messageInputViewFrame
        tableView.frame.size = tableViewSize
    }

    func drawMessageInputView() {
        let statusBarHeight = UIApplication.shared.statusBarFrame.height
        var height = textView.sizeThatFits(CGSize(
            width: textView.frame.size.width,
            height: CGFloat.greatestFiniteMagnitude)
        ).height

        if height < MIN_TEXT_VIEW_HEIGHT {
            height = MIN_TEXT_VIEW_HEIGHT
        } else if MAX_TEXT_VIEW_HEIGHT < height {
            height = MAX_TEXT_VIEW_HEIGHT
        }

        if let keyboardFrame = keyboardFrame {
            textView.frame = CGRect(
                x: textView.frame.origin.x,
                y: textView.frame.origin.y,
                width: textView.frame.width,
                height: height
            )
            messageInputView.frame = CGRect(
                x: messageInputView.frame.origin.x,
                y: view.frame.height - keyboardFrame.size.height - (textView.frame.height + (TEXT_VIEW_MARGIN * 2)),
                width: view.frame.width,
                height: height + (TEXT_VIEW_MARGIN * 2)
            )
            tableView.frame.size = CGSize(
                width: tableView.frame.width,
                height: view.frame.height - (statusBarHeight + keyboardFrame.height + height)
            )
        }
    }

    @objc private func onCameraButtonTapped(_ sender: UIButton) {
        print("camera.")
    }

    @objc private func onSendButtonTapped(_ sender: UIButton) {
        print("send.")
    }
}

extension ViewController: UITextViewDelegate {

    func textViewDidChange(_ textView: UITextView) {
        drawMessageInputView()
    }
}
おわりに
今回はメッセージ機能でよく見かける動的な入力部分の実装方法を紹介しました。
この記事が誰かの役に立てば幸いです。
最後までご覧いただきありがとうございました!
