この記事でできること
Angular環境の構築。
html,cssを書き、開発できた感を出す。
Angular環境構築について
Angular CLIはコードの生成をするために作られた公式のツールです。
http://cli.angular.io
プロジェクトやコンポーネントのコードのひな形を生成してくれます。
インストール方法
$ npm install -g @angular/cli
インストール完了後はターミナル上で ng コマンドが使用可能になります。
Angular CLIのコマンド
// 新規プロジェクトの作成
$ ng new project-name

// コンポーネントの作成
$ ng generate component my-component

// ローカルサーバーの起動(cnrl+Cでサーバーの停止ができます)
$ ng serve
まずプロジェクト作成し、サーバーを立ち上げる
$ ng new project-name
$ ng serve
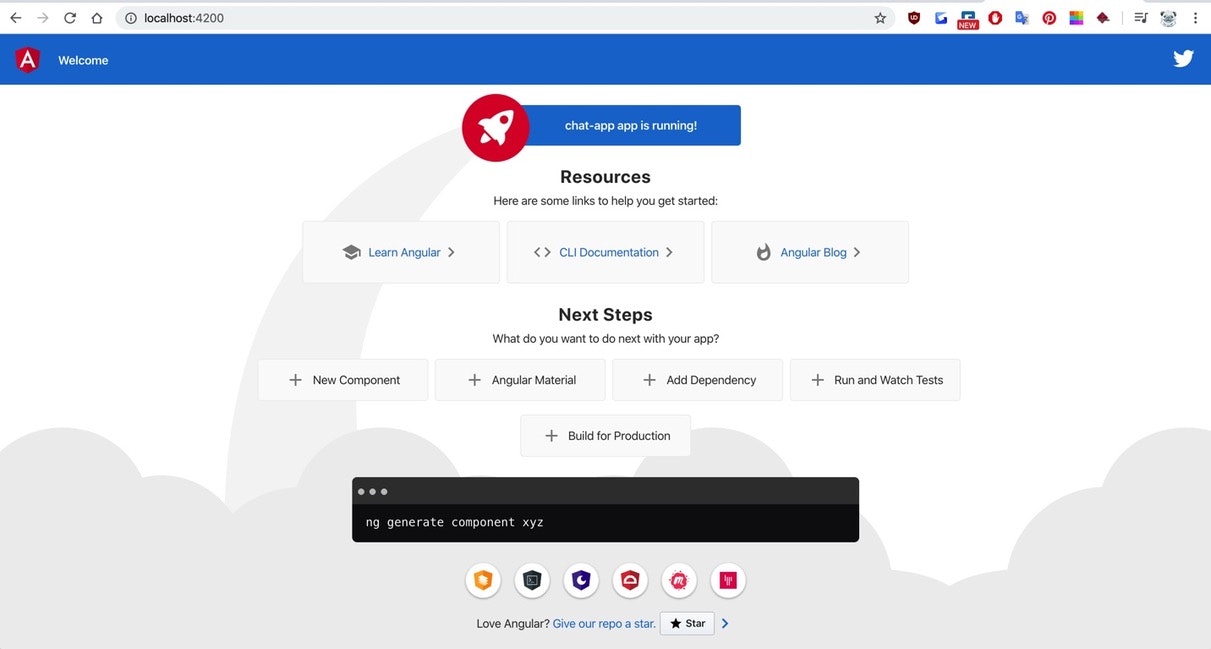
正しくプロジェクトが立ち上がっている場合は上記のような画面が表示される。
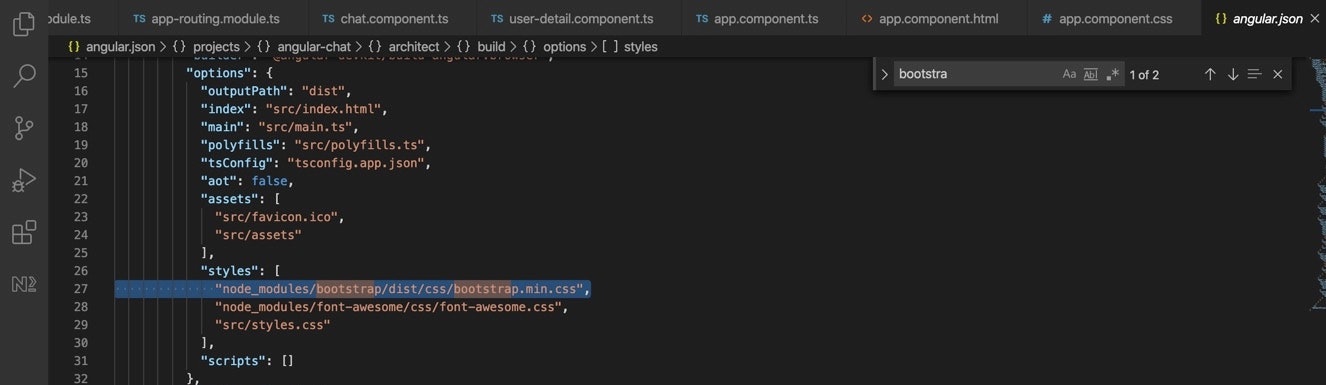
bootstrapを使用するため、インストールします
$ npm install bootstrap
インストールが完了したらangular.jsonファイルのstylesにbootstrapの記述を追記します。
モックデータを作成して表示する
app.component.html,cssにモックデータをコピーする
app.component.html
<div class="page">
  <section class="chat">
    <div class="chat-timeline">
      <div class="list-group-item list-group-item-action flex-column align-items-start border-0">
        <div class="media">
          <div class="media-left">
            <a href="#" class="icon">竹</a>
          </div>
          <div class="media-body">
            <div class="d-flex w-100 justify-content-between">
              <h4 class="media-heading">竹井 賢治</h4>
              <small class="media-date">2017/12/01</small>
            </div>
            <pre>ダミーテキスト。ダミーテキスト。ダミーテキスト。ダミーテキスト。ダミーテキスト。ダミーテキスト。ダミーテキスト。ダミーテキスト。ダミーテキスト。ダミーテキスト。ダミーテキスト。ダミーテキスト。ダミーテキスト。ダミーテキスト。ダミーテキスト。ダミーテキスト。</pre>
          </div>
        </div>
      </div>
      <div class="list-group-item list-group-item-action flex-column align-items-start border-0">
        <div class="media">
          <div class="media-body">
            <div class="d-flex w-100 justify-content-between">
              <h4 class="media-heading">五十川 洋平</h4>
              <small class="media-date">2017/12/01</small>
            </div>
            <pre>ダミーテキスト。ダミーテキスト。ダミーテキスト。ダミーテキスト。ダミーテキスト。ダミーテキスト。ダミーテキスト。ダミーテキスト。</pre>
          </div>
          <div class="media-right">
            <a href="#" class="icon">五</a>
          </div>
        </div>
      </div>
    </div>
  </section>

  <section class="chat-editor">
    <form class="chat-form">
      <div class="form-header d-flex flex-row-reverse mb-2">
        <span class="input-group-btn"><button class="btn btn-info btn-sm" type="submit" tabindex="2">送信</button></span>
      </div>
      <div class="input-group">
        <textarea class="form-control" placeholder="メッセージを入力" tabindex="1"></textarea>
      </div>
    </form>
  </section>
</div>
app.component.css
.page {
  overflow: scroll;
  max-width: 960px;
  height: 100%;
  margin: 0 auto;
  padding: 10px 0;
  background-color: #fff;
  border-left: 1px solid #DDDDDD;
  border-right: 1px solid #DDDDDD;
}

section {
  margin: 50px 10px 90px;
}

.chat-editor {
  display: block;
  position: fixed;
  bottom: 0;
  width: 100%;
  max-width: 958px;
  min-height: 100px;
  margin: 0;
  padding: 10px;
  border-top: 1px solid #DDDDDD;
  background-color: #fff;
}

.page .chat .media-body {
  padding: 15px;
  margin: 0 10px;
  background-color: #f5f5f5;
  border-radius: 4px;
  font-size: 15px;
  word-break: break-all;
}

.media-body h4.media-heading {
  color: #aaaaaa;
  font-size: 13px;
}

.media-body .media-date {
  color: #aaaaaa;
  font-size: 11px;
}

.media-body pre {
  font-family: inherit;
  color: inherit;
  font-size: inherit;
  margin: 0;
  word-wrap: break-word;
  white-space: pre-wrap;
}

.icon {
  display: block;
  width: 50px;
  height: 50px;
  margin: 5px;
  border-radius: .3rem;
  color: #fff;
  font-size: 30px;
  line-height: 50px;
  text-align: center;
}

.media-left .icon {
  background-color: #f0974e;
}
.media-right .icon {
  background-color: #35b8c2;
}
ローカルサーバを起動して動作確認
$ ng serve
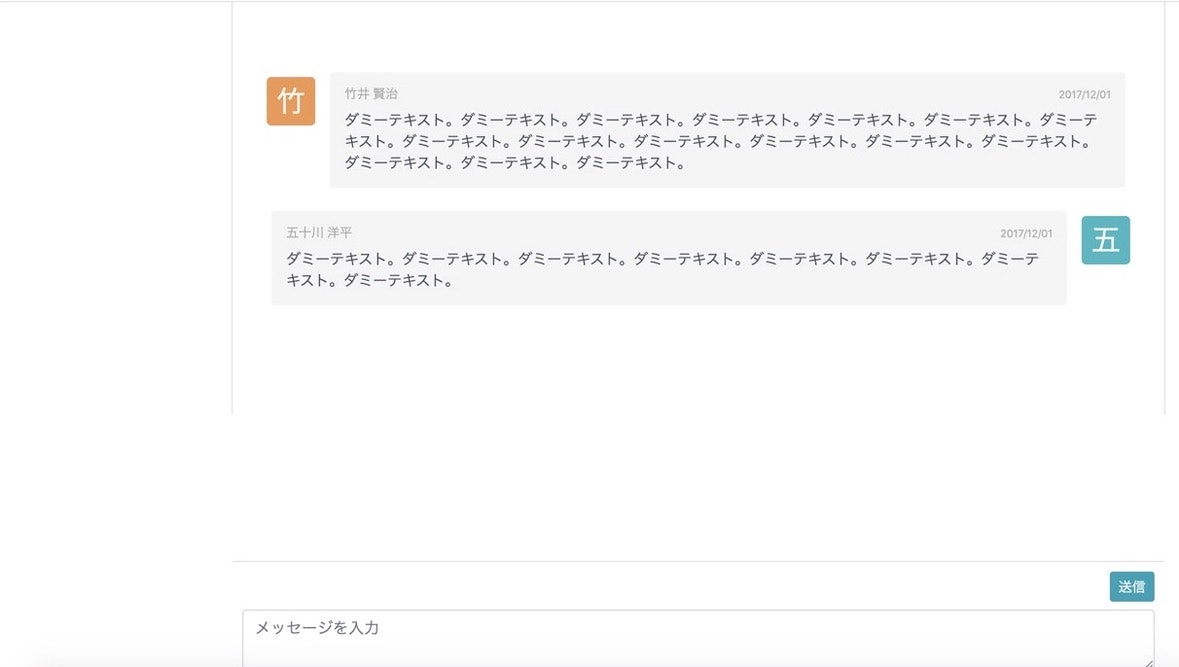
簡易的なチャット画面が表示されれば環境構築と簡易的なアプリの実装は完了です。
次はAngularの機能について説明します。