1. はじめに
顕微鏡観察等の画像解析に広く利用される ImageJ (JAVAの仮想マシン上で動作)とOpenCV, scikit-image などの Python 画像処理ライブラリとを連携させるため、PyImageJ をインストールした JupyterLab の Docker コンテナ環境を構築しました。
docker コマンドが使用できる環境であれば、Python ラッパー関数を提供する PyImageJ を使用して、 ImageJ の機能を Python ノートブック上でお手軽に試すことができます。
ここでは、OpenCV による白黒二値化処理と ImageJ による粒子解析を組み合わせた参考事例を紹介します。
2. 動作テスト
2.1. JupyterLab サーバー起動
ターミナルを開き、カレントディレクトリに notebooks ディレクトリを作成しましょう。
次に、以下の docker コマンドを入力します。
ユーザー権限の問題が生じないように、環境変数 NB_UID および NB_GID に、ホストユーザーの UID / GID の値を設定しましょう。
 docker run -it \
  --env NB_UID=1000 \
  --env NB_GID=100 \
  -p 8888:8888 \
  --name jupyterlab \
  -v $PWD/notebooks:/notebooks  \
  ken2s/jupyterlab
しばらくすると、ターミナルに以下のような、アクセス先と <token> が表示されます。
http://<hostname>:8888/lab?token=<token>
Webブラウザで http://localhost:8888 を開いて Password or token: に <token> を入力、もしくは、 http://127.0.0.1:8888/lab?token=<token> をそのまま開くことで、JupteLab サーバーにアクセスできます。
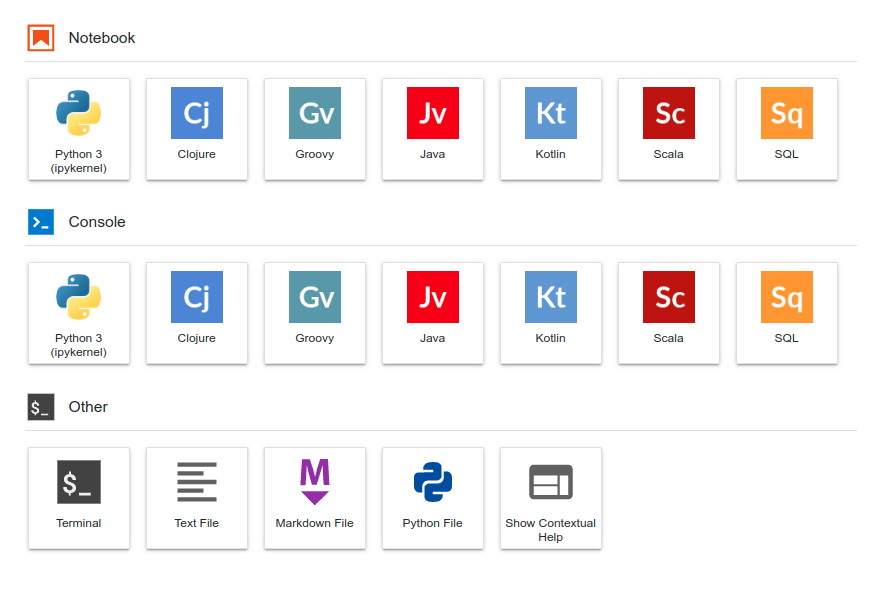
ImageJ の インストールに伴って JupteLab の Launcher メニューは賑やかなものとなります。
2.2. PyImageJ テスト
Python ノートブックを新規に開き、セルに以下のコードを入力して実行すれば、PyImageJ テストが可能です。
# Create an ImageJ2 gateway with the newest available version of ImageJ2.
import imagej
ij = imagej.init()
print(f"ImageJ version: {ij.getVersion()}")
ImageJ version: 2.5.0/1.53r のようにバージョン情報が表示されたらテスト完了です。
3. 画像解析例
ここでは、ImageJ の サンプル画像 blobs.gif を使用した画像解析例を示します。
ノートブック全文を、blobs_segmentation.ipynb に示します。
3.1. 初期化・Plugin読込み ImageJ
ImageJ を初期化するとともに、Plugin を読み込みます。
詳細は、PyImageJ のドキュメントを確認しましょう。
import imagej
import scyjava as sj

# initialize imagej
ij = imagej.init(mode="headless", add_legacy=True)
print(f"ImageJ version: {ij.getVersion()}")

# get additional resources
HyperSphereShape = sj.jimport("net.imglib2.algorithm.neighborhood.HyperSphereShape")
Overlay = sj.jimport("ij.gui.Overlay")
Table = sj.jimport("org.scijava.table.Table")
ParticleAnalyzer = sj.jimport("ij.plugin.filter.ParticleAnalyzer")
3.2. イメージ読込み ImageJ
ImageJ でサンプル画像を読み込み、表示します。
# Load the image
url_img = "https://imagej.nih.gov/ij/images/blobs.gif"
img_ij = ij.io().open(url_img)

# Display the image
ij.py.show(img_ij)
3.3. 画像変換 ImageJ -> Python
ImageJ で読み込んだ画像を OpenCV で扱うため、 xarray, ndarray に変換します。
import cv2
import xarray as xr

# Send the image to Python
img_xr = ij.py.from_java(img_ij)

# convert the array from xarray to ndarray
img_np = xr.DataArray.to_numpy(img_xr)
3.4. 前処理・白黒二値化 Python
OpenCV によって、グレー画像に変換し、ヒストグラム平坦化、ガウシアンぼかし処理後、白黒二値化画像に変換します。さらに、粒子解析の際に粒子(白色)を認識させるために白黒画像を反転させます。
# convert to grayscale image
img_gray = cv2.cvtColor(img_np, cv2.COLOR_BGR2GRAY)

# Equalizes the histogram of a grayscale image
# using Contrast Limited Adaptive Histogram Equalization
clahe = cv2.createCLAHE(clipLimit=3.0, tileGridSize=(8, 8))
img_clahe = clahe.apply(img_gray)

# GaussianBlur
img_blur = cv2.GaussianBlur(img_gray, ksize=(5, 5), sigmaX=0)

# threshold
ret, img_th = cv2.threshold(img_blur, 0, 255, cv2.THRESH_OTSU)

# inverse image
img_inv = cv2.bitwise_not(img_th)

# Display the image
ij.py.show(img_inv, "gray")
3.5. 画像変換 Python -> ImageJ
再度、画像を ImageJ で扱うために変換します。
# Converting Python objects to Java
img_java = ij.py.to_java(img_inv)

# convert ImgPlus to ImagePlus
img_imp = ij.py.to_imageplus(img_java)
3.6. 粒子解析 ImageJ
ImageJ による粒子解析を実行します。
# get ResultsTable and set ParticleAnalyzer
rt = ij.ResultsTable.getResultsTable()
ParticleAnalyzer.setResultsTable(rt)

# set measurements
ij.IJ.run("Set Measurements...", "area center shape")

# run the analyze particle plugin
ij.py.run_plugin(
    plugin="Analyze Particles...",
    args="size=0-Infinity circularity=0.00-1.00 clear",
    imp=img_imp,
)
3.7. データ変換 ImageJ -> Python
解析データを pandas daterffreme に変換します。
# convert results table -> scijava table
sci_table = ij.convert().convert(rt, Table)

# scijava table -> pandas dataframe
df = ij.py.from_java(sci_table)
3.8. 解析結果 Python
# print dataframe
df
     Area          XM          YM     Circ.        AR     Round  Solidity
0   426.0   20.575117   13.645540  0.663245  2.081601  0.480400  0.881988
1   183.0   63.521858    4.734973  0.754354  1.776324  0.562960  0.950649
2   659.0  108.812595   13.053869  0.863307  1.066680  0.937488  0.966985
3   432.0  154.972222   10.270833  0.867364  1.060849  0.942641  0.960000
4   471.0  247.385350   13.954352  0.810489  1.578974  0.633323  0.964176
..    ...         ...         ...       ...       ...       ...       ...
57  211.0   46.533175  241.007109  0.939930  1.271582  0.786422  0.944072
58   77.0  179.136364  251.668831  0.593288  3.067080  0.326043  0.900585
59   88.0  128.352273  251.795455  0.488962  3.937549  0.253965  0.936170
60   50.0  234.760000  252.000000  0.630967  2.603278  0.384131  0.909091
61   46.0   74.152174  252.391304  0.539673  4.022377  0.248609  0.893204

[62 rows x 7 columns]
解析結果の各項目は、以下のとおりです。
- Area : Area (面積)
- XM, YM : Centroid (重心の座標)
- Circ. : Cicularity (真円度)
- AR : Aspect Ratio (アスペクト比)
- Roundness : Roundness (円形度)
- Solidity : Solidity (凸度)
各項目の定義式等を確認する際には、 ImageJ のドキュメントを参照しましょう。
4. Docker コンテナ・イメージ解説
Dockerfile を以下に示します。
少々トリッキーな設定を含みます(後述)。
最新の Dockerfile は github を参照しましょう。
FROM jupyter/scipy-notebook

USER ${NB_USER}

WORKDIR /tmp

ENV CONDA_DIR=/opt/conda
ENV JAVA_HOME=/opt/conda/jre

COPY --chown=${NB_UID}:${NB_GID} requirements.txt ./
RUN pip install --upgrade pip  &&\
    pip install --quiet --no-cache-dir -r ./requirements.txt

RUN conda install beakerx openjdk=8 pyimagej rise \
    jupyter_contrib_nbextensions -c conda-forge -y &&\
    conda clean -i -t -y

RUN pip install --quiet --no-cache-dir git+https://github.com/imagej/pyimagej.git@master &&\
    wget https://raw.githubusercontent.com/imagej/pyimagej/master/doc/Puncta-Segmentation.ipynb &&\
    wget https://raw.githubusercontent.com/imagej/pyimagej/master/doc/sample-data/test_still.tif &&\
    mkdir sample-data &&\
    mv test_still.tif sample-data &&\
    jupyter nbconvert --to python Puncta-Segmentation.ipynb &&\
    python Puncta-Segmentation.py

RUN fix-permissions "${CONDA_DIR}" &&\
    fix-permissions "/home/${NB_USER}"

WORKDIR /notebooks

EXPOSE 8888
- ベースとなる image は
jupyter/scipy-notebookです。 - コンテナ内の user は
jovyanとなります。 - PyImageJ 公式ドキュメント では、conda + mamba 仮想環境 によるインストールが推奨されていますが、本コンテナでは 仮想環境を使用していません。
- 本記事執筆時点の最新版 PyImageJ 1.2.1 では、求める機能に不具合があったため、github から、最新コードを取り込みました。(
PyImageJのバージョンアップ確認後、Docker イメージ見直し予定) - コンテナ起動直後の
imagej.init()時に、数分かかること(Marvenキャッシュ生成 ?)があるため、イメージ作成時にサンプルプログラムを実行させて、imagej.init()の時短をはかりました。 - pipでインストールしたモジュールは、 requirements.txt を参照しましょう。
5. おわりに
ImageJ, Python, JupyterLab の組み合わせた Docker コンテナ・イメージを作成し、OpenCV による画像処理と ImageJ による粒子解析を組み合わせた事例を紹介しました。
公開先
更新履歴
- 2022/07/01 初稿
参考記事


