2018/01/26 14:09現在 作成中です. しばしの間, 汚れた投稿になります, すみません.
接続
有線LAN接続し, terminal(mac) or cmd(windows)で
$ssh pi@raspberrypi.local
PWは, raspberry (デフォルトのまま)
windowsはデフォルトだとcmdでsshができない.
openSSHなどを入れる必要がある.
インストールについては
https://www.eaton-daitron.jp/techblog/4627.html
を参照のこと.
tera termとかを入れるのもアリです.
raspiのIPを探す
上記のようにraspberrypi.localで繋げられるように設定していない場合は, raspiの有線LANをルーターにさして, IP探してやれば良い
arp
$ arp -a
arp-scan
$ brew install arp-scan
等でinstallした後に
$ sudo arp-scan -I en0 -l
Interface: en0, datalink type: EN10MB (Ethernet)
Starting arp-scan 1.9 with 256 hosts (http://www.nta-monitor.com/tools/arp-scan/)
192.168.1.1 38:d5:47:bd:fa:b0   (Unknown)
192.168.1.168   d0:d2:b0:8b:4e:a5   (Unknown)
192.168.1.183   70:71:bc:22:5f:3e   PEGATRON CORPORATION
192.168.1.237   b8:27:eb:0b:4c:d9   Raspberry Pi Foundation
192.168.1.253   e4:f0:42:41:43:a9   (Unknown)

524 packets received by filter, 0 packets dropped by kernel
Ending arp-scan 1.9: 256 hosts scanned in 1.870 seconds (136.90 hosts/sec). 5 responded
とすればIPがわかる.
nmap
$ brew install nmap
等でinstallした後に
$ sudo nmap -sP 192.168.1.0/24

Starting Nmap 7.60 ( https://nmap.org ) at 2018-03-01 13:57 JST
Nmap scan report for router.asus.com (192.168.1.1)
Host is up (0.0030s latency).
MAC Address: 38:D5:47:BD:FA:B0 (Asustek Computer)
Nmap scan report for ks-Apple-TV (192.168.1.168)
Host is up (0.0038s latency).
MAC Address: D0:D2:B0:8B:4E:A5 (Apple)
Nmap scan report for HP-Pavilion1 (192.168.1.183)
Host is up (0.0025s latency).
MAC Address: 70:71:BC:22:5F:3E (Pegatron)
Nmap scan report for raspberrypi (192.168.1.237)
Host is up (0.0044s latency).
MAC Address: B8:27:EB:0B:4C:D9 (Raspberry Pi Foundation)
Nmap scan report for Google-Home (192.168.1.253)
Host is up (0.048s latency).
MAC Address: E4:F0:42:41:43:A9 (Unknown)
Nmap scan report for MBP (192.168.1.66)
Host is up.
Nmap done: 256 IP addresses (6 hosts up) scanned in 2.04 seconds
とすればIPがわかる.
基礎の雑記
python_basic.py
for i in range(10):
  print(i)

if i == 1:
  print("hello")

i = 0
while (i<10):
  i += 1
  print(i)

while True:
  hoge
jupyter
https://www.anaconda.com/download/
からDLしてinstall
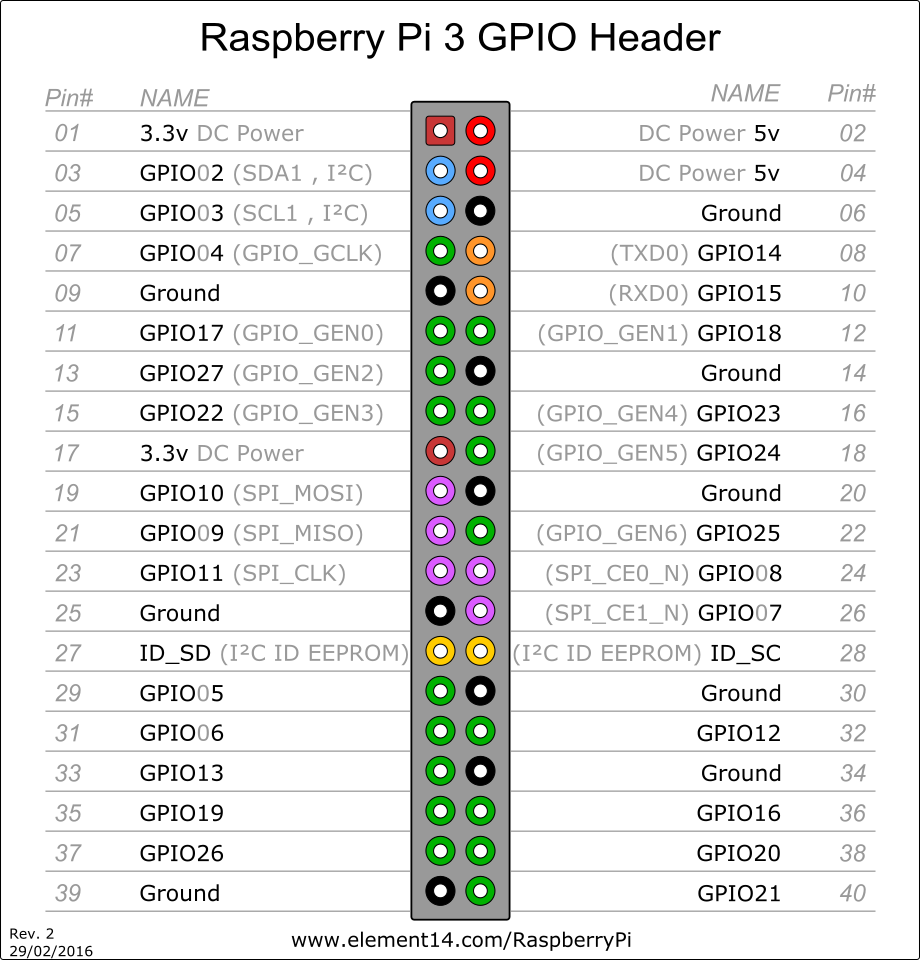
raspberrypi pinout
linuxのcmd
$ls
現在のディレクトリの中にあるファイル・ディレクトリを見る

$ls -l
現在のディレクトリの中にあるファイル・ディレクトリを見る(詳細表示)

$ls -a
現在のディレクトリの中にあるファイル・ディレクトリを見る(隠しファイル・ディレクトリも表示)

$ls -la
現在のディレクトリの中にあるファイル・ディレクトリを見る(詳細表示. 隠しファイル・ディレクトリも表示)

$pwd
現在のディレクトリのpathを表示(print working directory)

$cd testDir
"testDir"というディレクトリに移動する

$cp test.py toDir
"test.py"というファイルを"toDir"というディレクトリの中にコピーする

$cp -r fromDir toDir
"fromDir"というディレクトリを"testDir"というディレクトリの中にコピーする

$mv test.py toDir
"test.py"というファイルを"toDir"というディレクトリの中に移動する

$mv test.py test2.py
"test.py"というファイルを"test2.py"というファイル名に変更する

$rm -rf testDir/
"testDir"というディレクトリを消す
convert to wav
avconv -i input.m4a output.wav

ffmpeg -i from.aiff to.wav
USBメモリ
参照:
OS起動中のUSBメモリのオートマウント
USBメモリをオートマウントする
Raspberry PiでUSBメモリを使う
scp
参照: scpコマンドでディレクトリ(フォルダ)をコピーしました
$scp [移動したいファイル] [行き先のPC]:[行き先のディレクトリ]
$scp from.py pi@raspberrypi.local:/home/pi/Documents/toDir
現在のディレクトリにある"from.py"を, raspiの中の"/home/pi/Documents/toDir"にコピーする

$scp -r [移動したいディレクトリ] [行き先のPC]:[行き先のディレクトリ]
$scp fromDir/ pi@raspberrypi.local:/home/pi/Documents/toDir
現在のディレクトリにある"fromDir"を, raspiの中の"/home/pi/Documents/toDir"にコピーする
emacs
開き方.
$emacs test.py
保存してemacsを終了.
emacsを開いている状態で,
Ctrl + x -> Ctrl + c -> y
raspberry piの中身をまるごと複製する
$df

$diskutil umountDisk /dev/disk3

($ cd /Volumes/T/Dropbox/raspberry)
$sudo dd if=/dev/rdisk3 of=raspbian_2018-07-26.dmg bs=1m

passwordを聞かれるので, 入力
ctrl + tで進捗がわかる
8GBで約7分半だった