ミニアプリの内容
ユーザーは投稿ができ、投稿に対しいいねが出来るようにする
今回のミニアプリの設計
-
ユーザー
→投稿できる
→いいねができる -
投稿
→内容のみ
Railsでプロジェクトを作成しよう
$ rails new like_sample
$ cd like_sample
(バージョン 6.0.2で僕は作成しています)
Userモデルの作成
gem deviseを使ってUserモデルを作成します
deviseの導入
gem 'devise'
gem fileの最下部にdeviseを記載し、bundle installします
deviseはinstallコマンドを忘れずに。
$ bundle install
$ rails g devise:install
$ rails g devise user
$ rails g devise:views
postモデルの作成
postモデルには投稿内容contentと、誰が投稿したのかというuser_idが入るようにします。
$ rails g model post content:string user:references
$ rails db:migrate
アソシエーションの確認
ここまで作成したUserモデルとPostモデルは1対多の関係です。
ユーザーそれぞれはたくさんの投稿ができ、投稿それぞれは1人のユーザーによって書かれたものであるというようなイメージです。
それではアソシエーションを組みましょう!
user.rb
class User < ApplicationRecord
  devise :database_authenticatable, :registerable,
         :recoverable, :rememberable, :trackable, :validatable
  has_many :posts, dependent: :destroy
end
has_many :postsの後に今回はdependent: :destroyをつけました。これはpostがuserに依存している。ここでは、もしユーザーがデータベースから削除されてしまった場合にユーザーがした投稿も全て消えるようになります。
post.rb
モデルの作成時にuser:referencesをつけたのですでにbelongs_to :userが書かれています。
class Post < ApplicationRecord
  belongs_to :user
end
コントローラの作成
users_contoroller.rb
ユーザーの一覧ページと詳細ページがあることを考慮して、indexアクションとshowアクションを定義します。
$ rails g controller users index show
posts_controller.rb
投稿も同様にindexアクションとshowアクションを定義します。(createアクションもあるが、ビューが存在しないのでここでは書かない)
$ rails g controller posts index show
ルーティングの設定
ルーティングを考えていきます。
・投稿の一覧と詳細が見れる
・投稿することができる
・ユーザーの一覧と詳細が見れる
ことから以下のようなルーティングにします。
routes.rb
Rails.application.routes.draw do
  devise_for :users

  resources :users, only: [:index, :show]
  resources :posts, only: [:index, :show, :create]

  root 'posts#index'

end
コントローラーのアクションとそれに対応するビューを作っていこう
posts_controller.rb
posts_controllerを以下のように変更しよう。
class PostsController < ApplicationController
  before_action :authenticate_user!, only: [:show, :create]
  def index
    @posts = Post.all
    @post = Post.new
  end

  def show
    @post = Post.find(params[:id])
  end

  def create
    @post = Post.new(post_params)
    @post.user_id = current_user.id
    if @post.save
      redirect_back(fallback_location: root_path)
    else
      redirect_back(fallback_location: root_path)
    end
  end

  private
  def post_params
    params.require(:post).permit(:content)
  end
end
ログインしていないユーザーはshow, createは実行できないようになりました。
次はビューを作っていきます。
posts/index.html.erb
   <h1>いいねサンプル</h1>
    <% if user_signed_in? %>
      <%= link_to "ログアウト", destroy_user_session_path, :method => :delete %>
      <%= link_to "マイページへ", user_path(current_user.id) %>
      <h2>投稿する</h2>
      <%= form_for @post do |f| %>
       <%= f.text_field :content %>
       <%= f.submit %>
      <% end %>
     <hr>
    <h2>投稿一覧</h2>
    <% @posts.each do |post| %>
      <a href="/users/<%= post.user.id %>"><%= post.user.email %></a>
      <p><a href="/posts/<%= post.id %>"><%= post.content %></a></p>
    <% end %>

<% else %>
  <%= link_to "ユーザー登録", new_user_registration_path %>
  <%= link_to "ログイン", new_user_session_path %>
<% end %>
posts/show,html.erb
    <h1>投稿詳細ページ</h1>
    <h3><%= @post.user.email %></h3>
     <h3><%= @post.content %></h3>
     <%= link_to "ホームへ戻る", posts_path %>
users_controller.rb
class UsersController < ApplicationController
  def index
    @users = User.all
  end

  def show
    @user = User.find(params[:id])
  end
end
users/index.html.erb
<h1>ユーザー一覧</h1>
<% @users.each do |user| %>
  <a href="/users/<%= user.id %>"><%= user.email %></a>
  <hr>
<% end %>
<%= link_to "ホームへ戻る", posts_path %>
users/show.html.erb
<h1>ユーザー詳細ページ</h1>
<h3><%= @user.email %></h3>
<h2>投稿内容</h2>
<% @user.posts.each do |post| %>
  <a href="/posts/<%= post.id %>"><%= post.content %></a>
  <hr>
<% end %>
<%= link_to "ユーザー一覧へ", users_path %>
<%= link_to "ホームへ戻る", posts_path %>
ここまでで一旦ユーザー登録機能と投稿機能が実装できているか確認しましょう
いよいよ いいね機能を実装していきます。
Likeモデルを作ろう
いいね機能は、誰がどの投稿に対していいねをしたのかという情報をLikeテーブルというUserテーブルとPostテーブルの中間テーブルに格納していきます。
$ rails g model like post:references user:references
$ rails db:migrate
アソシエーションの確認
中間テーブルであるLikeテーブルを介してユーザーがどの投稿にいいねをしているのか、逆に投稿がどのユーザーにいいねされているのかを簡単に取得できるようにするために、liked_postとliked_usersなるものを作ります。
user.rb
class User < ApplicationRecord
  devise :database_authenticatable, :registerable,
         :recoverable, :rememberable, :trackable, :validatable
  has_many :posts, dependent: :destroy
  has_many :likes, dependent: :destroy
  has_many :liked_posts, through: :likes, source: :post
end
liked_postsによってuserがどの投稿をいいねしているのかを簡単に取得できるようになります。
post.rb
class Post < ApplicationRecord
  belongs_to :user
  has_many :likes
  has_many :liked_users, through: :likes, source: :user
end
liked_usersによって投稿が誰にいいねされているのかを簡単に取得できるようになります。
likes_controllerの作成
$ rails g controller likes
likeに関してはビューを持たない(投稿の詳細ページで完結する)のでアクションはあとからつけていきます。
- いいねをする→likes#create
→Likeモデルにuser_idとpost_idを格納 - いいねを取り消す→likes#destroy
→Likeモデルのレコードを削除する
バリデーションをつけよう
いいね機能にバリデーションをつけます。具体的に何をするのかというと、1人が1つの投稿に対して、1つしかいいねをつけられないようにします。(今回は自分の投稿にもいいねができます)
like.rb
class Like < ApplicationRecord
  belongs_to :user
  belongs_to :post
  validates_uniqueness_of :post_id, scope: :user_id
end
validates_uniqueness_ofによって、post_idとuser_id の組が1組しかないようにバリデーションをかけました。
ルーテイングの作成
Rails.application.routes.draw do
  devise_for :users

  resources :users, only: [:index, :show]
  resources :posts, only: [:index, :show, :create] do
    resources :likes, only: [:create, :destroy]
  end

  root 'posts#index'

end
likeコントローラーを作ろう
class LikesController < ApplicationController
  def create
    @like = current_user.likes.create(post_id: params[:post_id])
    redirect_back(fallback_location: root_path)
  end

  def destroy
    @like = Like.find_by(post_id: params[:post_id], user_id: current_user.id)
    @like.destroy
    redirect_back(fallback_location: root_path)
  end
end
投稿の詳細ページでいいねをできるようにするので、posts_controllerのshowアクションに内容を追加していきます。
post_controller.rb
class PostsController < ApplicationController
  before_action :authenticate_user!, only: [:show, :create]
  def index
    @posts = Post.all
    @post = Post.new
  end

  def show
    @post = Post.find(params[:id])
    @like = Like.new
  end

  def create
    @post = Post.new(post_params)
    @post.user_id = current_user.id
    if @post.save
      redirect_back(fallback_location: root_path)
    else
      redirect_back(fallback_location: root_path)
    end
  end

  private
  def post_params
    params.require(:post).permit(:content)
  end
end
いいねしているかどうかの判定
また、ユーザーが投稿に対して、すでにいいねをしているのかどうかを判定することができるようにalready_liked?を定義します。
user.rb
class User < ApplicationRecord
  devise :database_authenticatable, :registerable,
         :recoverable, :rememberable, :trackable, :validatable
  has_many :posts, dependent: :destroy
  has_many :likes, dependent: :destroy
  has_many :liked_posts, through: :likes, source: :post
  def already_liked?(post)
    self.likes.exists?(post_id: post.id)
  end
end
ビューを変更しよう
posts/show.html.erb
投稿詳細ページでいいねをできるようなビューに変更していきます。
内容としては
・いいねしている時→「いいねを取り消す」ボタンを表示
・いいねをしてない時→「いいね」ボタンを表示
・いいねの件数の表示
・投稿に対して誰がいいねしたのかを表示
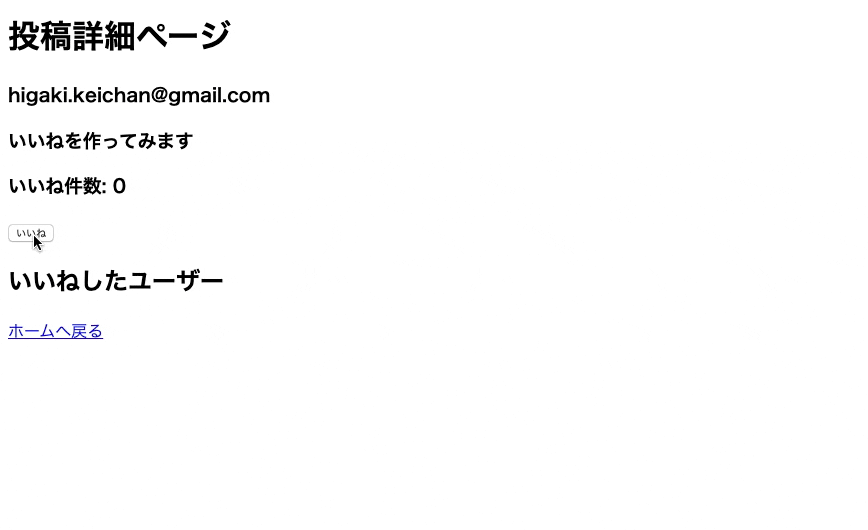
<h1>投稿詳細ページ</h1>
<h3><%= @post.user.email %></h3>
<h3><%= @post.content %></h3>
<h3>いいね件数: <%= @post.likes.count %></h3>
<% if current_user.already_liked?(@post) %>
  <%= button_to 'いいねを取り消す', post_like_path(@post), method: :delete %>
<% else %>
  <%= button_to 'いいね', post_likes_path(@post) %>
<% end %>
<h2>いいねしたユーザー</h2>
<% @post.liked_users.each do |user| %>
  <li><%= user.email %></li>
<% end %>

<%= link_to "ホームへ戻る", posts_path %>
posts/index.html.erb
投稿一覧ページでもいいねの数を見れるようにしましょう。
<h1>いいねサンプル</h1>
<% if user_signed_in? %>
  <%= link_to "ログアウト", destroy_user_session_path, :method => :delete %>
  <%= link_to "マイページへ", user_path(current_user.id) %>
  <%= link_to "ユーザー一覧へ", users_path %>
  <h2>投稿する</h2>
  <%= form_for @post do |f| %>
    <%= f.text_field :content %>
    <%= f.submit %>
  <% end %>
  <hr>
  <h2>投稿一覧</h2>
  <% @posts.each do |post| %>
    <a href="/users/<%= post.user.id %>"><%= post.user.email %></a>
    <a href="/posts/<%= post.id %>"><%= post.content %></a>
    (<%= post.liked_users.count %>)
  <% end %>

<% else %>
  <%= link_to "ユーザー登録", new_user_registration_path %>
  <%= link_to "ログイン", new_user_session_path %>
<% end %>
users/index.html.erb
最後にユーザーの一覧を表示しましょう。
<h1>ユーザー一覧</h1>
<% @users.each do |user| %>
  <a href="/users/<%= user.id %>"><%= user.email %></a>
  <hr>
<% end %>
<%= link_to "ホームへ戻る", posts_path %>
以上です
これでユーザーが投稿に対していいねをすることができるようになりました。
デザインなど加えてより見やすくしてください
ソースコードはこちらから
2026年3月 追記(最新情報)
この記事は2020年2月に投稿されました。
Rails 7+ / Rails 8 での変更点
link_to の method オプション
Rails 7以降、@rails/ujs がデフォルトから削除されたため、link_to の method: オプションが動作しない場合があります:
# 旧(Rails 6以前)
link_to "いいね", post_like_path(post), method: :post

# 新(Rails 7+、Turbo対応)
link_to "いいね", post_like_path(post), data: { turbo_method: :post }

# または button_to を推奨
button_to "いいね", post_like_path(post), method: :post
form_for → form_with
form_for は非推奨です。新しいコードでは form_with を使用してください。
Turbo Streams でリアルタイム更新
Rails 7+ では Turbo Streams を使えば、ページリロードなしでいいね数をリアルタイム更新できます。
dependent: :destroy
引き続きベストプラクティスです。変更はありません。