はじめに
こんにちは、プログラミングを始めて約3年のエンジニアのkeitaMaxです。
Next.jsを使ってフロントエンドの開発をしたいと思い、今回開発環境を整えていこうと思います。もしやり方が違ったり、もっといいやり方があるというのがあればぜひ教えていただきたいです。
今回は以下を目標としたいと思います。
- 自分のローカル環境でNext.jsの環境を作り、ブラウザで初期表示画面を見る。
- カウントアップの画面を作成する。
1. 自分のローカル環境でNext.jsの環境を作り、ブラウザで初期表示画面を見る
まず、自分の開発したいフォルダの中で以下のコマンドを実行します。
npx create-next-app@latest
するといくつか質問が来るので、以下のように答えます。
PS C:\develop> npx create-next-app@latest
Need to install the following packages:
create-next-app@14.1.0
Ok to proceed? (y) y
√ What is your project named? ... next-example-app
√ Would you like to use TypeScript? ...  Yes
√ Would you like to use ESLint? ...  Yes
√ Would you like to use Tailwind CSS? ...  Yes
√ Would you like to use `src/` directory? ...  Yes
√ Would you like to use App Router? (recommended) ... No / Yes
√ Would you like to customize the default import alias (@/*)? ...  Yes
√ What import alias would you like configured? ... @/*
Creating a new Next.js app in C:\develop\next-example-app.
質問が終わると以下のように表示されます。
Success! Created next-example-app at C:\develop\next-example-app
これでNext.jsの開発環境が構築できました。
次にブラウザで初期画面を表示します。
以下のコマンドをたたいて実行します。
npm run dev
すると以下のように実行結果が表示されます。
> next-example-app@0.1.0 dev
> next dev

   ▲ Next.js 14.1.0
   - Local:        http://localhost:3000

 ✓ Ready in 2.3s
 ○ Compiling / ...
 ✓ Compiled / in 3s (510 modules)
 ✓ Compiled in 236ms (240 modules)
 ✓ Compiled /favicon.ico in 450ms (515 modules)
ここに表示されているhttp://localhost:3000にブラウザでアクセスすると、以下のようにNext.jsの初期画面が表示されました。
2. カウントアップの画面を作成する
まずはsrc配下にフォルダを新しく作成します。pagesとviews、componentsフォルダを作成します。
フォルダ構成は以下のようになりました。
next-example-app/
└── src/
     ├── components/
     ├── pages/
     └── views/
pagesはルーティングに使用します。
viewsはpagesからimportして画面表示を主に担当させます。
componentsはviewsで使用するレイアウトの部品を入れておくのに使用します。
次に、pages配下に新しくcount.tsxファイルを作成します。
import React, { useEffect, useState } from "react";

const CountPage = React.memo(() => {
  const [isClient, setIsClient] = useState(false);
  useEffect(() => {
    setIsClient(true);
  }, []);
  if (!isClient) {
    return null;
  }

  return (
    <div>
      <p>ここはカウントアップのページです!</p>
    </div>
  );
});

export default CountPage;
CountPage.displayName = "CountPage";
そして、以下URLにアクセスをするとここはカウントアップのページです!という文字が表示されていると思います。
http://localhost:3000/count

次に、viewsフォルダの配下にCountViewというフォルダを作成します。その配下にindex.tsxファイルを作成します。
import React from "react";

export const CountView = React.memo(() => {
  return (
    <div>
      <p>ここはカウントアップのページです!CountViewを表示しています!</p>
    </div>
  );
});
CountView.displayName = "CountView";
このindex.tsxをcount.tsxから読み込ませるように修正します。
import { CountView } from "@/views/CountView";
import React, { useEffect, useState } from "react";

const CountPage = React.memo(() => {
  const [isClient, setIsClient] = useState(false);
  useEffect(() => {
    setIsClient(true);
  }, []);
  if (!isClient) {
    return null;
  }

  return <CountView />;
});

export default CountPage;
CountPage.displayName = "CountPage";
そして再度以下URLにアクセスすると、ここはカウントアップのページです!CountViewを表示しています!と表示されていると思います。
http://localhost:3000/count

次に実際のカウントアップの機能を作成していきます。
CountView/index.tsxを以下のように修正し、新しくCountViewフォルダ配下にhooks.tsを作成しました。
hooks.tsはCountView/index.tsxで使用する処理をフォルダを分けておいています。
import React from "react";
import { useCountView } from "./hooks";

export const CountView = React.memo(() => {
  const { count, addCount } = useCountView();
  return (
    <div>
      <p>{count}</p>
      <button onClick={addCount}>カウントアップ</button>
    </div>
  );
});
CountView.displayName = "CountView";
import { useState } from "react";

export const useCountView = () => {
  const [count, setCount] = useState<number>(0);
  const addCount = () => {
    setCount(count + 1);
  };
  return {
    count,
    addCount,
  };
};
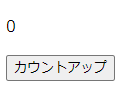
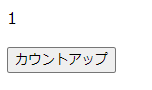
先ほどのURLにアクセスして確認すると以下のように表示され、カウントアップボタンを押すと数字がカウントアップされます。
おわりに
今回作成したカウントアップのアプリを次回以降、Tailwind CSSを使用して装飾したり、Storybookを使用してテストコードを作成する予定です。
また、最終的にはGitにPushしたときに自動テストを回してOKかNGか判定したり、自動デプロイといったCI/CDができる環境を作成していきたいと思っております。
この記事で質問や、間違っているや、もっといい方法があるといったご意見などありましたらご指摘していただけると幸いです。
また、CI/CDに関してこうしたほうがいいといったアドバイスもしていただけると嬉しいです。
最後まで読んでいただきありがとうございました!
次の記事