はじめに
Pillowを使って、特定の画像にある特定の色の領域だけを別の画像と合成するプログラムの備忘録です。
実装
指定した色の違いをどの程度許容するか(0~1)をパラメータで指定できるようにしました。
from PIL import Image
import numpy as np


def is_within_color_range(pixel_array, target_color, tolerance):
    """
    ピクセルが指定された色範囲内かどうかをチェックする関数。
    tolerance: 0~1で許容範囲を設定
    """
    # RGB各色について許容範囲内かどうかをベクトル化して判定
    diff = np.abs(pixel_array - target_color) / 255.0
    return np.all(diff <= tolerance, axis=-1)


def apply_color_mask_and_overlay(img_a, img_b, target_color, tolerance=0.1):
    """
    透過PNG画像Aの特定の色の領域をマスクし、画像Bをその領域に重ねて新しい画像Cを作成する関数。
    :param img_a: 画像A
    :param img_b: 画像B
    :param target_color: 色範囲に一致するRGBのタプル (r, g, b)
    :param tolerance: 色の許容範囲 (0~1)
    :return: 新しい透過PNG画像
    """
    # 画像AとBのサイズが一致することを確認
    if img_a.size != img_b.size:
        img_b = img_b.resize(img_a.size, Image.Resampling.BICUBIC)

    # 画像Aのピクセルデータを取得
    img_a_data = np.array(img_a)
    img_b_data = np.array(img_b)

    # 画像Aの透明度が0でない領域をマスクし、指定色範囲に一致する領域を見つける
    alpha_mask = img_a_data[:, :, 3] > 0  # 透過していない部分
    color_mask = is_within_color_range(img_a_data[:, :, :3], target_color, tolerance)

    # 両方の条件(透過していない + 色範囲一致)を満たす領域を選択
    combined_mask = np.logical_and(alpha_mask, color_mask)

    # 画像Aの指定領域を画像Bで置き換える
    img_c_data = img_a_data.copy()
    img_c_data[combined_mask] = img_b_data[combined_mask]

    # 結果を新しい画像として保存
    img_c = Image.fromarray(img_c_data)
    return img_c
利用シーン
合成したい領域を塗りつぶして別の画像と合成
-
target_colorを変えることで、特定の色の領域のみを合成できます。 -
合成処理開始~合成処理終了の処理を繰り返すことで、連続して別の色&別の画像と合成を行うことできます。
# ===== 合成処理開始 =====
target_color = [0, 255, 0] # 合成する領域の色(この場合緑)
tolerance = 0.1 # 指定した色の違いをどの程度許容するか
img_a = Image.open("input.png").convert("RGBA")
img_b = Image.open("fill.png").convert("RGBA")
new_image = apply_color_mask_and_overlay(img_a, img_b, target_color, tolerance)
# ===== 合成処理終了 =====
new_image.save("output.png")
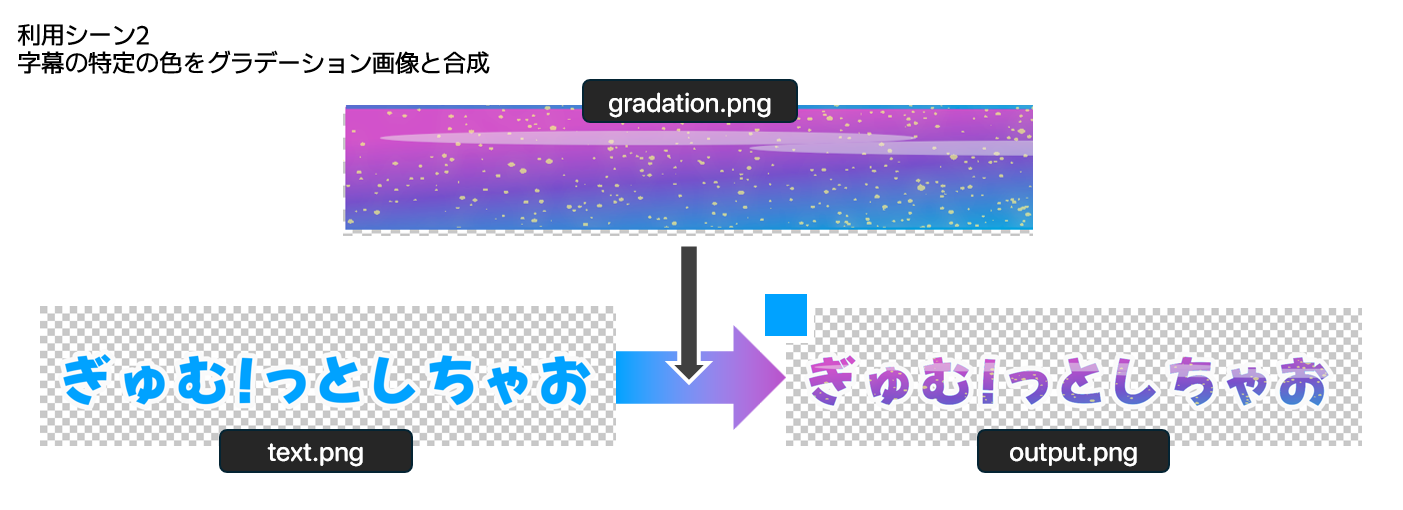
字幕の特定の色をグラデーション画像と合成
- PILでテキストを描画する場合グラデーションで塗りつぶすことが難しいため、適当な色で塗りつぶしておき、後で合成できます。
テキストを適当な色で描画
image = Image.new('RGBA', (WIDTH, HEIGHT), (255, 255, 255, 0))
draw = ImageDraw.Draw(image)
font = ImageFont.truetype(font_path, font_size)
draw.text((X, Y), text, font=font, fill=(0, 162, 255, 255), stroke_width=stroke_size, stroke_fill=(255, 255, 255, 255))
image.save('text.png', 'PNG')
# ===== 合成処理開始 =====
target_color = [0, 162, 255] # 合成する領域の色(この場合水色)
tolerance = 0.1 # 指定した色の違いをどの程度許容するか
img_a = Image.open("text.png").convert("RGBA")
img_b = Image.open("gradation.png").convert("RGBA")
new_image = apply_color_mask_and_overlay(img_a, img_b, target_color, tolerance)
# ===== 合成処理終了 =====
new_image.save("output.png")
おわりに
実際画像編集ソフトを使えばすぐに行える合成処理ではありますが、Pythonを使って大量の画像を処理したい場合、自動化したい場合などにご利用いただければと思います。

